






Data recovery rates are not one reliable percentage. Your chances depend on what happened to the file, what happened to its storage afterward, and whether a readable copy still exists elsewhere. A document in the Recycle Bin is a different case from a deleted file on a heavily used SSD. Before you scan anything, check backups and identify the original device. If the device clicks, disappears, or shows a false capacity, stop direct software scans. The useful question is not “What is the average rate?” but “What evidence makes my case recoverable?”
Why a published percentage cannot predict your file
A recovery claim often hides its denominator. Did the reported cases include easy Recycle Bin restores, damaged disks, overwritten files, or files that were found but would not open? Were results counted by case, by file, or by recovered byte? Without those definitions, two percentages cannot be compared. Even a genuine figure from one laboratory would describe its own case mix, not your laptop or USB drive. Treat a confident universal number as a sales claim until its method is visible.
The phrase “success” also needs a definition. Finding a filename in a scan is not the same as opening the file. A recovered photo may have a valid thumbnail but damaged full-size pixels. A document may open while its latest edits are missing. For a video, several seconds of playback cannot prove that the end is intact. Set your own success test before choosing a tool: identify the exact version you need, restore it to another device, and inspect the content that matters.
There is a second reason to resist a broad rate. Many recoveries come from an intact backup or cloud version rather than a disk scan. That is excellent news for the user, but it says little about whether deleted sectors on a particular drive remain readable. Separate “Can I get my work back somehow?” from “Can a scan reconstruct this deleted local copy?” The first question is usually more important, and it should be answered first.
Find the easiest surviving copy before estimating odds
Check the Recycle Bin for a Windows deletion, then the trash or version history of any synced service. Look on another PC, a mailed attachment, a removable backup drive, or a previous project export. Do not overwrite the only current file when restoring an older version. Save the candidate under a distinct name and compare its contents. If an intact copy already exists, you have a practical recovery path even if the original deleted blocks are gone.
Remember that “missing” may not mean “deleted.” Search likely folders using a distinctive filename or extension. Confirm the signed-in Windows account and the application profile. A folder moved during cleanup can disappear from its old location while the files remain intact. If a USB drive shows a new letter, inspect its contents carefully before deciding that anything was erased. These checks cost little and avoid unnecessary writes to a source that may still hold recoverable data.
For a file that really left the Recycle Bin, our Recycle Bin recovery overview explains the difference between restoring an item that is still there and searching after it has been emptied. If the file belongs to a cloud account and was never stored locally, use that provider’s own recovery options. A Windows scan cannot inspect remote server history.
Four details that change the outlook after local deletion
What was written to the source afterward?
Windows can mark space from a deleted file as available for reuse. New downloads, application updates, and even ordinary background activity can place new data there. That is why the first safe move is to stop unnecessary use of the affected device. Installing a recovery app on the same partition is especially avoidable. Microsoft’s Windows File Recovery guidance likewise tells users to minimize computer use and save recovered files to a separate destination.
Is the storage an SSD or another device?
On SSDs, deletion can interact with TRIM and internal cleanup. The result depends on the device and system state, so do not claim that every deleted SSD file is either recoverable or impossible. Ask whether a backup or earlier copy exists before testing the disk. A magnetic hard drive may have a different post-deletion picture, but later writes can still overwrite the needed areas. A USB flash drive also has its own controller behavior; its appearance as a drive letter does not reveal what remains beneath the file system.
Was a file deleted, formatted, or lost with a partition?
These events leave different clues. Normal deletion may preserve file-system records for a while. By contrast, a quick format changes the file system’s visible structure, and a full format or subsequent reuse can be more destructive. A missing partition can hide files even when its data region has not been replaced. Do not create a new partition, initialize the disk, or format it just to make Windows show a drive letter. Those changes can make later recovery harder. Preserve the layout and identify the event first.
Does the device stay readable?
Consistent detection is a basic condition for ordinary software recovery. Repeated disconnections, clicking, severe read errors, or wildly incorrect capacity point toward physical or controller trouble. Stop direct scans in those cases. A suitable image made with appropriate equipment, or professional assistance, may protect remaining readable areas better than repeated attempts against the original. No software can promise to reconstruct bytes that the hardware no longer supplies.
Judge the result by files you can actually use
A scan list can be exciting, especially when it shows familiar folder names. Treat it as a list of candidates. Check the former path, type, and size. Preview representative documents, photos, or videos where the tool permits it. A preview can show that a sample is readable, but it cannot certify every page or frame. For a collection of work files, choose samples from different dates and subfolders instead of checking five copies of one easy file.
Recover candidates to another healthy device. Then open them with their normal applications. With a spreadsheet, inspect formulas or a sheet that mattered. View photos at full size rather than trusting thumbnails. For a video, play the beginning, middle, and end. Record what is intact, partial, or missing. This is a more honest measure of your outcome than the number of hits shown during scanning.
Also distinguish the newest needed version from an older readable copy. A backup from last month may open perfectly but still fail your actual task if the lost work happened yesterday. Conversely, a slightly older copy may save hours of reconstruction. Note the version, not just the extension. A useful recovery report tells you which work is back and which work still needs to be recreated.
A careful Drecov path for a stable Windows drive
When a local file is missing and no backup solves the problem, Drecov can search a stable Windows-readable PC drive, external disk, or USB device. It offers Quick Scan, Deep Scan, filtering, and preview, and can save selected results elsewhere. Lost Partition Recovery is relevant when a partition itself has disappeared; it does not repair the partition table. Drecov is not a hardware repair tool, and no scan guarantees a particular data recovery rate.
Before using it, stop writes to the original location and prepare a healthy destination with enough free space. Do not install the program onto the partition that held the missing files. If the source becomes unstable or vanishes during reading, stop. Protecting the device matters more than finishing a scan. For general loss methods beyond one device, see Windows file recovery choices.
⚠ Warning: Install it on a drive different from the one where your data was lost to prevent overwriting.
Step 1: select where the file actually lived
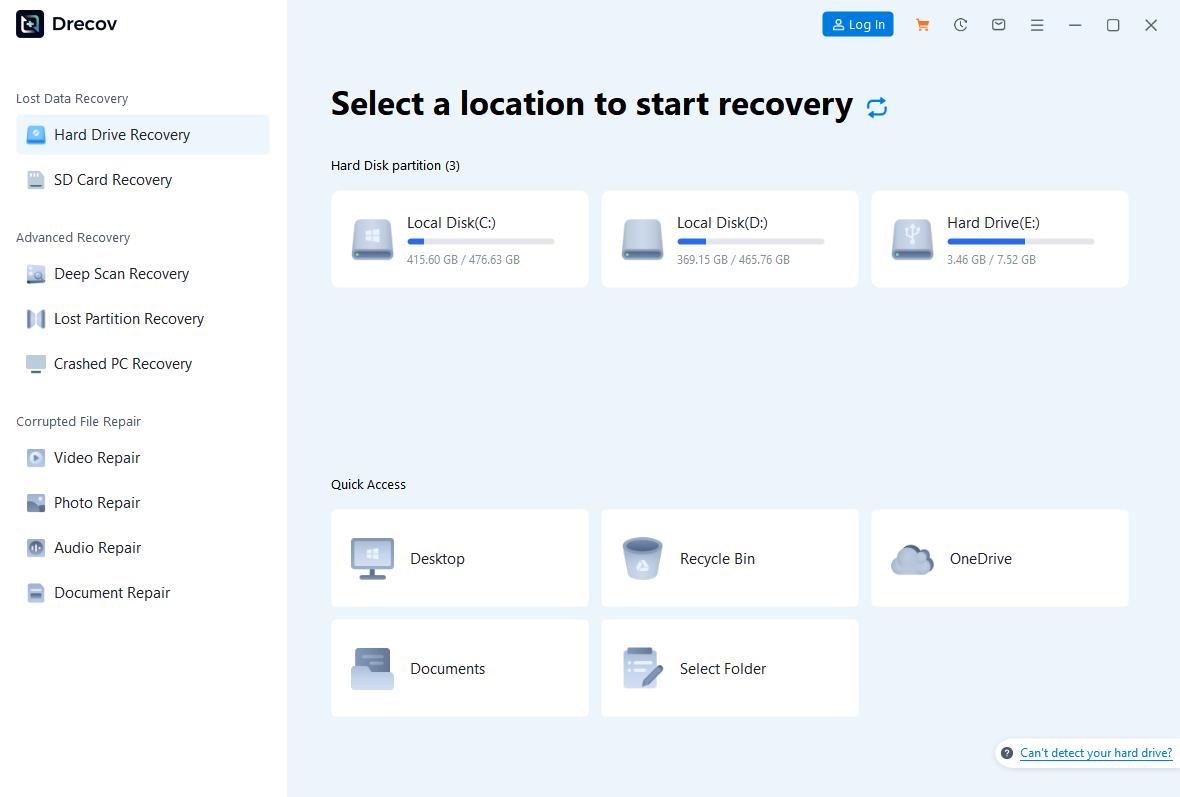
Open Drecov and select the original drive or partition. For a disappeared USB file, choose that USB device only if it remains consistently recognized. Avoid guessing based on the current drive letter alone; check its capacity and contents against the device you remember. An external drive that now reports the wrong size needs investigation rather than a routine scan.
Step 2: search without turning the source into a workspace
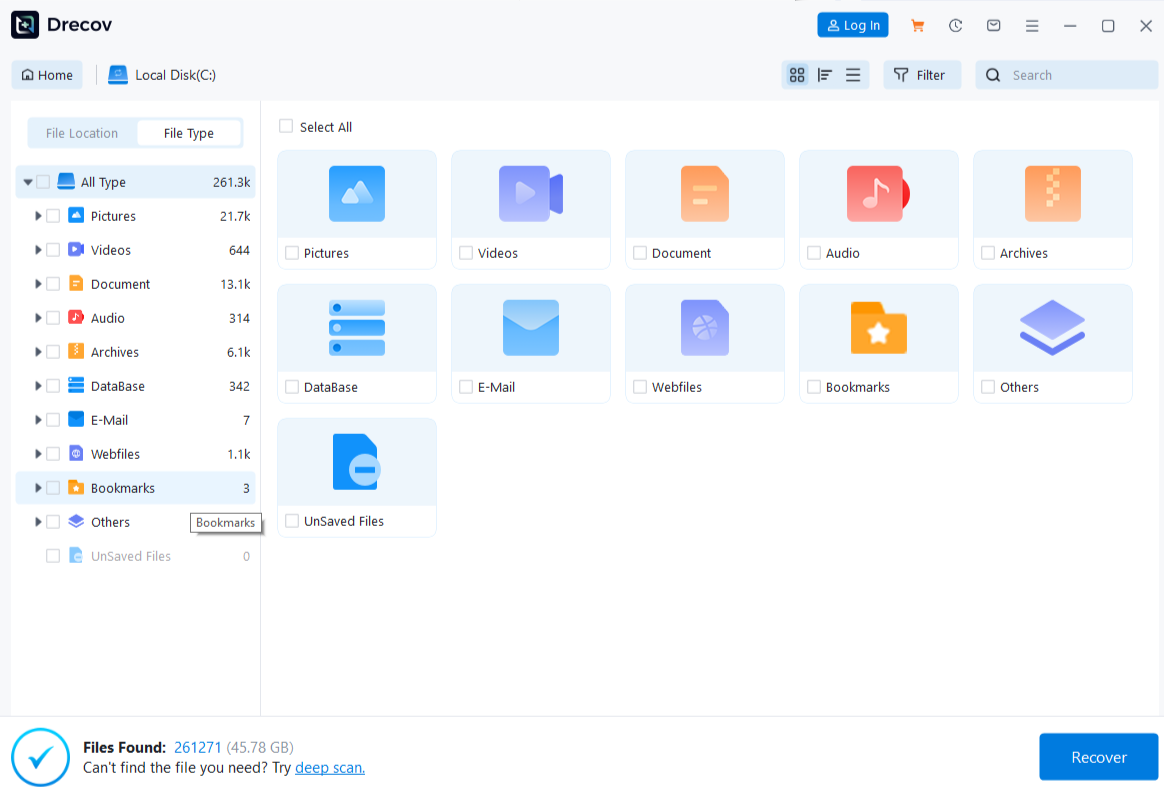
Run Quick Scan first. If the needed files are absent and the device is stable, run Deep Scan. Use filename, file type, or original path to narrow candidates. Preview a few files that represent the work you need. If a document preview fails, do not conclude that every candidate is corrupt; compare several, and remember that previews have format limitations.
Step 3: restore and verify the real outcome
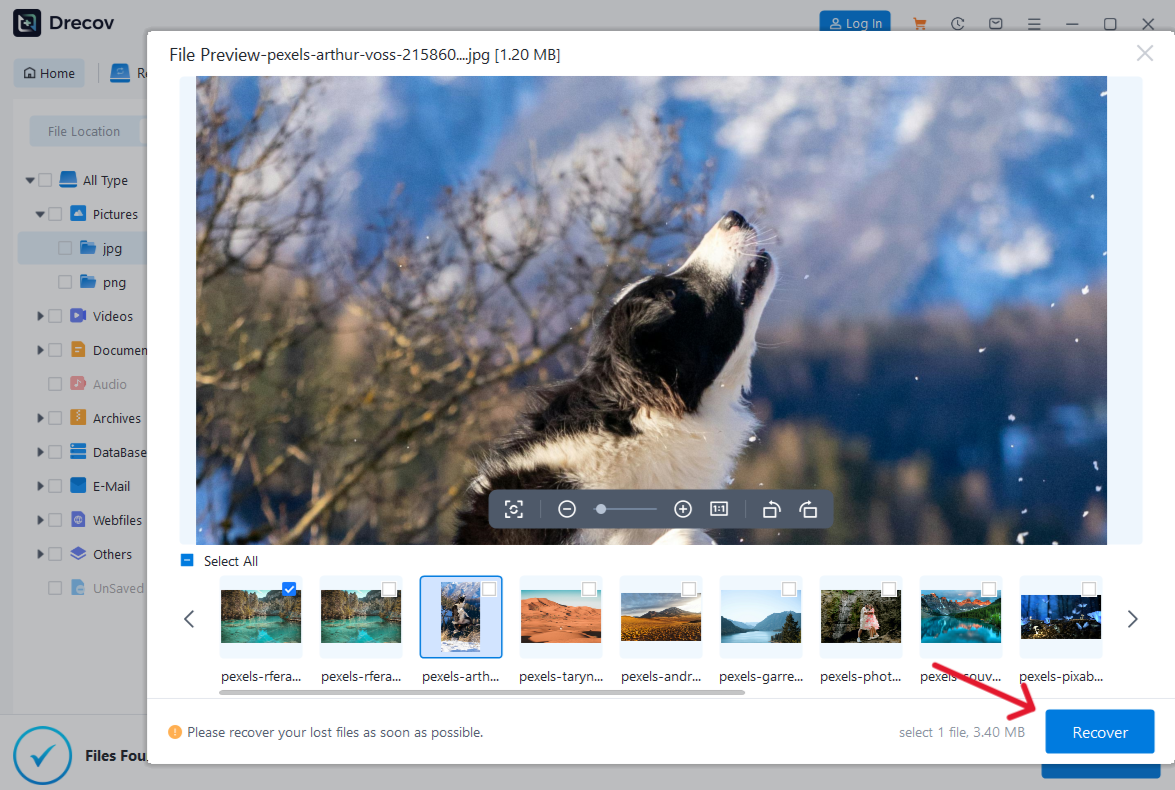
Save selected files to the separate healthy device, never the source. If the output is not where expected, check Drecov Folder or Recovery Folder on that destination. Open and sample the restored files before considering them recovered. Only then decide whether to run repairs, reformat a device, or rebuild a partition. For removable-media cases, the USB recovery overview can help you keep the original device separate from the recovery destination.
⚠ Warning: Install it on a drive different from the one where your data was lost to prevent overwriting.
FAQs
Can anyone give a reliable percentage for my specific files?
Not from a keyword or a brief symptom alone. A useful assessment needs the loss event, the device state, later writes, and a test of actual recovered files. A published percentage without those details is not a prediction for your case.
Does waiting always make recovery impossible?
Elapsed time alone is not the whole story. What the device did during that time matters. An unused, disconnected drive differs from a busy system SSD. Stop new writes now, but do not assume that yesterday’s loss has a known outcome.
Does a successful preview guarantee full recovery?
No. It suggests that the displayed sample can be decoded. The remainder of a document or video may still be missing or damaged. Restore to another device and inspect the parts you care about before calling the job complete.
Should I run CHKDSK before looking for deleted files?
Not when important data may be at risk. CHKDSK changes file-system structures and is not a first step for estimating recoverability. Protect or recover the files, or obtain a suitable image, before considering repairs on the source.
What if the drive is making clicking noises?
Stop repeated power cycles and direct scans. The device may be physically unstable. Seek appropriate imaging or professional help; ordinary recovery software cannot fix the mechanism, and every additional read attempt may reduce what remains accessible.
Conclusion
Data recovery rates make sense only after you define the loss and verify usable files. Start with existing copies, then examine the source’s health and what was written after deletion. Keep unstable hardware out of routine scanning. For a stable Windows device with no helpful backup, Drecov can search the original location, let you inspect candidates, and recover them to another healthy drive. The final measure is whether the specific files and versions you needed open and work.
⚠ Warning: Install it on a drive different from the one where your data was lost to prevent overwriting.