







If the picture turns green when you play a video but the rest of Windows looks normal, do not assume the clip is ruined. Try one other known-good video in the same player, then try the affected clip in another trusted player. Those two comparisons tell you whether the fault follows one file, one application, or the display path. Preserve the original recording before converting, repairing, or deleting anything. A green rectangle inside a video window is a different problem from an entire computer screen that turns green or crashes.
Run the two-file, two-player test
Start with a video you know has played correctly on this PC. Open it in the application that shows the green picture. If both videos turn green there, the player, decoder, graphics path, or Windows playback settings deserve attention. If only the new clip turns green, keep the original file untouched and test that same clip elsewhere. Do not create a converted copy over the source file.
Next, open the affected clip in a second trusted player that supports its format. A normal picture there points toward a player-specific setting or codec path. A green picture everywhere raises the possibility of a damaged file, unsupported video encoding, or a system-wide graphics issue. These are clues, not verdicts. A clip may contain multiple streams, and one application might ignore a problem that another cannot handle.
Write down whether sound plays, whether the green area is solid or flashes, and whether the progress bar moves. If the video has audio and advances normally while only the image is green, the container may still be readable even though picture decoding fails. If the file will not open at all, use a different diagnostic path from “video plays green.”
Check whether the green area belongs to the video window
Move the player window, minimize it, and look at another application. A green image confined to the playback area suggests video rendering or decoding. A green tint over menus, the desktop, and unrelated applications suggests a monitor, cable, graphics-driver, or broader display problem. Try a screenshot: if the captured image looks normal on another device while your monitor stays green, that is useful evidence of a display-path fault.
For a laptop with an external monitor, compare the built-in display and external display without changing the original video file. If the problem appears on only one display, check its cable, input, color settings, and refresh-rate arrangement. Microsoft’s Windows video playback guidance notes that video processing settings and mixed display refresh rates can affect playback behavior. Adjust one setting at a time and reverse a change that makes no difference.
A system crash with a wholly green screen is a separate event. The Windows green-screen diagnosis page addresses that OS/display branch. Do not run file-repair software on a good clip merely because the computer’s screen changed color.
If one player alone shows green
Close the affected player and reopen it before changing its settings. Note whether the issue began after an application or graphics update. Look for that player’s hardware acceleration or video-output option and test a single reversible change. Some players expose more than one rendering path; switching paths can show whether the decoder and GPU interaction is responsible. Do not download a random “codec pack” from an untrusted site to solve one green picture.
Test the same file again after each change. When turning off hardware acceleration removes the green picture, record that result and check for an official player or display-driver update. The change does not mean the file was damaged. If the green picture returns only with a specific display attached, compare the monitor setup rather than repeatedly converting the clip.
A media app that uses Windows’ built-in video platform may respond to Windows video playback settings. Open Settings > Apps > Video playback on Windows versions where that page is available. Do not expect every third-party player to use those controls. The decisive test is whether the same app changes behavior after one setting changes, while the original file remains identical.
If the same clip looks green everywhere
Confirm the file is complete
Check the clip’s file size and copy date. If it came from a camera, phone, cloud download, or USB transfer, compare it with the source copy before attempting repair. A file that was only partly transferred may have a valid name and thumbnail but incomplete video data. If the source device still holds the original, copy it to a new healthy location and open the copy. Do not erase the source recording until a full playback check succeeds.
Try a short section at the beginning, middle, and end. A green picture only after a particular point suggests a different issue from a clip that is green from its first frame. Record whether audio continues at the bad point. These details help a repair specialist or creator of the recording understand what failed without needing to guess from the extension alone.
Separate codec limits from damage
A video container such as MP4 or MOV does not tell you everything about the picture stream inside it. An older player may recognize the container and audio but lack support for the video encoding used by the recording. Test a current trusted player or the device that created the clip. If the original plays there, avoid labeling it corrupt. Export a compatible copy only from an application that can read the original correctly.
If no trusted player or source device can show the picture, preserve the file and any matching camera sidecar files. A repair attempt should work on a duplicate. Recovery software and video-file repair are different jobs: one retrieves a missing or inaccessible file copy, while the other tries to reconstruct damaged file content. For a WMV-specific failure, see the WMV diagnosis. Neither route can guarantee that missing video frames will reappear.
When retrieving an earlier video copy makes sense
Before altering a damaged-looking clip, check cloud version history, the camera card, an export folder, and backups for an intact earlier copy. This is often more useful than repairing the only visible file. If a local original was deleted after a failed transfer or replaced by a bad export, stop writing to the drive that held it. A stable, readable source may still contain recoverable file data; a drive that repeatedly disconnects or reports severe read errors needs imaging or specialist attention instead.
Drecov is Windows data recovery software for missing or inaccessible local files. Its Quick Scan, Deep Scan, filtering, preview, and recovery to another healthy location can help search for an earlier video copy on a stable device. The video-recovery overview describes that file-retrieval role. Drecov does not adjust a player’s rendering setting and does not promise to repair corrupted video frames. Preview can help identify candidates, but full playback after recovery is the meaningful test.
⚠ Warning: Install it on a drive different from the one where your data was lost to prevent overwriting.
Step 1: Choose the original recording location
Prepare a different healthy drive for recovered output. Do not install Drecov on the location that held the lost original. Open Drecov and select the former folder’s drive, camera card, or USB device, provided it remains stable and readable. If the source becomes hot, drops offline, or reports serious errors, stop direct scanning.
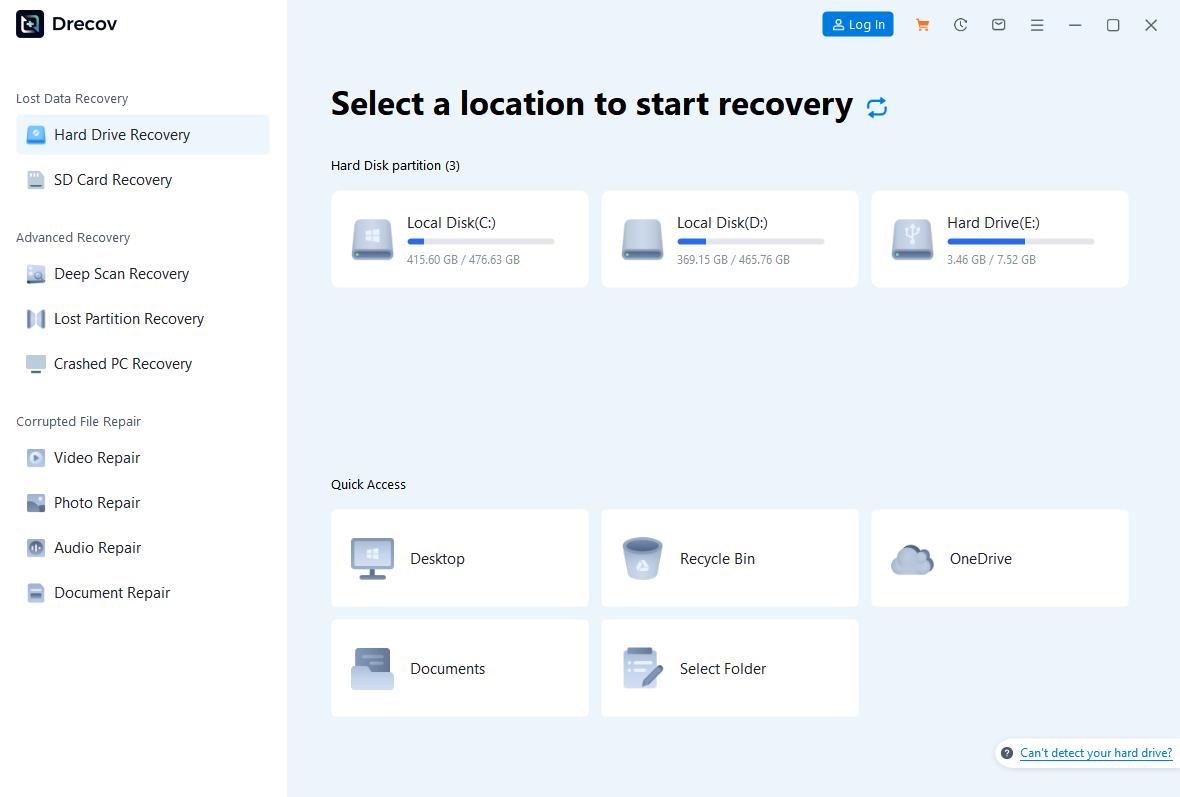
Step 2: Scan for the video, then narrow results
Run Quick Scan first. Search by former filename, folder, extension, and approximate recording date where supported. If the clip is absent and the device remains stable, run Deep Scan. Preview representative results to identify plausible copies. A thumbnail or preview does not prove the whole video is complete.
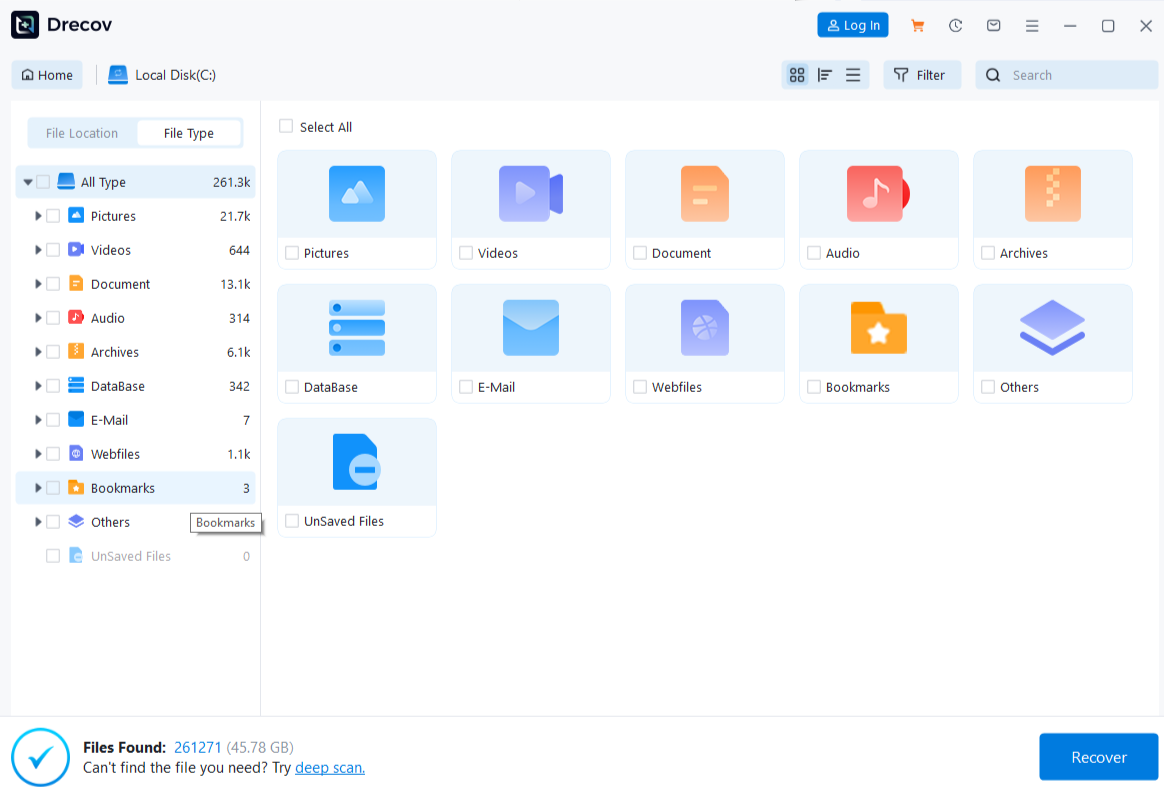
Step 3: Recover elsewhere and play the whole clip
Save candidates to the prepared healthy destination, never back to the original device. If the files are not where expected, check the Drecov folder or Recovery folder. Play the beginning, middle, and end, compare audio synchronization, and keep the source untouched until you know which copy is sound.
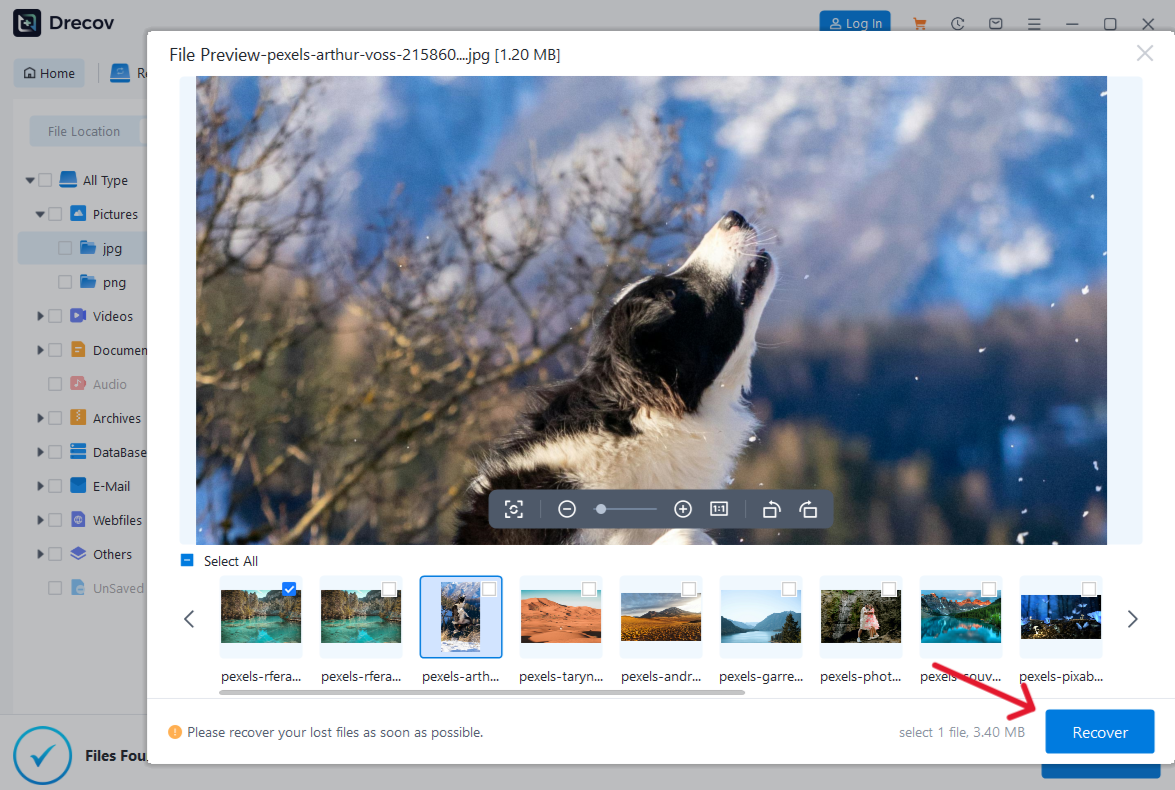
⚠ Warning: Install it on a drive different from the one where your data was lost to prevent overwriting.
FAQs
Why is the video green but the sound normal?
The audio stream may decode while the picture stream does not. Compare another file and another player before concluding that the clip itself is damaged.
Does a green video mean my graphics card is failing?
Not necessarily. If only one player or one clip is affected, test software and file explanations first. A green desktop or repeated display faults across apps call for broader hardware and driver checks.
Should I convert the green clip to another format?
Only on a copy, and only after finding an application that reads the original correctly. Converting a file whose picture cannot be decoded may create a second green file without fixing the cause.
Can data recovery software make the green picture normal?
It can search for an earlier intact copy if the original was deleted or lost. It cannot correct a player setting or promise to reconstruct missing video frames.
What should I preserve from a camera recording?
Keep the original clip, the source device when practical, and related files in the recording folder. Avoid formatting the camera card until a complete healthy copy has been verified.
Conclusion
A green video picture is a symptom to localize. Compare two files and two players, then check whether the green area belongs only to playback or to the whole display. Keep the original clip while testing settings or a compatible player. When an earlier local recording was deleted or lost, Drecov can search a stable source and save candidate videos elsewhere; verify complete playback before relying on them. It is not a substitute for fixing a decoder, display, or damaged video content.
⚠ Warning: Install it on a drive different from the one where your data was lost to prevent overwriting.