


Have you ever been cleaning up your hard drive, toggled the “Show Hidden Files” option, and suddenly noticed a mysterious directory named $recycle.bin folder sitting at the root of your C: drive? For many users, this discovery triggers a bit of anxiety. Is it a virus? Is it a leftover from a failed update? Why is it taking up so much space?
In reality, the $recycle.bin folder is one of the most critical safety nets within the Windows operating system. As an expert in data recovery and SEO, I have seen countless cases where understanding this folder was the difference between losing a week’s worth of work and restoring it in seconds. This comprehensive guide will walk you through everything you need to know about this hidden giant, from its internal architecture to professional recovery methods using tools like PandaOffice Drecov.
What is $Recycle.Bin Folder?
Definition and Purpose
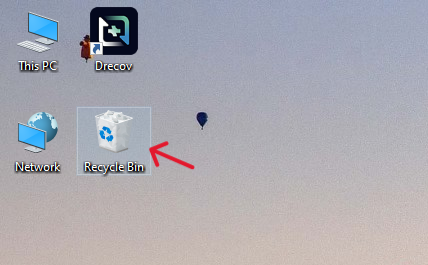
To put it simply, the $recycle.bin folder is the actual physical location on your hard drive where deleted files are stored. While you interact with the “Recycle Bin” icon on your desktop, that icon is merely a graphical shortcut—a specialized window that aggregates deleted items from every drive on your computer.
The purpose of the $recycle.bin folder is to act as a temporary holding area. When you delete a file in Windows, the system doesn’t immediately overwrite the sectors on the disk. Instead, it moves the file into this hidden directory. This allows for the “Undo” or “Restore” functionality that we all rely on. Without this folder, every deletion would be instantaneous and permanent, leaving no room for human error.
Difference Between Recycle Bin and $Recycle.Bin
It is vital to distinguish between the user interface and the system storage. The windows recycle bin folder (the one on your desktop) is a “Virtual Folder.” It doesn’t have a single path because it pulls data from multiple $Recycle.Bin directories located across different partitions.
| Feature | Desktop Recycle Bin | $Recycle.Bin Folder |
| Visibility | Always visible (usually) | Hidden system file |
| Location | Desktop environment | Root of every drive (C:, D:, etc.) |
| Access | Double-click icon | Requires administrative privileges |
| Structure | Unified view of all deleted files | Partition-specific storage |
Where is the $Recycle.Bin Folder Located?
Default Locations on Drives
A common misconception is that there is only one $recycle.bin folder. In reality, Windows creates one on every single partitioned drive connected to your system. If you have a C: drive for your OS and a D: drive for your games, you will have:
C:\$Recycle.BinD:\$Recycle.Bin
Even external USB drives and SD cards will generate this folder the moment you delete a file while they are plugged in. This distributed system is designed for efficiency; it is much faster for Windows to move a file to a hidden folder on the same drive than to move it across different physical disks.
Why It’s Hidden
Google’s security guidelines and Windows’ own architecture prioritize system stability. The $recycle.bin folder is marked as a “Protected Operating System File.” It is hidden to prevent users from accidentally renaming it, deleting its metadata, or interfering with the Security Identifiers (SIDs) inside. If a user were to manually tamper with these files, the “Restore” function would break, leading to potential data loss.
How the $Recycle.Bin Folder Works
File Deletion Process
When you right-click a file and select “Delete,” or press the Delete key, a specific sequence of events occurs:
- Windows identifies which drive the file resides on.
- The file is moved to the $recycle.bin folder on that specific drive.
- The file is renamed to a system-readable format.
- The original path and deletion timestamp are recorded in a metadata index.
Metadata and File Storage
Inside the windows recycle bin folder structure, your files lose their original names. If you deleted “Budget_2026.xlsx,” it might be renamed to something like $R1A2B3C.xlsx.
Accompanying this is a header file starting with $I. This $I file is the “brain” of the operation. It tells Windows: “This scrambled file was originally named Budget_2026.xlsx and lived in the Documents folder.” When you click “Restore,” Windows reads the $I file and moves the $R file back to its home.
Structure of the $Recycle.Bin Folder
User SID Subfolders
If you manage to enter the $recycle.bin folder, you won’t see your files immediately. Instead, you will see folders with long, alphanumeric strings starting with S-1-5-21. These are Security Identifiers (SIDs).
Each user on a Windows PC has a unique SID. This ensures that if “User A” deletes a private photo, “User B” cannot see it in their Recycle Bin, even though they are using the same computer. It is a fundamental pillar of Windows privacy and multi-user security.
File Naming System
The naming convention is strict:
- $R [Random String]: The actual data content.
- **$I [Random String]:** The index/metadata.If you lose the
$I\file, the data is still there, but Windows won’t know where it came from or what it was called. This is where professional data recovery tools become necessary.
Is $Recycle.Bin Safe or a Virus?
Normal System Behavior
Is the $recycle.bin folder safe? Yes. It is a native component of Windows. If you see it, your computer is likely functioning exactly as intended. It is not a sign of an infection.
When to Be Concerned
While the folder itself is safe, some malware authors use clever naming schemes to hide. Be wary if:
- You see a folder named
Recycle.bin(without the$sign). - The folder is found inside another folder like
C:\Windows\System32\$Recycle.Bin. - An antivirus scan flags a specific executable inside the bin.
If you are suspicious, always run a full scan using Microsoft Defender.
Can You Delete the $Recycle.Bin Folder?
What Happens If You Delete It
You can delete the $recycle.bin folder using administrative commands (like rd /s /q), but it is like trying to delete the air in a room. Windows will simply recreate a fresh, empty version of the folder the next time you delete a file or restart the system. Deleting it is often used as a troubleshooting step to fix a “Corrupted Recycle Bin” error.
Safe Methods to Clear It
Instead of manually hunting for hidden folders, use the built-in Windows tools:
- Right-click the Recycle Bin on your desktop and select Empty Recycle Bin.
- Use Disk Cleanup: Type “Disk Cleanup” in the Start menu, select your drive, and check the “Recycle Bin” box.
How to View the $Recycle.Bin Folder
If you need to access the windows recycle bin folder directly for troubleshooting, follow these precise steps:
Enabling Hidden Files
- Step 1: Open File Explorer (Win + E).
- Step 2: Click on the View tab (or the three dots “…” in Windows 11).
- Step 3: Select Options > Change folder and search options.
- Step 4: In the View tab, find “Hidden files and folders” and select Show hidden files, folders, and drives.
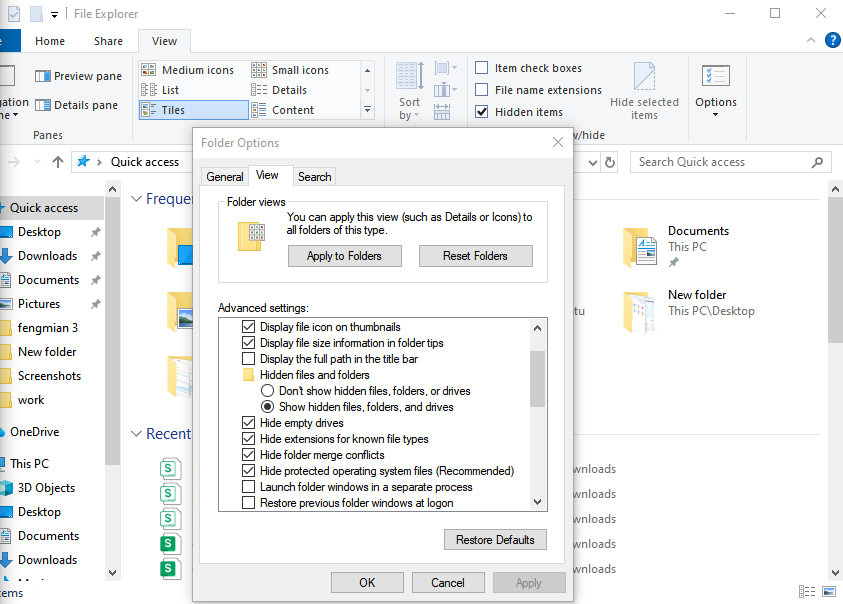
- Step 5: Crucial Step: Uncheck the box that says Hide protected operating system files (Recommended).
- Step 6: Click Apply and OK.
Accessing via File Explorer
Once those settings are applied, navigate to C:\. You will see the $recycle.bin folder appearing as a semi-transparent icon. You can now enter it to view the SID subfolders.
Managing Disk Space Using $Recycle.Bin
Storage Limits
By default, Windows allocates about 5% to 10% of your disk space to the $recycle.bin folder. On a 1TB drive, that’s up to 100GB! If you are a video editor or gamer, this can fill up quickly.
Cleaning Up Space
To change the limit:
- Step 1: Right-click the desktop Recycle Bin and select Properties.
- Step 2: Select the drive you want to modify.
- Step 3: Choose Custom size and enter the maximum size in MB.
- Step 4: Click Apply.
Common Issues with $Recycle.Bin
Folder Taking Too Much Space
If the bin feels bloated, it’s usually because “Large Files” aren’t being cleared. Remember that files larger than the bin’s allocated capacity are often deleted permanently (bypassing the bin), but files just under the limit will sit there indefinitely until you empty it.
Corruption Problems
Sometimes you might see an error: “The Recycle Bin on C:\ is corrupted. Do you want to empty the Recycle Bin for this drive?”
This happens when the $I metadata files get out of sync with the $R data files. The best fix is to let Windows empty it or use the Command Prompt:
rd /s /q C:\$Recycle.Bin
Professional Data Recovery with PandaOffice Drecov
What happens if you’ve emptied the $recycle.bin folder and realized you made a catastrophic mistake? When the “Restore” button is gone, you need professional-grade software. PandaOffice Drecov is specifically designed to scan the “unallocated space” of your drive to find files that the windows recycle bin folder has let go of.
⚠ Warning: Install it on a drive different from the one where the data was lost (e.g., if you lost files on C:, install the software on D: or an external drive) to avoid overwriting your own data.
How to Recover Data Using PandaOffice Drecov
- Step 1: Select the Location
Launch the program. You will see a list of drives. To recover items recently emptied from the bin, select the specific drive partition (e.g., Local Disk C:) or specifically select the Recycle Bin icon within the software interface.

- Step 2: Perform a Deep Scan
Click the Scan button. PandaOffice Drecov will first perform a Quick Scan, followed by a Deep Scan. The Deep Scan is essential for the $recycle.bin folder recovery because it looks for file signatures even if the metadata is destroyed.

- Step 3: Filter and Preview
Use the sidebar to filter by file type (JPG, PDF, DOCX). One of the best features of PandaOffice Drecov is the Preview function. Before you commit to a recovery, double-click the file to ensure the data is intact and not corrupted.

- Step 4: Recover and Save
Select the files you wish to bring back. Click the Recover button. Warning: Always save the recovered files to an external hard drive or a different partition. Saving them back to the original location can cause permanent data corruption.
Advanced Manual Recovery Methods
If you are a power user, you can sometimes use the Windows Registry to fix visibility issues or the Command Prompt for deeper management.
Restoring the Bin via Registry
If your desktop icon has vanished:
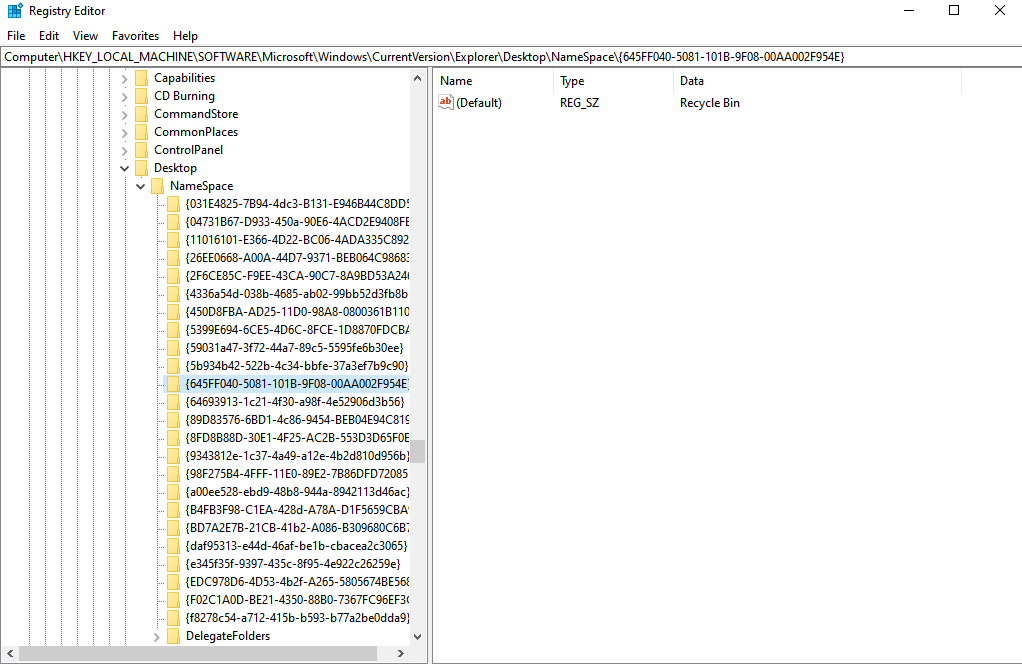
- Press Win + R, type
regedit, and hit Enter. - Navigate to:
HKEY_LOCAL_MACHINE\SOFTWARE\Microsoft\Windows\CurrentVersion\Explorer\Desktop\NameSpace. - Ensure the key
{645FF040-5081-101B-9F08-00AA002F954E}exists.
For more visual guides on finding the bin, check out where is recycle bin in windows 10 3 quick ways to find it.
Hiding the Desktop Icon
Some users prefer a clean desktop. You can remove the icon without disabling the $recycle.bin folder functionality. Learn how to remove the recycle bin from desktop to streamline your workspace.
General Search Tips
If you are still struggling to locate the directory on a complex system, see this guide on where do i find recycle bin in windows 10.
Best Practices for Using Recycle Bin
Safe File Deletion
- Avoid Shift + Delete: Only use this if you are 100% certain you will never need the file again. It bypasses the $recycle.bin folder entirely.
- Check Before Emptying: Make it a weekly habit to glance through the bin before clicking “Empty.”
Avoiding Data Loss
- Regular Backups: The Recycle Bin is a safety net, not a backup solution. Use cloud storage or external drives.
- SSD vs. HDD: Be aware that on SSDs, a feature called TRIM often wipes deleted data much faster than traditional HDDs. If you delete something on an SSD, stop using the computer immediately and run PandaOffice Drecov.
Technical Deep Dive: The $I and $R Relationship
To understand why data recovery is possible, we must look at the hexadecimal level. When a file is in the $recycle.bin folder, the operating system changes the first character of the filename in the Master File Table (MFT) to a special marker that signals the space is “available.”
However, the actual $1s$ and $0s$ that make up your graduation photo or business report remain on the magnetic platters or flash cells. As long as no new data is written to those specific coordinates, the file is 100% recoverable. This is why the PandaOffice Drecov tool is so effective—it ignores the “available” flag and reads the raw data directly.
$Recycle.Bin folder FAQs
1. Why does my $Recycle.Bin have a weird name like S-1-5-21-…?
Those are User SIDs. They ensure that in a household or office with multiple users on one PC, your deleted items remain private and aren’t visible to others.
2. Can I move the $Recycle.Bin folder to another drive?
No. Because of how Windows handles file pointers, each drive must have its own local $recycle.bin folder. You can, however, disable it for specific drives in the Recycle Bin Properties.
3. Does deleting files from a USB drive put them in the $Recycle.Bin?
Yes, but only if the USB is formatted with NTFS. Many older USB sticks use FAT32, which sometimes bypasses the bin. Always be careful with external media!
4. How often should I empty the windows recycle bin folder?
If you have plenty of storage, once a month is fine. If you are a power user working with large 4K video files, you might want to empty it daily to keep your drive performance optimal.
5. Can I change the icon of the Recycle Bin?
Yes. This is done through Settings > Personalization > Themes > Desktop icon settings. This changes the visual look but does not affect the hidden $recycle.bin folder on your C: drive.
Conclusion
The $recycle.bin folder is far more than just a digital trash can. It is a sophisticated, multi-layered database designed to protect us from our own mistakes. By understanding its structure—from the hidden root directories to the SID subfolders—you can manage your computer’s storage more effectively and troubleshoot errors with confidence.
Remember, if you ever find yourself in a situation where the Recycle Bin has been emptied and your files are missing, don’t panic. The data is likely still there, hidden in the sectors of your drive. Using a professional tool like PandaOffice Drecov provides the best chance of a successful recovery.


