


Losing important files on your Windows computer can feel like a nightmare. Whether it’s a deleted document, corrupted photos, or lost data after a system crash, the panic is real. But here’s the good news: in most cases, your files are not permanently gone. When you understand how to recover files on windows, you realize that the operating system doesn’t immediately destroy data; it simply marks the space as “available.” With the right approach, tools, and techniques, you can successfully recover lost data on Windows before it is overwritten by new information.
This comprehensive guide will walk you through how to recover files on windows, step by step, using both built-in features and advanced recovery methods. Whether you’re a beginner or someone looking for deeper solutions, you’ll find everything you need right here to restore your digital life.
Understanding How File Loss Happens on Windows
Before jumping into recovery methods, it’s important to understand why files get lost in the first place. Knowing the cause can help you choose the best recovery method. Files can disappear due to:
- Accidental deletion: Including emptying the Recycle Bin or using permanent delete shortcuts.
- System crashes: Unexpected shutdowns during a write process can corrupt file headers.
- Virus or malware attacks: Malicious software may hide, encrypt, or delete your data.
- Hard drive corruption: Logical errors or bad sectors making the drive inaccessible.
- Formatting errors: Accidentally wiping a partition while reinstalling Windows.
- Software conflicts: Applications crashing while saving a file.
The most critical thing to remember regarding how to recover files on windows is the “Overwriting Rule.” When you delete a file, Windows removes the pointer to that data. The actual bits and bytes stay on the platter or flash cells until a new file needs that space. Therefore, the moment you realize data is missing, you must stop using the drive immediately.
Method 1: Recover Files from the Recycle Bin
Let’s start with the simplest solution for how to recover files on windows. If you’ve recently deleted a file by pressing the “Delete” key or dragging it to the trash, it’s likely sitting in the Recycle Bin.
Steps to Recover Files from Recycle Bin
- Step 1: Double-click the Recycle Bin icon on your desktop.

- Step 2: Locate the file or folder you want to restore. You can use the search bar in the top right corner if the bin is cluttered.
- Step 3: Right-click the file and select Restore.
- Step 4: The file will return to its original location instantly.
This method works perfectly for standard deletions, but it won’t help if you used the Shift + Delete shortcut or if the file was too large for the bin.
Method 2: How to Recover Files After Shift Delete Windows
Many power users prefer using Shift + Delete to bypass the Recycle Bin and save time. However, this often leads to accidental data loss. If you are wondering how to recover files after shift delete windows, you must look beyond the desktop interface and into Windows’ shadow copies or backup systems.
Using Windows File History
Windows includes a powerful backup feature called File History, which automatically saves copies of your files located in the Documents, Music, Pictures, Videos, and Desktop folders.
Steps to Recover Files Using File History
- Step 1: Open the folder where the deleted file was originally stored.
- Step 2: Click the Home tab on the top ribbon and select the History button (or right-click the folder and select Restore previous versions).
- Step 3: Use the left and right arrows to browse through different saved versions of the folder.
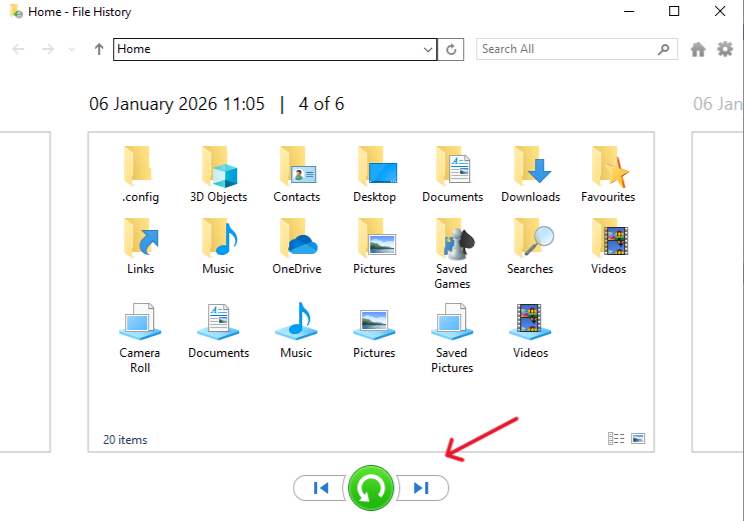
- Step 4: Once you find the version containing your “Shift + Deleted” file, select it and click the green Restore icon.
Pro Tip: For File History to work, you must have previously enabled it in Settings > Update & Security > Backup. If this wasn’t turned on, you’ll need to use professional software like PandaOffice Drecov data recovery software to scan the drive clusters directly.
Method 3: Recover Files from RAW Drive Windows
One of the most frustrating errors is when your drive suddenly becomes inaccessible, and Windows prompts you to “format the disk before you can use it.” This usually means the file system has become RAW. Learning how to recover files from RAW drive windows is essential because formatting the drive as Windows suggests will make recovery much harder.
A RAW drive occurs when the operating system can no longer recognize the file system (NTFS or FAT32) due to a corrupted partition table or damaged boot sector.
Steps to Fix and Recover from a RAW Drive
- Step 1: Connect the drive and identify its drive letter in Disk Management (Right-click Start > Disk Management).
- Step 2: Avoid the temptation to click “Format.” Formatting creates a new, empty file system, which may overwrite the metadata of your old files.
- Step 3: Use the CHKDSK command to see if the file system can be repaired. Open Command Prompt as Administrator and type
chkdsk X: /f(replace X with your RAW drive letter). - Step 4: If CHKDSK reports that it “is not available for RAW drives,” you must use a dedicated tool like PandaOffice Drecov to perform a signature search. This bypasses the corrupted file system to find files based on their unique binary headers.
For more information on handling system-level drive issues, you might find this guide on how to reinstall Windows 10 from USB helpful if your OS is also failing.
Method 4: Using PandaOffice Drecov Data Recovery Software
When built-in Windows tools fail—especially in cases of permanent deletion, formatted partitions, or RAW drives—you need a professional-grade engine. PandaOffice Drecov data recovery software is designed to handle complex logical data loss scenarios with a high success rate. It supports hundreds of file formats, including .docx, .jpg, .mp4, and .zip.
⚠ Warning: Do not install the software on the same drive/partition where the lost files were located, as the installation process itself could overwrite your deleted data.
Detailed Steps to Use PandaOffice Drecov
- Step 1: Select the Location. Launch the program. On the main interface, you will see a list of all connected drives and partitions. Select the specific drive (e.g., C: drive or an external USB) where you lost your files and click Start Scan.

- Step 2: Scan Process. The software will perform a Quick Scan first to find recently deleted files. It will then automatically transition into a Deep Scan, which searches the drive sector-by-sector. You can monitor the progress bar at the top.

- Step 3: Filter and Preview. Once the scan is complete (or even while it is running), you can use the sidebar to filter by file type (e.g., Photos, Documents). PandaOffice Drecov allows you to double-click a file to Preview it. This ensures the file is intact before you commit to recovering it.

- Step 4: Recover and Save. Check the boxes next to the files you want to get back. Click the Recover button.
Key Point: Always save the recovered files to a different physical drive (like an external HDD or a different partition) to prevent data corruption.
For more information and official resources on Windows management, you can visit the Official Microsoft Support Page.
Method 5: Restore Files Using Windows Backup (System Image)
If you have been diligent with your system maintenance, you might have a System Image or a Backup and Restore (Windows 7) archive. This is a “snapshot” of your entire system at a specific point in time.
Steps to Recover Files from Backup
- Step 1: Connect the external media containing your backup.
- Step 2: Open the Control Panel and navigate to System and Security > Backup and Restore (Windows 7).
- Step 3: Under the “Restore” section, click Restore my files.
- Step 4: Click Browse for files or Browse for folders to select the items from the backup.
- Step 5: Choose whether to restore them to the original location or a new folder.
This method is highly effective for mass data loss, such as after a hard drive failure, but it is only as good as your last backup date. If you’re struggling to find where these backups might be or where your deleted items went, check out this article on where is the Recycle Bin in Windows 10.
Method 6: Use Command Prompt (CMD) to Recover Hidden Files
Sometimes, you haven’t actually deleted your files; rather, a virus or a system error has changed the file attributes to “Hidden” or “System,” making them invisible in File Explorer. If you are learning how to recover files on windows using the command line, the attrib command is your best friend.
Steps to Recover Files Using CMD
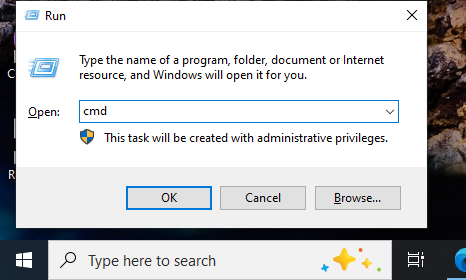
- Step 1: Press Win + R, type
cmd, and press Ctrl + Shift + Enter to run as Administrator.
- Step 2: Identify the drive letter of the affected disk (e.g., E:).
- Step 3: Type the following command and press Enter:
attrib -h -r -s /s /d E:\*.* - Step 4: Wait for the command to finish. This command removes the Hidden (-h), Read-only (-r), and System (-s) attributes from all files and folders on the drive.
- Step 5: Open your drive in File Explorer to see if your files have reappeared.
Method 7: Recover Files from External Drives and SD Cards
External storage devices are frequently unplugged without being “safely removed,” leading to file system corruption. The process for how to recover files on windows from an external source is similar to internal drives but requires a few extra checks.
Steps to Recover External Drive Files
- Step 1: Connect the device. If Windows doesn’t assign a drive letter, go to Disk Management, right-click the drive, and select Change Drive Letter and Paths.
- Step 2: Open PandaOffice Drecov data recovery software.
- Step 3: Select the external drive from the “External Devices” list.
- Step 4: Run a Deep Scan. External drives often have fragmented file systems, so a Deep Scan is more likely to yield results.
- Step 5: Preview and restore.
If you are having trouble even finding the desktop shortcuts to manage these drives, you can read more about locating the Recycle Bin and system icons on Windows 10 and 11.
Tips to Increase Your Data Recovery Success Rate
Recovering files isn’t just about having the best software; it’s about the actions you take the moment you realize the data is missing. To maximize the chances of how to recover files on windows successfully, follow these professional tips:
- Cease All Activity: The very second you realize a file is gone, stop. Do not browse the web (which creates cache files), do not download new apps, and do not move other files.
- Avoid Rebooting Unnecessarily: While it sounds counter-intuitive, every time Windows boots up, it writes thousands of small log files and temporary data to the disk.
- Check Cloud Clones: If you use OneDrive, Dropbox, or Google Drive, check the “Trash” or “Deleted Files” folder on the web version of these services. They often keep deleted files for 30 days.
- Use a Different Recovery Destination: We cannot stress this enough. If you are recovering data from drive D:, save the recovered files to drive C: or an external USB.
- Run as Administrator: Always run recovery software with administrative privileges to ensure it has the permission to read the raw sectors of the disk.
Common Mistakes to Avoid During Windows Recovery
When people try to figure out how to recover files on windows, they often make mistakes that turn a recoverable situation into a permanent loss.
- Installing Software on the Target Drive: As mentioned, this is the #1 cause of overwritten data.
- Running CHKDSK on a Failing Drive: If your hard drive is making clicking sounds (physical failure), running CHKDSK can actually kill the drive faster by putting extreme stress on the mechanical parts.
- Trusting “Free” Software from Unverified Sources: Some “free” tools are actually malware in disguise, or they are limited and may corrupt the file structure during the “recovery” process.
- Giving Up Too Early: If a Quick Scan doesn’t find your file, don’t panic. A Deep Scan takes longer but looks at the underlying data patterns rather than the file table.
How to Prevent File Loss in the Future
Once you have learned how to recover files on windows and successfully retrieved your data, your next priority should be prevention. Data recovery is a reactive measure; backup is a proactive one.
Best Practices for Data Safety
- Enable File History: It is built-in and free. Dedicate a small external hard drive for this purpose.
- The 3-2-1 Backup Rule: Keep 3 copies of your data, on 2 different types of media, with 1 copy located off-site (cloud).
- Use an Uninterruptible Power Supply (UPS): This prevents system crashes and file corruption caused by sudden power outages.
- Regular Disk Health Checks: Use tools like CrystalDiskInfo to monitor the S.M.A.R.T. status of your drives. If a drive shows “Caution,” move your data immediately.
- Update Your Antivirus: Ensure Windows Defender or your chosen antivirus is up to date to prevent ransomware from encrypting your files.
Recover Files On Windows FAQs
1. Can I recover permanently deleted files on Windows without software?
If you have a backup (File History or System Image) or if the files were synced to the cloud (OneDrive), yes. Otherwise, you will need data recovery software to scan the disk clusters.
2. Is file recovery 100% guaranteed?
No. If the sector where the file was stored has been overwritten by a new file, the original data is gone. This is why immediate action is required.
3. What happens if my drive is physically damaged?
If the drive is clicking, grinding, or not spinning at all, software cannot help. You must send the drive to a professional data recovery lab with a “Clean Room” environment.
4. How long does a deep scan take?
It depends on the size and speed of your drive. A 1TB HDD might take 2 to 5 hours, while a 500GB SSD might take less than 30 minutes.
5. Does Windows have a built-in recovery tool for deleted files?
Yes, Microsoft provides a command-line tool called “Windows File Recovery” via the Microsoft Store, though it is less user-friendly than GUI-based tools like PandaOffice Drecov.
Conclusion
Mastering how to recover files on windows is an essential skill in the digital age. Whether you are dealing with a simple accidental deletion solved by the Recycle Bin, a more complex scenario involving how to recover files after shift delete windows, or a technical nightmare like a RAW drive, there is almost always a path to recovery.
By using built-in Windows utilities like File History and Command Prompt, or by utilizing the advanced scanning power of PandaOffice Drecov data recovery software, you can navigate data loss with confidence. The most important takeaways are to act quickly, avoid writing new data to the affected drive, and always maintain a robust backup strategy for the future.


