


If your computer has started to feel slow, cluttered, or just not as responsive as it used to be, there’s a good chance temporary files are piling up in the background. These files are created by Windows and various applications to store short-term data, but over time, they can take up a surprising amount of space. Learning how to clear temp files Windows 10 is one of the easiest and most effective ways to improve your system’s performance without installing any additional hardware.
In this comprehensive guide, you’ll learn exactly what temp files are, why they matter, and how to safely remove them using multiple proven methods. Furthermore, we will explore the critical intersection of system maintenance and data recovery, ensuring that even if you accidentally delete something important, you have the tools to get it back.
What Are Temporary Files in Windows 10?
Temporary files—often called temp files—are pieces of data that your system stores temporarily while performing tasks. These files are meant to be deleted automatically once they are no longer needed, but that doesn’t always happen.
For example, when you install software, browse the internet, or edit documents, Windows creates temporary files to speed up processes. Think of them as scratch notes your system uses while working. Once the job is done, those notes should be thrown away—but sometimes they get forgotten. These files typically carry the .tmp extension or are stored in specific folders designated for transient data.
Over time, these files accumulate and can:
- Consume valuable disk space.
- Slow down system performance.
- Cause software conflicts.
- Lead to unexpected errors.
That’s why knowing how to clear temp files Windows 10 is essential for maintaining a healthy PC.
Why You Should Clear Temp Files Regularly
You might be wondering—if these files are temporary, why should you bother deleting them manually? The answer is simple: Windows doesn’t always clean them up efficiently. As a result, your system can become cluttered with unnecessary data. When your storage drive (especially an SSD or HDD acting as a boot drive) reaches capacity, the OS struggles to find “scratch space” for current operations, leading to sluggishness.
Clearing temp files can:
- Free up gigabytes of storage space.
- Improve system speed and responsiveness.
- Reduce system errors and crashes.
- Enhance overall performance.
Imagine your computer as a workspace. Temporary files are like scraps of paper scattered everywhere. Cleaning them up makes everything easier to manage and faster to access. However, while cleaning, users often fear deleting something critical. This brings us to a vital technique for safety.
How to Clear %temp% Files Safely
Before you start mass-deleting files, you need to understand that not all temporary files are identical. There are user-specific temp files and system-wide temp files. Knowing how to clear %temp% files safely ensures that you don’t disrupt active processes or lose data that is currently being processed by an open application.
Step 1: Close All Active Programs
Before navigating to the temp folders, save your work and close all applications. If a program is running, it might be using a temp file to store your unsaved progress. Deleting a file in use is usually blocked by Windows, but it’s best practice to start with a clean slate.
Step 2: Access the User Temp Folder
Press the Windows Key + R on your keyboard to open the Run dialog box. Type %temp% into the box and hit Enter. This environment variable points directly to C:\Users\[Username]\AppData\Local\Temp.
Step 3: Select and Delete
Once the folder opens, press Ctrl + A to highlight every item. Press the Delete key.
Step 4: Handling the “File In Use” Prompt
During the process, Windows will likely show a popup stating, “The action can’t be completed because the file is open in another program.”
Warning Prompt: Do not force these files to delete. Check the box “Do this for all current items” and click Skip. These files are currently necessary for your system’s operation.
Step 5: Empty the Recycle Bin
Deleting the files from the folder moves them to the Recycle Bin. To actually free up space, right-click the Recycle Bin on your desktop and select Empty Recycle Bin.
Advanced Manual Cleanup: The System Temp Folder
In addition to the user-specific files, Windows maintains a system-level temp folder. Learning how to clear temp files Windows 10 involves checking this location as well.
Step 1: Open the Run Dialog
Press Windows Key + R again.
This time, type temp (without the percentage signs) and press Enter. You may be prompted for administrator permission; click Continue.
Step 3: Clean the Directory
Similar to the previous method, select all files and delete them, skipping any that are currently in use by the system.
Recover Unsaved Word Documents from Temp Files
While cleaning is great for performance, temp files sometimes serve as a literal lifesaver. Have you ever had Microsoft Word crash before you could hit save? Before you learn how to clear temp files Windows 10 to the point of no return, you should know that those “junk” files might contain your lost work.
If you are trying to recover unsaved Word documents from temp files, follow these steps before you empty your bin:
Step 1: Locate the AutoRecover Path
Open Microsoft Word and go to File > Options > Save. Look for the “AutoRecover file location” path. Usually, it looks like C:\Users\[Username]\AppData\Roaming\Microsoft\Word\.
Step 2: Search for .asd or .tmp Files
Navigate to that path in File Explorer. Look for files with the .asd extension. Additionally, you can search the %temp% folder we discussed earlier for files starting with a tilde (~) or ending in .tmp that match the timestamp of your lost work.
Step 3: Use the “Recover Unsaved Documents” Feature
In Word, go to File > Open > Recent and scroll to the bottom. Click Recover Unsaved Documents. This will browse the specific temp folder where Word stores drafts.
Step 4: Rename and Save
If you find a temp file that looks like your document, open it with Word. If it opens successfully, immediately go to File > Save As and give it a proper name and location.
Professional Data Recovery with PandaOffice Drecov Data Recovery Software
Sometimes, the manual methods of finding a temp file aren’t enough, or perhaps you realized too late that you deleted a vital document while trying to learn how to clear temp files Windows 10. When the Recycle Bin is empty and the folders are gone, you need a professional-grade solution.
PandaOffice Drecov data recovery software is a powerful tool designed to retrieve lost, deleted, or formatted data from your Windows 10 system. Whether you accidentally wiped your temp folder or lost a partition, Drecov uses advanced scanning algorithms to piece your data back together.
⚠ Warning: Warning Prompt: Never install recovery software on the same drive/partition where the lost data was located. This prevents “overwriting” the very files you are trying to save. If you lost files on drive C:, install Drecov on drive D: or an external USB.
Why Choose PandaOffice Drecov?
- Deep Scan Technology: It goes beyond surface-level deletion to find fragmented data.
- Preview Before Recovery: You can view files before deciding to restore them, ensuring you don’t waste time on corrupted bits.
- High Success Rate: Specifically optimized for Windows file systems like NTFS and FAT32.
Step 1: Select the Location to Scan
Launch the PandaOffice Drecov data recovery software. On the main interface, you will see a list of available drives. Select the drive where your temp files or lost documents were stored (usually the Local Disk C:).

Step 2: Run the Scan
Click the Scan button. The software will perform a Quick Scan followed by a Deep Scan. During this time, you can see files appearing in real-time. Use the filter sidebar to search for specific file types like .docx, .pdf, or .tmp.
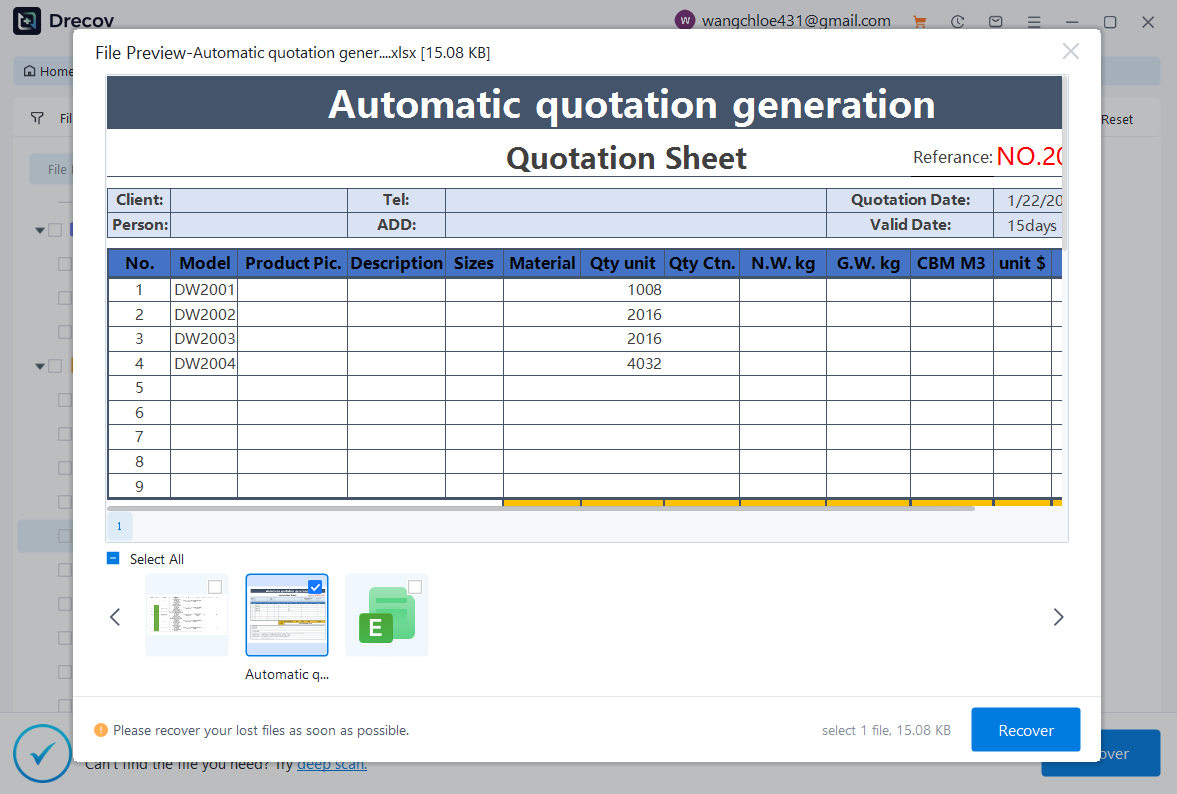
Step 3: Preview and Recover
Once the scan is complete, browse through the results. If you find your unsaved document or accidentally deleted file, select it and click Recover. Choose a destination on a different drive to save the recovered files safely.
Method 2: Delete Temp Files Using Disk Cleanup
Windows 10 includes a built-in tool called Disk Cleanup that helps remove unnecessary files without needing to navigate through hidden folders. This is the “official” recommended way for how to clear temp files Windows 10.
Step 1: Launch the Tool
Type Disk Cleanup in the Windows search bar and select the app from the results.
Step 2: Select Drive
Select the drive you want to clean (usually C:). Click OK.
Step 3: Select File Categories
The tool will calculate how much space you can save. Scroll through the list and ensure Temporary files is checked. You may also want to check Temporary Internet Files and Delivery Optimization Files.
Step 4: System File Cleanup
Click the button labeled Clean up system files. This restarts the tool with higher permissions, allowing it to find old Windows Update files which can often take up 10GB or more.
Step 5: Finalize Deletion
Click OK, then click Delete Files to confirm. This process is very safe and specifically targets data that is no longer required by the OS.
Method 3: Clear Temp Files via Settings
Windows 10 Settings provides a more modern way to manage storage, offering a visual breakdown of what is consuming your disk space.
Step 1: Open Storage Settings
Click the Start menu and select the Settings (gear icon). Navigate to System > Storage.
Step 2: Analyze Disk Space
Wait a few moments while Windows calculates the usage. You will see a category labeled Temporary files. Click on it.
Step 3: Select and Remove
Windows will provide a detailed list, including the Downloads folder, Recycle Bin, and previous Windows installations.
Key Operation Point: Be careful with the “Downloads” checkbox; it will delete everything in your Downloads folder. Check only what you want to remove and click Remove files.
Method 4: Enable Storage Sense for Automatic Cleanup
If you don’t want to manually clear temp files every time, Storage Sense is your best friend. This is the “set it and forget it” method for how to clear temp files Windows 10.
Step 1: Toggle Storage Sense
Go to Settings > System > Storage. Find the toggle for Storage Sense and turn it On.
Step 2: Configure the Schedule
Click Configure Storage Sense or run it now. Here, you can decide how often Windows cleans up. Options include “Every day,” “Every week,” or “When disk space is low.”
Step 3: Set Deletion Rules
You can also set Storage Sense to delete files in your Recycle Bin or Downloads folder if they haven’t been opened for a certain number of days (e.g., 30 days). This ensures your system stays lean automatically.
Method 5: Clear Browser Temporary Files
Your web browser also stores temporary files like cache and cookies. These can slow down your internet experience and even cause privacy concerns.
Steps for Google Chrome
- Open Chrome and press Ctrl + Shift + Delete.
- Set the time range to “All time.”
- Select Cached images and files.
- Click Clear data.
Steps for Microsoft Edge
- Open Edge and go to Settings > Privacy, search, and services.
- Under “Clear browsing data,” click Choose what to clear.
- Select Cached images and files and click Clear now.
Clearing browser temp files can improve browsing speed and fix loading issues on websites that have updated their content.
Method 6: Use Command Prompt to Delete Temp Files
For advanced users or IT professionals, the Command Prompt (CMD) offers a powerful way to clear temp files using scripts or single lines of code.
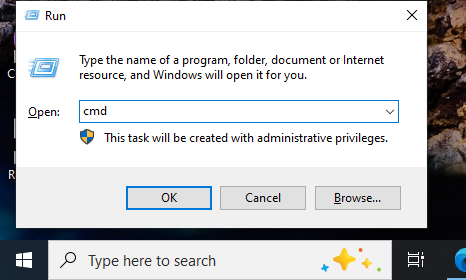
Step 1: Open CMD as Administrator
Search for “cmd” in the Start menu, right-click it, and select Run as administrator.
Step 2: Execute the Command
Type the following command carefully:
del /q/f/s %TEMP%\*
/q: Quiet mode (doesn’t ask for confirmation)./f: Force deletion of read-only files./s: Deletes files from subdirectories as well.
Step 3: System Temp Cleanup
You can do the same for the system temp folder by typing:
del /q/f/s C:\Windows\Temp\*
How Much Space Can You Free Up?
The amount of space you recover depends on how long it’s been since your last cleanup and how heavily you use your computer.
| Usage Level | Estimated Space Freed | Common File Types |
| Light Use | 500 MB – 2 GB | Browser cache, small app logs |
| Moderate Use | 2 GB – 10 GB | Windows Update leftovers, app installers |
| Heavy Use | 10 GB+ | Video editing cache, old OS versions |
It’s not uncommon for users to recover several gigabytes of storage, especially if they haven’t cleaned temp files in months. Using PandaOffice Drecov data recovery software occasionally to check for “lost” large files is also a great way to manage space proactively.
Common Mistakes to Avoid
While clearing temp files is safe, there are a few things you should watch out for:
- Don’t delete files from unknown system folders: Only stick to the
tempand%temp%paths. Deleting files fromSystem32, for instance, can break your OS. - Avoid removing files currently in use: As mentioned, if Windows says a file is busy, leave it alone.
- Always double-check before deleting important data: Ensure your Downloads folder doesn’t contain a file you need before hitting “Clear All” in Settings.
- Don’t rely solely on third-party tools: While tools like CCleaner are popular, Windows 10’s built-in tools are often safer and more integrated.
If you ever find yourself in a situation where a cleanup went wrong, remember to recover files on Windows like a pro using dedicated recovery tools.
Best Practices for Maintaining a Clean System
Keeping your system clean isn’t a one-time task—it’s an ongoing habit. To keep your Windows 10 experience snappy:
- Clear temp files at least once a month.
- Enable Storage Sense for automation.
- Regularly clean browser cache.
- Keep your system updated.
- Monitor disk usage.
Sometimes, system security settings might interfere with how you manage files. For instance, if you are using specialized tools for recovery, you might need to know how to let crack file through Windows Security . Additionally, knowing how to change file type in Windows 11 or Windows 10 can help you identify mystery temp files that didn’t get their extensions properly assigned.
Clear Temp Files Windows 10 FAQs
1. Is it safe to delete temp files in Windows 10?
Yes, temporary files are by definition non-essential data used for short-term tasks. Deleting them does not harm your installed programs or personal files.
2. How often should I clear temp files?
For most users, once a month is plenty. If you do a lot of video editing or software testing, once a week might be better.
3. Will deleting temp files speed up my PC?
Yes. It reduces the overhead on your storage drive and helps the OS manage virtual memory more effectively.
4. What happens if I don’t delete temp files?
The files will continue to grow until your drive is full. Once your drive is near 100% capacity, you will experience significant lag and possibly system crashes.
5. Can I automate temp file cleanup?
Absolutely. Use the Storage Sense feature found in Windows 10 Settings to automate the entire process.
Conclusion
Learning how to clear temp files Windows 10 is one of the simplest yet most effective ways to maintain your computer’s performance. Temporary files may seem harmless, but over time, they can slow down your system and take up valuable space. By using built-in tools like Disk Cleanup, Storage Sense, and manual deletion methods, you can keep your PC running smoothly.
However, maintenance always carries a slight risk of accidental loss. Whether it’s a crashed Word document or a mistakenly emptied folder, having PandaOffice Drecov data recovery software in your digital toolkit ensures that your data is never truly gone. Start your cleanup today and enjoy a faster, more efficient Windows experience!


