


In the modern digital landscape, our memories and professional assets are primarily stored as bits and bytes. Whether it is a snapshot of a wedding or a crucial marketing graphic, losing a digital image can feel like losing a piece of history. However, the science of file recovery photo retrieval has advanced significantly. This comprehensive guide will walk you through the technical nuances of how data is stored, why it “disappears,” and the exact steps you can take to bring your lost images back to life.
Understanding the Mechanics of Digital Storage
Before we dive into the “how,” we must understand the “why.” When you delete a photo from your SD card or hard drive, the computer does not immediately shred the data. Instead, the file system (like NTFS or FAT32) simply marks the space as “available.” Think of it like a library where the index card for a book is thrown away, but the book remains on the shelf until someone puts a new book in its place.
This is the golden rule of file recovery photo: stop using the device immediately. If you continue to save new files, you risk overwriting the very data you are trying to save.
How to Recover Deleted Photos from Computer: The Basic First Steps
Losing a file can be heart-wrenching, but often the solution is simpler than you think. Before reaching for heavy-duty software, you should check the built-in safety nets provided by your operating system.
Step 1: Scrutinize the Recycle Bin or Trash
It sounds elementary, but a significant percentage of data loss cases are resolved here.
- For Windows: Open the Recycle Bin on your desktop. Use the search bar to look for specific file extensions like
.jpgor.png. - For macOS: Check the Trash icon in your dock.
- Action: Right-click the file and select Restore.
Step 2: Check Cloud Synchronization
In 2026, most systems are linked to cloud services. Even if you deleted the local copy, the cloud version might still exist in a “Recently Deleted” folder.
- Check Google Photos or OneDrive’s web interface.
- Look for a “Bin” or “Trash” category on the left-hand sidebar. Usually, these services keep files for 30 to 60 days.
Advanced Technical Methods: Using Command Line and System Images
If the basic steps fail, we need to move deeper into the system. This level of file recovery photo work requires more precision but can be highly effective for system-level glitches.
Method 1: Using the ATTRIB Command (Hidden Files)
Sometimes, photos aren’t deleted; they are just hidden by malware or system errors.
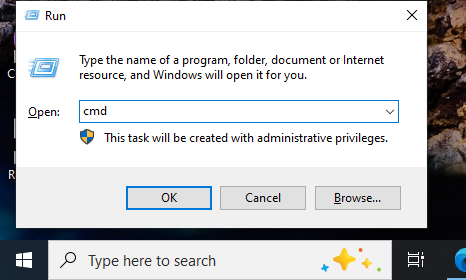
- Step 1: Press Windows + R, type
cmd, and press Enter.
- Step 2: Type the drive letter followed by a colon (e.g.,
E:) and press Enter. - Step 3: Type the following command:
attrib -h -r -s /s /d *.*and hit Enter. This command removes the “hidden,” “read-only,” and “system” attributes from all files in the directory.
Method 2: Restoring from a System Image
If you have Windows Backup enabled, you can revert a folder to a previous state.
- Step 1: Navigate to the folder where the photos were originally stored.
- Step 2: Right-click the folder and select Restore previous versions.
- Step 3: Select a version dated before the deletion and click Restore.
Professional Grade Restoration with PandaOffice Drecov
When manual methods aren’t enough, professional software is the most reliable way to perform a file recovery photo operation. PandaOffice Drecov is a premier tool designed with a high-success algorithm specifically tuned for image reconstruction.
Unlike basic undelete tools, Drecov performs “Deep Scanning.” This means it ignores the corrupted file system index and scans the raw sectors of your disk to find header signatures of image files (like the FF D8 FF hex code for JPEGs).
Warning: Do not install the software on the same drive where the photos were lost. This prevents overwriting the data.
Step-by-Step Guide to Using PandaOffice Drecov
Step 1: Select the Target Location
Upon launching, you will see a list of drives. Select the specific partition or external SD card where your photos were stored. Click the Scan button.

Step 2: Filtering for Photos
Drecov allows you to filter results by file type. On the left sidebar, select Graphics/Images. This narrows the search specifically to file recovery photo formats like RAW, TIFF, and JPEG.

Step 3: Previewing and Verification
One of Drecov’s best features is the real-time preview. Double-click a file to see if it is intact. If the preview looks clear, the file is recoverable.

Step 4: Execution of Recovery
Check the boxes next to the images you want. Click Recover and choose a destination on a different physical drive (e.g., an external USB stick).
Pro Tip: Always keep your software updated to the 2026 version to ensure compatibility with the newest HEIC and ProRAW image formats used by modern smartphones.
To truly master file recovery photo tasks, one must understand that different devices store data differently.
- SD Cards (FAT32/exFAT): These are prone to “File Allocation Table” errors. If your camera says “Card Error,” don’t format it! Use Drecov’s partition recovery mode to read the raw data.
- SSDs (TRIM Command): On modern Solid State Drives, a feature called TRIM often wipes data immediately after deletion to maintain speed. Recovery on SSDs must be performed within minutes of the loss for a high success rate.
The Importance of EXIF Data
A successful file recovery photo isn’t just about the pixels; it’s about the metadata. Professional tools like Drecov aim to preserve the EXIF data, which includes the date taken, camera settings, and GPS coordinates. This is vital for professional photographers who need to keep their archives organized.
Essential Resources and Further Reading
After you have successfully navigated the steps of file recovery photo restoration, you may find yourself needing to solve other specific data issues. Whether you are dealing with browser-specific data or cloud storage conflicts, these expert guides will help you maintain a healthy digital ecosystem:
- For those looking for alternative tools, check out our Recuva 2026 Expert Guide.
- Need to secure media from the web? Learn how to download video from Firefox.
- If your files disappeared due to cloud syncing, see how to disable OneDrive folders properly.
- Lost your web shortcuts? Find the Firefox bookmarks location to restore your data instantly.
Tips for Data Prevention
While knowing how to perform a file recovery photo search is a life-saving skill, prevention is the ultimate strategy.
- The 3-2-1 Rule: Keep 3 copies of your data, on 2 different media types, with 1 copy stored off-site (cloud).
- Verify Transfers: When moving photos from a camera to a computer, use “Copy and Paste” instead of “Cut and Paste.” Only delete the source files once you are sure the destination files open correctly.
- Routine Health Checks: Use S.M.A.R.T. monitoring tools to check the health of your hard drives. If a drive shows “Reallocated Sectors,” it is time to migrate your photos to a new device.
Frequently Asked Questions About File Recovery Photo
1. Why do some recovered photos appear as grey boxes or horizontal lines?
This phenomenon is known as data corruption. When a file recovery photo operation is performed, the software attempts to piece together clusters of data. If a portion of the original data has been overwritten by a new system file or a background update, the “link” in the JPEG chain is broken. Even if the file header is intact, the image data is incomplete. To avoid this, always perform recovery as soon as the loss is detected to prevent the OS from overwriting those sectors.
2. Can I perform a file recovery photo task on a physically damaged SD card?
If the computer or camera cannot detect the SD card at all (no “disk inserted” notification), software-based recovery like PandaOffice Drecov cannot communicate with the device. Physical damage—such as a cracked chip or a snapped connector—requires a Clean Room service. However, if the card is detected but shows as “Unformatted” or “Raw,” you can still use Drecov to bypass the logical errors and extract the images.
3. Does “Quick Format” permanently erase my photos?
No. A Quick Format simply rewrites the partition table and the root directory, making the drive appear empty to the user. The actual photo data remains on the disk sectors. You can still successfully execute a file recovery photo scan on a formatted drive. Warning: Avoid a “Full Format,” as this writes zeros across the entire drive, making recovery virtually impossible for any software.
4. Is it possible to recover photos from a smartphone without a computer?
While there are mobile apps for this, they are often limited by “Sandboxing” (security restrictions in Android and iOS). For a high-success file recovery photo result, it is much more effective to connect the phone to a PC/Mac in MTP or Mass Storage mode and use a desktop-class tool. This allows the software to scan the storage architecture more deeply than a mobile app can.
5. How do I know if a file is “recoverable” before I save it?
Most professional tools, including PandaOffice Drecov, include a Preview Engine. Before you hit the final “Recover” button, you should be able to see a thumbnail or a full-size version of the image. If the preview displays correctly, the metadata and bitstream are intact. If the preview is blank or shows an “Invalid File” error, the data has likely been partially overwritten.
Conclusion
Mastering the art of file recovery photo restoration is a blend of immediate action, technical knowledge, and the right professional tools. Whether you are dealing with a simple accidental deletion or a complex partition error, the digital footprints of your images often remain long after they vanish from your sight. By following a structured approach—starting with basic system checks, moving to command-line diagnostics, and finally utilizing the deep-scanning power of PandaOffice Drecov—you can reclaim your lost data with a high success rate. Remember that in 2026, data integrity depends on proactive habits: stop using the affected drive immediately and always maintain a multi-layered backup strategy to ensure your memories remain permanent.


