


Managing cloud storage effectively is no longer just a “techie” skill; it is a fundamental necessity for anyone working in 2026. Microsoft OneDrive is a powerhouse for productivity, but its seamless integration with Windows often leads to confusion. Many users find themselves asking how to disable a folder from OneDrive because they want to save local disk space, stop certain files from syncing, or simply organize their digital life more effectively.
However, cloud management carries inherent risks. A single misclick can lead to accidental deletions, leaving you scrambling for a way to get your files back. In this comprehensive guide, we will explore everything from basic folder management to professional-grade data recovery using tools like PandaOffice Drecov.
Understanding the OneDrive Sync Logic
Before we dive into the “how-to,” we must understand the “why.” OneDrive functions as a mirror. If you delete a file on your PC while it is syncing, it disappears from the cloud. Conversely, if you want to stop a folder from syncing without losing it forever, you need to use the “Account” settings to uncheck it.
Learning how to disable a folder from OneDrive allows you to keep those files on the cloud (the “master copy”) while removing them from your local hard drive. This is the gold standard for managing small SSDs.
Level 1: The Basic Method – Selective Syncing
This is the most common solution for users who want to keep their cloud storage intact but clean up their local File Explorer.
Step-by-Step Guide to Selective Syncing
- 1. Locate the OneDrive Icon: Look for the small blue or white cloud icon in your Windows Taskbar (system tray) near the clock.
- 2. Open Settings: Right-click the icon and select the gear icon, then click Settings.
- 3. Account Tab: In the sidebar, navigate to the Account section.
- 4. Choose Folders: Click the button labeled Choose folders.
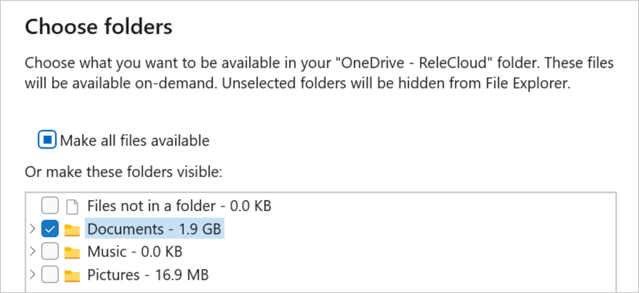
- 5. Uncheck the Folder: A list of all your synced folders will appear. To how to disable a folder from OneDrive, simply uncheck the box next to the folder name.
- 6. Confirm: Click OK.
Important Warning: Once you uncheck a folder, it will disappear from your local computer. It still exists atOneDrive.com, but you won’t see it in your C: drive anymore.
Level 2: Moving Folders Outside the OneDrive Directory
Sometimes, you don’t want a folder to be part of the cloud ecosystem at all. If you have a folder currently living inside your OneDrive path (usually C:\Users\Name\OneDrive), the best way to “disable” it is to move it physically.
- Step 1: Open File Explorer.
- Step 2: Navigate to your OneDrive folder.
- Step 3: Right-click the folder you want to remove and select Cut (or press Ctrl + X).
- Step 4: Navigate to a local directory, such as your “Documents” folder (the one not labeled with a cloud icon) or an external drive.
- Step 5: Paste (Ctrl + V) the folder there.
By moving the folder, OneDrive stops tracking it immediately. This is the cleanest way to ensure specific data remains strictly local.
As you master the art of disabling folders, you might find yourself needing to do the opposite: collaborating. Knowing how to share OneDrive folder permissions is just as vital as knowing how to restrict them.
The Seamless Way to Collaborate
- 1. Right-Click Action: In your File Explorer, right-click the folder you wish to share.
- 2. Select Share: Choose the Share option with the OneDrive logo.
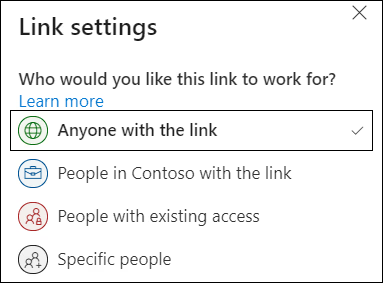
- 3. Set Permissions: You can choose “Anyone with the link” or “Specific people.”
- 4. Copy Link: Once you’ve set the permissions, copy the link and send it via email or Slack.
Interestingly, knowing how to share OneDrive folder links helps you understand the hierarchy of your cloud. If you disable a folder locally but have shared it with a colleague, they can still access it online even if you’ve removed it from your own laptop.
Level 3: Advanced Methods – Using the Registry Editor
For power users and IT administrators who want to permanently how to disable a folder from OneDrive at a system level, the Windows Registry is the final frontier
Caution: Editing the Registry can be risky. Always create a system restore point before proceeding.
- 1. Open Registry Editor: Press Win + R, type
regedit, and hit Enter. - 2. Navigate to the Path: Go to
HKEY_LOCAL_MACHINE\SOFTWARE\Policies\Microsoft\Windows\OneDrive.

- 3. Create a New Value: If it doesn’t exist, right-click, select New > DWORD (32-bit) Value.
- 4. Name it: Name the value
DisableFileSyncNGSC. - 5. Set Value: Double-click it and set the Value Data to
1.
This effectively kills the syncing engine. If you ever need to reverse this, simply change the value back to 0.
The Hidden Danger: Data Loss During Sync Changes
Whether you are learning how to disable a folder from OneDrive or adjusting your sharing settings, things can go wrong. A sync conflict might occur, or you might accidentally delete a folder thinking it was “just a shortcut” when it was actually the original file.
When the Recycle Bin is empty and the OneDrive online “Second-stage recycle bin” fails you, you need a professional-grade recovery solution.
Recovering Lost Files with PandaOffice Drecov
PandaOffice Drecov is a premier data recovery tool designed for the modern era. Whether your files were lost during a botched OneDrive unlinking, a sudden system crash, or a hardware failure, Drecov uses deep-sector scanning technology to find what other tools miss. For a deeper look at its capabilities, you can read this complete guide to PandaOffice Drecov to understand how it handles complex recovery scenarios.
Why Choose PandaOffice Drecov?
- High Success Rate: Supports over 1000+ file formats, ensuring that everything from essential .docx reports to precious .jpg photos and compressed .zip archives can be retrieved.
- Preview Before Recovery: Eliminate the guesswork; the built-in previewer allows you to view your photos and documents before you click “Restore,” saving you time and storage space.
- Cloud-Aware Scanning: Specifically optimized to find fragments of files that were managed by sync engines like OneDrive. This makes it the ideal companion for users transitioning away from cloud storage who need to ensure no local data was lost in the process.
⚠ Warning: Install it on a drive different from the one where your data was lost to prevent overwriting.
Step-by-Step Recovery Process
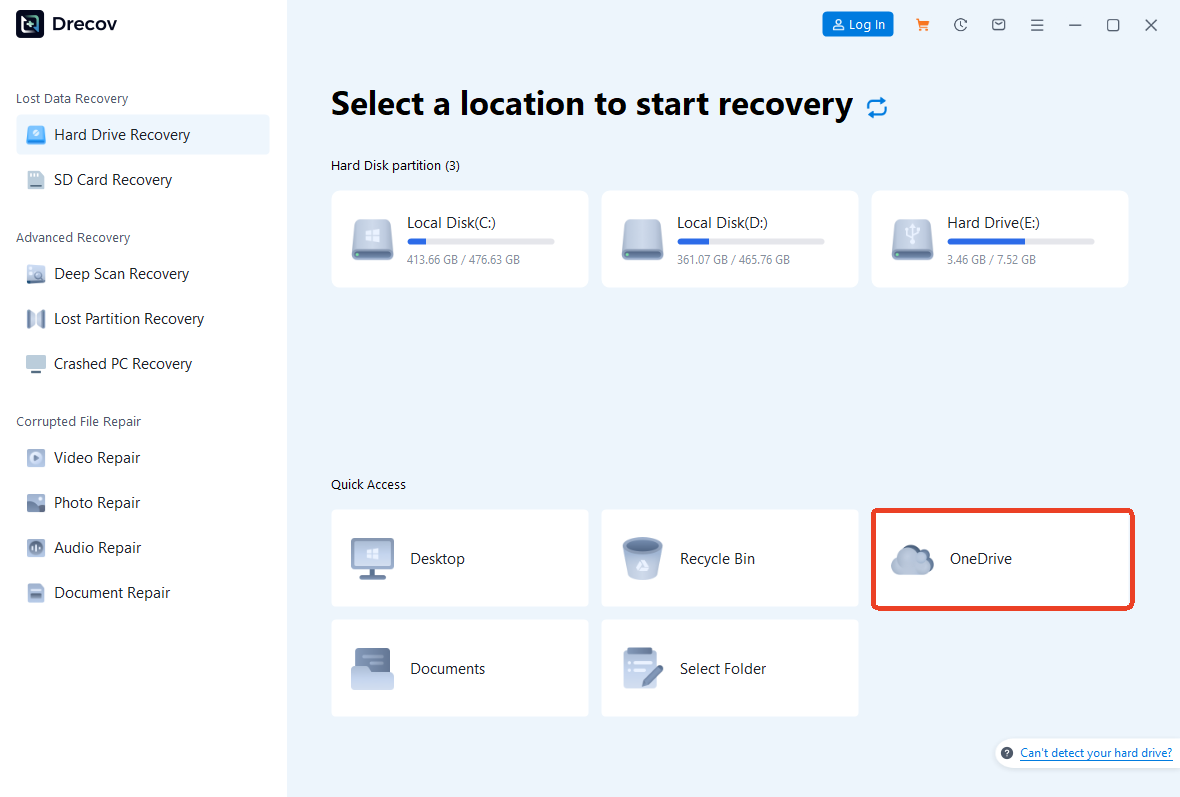
Step 1: Select the Location Launch the software. You will see a list of drives. Select the partition where your OneDrive folder was located (usually the C: drive).
Step 2: Initiate the Deep Scan Click the Scan button. PandaOffice Drecov will begin a two-phase scan. The first is a quick scan for recently deleted items, followed immediately by a Deep Scan that searches the file system’s “blueprints.”
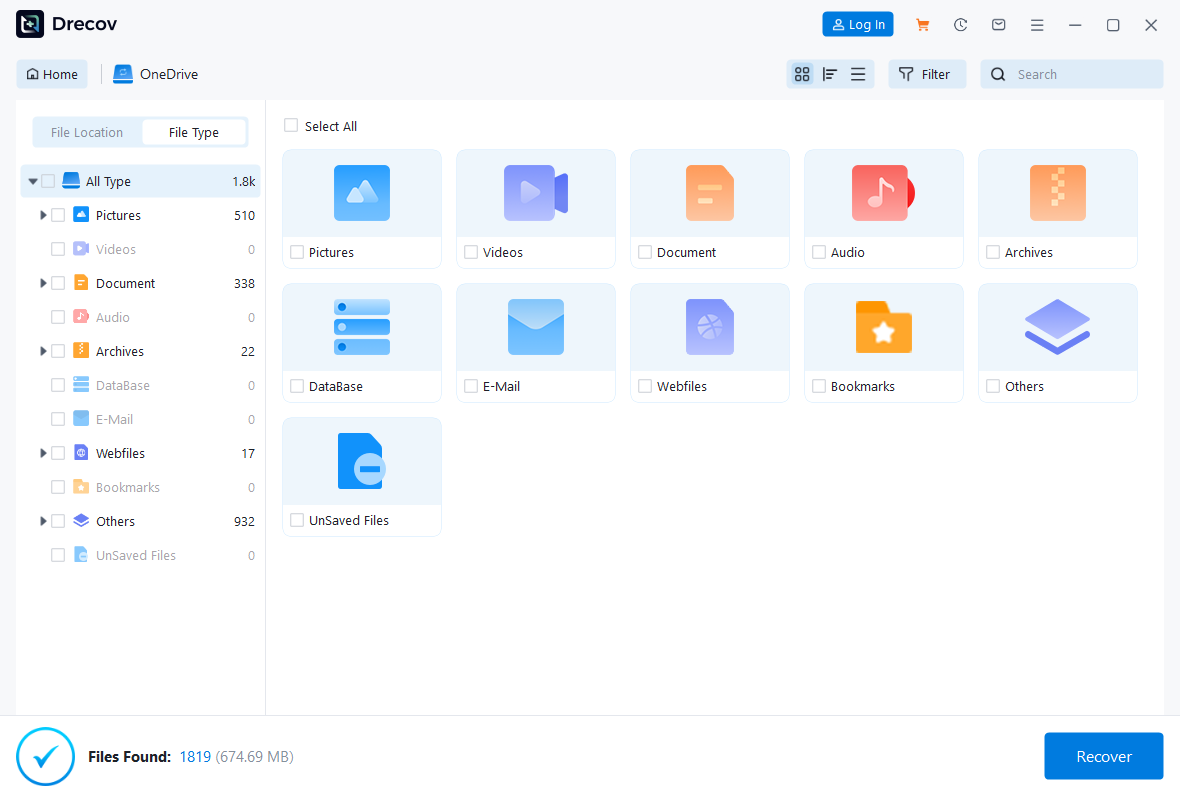
Step 3: Filter and Preview Use the search bar to look for the specific folder name you were trying to disable. You can filter by file type (e.g., “Documents” or “Pictures”). Double-click a file to preview its contents.
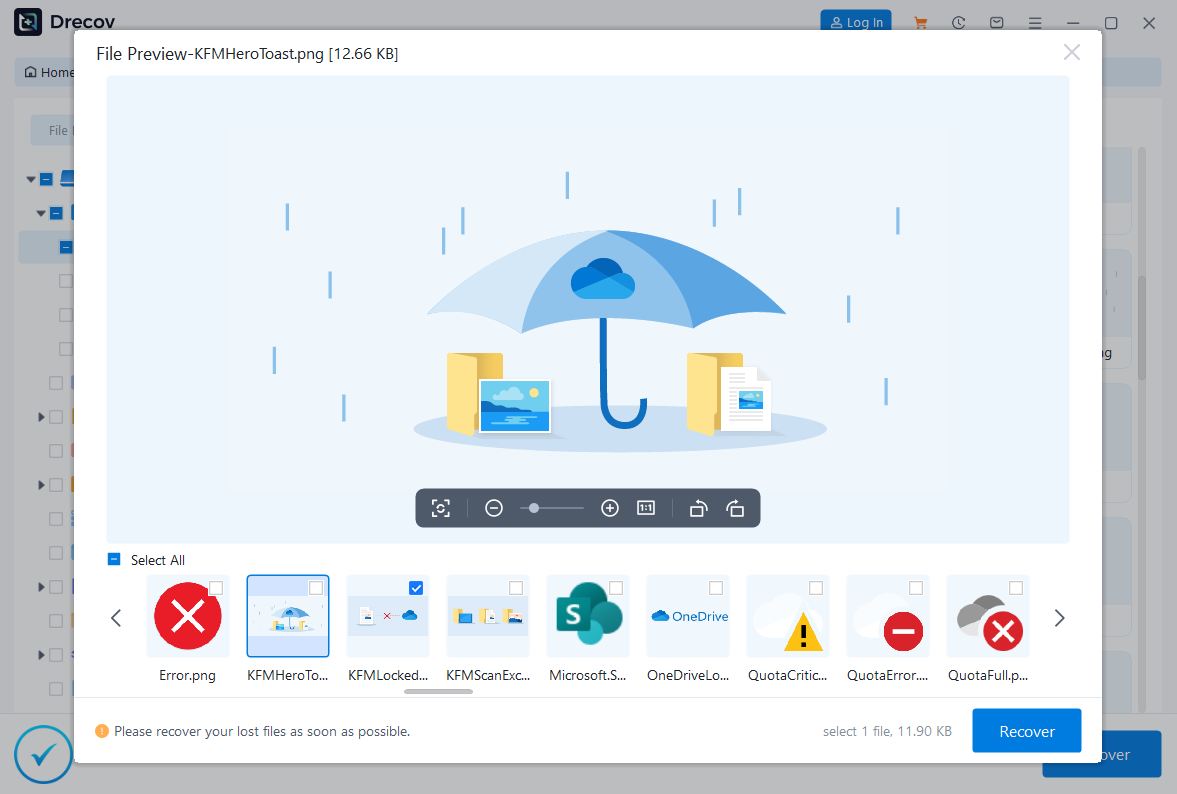
Step 4: Recover and Save Select the checkboxes for the files you need. Click Recover.
Pro-Tips for Data Integrity in 2026
As we navigate through 2026, the complexity of “Hybrid Storage” (Local + Cloud) is increasing. To avoid needing a recovery tool in the first place, follow these expert rules:
- The 3-2-1 Rule: Keep 3 copies of your data, on 2 different media types, with 1 copy off-site (the cloud).
- Pause Syncing: If you are moving large amounts of data or trying to how to disable a folder from OneDrive, pause the syncing engine first. This prevents the “deletion loop” where the cloud thinks you want to delete the file everywhere.
- Check the Online Version First: Before you delete anything locally, log into OneDrive Web to ensure your files are safely backed up there.
Deep Dive: More Data Recovery Insights
If you’ve managed to successfully navigate your OneDrive settings but find that your system is still acting up, or you’ve encountered other software-related data issues, you aren’t alone. Data recovery isn’t just about deleted files; it’s about maintaining a healthy digital environment.
Often, the root of the problem lies in how your operating system interacts with cloud storage. For instance, many users find themselves frustrated when their Save As location is stuck on OneDrive, forcing files into the cloud against their preference. This disruption can lead to misplaced documents or sync errors that complicate recovery efforts.
If you decide that cloud integration is causing more harm than good, you might consider a more permanent change. Learning how to uninstall OneDrive on both Windows and Mac can help stabilize your local file management. However, proceed with caution: it is vital to delete OneDrive the right way to ensure you don’t accidentally wipe your life’s work during the process.
For those using the latest OS, specialized steps may be required to remove OneDrive from Windows 11 to prevent it from reappearing after system updates. If a full removal feels too drastic, a safer middle ground is to simply turn off OneDrive sync. This allows you to keep your files locally accessible without the risks associated with continuous background synchronization.
By taking control of these settings, you reduce the risk of data conflicts and ensure that your recovery tools have a stable foundation to work from.
How to disable a folder from OneDrive FQAs
1. Will disabling a folder from OneDrive delete it from my hard drive?
Answer: Yes, but only if you use the “Choose folders” method. When you uncheck a folder in OneDrive settings, the local copy is removed from your PC to save space, while the master version remains safe in the cloud. If you want to keep the file only on your PC and delete it from the cloud, you must move the folder out of the OneDrive directory (e.g., to a local folder on your C: or D: drive) before the sync process occurs.
Answer: You can manage this via the OneDrive web interface. Log in to OneDrive.com, right-click the folder, and select Share. After sharing, you can go to your local PC settings and use the “Choose folders” feature to uncheck that specific folder. This allows your collaborators to access the data online while it occupies zero bytes of your local disk space.
3. Why does a folder I disabled keep reappearing in my File Explorer?
Answer: This usually happens due to “Folder Redirection” or an active sync conflict. If Windows is told to redirect your “Documents” or “Pictures” folders to OneDrive, the system will recreate them automatically. To fix this, right-click the folder, go to Properties > Location, and click Restore Default. Additionally, ensure you have fully unlinked the folder in the “Account” tab of your OneDrive settings.
4. I accidentally deleted a folder while trying to disable it. Can I get it back?
Answer: First, check the OneDrive Recycle Bin online (accessible via the web version). If the files are not there and you’ve already emptied your local Trash, this is where a professional tool like PandaOffice Drecov becomes essential. Run a “Deep Scan” on your primary drive to locate and reconstruct the file fragments left behind by the OneDrive deletion command.
5. Can I disable OneDrive syncing for just one specific file?
Answer: No, OneDrive’s “Choose folders” feature only works at the folder level. If you need to stop a single file from syncing, you have two options: move that specific file into a folder that is already unchecked/disabled, or move it entirely outside of the OneDrive root directory.
Conclusion
Mastering how to disable a folder from OneDrive is a vital skill for anyone looking to optimize their PC’s performance and maintain privacy. Whether you choose the simple route of Selective Syncing or the more permanent Registry method, always remember that your data is your most valuable asset. Tools like PandaOffice Drecov act as your safety net, ensuring that even when technology fails, your work and memories remain intact.


