


Imagine working for hours on a complex financial model, a critical project tracker, or a massive data sheet. Suddenly, the power blinks, Excel crashes, or you accidentally click “Don’t Save.” That sinking feeling in your stomach is universal. Data loss is disruptive, frustrating, and potentially expensive. Fortunately, experiencing a data mishap does not mean your hard work has vanished forever, as mastering the right techniques for excel document recovery can help you reclaim your lost progress with ease.
With the right knowledge, you can perform an efficient excel document recovery and retrieve your files safely. As search engines like Google evolve, they prioritize content that genuinely helps users solve real-world problems. This comprehensive, step-by-step guide is designed to provide practical, reliable, and deeply technical yet accessible methods to rescue your spreadsheets from almost any data loss disaster.
Understanding the Architecture of Excel Data Loss
Before diving into the step-by-step solutions, we must understand how Microsoft Excel handles files during an excel document recovery scenario. When you open a spreadsheet, Excel creates temporary background copies of your work. Understanding this operational background helps us leverage built-in system tools and third-party solutions effectively.
Data recovery succeeds because deleting a file or closing it without saving rarely wipes the data immediately from your storage drive. Instead, the operating system simply marks that storage space as “available.” Until new data overwrites that specific sector, your original spreadsheet remains completely intact. Therefore, your absolute first rule of recovery is to stop writing new data to the affected drive immediately.
Built-in Microsoft Excel Solutions for Quick Recovery
We will begin with the easiest, most accessible native recovery tools built directly into Microsoft Excel. These methods require no technical expertise and can resolve a significant percentage of everyday accidents.
How to Recover Unsaved Excel Document Using AutoRecover
If Microsoft Excel closes unexpectedly due to a system crash, power outage, or sudden update, you can usually rely on the built-in AutoRecover feature. This utility automatically saves temporary copies of your work at specified intervals.
Step 1: Relaunch Microsoft Excel
Open Microsoft Excel from your desktop or start menu. Upon launching, the application automatically scans for unexpected termination logs. If it finds any, a Document Recovery pane will automatically appear on the left side of your screen.
Step 2: Review the Available AutoRecovered Files
Examine the timestamps and file names listed in the recovery pane. Excel will show you the original file name along with the time it was auto-saved. Click on the version that represents your most recent work.
Step 3: Verify and Save Your File
Once the file opens, carefully inspect the data to ensure the most recent updates are present. Immediately navigate to the top menu, click File, select Save As, choose your desired local folder, and save the file with a clear, distinct name.
⚠️ Warning Prompt: The Document Recovery pane is temporary. If you close this pane without saving the recovered document, Excel will remove the temporary files, making future recovery significantly harder.
Recovering Files via the Temporary Files Directory
If the Document Recovery pane does not appear automatically, you can still execute a manual excel document recovery by searching Excel’s hidden temporary storage vaults. This approach is highly effective if you manually closed a document and mistakenly clicked “Don’t Save.”
Open a completely blank Excel workbook. Click on the File tab located in the top-left corner of the interface to open the backstage view. Ensure you are on the Info tab in the sidebar menu.
Step 2: Access the Version Management System
Locate the large tile labeled Manage Workbook. Click the drop-down arrow next to it, and select Recover Unsaved Workbooks from the options.
Step 3: Browse the Unsaved Files Folder
Excel will automatically launch a standard File Explorer window directed to a specific system directory. The typical precise system path for these files is:
C:\Users\<YourUsername>\AppData\Local\Microsoft\Office\UnsavedFiles
Look for files bearing the .xlsb extension or containing unusual strings of numbers in their names.
Step 4: Open and Re-save the Document
Select the file matching the timeframe of your lost spreadsheet and click Open. A yellow warning bar will appear at the top of the worksheet stating, “This is a recovered file that is temporarily stored on your computer.” Click the Save As button on that bar to secure your file permanently.
Adjusting AutoRecover Settings for Future Protection
To prevent future data emergencies, you should optimize Excel’s background saving behavior.
Step 1: Open Excel Options
Click File and navigate down to Options at the very bottom of the left sidebar.
Step 2: Configure Save Frequencies
In the Excel Options dialogue box, click on the Save category. Locate the setting labeled Save AutoRecover information every X minutes. By default, Excel sets this to 10 minutes. Reduce this value to 1 minute or 2 minutes to minimize potential data gaps during a future crash.
Step 3: Enable the Unsaved Close Protection
Ensure that the checkbox reading Keep the last AutoRecovered version if I close without saving remains checked. Click OK to apply and save these precise system settings.
Resolving File Corruption and Loading Anomalies
Sometimes your file exists on your storage drive, but structural corruption prevents Microsoft Excel from opening it correctly. This section covers how to address severe application errors and file formatting hitches.
Excel File Open but Showing Blank or Error Messages
A particularly frustrating issue occurs when you double-click your spreadsheet, Excel launches successfully, but the entire workspace remains a completely blank grey screen, or throws an explicit read error. This frequently stems from misconfigured Dynamic Data Exchange (DDE) settings or broken file associations.
Method A: Disabling the Ignore DDE Configuration
Step 1: Access the Advanced Options Panel
Open Microsoft Excel to a blank workbook, click the File tab, and select Options from the bottom corner.
Step 2: Locate the General Section
In the Options window, click on the Advanced tab in the left-hand column. Scroll down through the settings until you reach the section explicitly labeled General.
Step 3: Toggle the DDE Setting
Look for the checkbox titled Ignore other applications that use Dynamic Data Exchange (DDE). If this box is checked, it prevents Excel from receiving opening instructions from Windows File Explorer. Uncheck this box immediately. Click OK at the bottom of the window to commit the changes, then restart Excel and attempt to open your spreadsheet again.
Method B: Utilizing the Native Open and Repair Utility
If structural corruption within the file workbook causes the blank screen, Excel’s built-in repair utility can fix the internal layout.
Step 1: Initiate the Open Command
Launch Excel, click File, and select Open. Instead of double-clicking your broken file, single-click it to select it within the browser window.
Step 2: Trigger the Repair Sequence
Look at the bottom right corner of the dialog box next to the open button. Click the small drop-down arrow attached to the Open button. From the resulting drop-down menu, select Open and Repair….
Step 3: Choose Your Action Strategy
A prompt will appear presenting two clear choices: Repair or Extract Data. Click Repair first to restore the formulas, formatting, and structural components of your file. If the system fails to repair the file, repeat this process and select Extract Data to salvage raw numbers and text values from the corrupted workbook structure.
Modifying the Registry to Fix Persistent File Open Failures
If the steps above do not resolve the issue, a deeper system conflict within the Windows Registry might be preventing files from rendering correctly.
⚠️ Warning Prompt: Modifying the Windows Registry incorrectly can cause severe operating system instability. Follow these instructions precisely and do not alter any unrelated keys.
Step 1: Launch the Registry Editor
Press the Windows Key + R shortcut on your keyboard to open the Run dialogue box. Type regedit into the text field and press Enter. Grant administrative permissions if prompted by Windows Account Control.
Use the folder hierarchy tree on the left panel to navigate precisely to the following directory path:
HKEY_CURRENT_USER\Software\Microsoft\Office\16.0\Excel\Options
(Note: The version number “16.0” corresponds to Office 2016, 2019, 2021, and Microsoft 365. If you use an older version, this number may vary, such as 15.0 for Office 2013).
Step 3: Clear Damaged Configuration Keys
Look for a binary value named FirstRun or Options in the right-hand pane that might be generating structural loading loops. Right-click the problem key, choose Delete, and confirm the action. Close the Registry Editor and restart your computer. Windows will cleanly recreate these essential configuration files upon the next launch, resolving deep-seated operational conflicts.
Advanced Data Extraction via Cloud and System Shadow Copies
When local document adjustments do not yield results, executing an advanced excel document recovery allows us to look to automated system backups and cloud architecture to find previous, uncorrupted versions of your spreadsheet files.
Recovering Data via OneDrive Version History
If you save your spreadsheets to OneDrive or work inside a Microsoft 365 cloud ecosystem, version history provides an exceptionally secure safety net against accidental saves or formatting errors.
Step 1: Access Your Cloud Storage
Open a web browser and log into your official Microsoft OneDrive Account. Navigate through your cloud folders to find the specific location of your lost or damaged Excel document.
Step 2: Open Version History Options
Right-click on the target spreadsheet file. From the contextual menu that appears, select Version History. A side panel will appear detailing every instance of that document saved over the past several weeks.
Step 3: Restore the Target Version
Review the modification dates and the names of the users who changed the file. Once you identify the version created right before the data loss occurred, click the three dots next to that version and select Restore. Alternatively, you can click Download to save that specific version locally without altering your current cloud file.
Utilizing Windows Volume Shadow Copies
The Windows operating system includes a data protection feature called System Restore, which periodically saves snapshot records known as Shadow Copies of your documents folder.
Step 1: Locate the Parent Directory
Open File Explorer and go to the folder where your lost Excel document was originally saved.
Step 2: View Previous Structural States
Right-click on the folder itself (or the specific Excel file if it is still visible) and select Properties from the bottom of the drop-down menu. In the properties window, click on the Previous Versions tab.
Step 3: Extract the Historical Document
Windows will display a chronological list of older folder states. Select a version timestamped prior to your file deletion or corruption event. Click Open to browse its contents, verify the state of your document, and copy the healthy file to a secure, separate directory.
Deep Data Carving with Professional Recovery Software
When files are permanently deleted, emptied from the Recycle Bin, or lost due to drive formatting, built-in system tools cannot perform a successful excel document recovery. At this stage, file allocation pointers are gone, and you need professional scanning tools to read raw data directly from your storage sectors.
Introducing PandaOffice Drecov Data Recovery Software
For complex data loss scenarios, PandaOffice Drecov data recovery software provides an excellent, highly reliable solution. This application features advanced scanning algorithms designed to search deep within storage structures to rebuild fragmented .xlsx and .xls files. It handles data recovery from local hard drives, external SSDs, USB flash drives, and camera memory cards seamlessly.
⚠ Warning: Never install data recovery software onto the exact same drive partition where the lost Excel documents were stored. Doing so can overwrite the deleted file sectors, destroying your data permanently. If you lost files on drive C, install the program onto drive D or an external storage drive.
Follow these steps carefully to maximize your chances of a successful file recovery.
Step 1: Select the Target Drive and Scan Mode
Launch the application. The home screen displays an organized overview of all connected drives and storage partitions. Select the drive partition where your lost spreadsheet originally resided. Click the Scan button to start a comprehensive search of the drive.

Step 2: Monitor and Filter the Scanning Process
The software will run a quick scan followed automatically by a deep sector-by-sector scan. You do not need to wait for the entire drive scan to complete; you can browse found files in real time. Use the search bar or filter settings to look specifically for file extensions like .xlsx or .xls to quickly locate your documents.
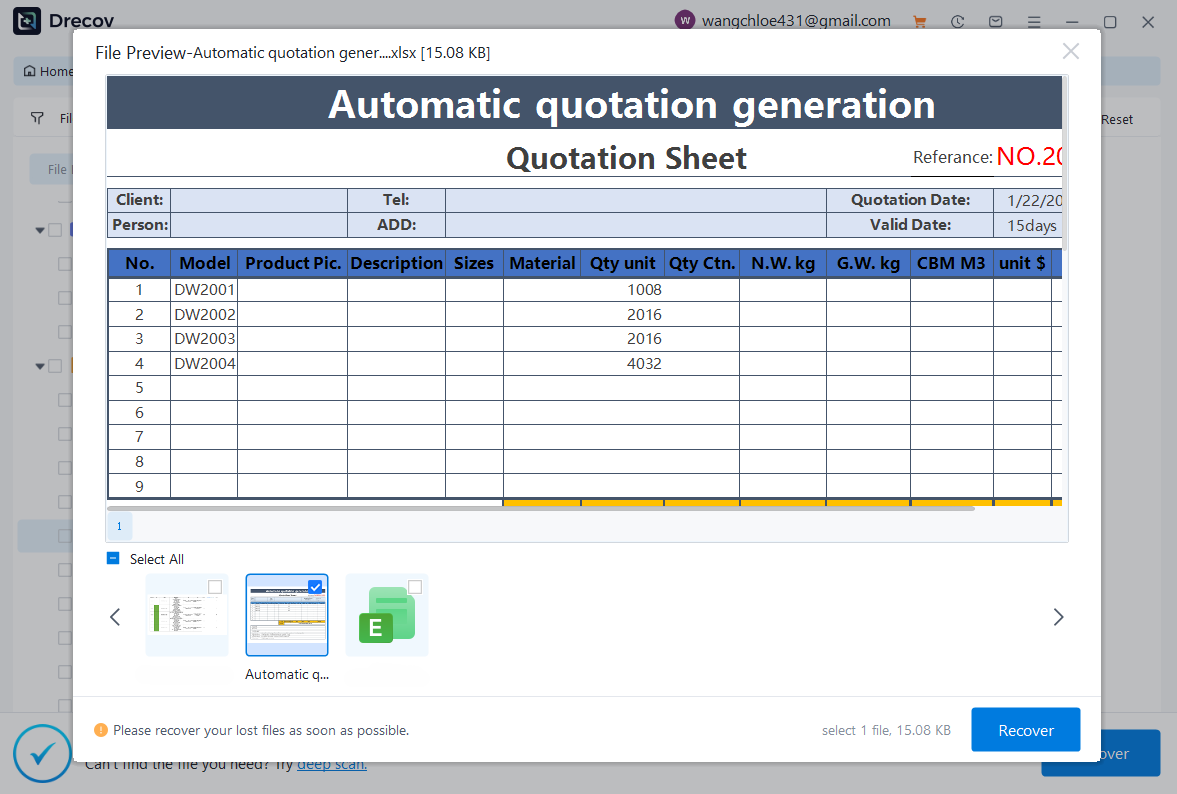
Step 3: Preview and Recover Your Excel Files
Double-click on a discovered Excel document within the results list to view its contents in the built-in preview pane. This helps you verify that the file is healthy and readable before recovery. Check the boxes next to the files you want to save, and click the Recover button in the bottom right corner. Choose a safe storage path on a completely separate drive to complete the process.
- If you encountered data loss on a USB drive or flash memory stick, you can learn how to fix file system compatibility issues by reviewing our guide on how to format USB to FAT32 on large drives.
- Additionally, if you lost spreadsheets that were stored on external drives or flash storage media, you can find tailored, step-by-step recovery techniques in our comprehensive tutorial on recovering deleted files from a USB flash drive.
- If browser crashes or system resets have affected your web workspace alongside your documents, you can restore your productivity setup by following our guide on how to get your Google Chrome bookmarks back.
Comprehensive Troubleshooting and Diagnostic Reference
To help you choose the right recovery method quickly, use this reference table to match your specific symptoms with the best solution:
| Issue Symptom | Root Cause | Recommended Recovery Tool |
| Excel crashed while actively writing data | Temporary memory interruption | AutoRecover Pane / Manual AppData Search |
| Document closed by accidentally clicking “Don’t Save” | User oversight | Manage Workbook -> Unsaved Files |
| Workbook opens but displays a totally blank workspace | DDE communication block or corrupted system files | Disable DDE / Advanced Open & Repair |
| Document deleted and the Recycle Bin emptied | File allocation record removed | PandaOffice Drecov data recovery software |
| File corrupted after a malware infection or bad save | Sector corruption or bad file header | OneDrive Version History / Shadow Copies |
Proactive Data Protection Strategies
While knowing how to perform an excel document recovery is incredibly helpful, preventing data loss in the first place is always the best approach. Implement these expert practices to secure your data moving forward:
- Implement the 3-2-1 Backup Strategy: Keep three copies of your data: two stored on different physical media types (such as an internal hard drive and an external backup drive) and one stored offsite in a secure cloud environment.
- Enable Cloud Autosave: If you use Microsoft 365, save your documents directly to OneDrive or SharePoint. This enables real-time autosaving, capturing every keystroke and protecting you from sudden power drops.
- Maintain Storage Drive Health: Regularly check your hard drive’s health using SMART diagnostic tools. If a drive shows signs of failure, replace it immediately to prevent catastrophic data loss.
- Use Reliable Power Equipment: Connect your critical workstation computers to an Uninterruptible Power Supply (UPS). A UPS gives you valuable extra minutes during a power outage to save your work and shut down your system safely.
Conclusion
Successfully recovering your files through an intensive excel document recovery process is often just the first step in resolving broader storage or drive issues. If your data loss was caused by a corrupted storage drive or an unreadable external device, you may need to reformat or optimize your media to ensure it is stable for future use.
By combining proactive file management habits with reliable recovery tools like Microsoft’s built-in utilities and specialized applications like PandaOffice Drecov, you can protect your valuable spreadsheets against unexpected data loss disasters.


