


Imagine this scenario: you have spent weeks meticulously crafting a project, or perhaps you have years of family photos stored on a single drive. Then, in a split second, a misplaced click or a sudden system crash wipes everything out. The panic that follows is universal. However, modern technology offers a beacon of hope in the form of a reliable file recovery tool. This guide serves as your comprehensive roadmap to navigating the world of data restoration. We will explore everything from basic built-in features to professional software solutions like PandaOffice Drecov, ensuring you possess the knowledge to retrieve your precious digital assets.
The Invisible Safety Net: How Data Storage Works
Before we dive into specific methods, we must understand why a file recovery tool can even function in the first place. When you delete a file on a Windows or Mac system, the computer does not immediately move a physical “eraser” over the data. Instead, it simply alters the file’s address in the file system’s index.
Think of your hard drive like a massive library. When you delete a file, the librarian (the operating system) simply rips the entry out of the card catalog. The book (your data) still sits on the shelf. The space is merely marked as “available” for new books. Consequently, as long as you do not write new data over that specific “shelf” space, a high-quality file recovery tool can find the book and put its entry back in the catalog.
Critical First Steps: Maximizing Your Success Rate
The moment you realize data is missing, your actions determine the likelihood of a successful recovery. If you continue using the device, you risk overwriting the very sectors where your lost data resides.
- Stop all write operations immediately. Do not download new files, install software on the affected drive, or even browse the web extensively, as browser caches create temporary files.
- Disconnect the drive if possible. If you lost data on a USB flash drive or SD card, unplug it. This prevents the operating system from performing background maintenance tasks that might overwrite your files.
- Prepare a secondary storage device. Never try to recover files back onto the same drive they were lost from. You will need a separate USB drive or external hard disk to save the rescued data.
Level 1: Utilizing Built-in System Features
Oftentimes, you do not need an external file recovery tool for simple mistakes. Both Windows and macOS include basic safety nets that can save you time and stress.
The Power of the Recycle Bin and Undo
If you simply hit the “Delete” key, the file usually moves to a temporary holding area.
- Step 1: Open the Recycle Bin on your desktop.

- Step 2: Locate your file and right-click it.
- Step 3: Select Restore. The file will return to its original folder.
Bonus Tip: If you just deleted a file a second ago, press Ctrl + Z on your keyboard to instantly undo the action.
Windows File History: The Native Backup Solution
For those who have enabled internal backups, Windows File History acts as a built-in file recovery tool.
- Step 1: Type “Restore your files with File History” in the Windows search bar.
- Step 2: Browse through the folders to find the version of the file you need.
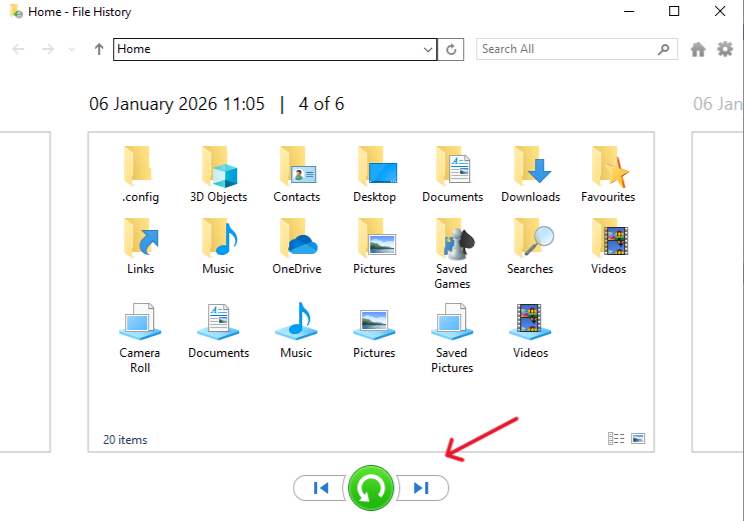
- Step 3: Click the green Restore button to bring it back.
Level 2: Cloud Storage and Sync Recovery
In our interconnected era, much of our data lives in the cloud. Services like OneDrive, Google Drive, and Dropbox have their own version of a file recovery tool built into their web interfaces.
OneDrive Version History and Recycle Bin
Microsoft OneDrive is particularly robust. Even if you delete a file locally, it often persists in the cloud bin for 30 days.
- Step 1: Log in to OneDrive.com.
- Step 2: Select Recycle Bin from the left-hand menu.
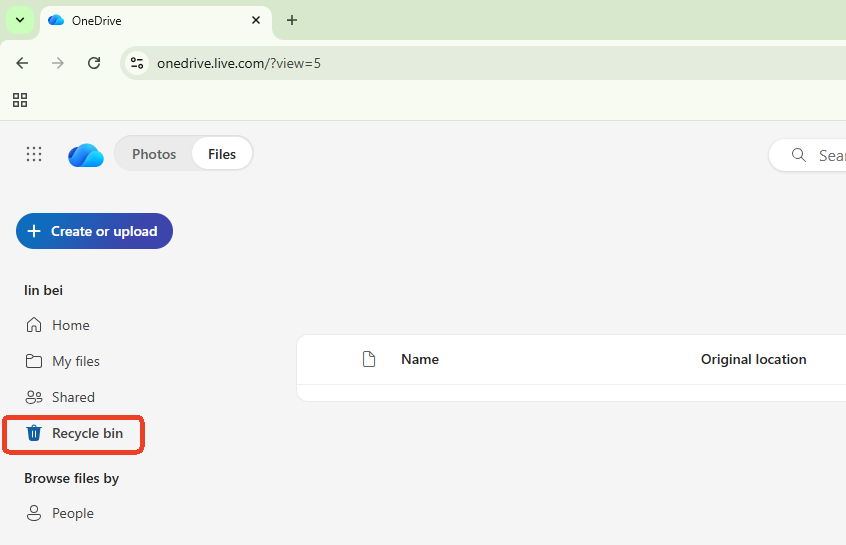
- Step 3: Choose your files and click Restore.
Furthermore, if a file was corrupted rather than deleted, you can use the “Version History” feature. Right-click the file in your OneDrive folder and select Version History to see older, uncorrupted versions. Managing your cloud storage is essential for data safety. For instance, if you find your sync folders are becoming too cluttered, you might need to learn how to disable a folder from OneDrive to recover lost files more efficiently.
Level 3: Professional Restoration with PandaOffice Drecov
When the Recycle Bin is empty and cloud backups are non-existent, you must turn to a specialized file recovery tool. This is where PandaOffice Drecov shines. It is a professional-grade utility designed to handle complex scenarios like formatted drives, partition loss, and virus attacks.
PandaOffice Drecov supports hundreds of file formats, including images (JPG, PNG, RAW), videos (MP4, MOV), documents (DOCX, PDF, XLSX), and even compressed archives. One of its standout features is the ability to fix corrupted or “unopenable” files during the recovery process, making it an incredibly versatile file recovery tool.
⚠ Warning: Do not install the software on the drive where the data was lost. If you lost files on drive C:, install Drecov on drive D: or an external USB. This prevents overwriting your lost data during the installation process.
How to Use PandaOffice Drecov: A Step-by-Step Guide
Step 1: Selecting the Target Location
Launch the program. You will see a clean interface listing all connected drives, including internal HDDs, SSDs, and external devices like SD cards. Select the specific partition or folder where your files were last seen.

Step 2: Initiating the Scan
Click the Scan button. PandaOffice Drecov will perform a two-stage process. First, it conducts a Quick Scan to find recently deleted files. Subsequently, it automatically transitions into a Deep Scan, which searches the raw sectors of your drive for older or fragmented data.

Step 3: Filtering and Previewing
As the scan progresses, you can use the sidebar to filter results by file type (e.g., Photos, Video, Documents).

Key Operation Point: Use the Preview feature. Double-click an image or document to see if it is intact. If you can see the preview, the file recovery tool can successfully restore it. This saves you from wasting time on corrupted fragments.
Step 4: Executing the Recovery
Select the checkboxes next to the files you wish to save and click the Recover button.
Warning Prompt: A dialogue box will ask for a destination. Choose a different drive than the source. For example, if you are recovering from a USB stick, save the files to your computer’s Documents folder.
Level 4: Advanced Command-Line Methods
If you prefer a more “hands-on” approach without a graphical interface, Windows provides the Command Prompt (CMD). While this is not a traditional file recovery tool, specific commands can occasionally reveal “lost” files that are actually just hidden by system attributes or minor file system errors.
Using the ATTRIB Command
Sometimes, a virus will hide your files on a USB drive rather than deleting them.
- Step 1: Plug in your USB drive and note the drive letter (e.g., G:).
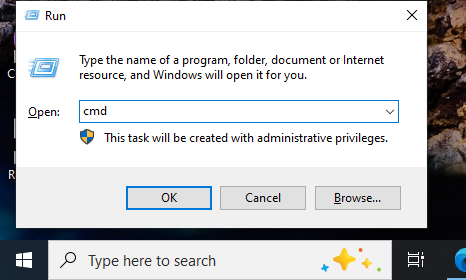
- Step 2: Press Win + R, type
cmd, and press Enter.
- Step 3: Type
G:(replace with your letter) and press Enter. - Step 4: Type the following command:
attrib -h -r -s /s /d *.*and press Enter.
This command removes the Hidden (-h), Read-only (-r), and System (-s) attributes from all files and directories on the drive. If your files were merely masked, they will reappear in the file explorer immediately.
The CHKDSK Utility
If a drive is inaccessible or showing as “RAW,” you can use the Check Disk utility before employing a third-party file recovery tool.
- Step 1: Open CMD as an administrator.
- Step 2: Type
chkdsk X: /f(where X is your drive letter). - Step 3: The system will attempt to repair structural errors in the file system. In some cases, this makes the files accessible again without further software intervention.
Level 5: System-Wide Restoration and Browser Data
Sometimes, data loss isn’t about a single file but a catastrophic system update or a bad driver. In these instances, your primary file recovery tool is the System Restore point.
How to Perform a System Restore
- Step 1: In the Windows search bar, type “Create a restore point” and click the result.
- Step 2: Click the System Restore button.
- Step 3: Select a date before the issues began and follow the prompts.
Learning how to restore computer to an earlier date on Windows is a vital skill for every PC owner, as it can undo system-wide corruption that individual file tools might miss.
Additionally, we often lose data that isn’t on our hard drive but within our browser. If you frequently work with online media, you know how frustrating it is when a video you need for a project disappears from a website. Using a browser-specific file recovery tool or downloader can prevent this. You might find our 2026 guide on how to download video from browser Firefox particularly helpful for preserving online content before it gets deleted.
Technical Deep Dive: The Difference Between SSD and HDD Recovery
When choosing a file recovery tool, the type of hardware you own matters immensely. Traditional Hard Disk Drives (HDDs) are generally easier to recover from because the data remains on the magnetic platters until it is physically overwritten.
Conversely, Solid State Drives (SSDs) utilize a technology called TRIM. When you delete a file on an SSD with TRIM enabled, the drive proactively wipes the cells to maintain high write speeds. Consequently, a file recovery tool often has a much shorter window of opportunity to rescue data from an SSD. If you lose data on an SSD, you must turn off the computer immediately to prevent the TRIM command from executing.
Why Choose PandaOffice Drecov Over Free Alternatives?
While there are many free options in the file recovery tool market, they often come with significant limitations. Many “free” tools limit the amount of data you can recover (e.g., 500MB) or fail to support modern file systems like APFS or ExFAT.
PandaOffice Drecov provides several advantages:
- Local Recovery: It does not upload your files to a server, ensuring your private photos and documents stay on your machine.
- Deep Sector Scanning: It can reconstruct files even if the partition table is completely destroyed.
- Raw Recovery: It can identify files based on their unique “headers” even when the filename and folder structure are gone.
- User-Friendly: You do not need to be an IT professional to use it. The step-by-step wizard guides you through the process effortlessly.
Common Scenarios for File Recovery
- Shift + Delete: When you bypass the Recycle Bin, the data is still there, but you need a file recovery tool like Drecov to find it.
- Formatted SD Cards: Cameras often “quick format” cards. This only wipes the index, meaning your photos are almost always recoverable.
- Emptying the Trash: If you emptied the bin by mistake, do not panic. The data is still in the “available” sectors.
- Virus/Ransomware: While ransomware encrypts files, some viruses simply delete them. A file recovery tool can often find the original, uninfected copies in the background sectors.
Conclusion
While a file recovery tool like PandaOffice Drecov is a powerful ally, the best strategy is always prevention. Data recovery is a reactive measure; backups are proactive.
Adhere to the 3-2-1 Backup Rule:
- 3 total copies of your data.
- 2 different local media types (e.g., an internal SSD and an external HDD).
- 1 copy off-site (e.g., cloud storage or a drive kept at a friend’s house).
By combining a robust backup strategy with the knowledge of how to use a professional file recovery tool, you ensure that your digital life remains secure. Whether you are dealing with a simple accidental deletion or a complex drive failure, the tools and techniques outlined in this guide provide the best possible chance of getting your files back.
Stay calm, stop writing to your drive, and let your chosen file recovery tool do the heavy lifting. Technology is on your side, and in most cases, your “lost” files are just waiting to be found. For more official information on storage health, you can visit the Official Microsoft Support Page or the SD Association for card maintenance tips.


