


Good morning. Hopefully everyone is fairing well during these crazy times. SO, trying to insert some video files into a PP presentation. Running PP 2010. I have the video files formatted as either wmv or avi. When aI attempt to insert the files, I get an error message that a CODEC is not available. Thank you and stay safe!—from Reddit
Understanding Why PowerPoint Cannot Insert Videos
Why This Issue Occurs
Many users experience the error PowerPoint cannot insert a video from the selected file when trying to embed media into a presentation. This can prevent smooth workflow, especially if your slides rely heavily on video content. This issue usually appears as a notification stating the file cannot be added, even though the video exists and can be played outside PowerPoint.
Common scenarios include unsupported video formats, file corruption, or compatibility issues between PowerPoint versions. Occasionally, the problem arises from system-level conflicts, such as insufficient memory or software conflicts with codecs. Understanding the reason behind this problem is the first step in learning how to fix the PPT and prevent data loss.
⚠️Warning: Attempting multiple inserts without addressing the root cause can corrupt your PowerPoint file.
Common Causes of Video Insertion Problems
File Format and Codec Issues
PowerPoint supports limited video formats such as MP4 and WMV. Attempting to insert AVI, MOV, or other unsupported formats often triggers PowerPoint cannot insert a video from the selected file errors. Codecs missing on the system may also prevent PowerPoint from recognizing the file.
Corrupted Video or Presentation File
A corrupted video file or a damaged PowerPoint file can block insertion. If the PowerPoint presentation has structural issues, users may need to fix the PPT or even PowerPoint recover previous version to restore normal functionality.
Software Compatibility Problems
Older PowerPoint versions may not support modern video codecs. For example, attempting to embed HEVC/H.265 videos into PowerPoint 2013 may fail. Updating PowerPoint or converting the video format can resolve these issues.
System-Level Conflicts
Running multiple heavy applications or having limited RAM can interfere with media insertion. Additionally, network drives, OneDrive syncing, or restricted folders may prevent PowerPoint from accessing video files correctly.
Methods to Fix PowerPoint Cannot Insert a Video
Method 1: Convert the Video to a Compatible Format
One of the simplest ways to resolve PowerPoint cannot insert a video from the selected file errors is to convert the video into a compatible format.
Steps to Convert the Video
- Identify the original video format.
- Use a video converter to convert it to MP4 (H.264 codec).
- Save the converted file to your local drive.
- Open PowerPoint and attempt to insert the converted video.
- Test playback to ensure the video works correctly.
Test Environment:
Windows 10, PowerPoint 2019, 16GB RAM.
This method resolves most format and codec-related issues.
Method 2: Move the Video File to a Local Folder
Network drives or cloud folders may cause access problems. Moving the file locally can help fix the PPT media insertion issues.
Steps to Move the File
- Copy the video to Desktop or Documents.
- Open your PowerPoint presentation.
- Click “Insert” > “Video” > “This Device.”
- Select the file from the local folder.
- Verify that the video inserts and plays correctly.
Test Environment:
Windows 11, local SSD storage.
This method is effective when the issue is related to file path or permissions.
⚠️Warning: Avoid inserting large videos directly from removable drives during editing sessions.
Method 3: Repair the PowerPoint File
If the presentation itself is corrupted, you may need to fix the PPT before adding videos.
Steps to Repair PowerPoint
- Open PowerPoint.
- Click “File” > “Open.”
- Select the presentation file.
- Click the arrow next to “Open” and choose “Open and Repair.”
- Wait for the repair to complete.
- Save the repaired file with a new name.
- Attempt to insert the video again.
Test Environment:
Windows 10, PowerPoint 2021, SSD drive.
This approach is useful when insertion errors are caused by a corrupted presentation rather than the video itself.
Method 4: Update PowerPoint and Codecs
Outdated software or missing codecs often trigger PowerPoint cannot insert a video from the selected file.
Steps to Update Software
- Open PowerPoint and go to “File” > “Account” > “Update Options.”
- Select “Update Now.”
- Ensure Windows is fully updated via “Settings” > “Update & Security.”
- Install any required media codecs or Windows Media Feature Packs.
- Restart PowerPoint and try video insertion again.
Test Environment:
Windows 11 Pro, Office 365.
Keeping software updated resolves compatibility issues and ensures smoother video embedding.
Method 5: Use Pandaoffice Drecov to Recover PowerPoint File
If the presentation is severely corrupted and video insertion fails consistently, Pandaoffice Drecov can recover corrupted PowerPoint file and restore the file to a functional state.
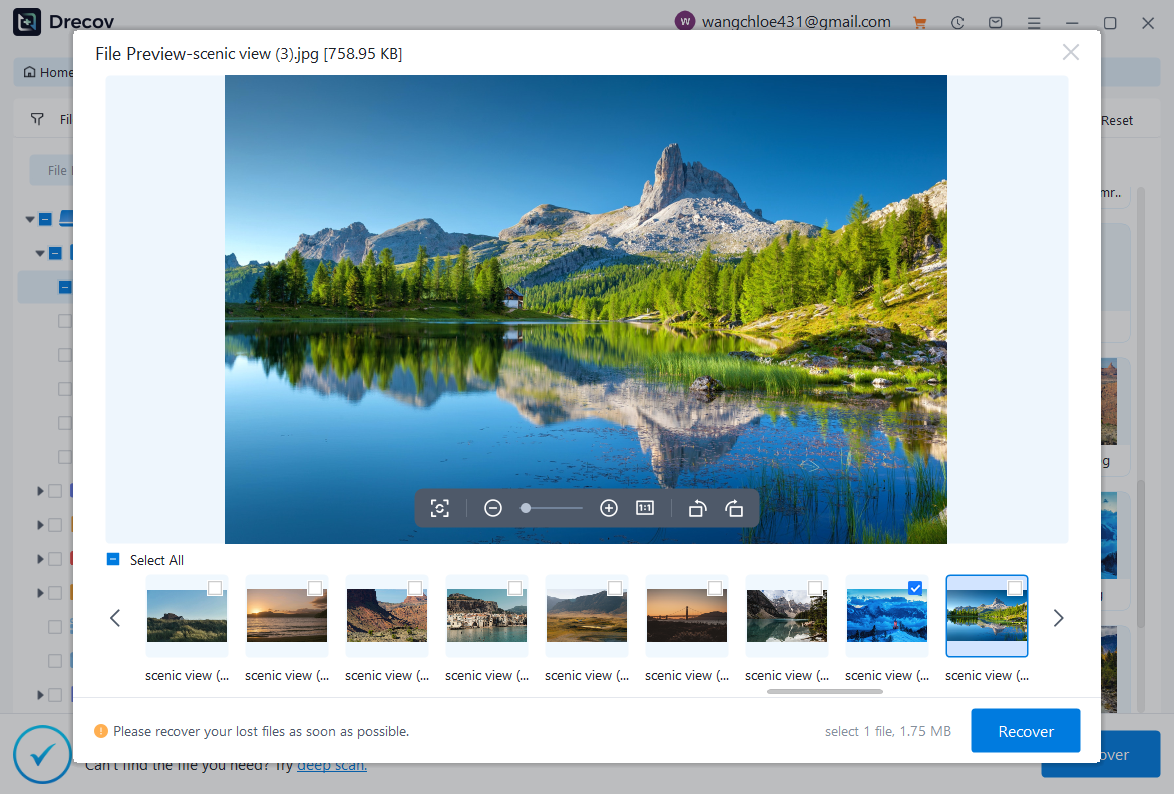
Download DrecovSteps Using Drecov
- Install and open Pandaoffice Drecov.
- Select the drive where the presentation is stored.
- Click “Scan” to search for recoverable PowerPoint files.
- Preview and select the corrupted file.
- Click “Recover” and save to a safe location.
- Open the recovered presentation and insert the video.
Test Environment:
Windows 11, 16GB RAM, SSD + external storage.


Why Choose PandaOffice Drecov?
When it comes to reliable file data recovery, PandaOffice Drecov offers a balanced combination of performance, ease of use, and broad compatibility. Whether you’ve lost important business files or personal memories, it provides an efficient way to restore data from various loss scenarios, including system crashes, accidental deletion, and formatted drives.
For users looking for advanced Photo Data Recovery Software, PandaOffice Drecov supports a wide range of image formats and storage devices. It can recover high-quality photos from SD cards, cameras, and internal drives while preserving original resolution and file structure. This makes it especially useful for photographers and everyday users alike.
If you are dealing with storage device issues, its external hard drive recovery capability ensures that data can be retrieved from USB drives, HDDs, and SSDs with minimal effort. The software performs deep scans to locate hidden or lost files, even in complex situations like partition loss.
In addition, PandaOffice Drecov excels in Document Recovery, helping users restore essential files such as Word, Excel, and PDFs. It also supports powerpoint recovery, allowing you to retrieve unsaved or deleted presentation files quickly—ideal for professionals working under tight deadlines.
This method is ideal when normal repair methods fail and you need to PowerPoint recover previous version functionality.
Method 6: Check File Path and Naming Conventions
PowerPoint may reject video files with long file paths or special characters.
Steps to Adjust File Path
- Shorten the file name to under 50 characters.
- Remove special characters (!, @, #, %, &, etc.).
- Place the video in a simple folder (e.g., C:\Videos).
- Reinsert the video in PowerPoint.
Test Environment:
Windows 10, PowerPoint 2019.
This resolves issues caused by excessive file path lengths or invalid characters.
Method 7: Disable Hardware Graphics Acceleration
Graphics settings can sometimes prevent videos from inserting.
Steps to Disable Hardware Acceleration
- Open PowerPoint.
- Go to “File” > “Options” > “Advanced.”
- Scroll to “Display.”
- Check “Disable hardware graphics acceleration.”
- Restart PowerPoint.
- Attempt video insertion again.
Test Environment:
Windows 11, integrated graphics system.
Disabling graphics acceleration can improve compatibility for multimedia elements.
Method 8: Compress the Video File
Large video files may trigger PowerPoint cannot insert a video from the selected file errors due to memory or resource limitations. Compressing the video can resolve this issue.
Steps to Compress the Video
- Open the video in a trusted video editor or converter.
- Reduce resolution (e.g., 1080p → 720p) and optimize the codec to H.264.
- Save the compressed version to your local drive.
- Insert the compressed video into PowerPoint.
- Test playback to ensure quality is acceptable.
Test Environment:
Windows 10, PowerPoint 2021, 8GB RAM.
This method works especially well for presentations with multiple videos or large HD files.
Method 9: Repair Office Installation
Corrupted Office components can prevent media insertion. Repairing Office can help fix the PPT.
Steps to Repair Office
- Open Control Panel.
- Go to “Programs and Features.”
- Select Microsoft Office and click “Change.”
- Choose “Quick Repair” or “Online Repair.”
- Follow the prompts and restart your system.
- Attempt video insertion in PowerPoint.
Test Environment:
Windows 11, Office 365.
Repairing Office ensures all necessary components are intact for video support.
⚠️Warning: Online Repair may reset some settings and require reconfiguration.
Method 10: Convert the Presentation File Format
Occasionally, the PowerPoint file format itself causes errors. Saving as a different format may resolve PowerPoint cannot insert a video from the selected file.
Steps to Convert File Format
- Open the presentation.
- Click “File” > “Save As.”
- Select a different format (e.g., .pptx → .ppt or .odp).
- Save the file to a local folder.
- Reopen the new file and attempt video insertion.
Test Environment:
Windows 10, PowerPoint 2019, local SSD.
This approach is effective for older presentations or files transferred between versions.
Method 11: Check Permissions and File Access
Video files stored in restricted folders or synchronized drives (OneDrive, SharePoint) may fail to insert.
Steps to Verify Permissions
- Ensure the video file is on a local drive.
- Right-click the file and select “Properties.”
- Confirm that the file is not read-only.
- Check security permissions to ensure full control.
- Reinsert the video into PowerPoint.
Test Environment:
Windows 11, local NTFS drive.
This method addresses access issues preventing PowerPoint from reading the file.
Method 12: Update Graphics Drivers
Outdated graphics drivers can interfere with multimedia insertion.
Steps to Update Drivers
- Press “Windows + X” and select “Device Manager.”
- Expand “Display Adapters.”
- Right-click your GPU and select “Update driver.”
- Choose “Search automatically for drivers.”
- Restart the system and open PowerPoint.
- Insert the video again.
Test Environment:
Windows 10, integrated GPU + discrete GPU.
This method improves multimedia compatibility across presentations.
Troubleshooting Tips for Persistent Video Issues
General Troubleshooting Recommendations
- Ensure videos play outside PowerPoint to rule out corruption.
- Avoid very long file paths or special characters.
- Close other applications to free memory.
- Save presentations locally before inserting videos.
- If multiple videos fail, test inserting a small sample video to isolate the issue.
By following these practices, users can prevent PowerPoint cannot insert a video from the selected file errors and ensure smooth multimedia integration.
FAQ: PowerPoint Video Insertion Problems
Why does PowerPoint refuse to insert my video file?
Common causes include unsupported formats, corrupted files, long file paths, or missing codecs.
How can I fix the PPT if video insertion fails repeatedly?
Try converting the video, repairing the PowerPoint file, updating Office, or using Pandaoffice Drecov to recover the file.
Can I recover previous versions of PowerPoint if the file becomes corrupted during video insertion?
Yes, PowerPoint AutoRecover and backup features allow you to PowerPoint recover previous version to restore a working file.
What formats are recommended for PowerPoint video insertion?
MP4 using H.264 codec is the most compatible and widely supported format across all modern PowerPoint versions.
Conclusion: Key Takeaways to Fix PowerPoint Video Issues
Summary of Effective Solutions
PowerPoint cannot insert a video from the selected file is a common problem but can be resolved using a variety of approaches:
- Convert videos to compatible formats (MP4/H.264).
- Move videos to local folders and check permissions.
- Repair the PowerPoint file using built-in tools or Pandaoffice Drecov.
- Update Office, graphics drivers, and codecs.
- Compress large files and adjust file paths.
By combining these strategies, users can fix the PPT, prevent future errors, and ensure reliable multimedia integration. Regular backups, proper file management, and software updates reduce the likelihood of encountering these issues.
⚠️Warning: Always back up presentations before attempting repairs or file conversions to prevent data loss.


