







You press Play, hear a soundtrack, and stare at a black rectangle. When VLC is not showing video, the first useful question is whether the same file displays elsewhere. Open a copy in another trusted player, then try a video you know works in VLC. These two tests separate a player or display problem from a file-specific problem without changing the original. Do not rename, convert, or overwrite an important recording yet. A black picture by itself does not mean the video has been deleted or that its data needs recovery.
Two short tests tell you where to look
Start with the local video file rather than a browser stream. Note whether VLC shows a black screen, a blank window, a frozen first frame, or an error before playback begins. Sound with a moving time counter suggests VLC can read at least part of the media. A counter that never advances points to a different failure, such as an inaccessible file or unsupported stream. Keep the exact behavior in mind; “no video” is too broad to choose a safe fix.
Try the same file outside VLC
In File Explorer, make a copy of the file if it matters and open that copy in another player already installed on the PC. A picture that appears there suggests the source is readable and VLC’s output path deserves attention. When both players fail on this one recording, compare its file size with a backup or an earlier version. A zero-byte file contains no playable video. A normal-looking size does not prove every frame survived, but it keeps the question open.
Try another file inside VLC
Choose a short clip that displayed correctly on this computer before. If that clip is black too, focus on VLC preferences, the graphics driver, or the monitor connection. If only one file fails, focus on its format and history. Did someone transfer it from a phone, download it, trim it, or copy it from a USB device immediately before the problem? The answer changes the next test. A file that never played may need a compatible decoder or a clean source copy; one that played yesterday may have changed after editing or synchronization.
Keep the tests small and reversible. Do not uninstall VLC or reset the PC simply because a single clip displays badly. If the problem is actually that playback freezes after a visible frame, the separate VLC freezing guide addresses that different symptom. Here, the picture never appears or goes blank at the start.
Sound that arrives too early or too late is a different diagnosis from a missing picture. Use the VLC audio-delay steps for a visible video with timing trouble; do not change synchronization controls to solve a completely black frame.
Change VLC’s picture path without touching the video file
If several otherwise playable videos are black only in VLC, close the current playback and open Tools > Preferences. On the Video tab, confirm that video output is enabled. Check whether the video has been sent to another display, especially after using a projector, television, or second monitor. Restore the VLC window to the main screen and test a known-good local clip before changing anything else.
Next, try a different video output module from the Video preferences and save the setting. Restart VLC, because an output change may not apply to the already open playback session. Test one clip and record whether the picture returns. If it does, leave the file alone: you found a display-path problem. If not, put that setting back before moving on. VideoLAN’s Windows VLC FAQ documents black or garbled output and changing VLC’s output settings; menu wording can vary with the installed version.
Test hardware decoding as a separate variable
In Tools > Preferences > Input / Codecs, look for the hardware-accelerated decoding setting. Note its current value, then choose the other available behavior, save, and restart VLC. Do not change output module, decoding, and several unrelated settings in one pass. A one-variable test tells you which change helped and lets you reverse it. If playback works only with hardware decoding disabled, the clip is not thereby “repaired”; VLC is using a different route to decode and display it.
Display drivers can also matter, but a driver replacement is a larger change than a VLC preference test. If Windows shows visual trouble in other applications as well, check the PC or graphics-card maker’s current instructions and keep a restore point or backup first. Do not install a driver from a random download page. A codec package from an untrusted site is not a safe response to a black VLC window either.
When just one recording has no picture
Look at what kind of file it is and where it came from. A camera may have stopped recording before it wrote a complete file index. Files copied from a failing flash drive may be shorter than the original. An online download may have saved an error response under a video extension. None of those cases can be fixed by changing VLC’s window size. Compare the affected file with a known-good copy from the camera, source website, or backup, preferably by file size and date before playing anything again.
Try the file on another computer or in another trusted player, but work from a duplicate. If one application plays it correctly, export a new copy only after preserving the original. If every application reports a problem, do not assume that a different extension will create missing frames. Renaming .mp4 to .avi changes a label, not the encoded content. Keep any edited or converted derivative separate so you retain a baseline for later diagnosis.
For a video stored on a USB device that disconnects, makes unusual sounds through an attached drive, or produces repeated read errors, stop repeated playback and scans. Protect the storage first with an appropriate image or professional help. Each retry can consume the remaining readable time. A stable file that is simply incompatible with VLC is very different from a recording whose source device is deteriorating.
Some recordings contain more than one video or audio track. Use VLC’s track menu to see whether a video track is selected; a disabled video track can leave audio playing. Also inspect the picture on the main display instead of assuming a full-screen window is visible where you expect it. If VLC shows an error message about an unsupported codec, write down its wording. That is more actionable than a generic “VLC is broken” report, and it prevents unnecessary changes to a healthy file.
Recover a missing original only when the file is actually gone
Sometimes the black clip is a damaged export while the intact original was later deleted from a Windows folder. In that case, recovering the older file can be more useful than repeatedly adjusting playback. First search the source folder, Recycle Bin, project export directory, cloud version history, and any camera or USB copy. If you find a working version, copy it to another healthy location and test it before deleting the black one. A synchronized service may hold versions even when the current local file is wrong.
Drecov is Windows data-recovery software for files that have been lost or deleted from a stable PC, USB device, memory card, or other supported storage. Its read-only recovery mode, Quick Scan, Deep Scan, file filtering, preview, and separate-destination recovery help you look for an earlier local video copy. It does not change VLC’s decoder, fix a graphics driver, repair physical damage, or guarantee that an overwritten recording can be recovered. The video recovery overview explains the file-loss side of this problem; use it only when a video is genuinely missing.
⚠ Warning: Install it on a drive different from the one where your data was lost to prevent overwriting.
Step 1: Choose the original location
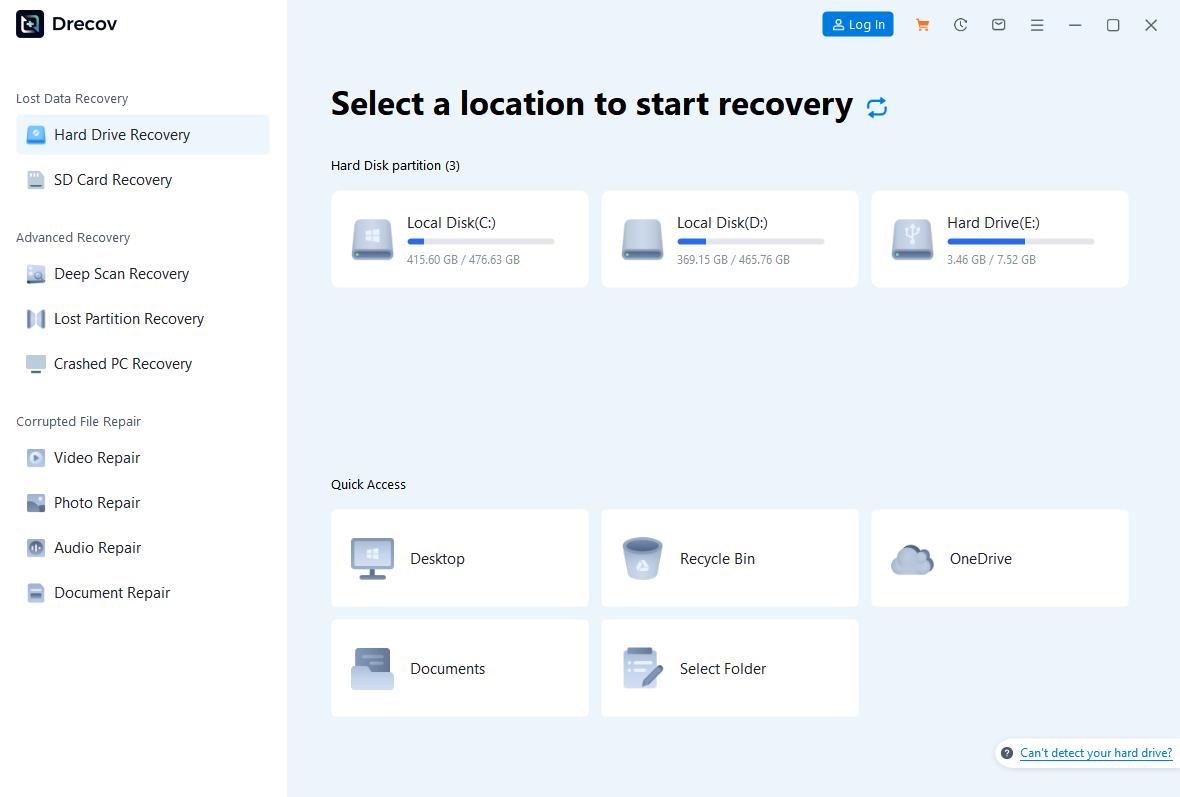
Stop writing new exports to the folder or device that held the lost recording. Prepare another healthy drive for any recovered files, and do not install Drecov on the affected partition. Open Drecov and select the original Windows volume or removable device where the intact video last existed. If that device is unstable or no longer remains connected, stop direct scans and seek an image or professional recovery instead.
Step 2: Run the first scan
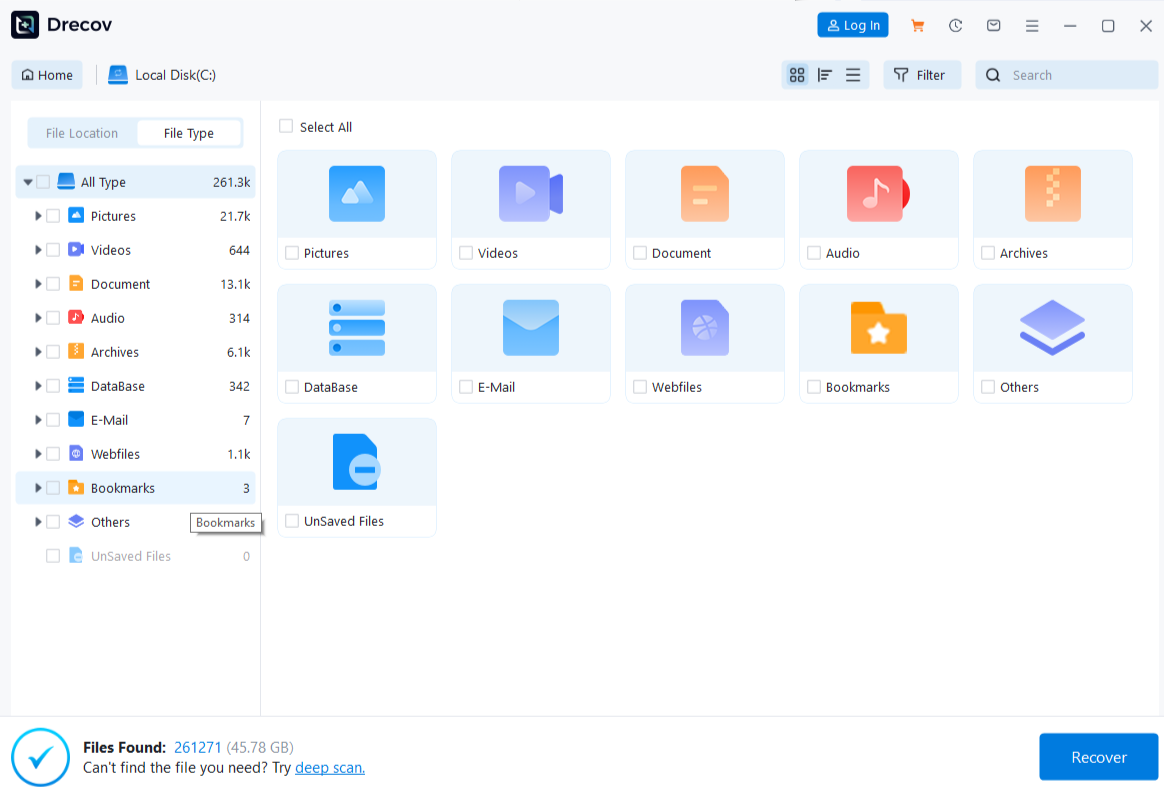
Start Quick Scan and inspect the likely folder and video results. Search using a remembered filename, extension, or former location if available. Do not select every video merely because its thumbnail looks familiar; several exports may share a similar first frame. Match dates, file sizes, and paths where the results show them.
Step 3: Deepen the search only on stable storage
If Quick Scan does not show the older recording and the source stays stable, run Deep Scan. This is a search for recoverable data, not a repair of the current black video. A physically unstable source is a stop condition. Repeated scans can make that situation worse; a professional image may be the safer next move.
Step 4: Preview and save elsewhere
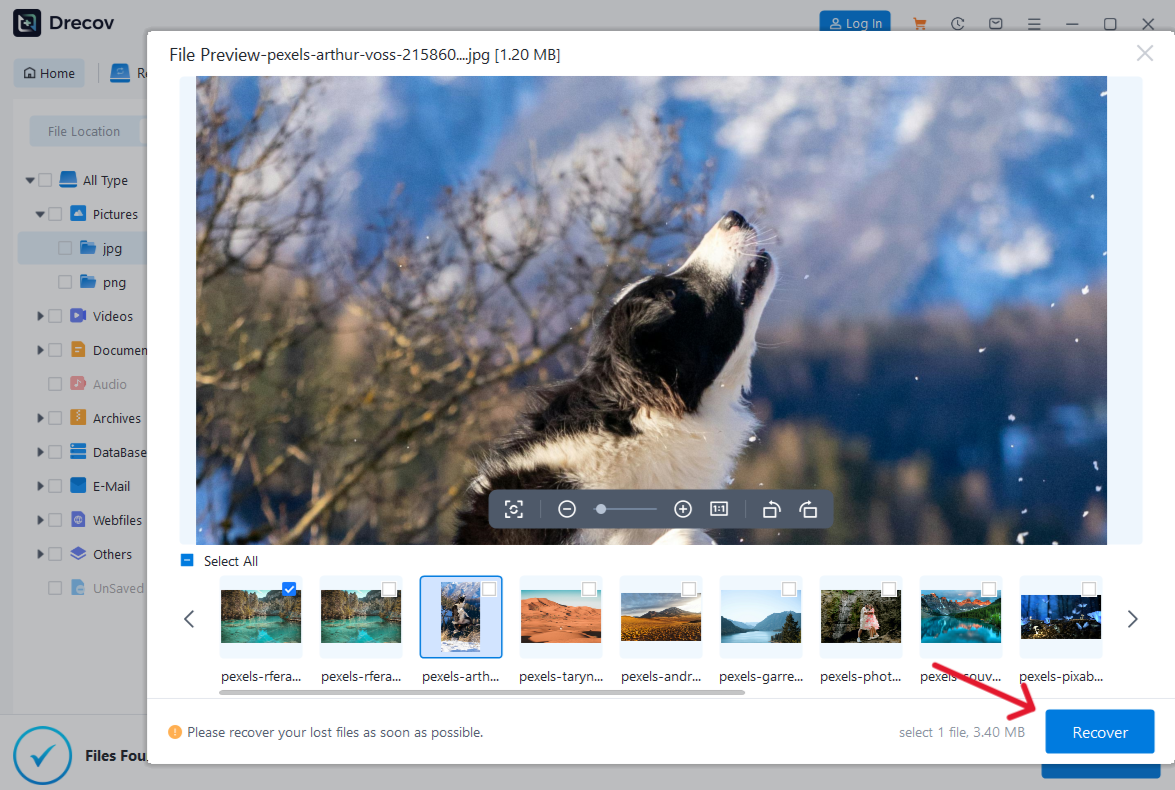
Filter for likely video types, preview representative candidates, and recover the best matches to the prepared healthy drive. A preview proves only that the sampled portion can be read, not that every scene and audio track is complete. Never save recovered output back to the original location. If the expected output folder seems empty, check the Drecov folder or Recovery folder at the destination before starting another scan.
Step 5: Verify before replacing anything
Open several points in each recovered clip, including the beginning, middle, and end. Check that the picture, sound, and duration make sense in a second player. Keep both the recovered candidate and the original black file until you know which one is useful. Only after that should you consider VLC resets, file conversion, or cleanup of old exports. If the recovered file is still black in every player, recovery found a file but did not restore missing picture data.
⚠ Warning: Install it on a drive different from the one where your data was lost to prevent overwriting.
FAQs
Why does VLC play sound but not video?
The file may contain usable audio while VLC’s video-output path fails, a video track is disabled, or the picture stream is damaged. The two-player and known-good-clip tests separate these possibilities faster than changing many settings at once.
Will resetting VLC preferences erase my videos?
VLC preferences are separate from your media files. Still, note custom settings before a reset and try reversible output and decoding checks first. A reset will not repair an incomplete or damaged recording.
Can a codec download solve every black-screen case?
No. A missing or unsupported decoder is only one possible cause. Output settings, a disconnected monitor, an incomplete file, or failing storage need different responses. Use trusted software sources rather than installing an unknown codec pack.
Should I convert the black video right away?
Preserve the original and test a duplicate first. Conversion may create another black file if the source picture stream is absent, and an overwrite could destroy the best available evidence. Examine a clean original or backup before exporting.
What if I deleted the version that used to play?
Check Recycle Bin, backups, and version history. For a missing local file on stable Windows storage, Drecov can search the original location and save candidates to another drive. It cannot guarantee recovery of a fully overwritten copy.
Conclusion
When VLC is not showing video, compare another player and a known-good clip before touching the recording. A picture that works elsewhere points toward VLC’s display or decoding settings; a file that fails everywhere needs an integrity and source-copy check. If the working original was deleted, Drecov can search its stable Windows storage and recover a candidate to another drive. Verify the picture, sound, and duration before replacing any file or making larger system changes.
⚠ Warning: Install it on a drive different from the one where your data was lost to prevent overwriting.