







In Windows encryption, a data recovery agent is an authorized recovery identity that may unlock EFS-protected files when the owner’s key is unavailable. File-scanning software performs a different job. The right recovery private key must match information associated with the encrypted file. Before reinstalling Windows, changing accounts, or trying another utility, preserve the original file and find out whether your organization has that recovery option.
Decide whether you need a key or a missing file
Start with one document you recognize. Can you see its name and expected size, but Windows refuses to open it? That differs from a document that no longer appears in its folder. An intact encrypted document needs authorized access to its content. Deleted documents need a backup or a file-recovery search. Running the wrong type of tool can waste time while the useful copy or original user profile remains at risk.
EFS means Encrypting File System. Windows uses it to protect individual files on suitable storage. BitLocker protects a volume and uses a different recovery process. A password-protected PDF or Office document also has its own protection mechanism. Do not assume that a BitLocker recovery key, an account password, and an EFS recovery certificate all perform the same job. Tell the administrator which protection Windows actually reports.
A familiar filename does not prove access
For example, an employee may still see a report after a computer change but lack the key that previously opened it. Changing ownership of the folder does not recreate that key. Another person might have deleted an ordinary PDF export while the encrypted original still exists. The first case needs encryption recovery; the second might need only the export’s backup or the Recycle Bin. Establish that distinction before making changes.
What the agent must have to help you
A certificate identifies a recovery identity and carries public-key information. Its matching private key provides the secret part necessary for the recovery operation. A certificate file alone is therefore not a universal unlocking tool. Your organization must also confirm that the recovery identity applies to the particular file. Someone with administrator permissions does not automatically possess every employee’s encryption key.
Why creating a new agent may not solve an old problem
A newly generated recovery certificate creates a new key pair. It does not magically match recovery information already associated with an inaccessible file. Organizations can manage and update recovery arrangements while they still have the required access, but a stranded document cannot simply accept a replacement key because its owner needs one. Ask IT to inspect the actual recovery information rather than repeatedly generating certificates.
Old Windows instructions sometimes describe default agents under specific historical configurations. Those examples do not prove that your current personal PC or company laptop has a usable recovery agent. Check your organization’s records and the affected file. Equally, a saved certificate with the right display name might not contain the private key. Names help locate candidates; the responsible administrator must verify the actual match.
Keep the secret separate from the support request
Do not email a private-key export and its password together. Use the organization’s approved secure process if an authorized technician requests them. A screenshot of the error and a file path can often start the investigation without exposing the secret. Retain the original device, account profile, and existing backups until the administrator confirms what information is necessary and how to preserve it.
Inspect one file without changing its encryption
On a working Windows computer with authorized access, right-click the document and open Properties. Under General, choose Advanced if that control appears. Look for the option describing encryption to secure data. View the setting without changing it. Windows versions, file systems, and permissions can affect the controls available. An unavailable button is not permission to format the device or disable protection across the folder.
Use an information command, not a repair command
Microsoft’s cipher command reference documents /c for displaying encrypted-file information. Open Command Prompt and enter cipher /c , followed by the full path of your actual file in quotation marks. Dragging the file into the window can help insert its path. Check the resulting line before pressing Enter, especially when a folder name contains spaces.
The purpose here is inspection. Record the information Windows displays and any precise error. Do not substitute /d, /e, or /w: those switches perform different actions, including decryption, encryption, or clearing unused disk space. A command copied from another tutorial can change data rather than explain the problem. Stop if you cannot confidently identify the file or understand the command.
When inspection cannot continue
An unreadable drive, repeated disconnections, or severe read errors changes the priority. Stop repeated scans and ask about specialist imaging or professional recovery. Physical damage requires specialist assessment, not another scanning utility. If Windows itself cannot start, a technician may need another working Windows PC and a safe connection to the source. Preserve any required volume-unlock information; connecting the drive elsewhere does not remove its encryption.
Give IT a request they can act on
Explain whether the file still exists, which Windows account previously opened it, and what changed before access failed. Include the full error text and the result of the inspection, where available. Mention an old computer or verified backup that may still contain a working account. Avoid resetting passwords, removing profiles, or reinstalling software while someone checks those remaining routes.
Have the administrator confirm a matching recovery identity, access to its private key, and an approved place to restore a test copy. Opening one representative document is a better first milestone than processing every folder. After authorized recovery succeeds, check the report’s pages or the project’s linked files. Save the result according to the organization’s protection policy rather than leaving an unprotected copy in a public folder.
If no usable key or recovery arrangement exists, ask about verified backups and other authorized copies. A recipient may hold an earlier unencrypted export through a legitimate workflow. That copy might lack recent edits, so compare its content before relying on it. Missing cryptographic access is not a reason to promise a brute-force shortcut or buy ordinary scanning software as an EFS unlocker.
When an unencrypted working copy really was deleted
Drecov addresses a different problem: lost local files on stable Windows storage. Its read-only recovery workflow offers Quick Scan, Deep Scan, filtering, and preview before saving supported files elsewhere. Here, look for an ordinary export or working copy that never required the missing EFS key. Drecov does not replace the agent’s private key or promise to decrypt an encrypted-only original.
Stop saving to the location that held the missing copy. Prepare a separate healthy recovery destination, and install the software outside the affected partition. SSD TRIM and later writes can reduce recovery prospects. For broader deletion cases, the file recovery overview explains the distinction between finding content and restoring access. Avoid repeated direct scans when a device behaves unstably.
⚠ Warning: Install it on a drive different from the one where your data was lost to prevent overwriting.
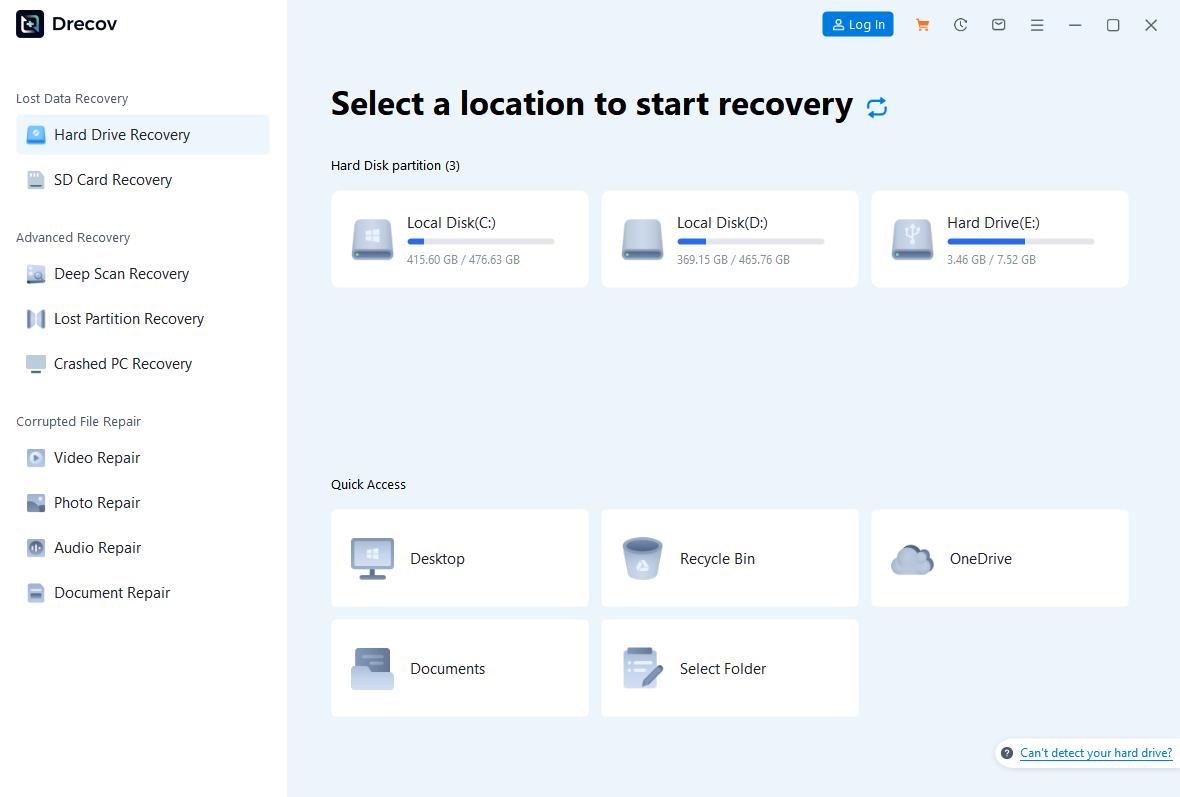
Step 1: Open Drecov and select the export’s original location
Choose the stable Windows folder or volume that contained the unencrypted copy, such as Documents or the project’s export folder. Do not select a different drive merely because it now has a familiar letter. Confirm the location with your notes. If an entire partition disappeared, Lost Partition Recovery can search associated data; it does not reconstruct encryption keys.
Step 2: Start with Quick Scan
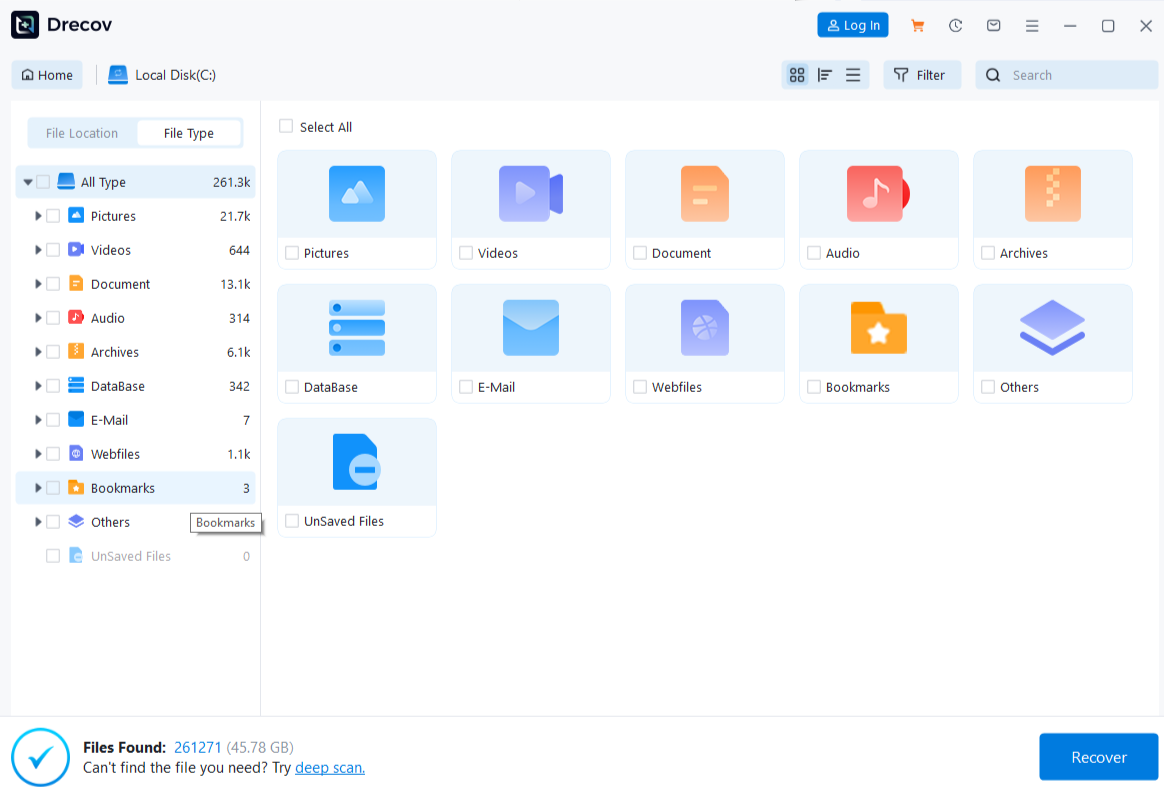
Run Quick Scan and look for the expected document name or original folder. Search for the export, not just the encrypted original. Useful examples include a PDF report or an ordinary document shared before the access problem. Keep track of which version you need so a readable but outdated result does not become your replacement by mistake.
Step 3: Use Deep Scan only while the source stays stable
Try Deep Scan if the first results do not include the needed copy. Stop if the source disconnects or develops serious read errors. A longer search does not bypass encryption or guarantee a better version. Specialist help takes priority when the device cannot remain reliably readable.
Step 4: Locate and preview the relevant documents
Narrow the results by available filename, type, former path, or date. Preview representative supported files and compare recognizable content. A successful preview does not certify every page. If the missing item was a PDF export, use the PDF recovery guidance for that file-specific search rather than treating a visible filename as proof of completeness.

Step 5: Recover to another healthy device
Save your selection to the prepared destination, never back to the source. Check Drecov Folder or Recovery Folder if the output does not appear where expected. Preserve multiple plausible versions until you compare them. Keep confidential exports within an authorized storage location throughout recovery.
Step 6: Verify before cleaning or reinstalling
Open recovered files in the appropriate application. Inspect the important pages, dates, and project dependencies rather than only the first screen. Compare them with any known backup. Only after you confirm usable copies should you consider source cleanup, account removal, formatting, or Windows reinstallation.
⚠ Warning: Install it on a drive different from the one where your data was lost to prevent overwriting.
FAQs about EFS recovery agents
Is a data recovery agent a person or an application?
In EFS, the term refers to an authorized recovery identity and its key material. An administrator may manage that identity. Ordinary file-recovery software performs a separate job and does not become an agent simply by scanning a drive.
Does being an administrator guarantee access?
No. Administrative rights and possession of the matching private key are different requirements. Let the responsible team verify the recovery arrangement for your actual file instead of assuming an elevated account can open everything.
Can I use a BitLocker recovery key for EFS?
A BitLocker key can provide authorized volume access when applicable, but it does not replace the separate EFS private key. Even an unlocked volume can contain individual encrypted files that require their own recovery route.
Will creating a certificate now unlock the document?
Not by itself. A new certificate does not supply the missing matching private key. Preserve the document and let IT compare its recovery information with existing keys and backups.
Should I delete the encrypted original after finding an export?
Keep it while your organization checks completeness, retention requirements, and any remaining recovery options. An export can omit recent changes or application features even when its pages look correct.
Conclusion
The EFS data recovery agent helps only when the relevant recovery identity and private key fit the file. Preserve the original, inspect rather than alter encryption, and give IT a clear account of the failure. Drecov has a separate role when an unencrypted local copy was genuinely deleted: search its original location, save elsewhere, and verify the recovered content before changing the source.
⚠ Warning: Install it on a drive different from the one where your data was lost to prevent overwriting.





