







A Scrivener project is more than one manuscript file. It combines a binder structure, individual writing documents, research material, settings, and possibly snapshots. A missing SCRIVX entry or a damaged project folder therefore needs a different recovery plan from a deleted paragraph inside one chapter. First preserve the complete project and existing backup archives. Then decide whether you need the whole project, a specific chapter, or only the visible manuscript text.
Quick answer: copy backups before opening them
Locate the actual configured Scrivener backup folder and preserve its existing archives somewhere outside the rotating backup workflow. Extract a candidate into a separate folder before opening it. For an unwanted edit inside a surviving chapter, inspect an existing snapshot instead of rolling back the entire project. A compiled DOCX or PDF can support reconstruction, but it does not replace the original binder, research, or project-level relationships.
These native recovery routes require no separate recovery utility for an existing Scrivener user. Scrivener itself remains commercial software. Also, automatic saving of the current project and creation of historical project backups serve different purposes. The current project can faithfully save an accidental deletion. An earlier backup or snapshot may preserve the state you need, provided it existed before the loss and remains available.
Classify the missing writing
Project structure versus document text
Check whether the project fails to open, opens with missing binder entries, or contains an overwritten chapter. Record the exact symptom and the last recognizable writing milestone. A damaged project index can coexist with readable internal text, while a healthy project can contain an unwanted edit. Those situations need different evidence. Do not rebuild the entire project before inspecting native backups and snapshots.
Make an inventory of the expected chapters, research folders, notes, and recent revisions. Also include compile settings and other project features important to the work. A recovered manuscript can contain every word while losing the organization used for the next draft. Therefore, define whether the immediate goal is an editable project or a limited reading copy. Keep those outcomes clearly labeled during comparison.
Preserve complete folders
On Windows, preserve the complete SCRIV project folder and its contents rather than copying only the SCRIVX project entry. Individual internal files can depend on surrounding structure. Close Scrivener before making a consistent recovery copy. Also preserve existing ZIP backups and record their source location. Repeatedly opening and closing candidates inside the normal backup workflow can rotate useful historical archives.
Do not rename internal project files or move chapter fragments around in the only original. A project that no longer opens may still contain valuable text and snapshots. Keep it unchanged for a later supported salvage procedure. Also distinguish a project folder from a compressed backup. Opening a file inside an archive view is not the same as extracting a complete working project to a normal folder.
Free route 1: restore an existing ZIP project backup
- Inspect Scrivener’s configured Backup options or the project’s custom backup settings.
- Copy useful existing backup archives to a separate recovery location.
- Extract a candidate fully and open its project through the supported Windows workflow.
- Compare the binder, missing chapters, and latest writing before accepting it.
Choose candidates around the loss rather than automatically selecting the latest archive. A backup after an accidental deletion can preserve the same missing chapter. Also inspect the actual backup coverage and project settings. A project can use a custom location or opt out of normal behavior. Enabling backups now cannot create an earlier manuscript state. Preserve what exists before changing the configuration.
Verify the extracted project
Check that extraction produced the complete project structure and that the SCRIVX entry belongs to that folder. Give the recovered candidate a clear name so you do not confuse it with the live project. Then inspect recognizable text and binder organization. A successful open is useful evidence, but it does not prove that the archive captured the final chapter or the intended revision of a scene.
Keep the original ZIP unchanged. If a later test reveals missing material, you can return to the archive without wondering what the application saved into the opened copy. Also record the candidate’s backup date and content milestone. This makes it easier to compare several archives and prevents an outdated but clean-looking project from replacing newer useful work without review.
Free route 2: compare an existing document snapshot
- Preserve the current project and select the affected writing document.
- Inspect its existing snapshots through Scrivener’s supported interface.
- Compare the desired snapshot with the current text.
- Copy needed material or roll back only after preserving the current state.
Snapshots protect individual document states inside the project when they were created. They do not automatically provide a separate backup of the entire project folder. Use them for a focused chapter or scene revision, not as proof that every research file or binder setting survives. Also compare the exact passage you need. A snapshot may predate the important rewrite even when its label looks relevant.
Recover a passage without discarding a later draft
If the current chapter contains useful new material, copy the missing passage into a separate document for comparison before replacing anything. Then reconcile it with the current narrative. A whole-document rollback can restore an old paragraph while losing a later ending. Use Scrivener’s comparison tools and a clear editorial checklist rather than assuming the earlier text should become current everywhere.
Record which passage came from the snapshot and whether you adjusted it after recovery. Also preserve the current document as a new snapshot or other deliberate candidate where appropriate. This creates a way back if the author changes their mind. Recovery should increase the available choices, not silently force the project into one earlier creative state.
Free route 3: transfer a chapter from a restored project
- Preserve the current project and open a separately extracted backup candidate.
- Identify the missing chapter or research item in the backup binder.
- Transfer verified content through Scrivener’s supported project-to-project workflow.
- Compare text, notes, metadata, and binder placement in a new working revision.
Partial restoration is useful when the live project contains substantial recent work but one older chapter disappeared. Replacing the whole project with the backup would lose those newer changes. Instead, recover the specific material you need and inspect its relationships. Also check duplicate titles. Several scenes can share working names, so identify the chapter by actual content rather than title alone.
Preserve editorial context
Inspect document notes, synopsis, labels, status, and any other metadata that matters to the writing process. A text-only copy may restore the prose while omitting that context. Also compare references to research items and neighboring chapters. If you reconstruct binder placement manually, record the decision. The useful result is a coherent writing project, not merely a collection of recovered paragraphs with uncertain order.
After transferring content, reopen the accepted project and inspect the affected chapter. Then test the relevant compile selection. A recovered scene can remain outside the intended output if project settings or binder placement differ. This is a separate validation question from whether the words survived. Check the workflow the author actually uses before declaring the manuscript ready for the next review stage.
Free route 4: rebuild from an existing compiled manuscript
- Locate your own DOCX, RTF, PDF, or other existing manuscript exports.
- Preserve them separately and identify the strongest editorial milestone.
- Extract or import verified text into a new recovery project.
- Reconstruct chapter organization and document any project information the export lacks.
A compiled manuscript can preserve the visible writing when the project structure fails. However, it normally does not include every binder item, research document, snapshot, or note. Also, a PDF can require careful text extraction. Compare punctuation, scene breaks, italics, special characters, and footnotes. A visually familiar page is not enough to prove that imported text matches the intended manuscript.
Choose the best source for reconstruction
An editable export may preserve more useful formatting than a PDF, while a later PDF may contain newer wording. Keep both when they complement each other. Use the stronger editable source as a base and reapply only verified later changes. Also compare the beginning and ending of each chapter. A compile selection can omit material that remains in the project but was never intended for that export.
If only a reading copy survives, define the reconstruction target clearly. You may restore a complete manuscript while leaving the original research binder and drafting history unavailable. Label that as a manuscript rebuild rather than a full project restore. This gives the author a useful deliverable and an honest list of remaining work instead of hiding missing creative context behind a successful import.
Free route 5: inspect readable internal text on a copy
- Preserve the complete damaged project folder unchanged.
- Create a separate working copy for a documented salvage procedure.
- Identify readable internal writing material using current version-appropriate guidance.
- Copy verified text into a new project and reconstruct organization deliberately.
This is a partial salvage route when native project backups and snapshots do not provide a usable result. Internal formats and identifiers can differ between versions, so avoid treating every numbered file as a chapter in visible binder order. Do not modify the original project to make fragments line up. Preserve the source and inspect actual text. A specialist support route may help interpret the remaining structure.
Keep fragment identity and order visible
Record each fragment’s original path and recognizable opening and ending. Then compare it with manuscript exports or an outline. This helps identify duplicates, earlier drafts, and missing transitions. A fragment can contain valuable prose while belonging to an abandoned version of the chapter. Therefore, do not concatenate everything automatically and describe the result as the original manuscript.
Also inspect unique research material separately. A recovered text chapter may refer to a PDF, image, or note that the salvage did not include. Keep an inventory of those dependencies. If you reconstruct a passage from notes or memory, mark it for editorial review. Recovery of readable text does not certify its place in the intended draft or the accuracy of newly rebuilt wording.
Example: recover one chapter without losing a new ending
Suppose an author notices that a middle chapter disappeared after several days of work on the ending. A backup from before the deletion contains the chapter but lacks the new ending. First preserve the live project and all useful archives. Extract the older backup separately, identify the correct chapter, and transfer it into a new working copy of the live project. Replacing the entire project would lose valuable recent writing.
Next, compare chapter transitions, synopsis, and compile inclusion. Check that the recovered chapter is the intended draft rather than a similarly titled earlier scene. Then generate a reading copy covering the recovered area and the ending. Finally, document the backup source and any editorial reconciliation. This creates a clear accepted manuscript while keeping the original candidates available until the author approves the result.
Validate an editable writing project
Inspect the binder, chapter order, text endings, notes, research items, snapshots, and relevant compile settings. Then save, close, and reopen the accepted project. Generate a representative compiled output and compare it with the intended manuscript. A project that opens cleanly can still omit a recovered chapter from compilation or contain an outdated scene under a familiar title.
Keep damaged originals, useful archives, snapshot evidence, and reconstructed exports until review finishes. Afterwards, establish a new independent project backup and test a restore copy. Also preserve meaningful manuscript exports. The project and the compiled text protect different needs: one supports continued drafting, while the other provides reading access through tools that do not understand Scrivener’s project structure.
Compare project candidates by writing milestones
Identify the intended chapter version
Choose distinctive passages near the beginning and end of the missing chapter. Also record a recent revision, a character name change, or another recognizable editorial detail. Apply the same sample to every candidate. A chapter title and word count can remain unchanged while the prose differs substantially. Compare actual text rather than treating a familiar binder label as proof of the intended draft.
Keep candidate paths and backup dates in a short record. If several archives contain useful material, preserve them until you understand which one supplies the strongest base. An earlier chapter may be complete while a later one contains an unfinished rewrite. This comparison supports an informed editorial decision and avoids restoring an entire project merely because its archive timestamp is the newest.
Distinguish a complete project from complete prose
A compiled manuscript can contain all the reading text while omitting research, notes, snapshots, and unused scenes. Conversely, a project can open with intact organization while a chapter’s latest wording is missing. Define which result the author needs now. An urgent reading copy and a reusable drafting project require different evidence and different acceptance checks.
Label limited results clearly. A manuscript reconstruction may be entirely useful without representing a full project restore. Also document any missing research item or drafting history that could affect the next revision. This prevents a later editor from discovering the gap only after they try to use a snapshot or source note that the recovery never actually restored.
Inspect binder and editorial context
Chapter order and compile inclusion
Compare the binder’s order with an outline or approved reading copy. Then inspect which documents the compile workflow includes. A recovered scene can appear in the binder but remain excluded from output. Also check scene breaks and chapter boundaries. These details affect practical usability even when every paragraph opens correctly in the editor.
Generate a focused compile covering the recovered area and its neighbors. Compare the transition into and out of the restored chapter. If a chapter came from an older backup, its references to later events may need editorial reconciliation. Record those changes as new editing work rather than implying they survived in the original candidate. Keep the unmodified recovered text available for comparison.
Synopsis, notes, labels, and research
Inspect the metadata used by the author’s actual workflow. A text transfer can restore prose while leaving synopsis, document notes, or status information behind. Also check linked or referenced research. A chapter that discusses a source image may remain incomplete for drafting purposes if that image is absent. Recover supporting material independently and keep its source documented.
If some metadata cannot be recovered, rebuild only what the author can verify. Avoid inventing a status or scene purpose from an ambiguous title. A concise gap note is more useful than a falsely complete project. This also helps prioritize the remaining work: unique research and editorial notes may deserve attention before cosmetic binder organization that can be recreated later.
Snapshot scope and provenance
A snapshot applies to a document state, not necessarily to every project feature. Compare the snapshot’s text and label with the actual revision you need. Also preserve the current document before rolling back. If the current draft has a useful later section, a copy-first merge can recover the older passage without discarding that new material.
Record which content came from a snapshot and which came from a project backup. Those sources can represent different points in the writing process. A merged chapter may be a valid accepted draft, but it is not an untouched historical state. Keeping provenance clear gives the author a practical way to revisit the decision without reopening every archive or relying on memory.
Reconstruct from exports carefully
Formatting and text extraction
When using DOCX, RTF, or PDF exports, compare italics, quotation marks, paragraph breaks, footnotes, and special characters. PDF extraction can introduce line breaks or hyphenation that changes the prose. Also inspect tables and any non-prose material. A document that looks familiar at page level can contain subtle text differences after import.
Preserve the original export and work in a new project. Reapply structure deliberately rather than repeatedly altering the only extracted copy. If you reconstruct chapter boundaries, compare an outline and known transitions. Also mark uncertain passages for review. The recovery can restore substantial writing while still requiring an editorial proofread, especially when the source was a reading copy rather than an editable project.
Multiple draft fragments
Internal text salvage can produce several related versions of a scene. Compare opening and ending lines and record each fragment’s source path. Do not concatenate every readable fragment automatically. Some may be abandoned alternatives or partial duplicates. Use the author’s outline and existing manuscript exports to establish intended order where possible.
If the evidence does not establish a fragment’s place, preserve it separately as recovered material. That is still useful creative work. Presenting it as a complete chapter without review would hide uncertainty and could introduce obsolete material into the manuscript. A clear fragment inventory helps the author make the editorial decision while keeping all recoverable writing available.
Establish a stable recovered writing project
Test after closing the recovery session
Save the accepted project, close it normally, and reopen it from the intended destination. Inspect the recovered chapter, a research item, and a representative compile. This checks durability and portability. A project that worked only while open from a temporary extraction folder can become another missing-source problem when that folder is later cleaned up.
Keep one clearly named working master and separate historical candidates. Include a short recovery note identifying the base project and reconstructed chapters. This gives another editor enough context to continue without navigating every experiment. Also preserve the original archives until approval finishes, because a later review may reveal a useful note or scene that the first pass did not prioritize.
Protect project structure and reading access
Create an independent complete project backup and a suitable manuscript export after acceptance. Test a representative restore copy rather than assuming an archive is valid because it exists. The project supports continued drafting, while the export preserves reading access through other software. Both provide value when an incident affects only one format or application environment.
Document the actual backup location, any custom project setting, and the authoritative project name. Keep major creative milestones deliberately instead of relying only on a small rotating set. This gives future recovery several concrete sources: a full project, document snapshots, manuscript exports, and independent research files that preserve context beyond the visible prose.
When PandaOffice Drecov may help
A storage scan may help when a local backup archive, project component, or manuscript export is genuinely absent from supported storage. PandaOffice Drecov does not rebuild a Scrivener binder automatically from unrelated text fragments. Check current support for the missing files and inspect actual content. A recovered SCRIVX name alone does not prove that all supporting project material survived.
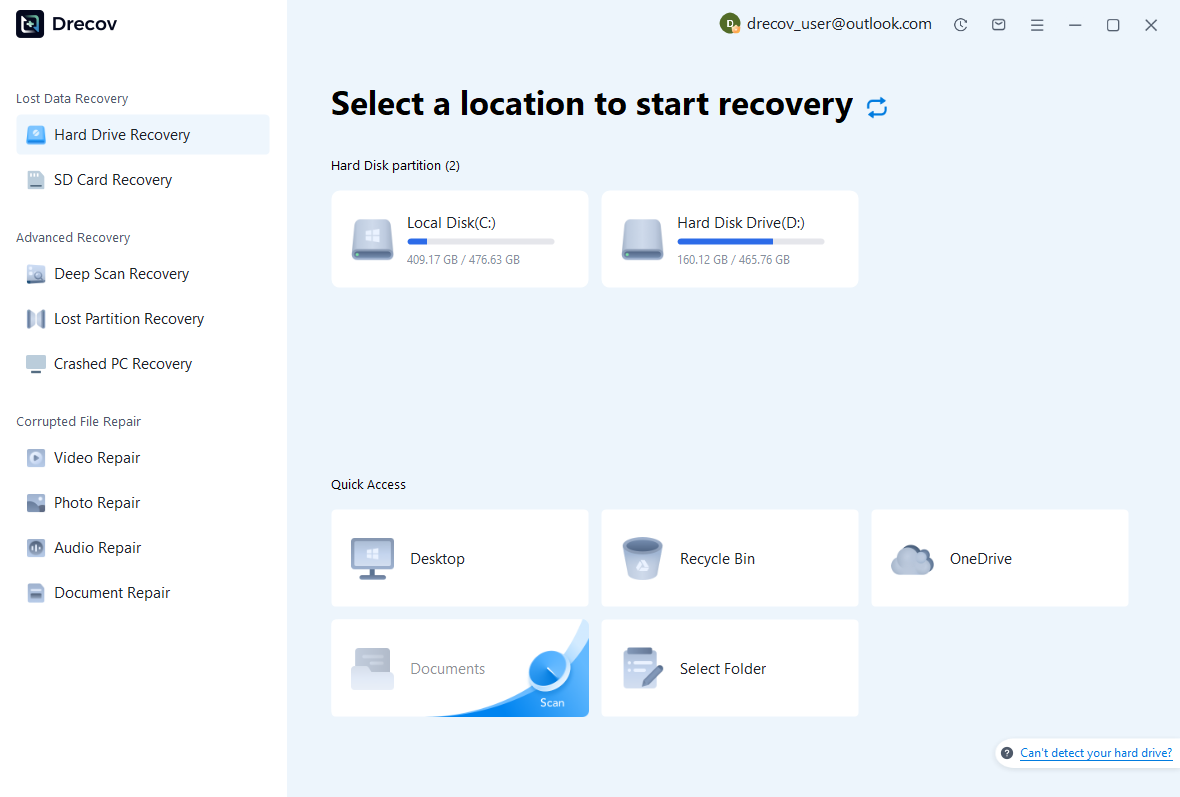
Step 1: select the actual writing storage
Identify the disk that held the live project and the separate backup location. They may differ. Avoid creating new large project archives or installing recovery software on affected storage. If the device repeatedly fails to read, stop repeated scans and assess its condition. Searching the application installation folder is unlikely to help when the missing manuscript lived in a separate project directory.
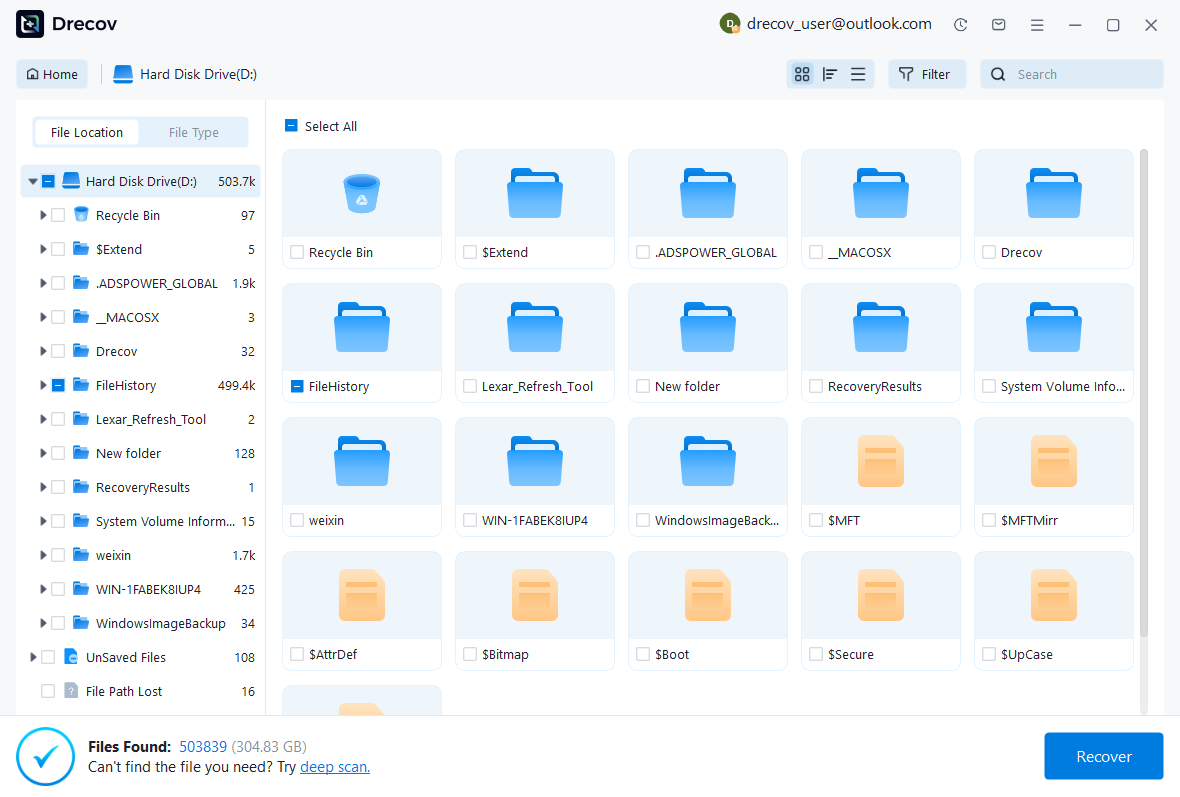
Step 2: preserve complete candidate groups
Use available path, date, name, and format filters. Retain ZIP archives, project components, and exports with their folder context where possible. Preserve several plausible revisions if the writing milestone is uncertain. A large archive can still be damaged, and a text preview may expose only part of a chapter. Record each source so later project-level comparison remains meaningful.
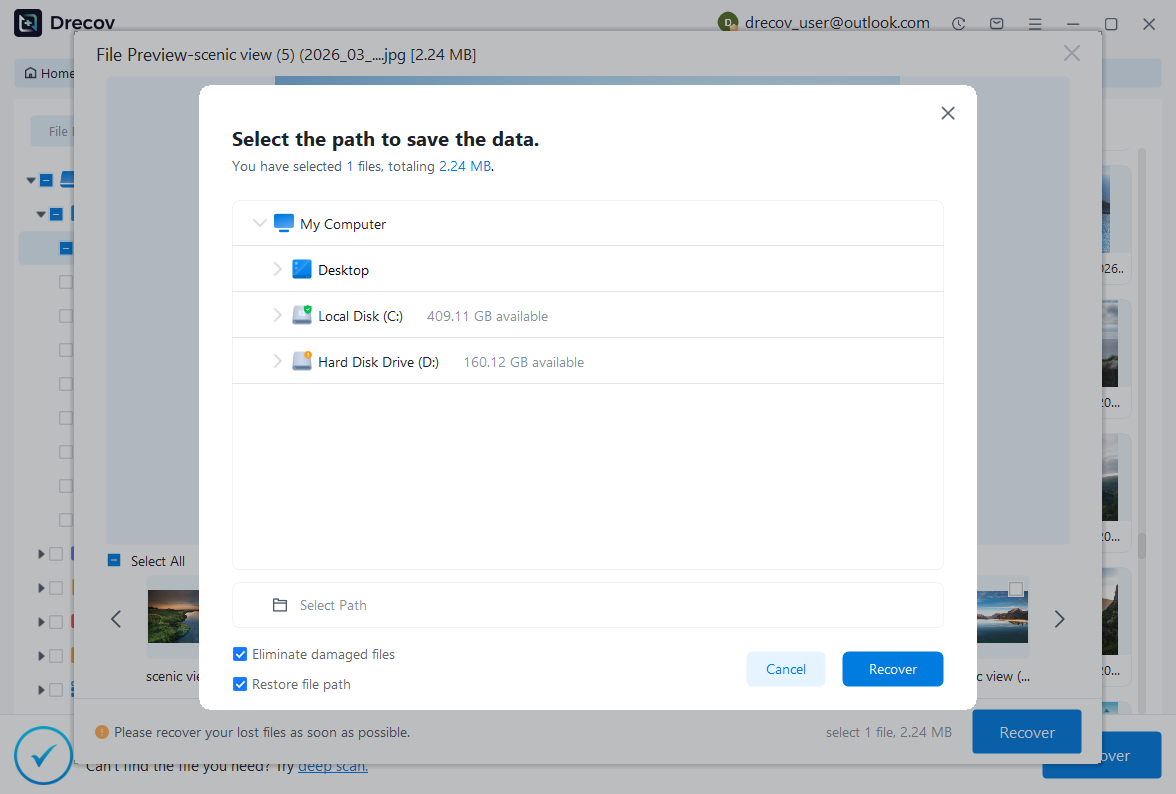
Step 3: recover elsewhere and test the writing
Save candidates to a different healthy physical disk. Review licensing and preview limitations before purchasing. Then extract archive copies or open project candidates through the appropriate Scrivener workflow. Inspect complete chapters and compile behavior. The recovery utility supplies potential files; editorial and project-level review determine whether they restore an editable manuscript rather than only a familiar project name.
Related recovery resources
Explore the relevant recovery options: Word document recovery, Hard drive recovery.
For another recovery case and its practical checks, read the related recovery guide.
Check the vendor guidance for the installed version: official recovery documentation 1, official recovery documentation 2, official recovery documentation 3.





