








An After Effects AEP preserves composition and project information, while footage, fonts, plugins, and other resources can remain outside it. After a crash, an automatic recovery or numbered Auto-Save may restore the composition without restoring a missing source clip. Start by separating project loss from dependency loss. Then preserve the available candidates and compare the actual animation state rather than assuming that a successful project open proves the whole production survived.
Quick answer: recover the project and reconnect its sources
Inspect the application’s crash recovery offer where available and preserve a separately named result. If that is unavailable or outdated, compare existing Auto-Save projects. A collected project or previous editable delivery can provide another recovery source. For missing footage, reconnect verified originals through the native replacement workflow. A rendered movie can preserve visible output, but it does not normally restore editable compositions, expressions, or individual layer relationships.
These native routes require no separate recovery utility for an existing After Effects user. The application itself still needs normal licensed access. Also, automatic recovery depends on material the program actually saved before the incident. Enabling Auto-Save now cannot create earlier project states. Define the required compositions, keyframes, source assets, and delivery settings before choosing a candidate that merely displays a familiar thumbnail.
Diagnose the production failure
Check the actual AEP path and record the exact error. A Recent Projects entry can point to an old or disconnected location. If the project opens, inspect whether compositions are present and whether the problem affects only linked sources. An offline clip or missing font requires a different response from a project file that cannot be read. Preserve readable candidates before changing application settings or converting assets.
Record the last editing milestone, such as a revised title, camera move, or expression change. Also note the creating application version and essential plugins. A missing dependency can change appearance without proving that the project data disappeared. Compare a known reference render where available. This helps distinguish an outdated candidate from a current project that simply needs its intended environment and source paths restored.
Inventory project dependencies
List video, audio, still images, image sequences, imported layered files, fonts, and external project links relevant to the compositions. Keep source folders and numbering intact where possible. An image sequence can become unusable if a recovery process flattens directories or renames frames indiscriminately. Also identify assets shared across compositions. Restoring one source correctly can repair several affected layers without replacing the entire project.
Keep project data, source media, caches, and renders separate in the inventory. A cache can support working performance but is not automatically an editable project backup. A finished render can show the intended output while omitting the controls needed for revision. Therefore, choose a recovery target based on the next production task. An archive copy and an editable motion-graphics template have different requirements.
Free route 1: inspect native crash recovery
- Preserve the project folder and available recovery material after the interruption.
- Relaunch After Effects and inspect its supported recovery offer if it appears.
- Open the recovered candidate and compare the exact composition edited last.
- Save a separately named project before relinking or modifying the recovered state.
Recovery behavior can vary with the installed release, so use current Adobe guidance for that version. Do not assume a crash prompt always appears or that it includes the last operation in memory. Inspect actual content. If the candidate opens, preserve it immediately and compare the relevant time range. A restored project can be a strong base even when one final keyframe or text change still needs reapplying.
Inspect the composition rather than the first frame
Check the composition’s duration, active camera, layer order, and the area edited before the crash. Then scrub representative points across the timeline. A static opening frame can look correct while later keyframes or expressions differ. Also inspect nested compositions. The visible top-level result may depend on a source precomposition whose latest changes did not survive in the recovered project.
Save the initial recovery state before adjusting it. If a plugin or source asset triggers another failure, you can return to that baseline. Record missing elements precisely, such as final title text absent or camera timing outdated. This makes the remaining work manageable and avoids replacing a useful current recovery with an older project merely because the older candidate opens with fewer warnings.
Free route 2: compare existing Auto-Save projects
- Locate the actual Auto-Save directory used by the production.
- Copy promising numbered candidates into a separate recovery folder.
- Open versions around the crash or unwanted-change time.
- Save the strongest verified candidate as a new working AEP outside the rotating backup location.
Auto-Save requires useful snapshots from before the loss. Inspect the actual configured interval and retained versions rather than promising a universal number of backups. Also distinguish an automatic project copy from the current manually saved AEP. A later filename can still preserve an unwanted edit. Compare the specific composition milestone and keep complementary candidates until you understand what each contains.
Build a small version comparison
For each candidate, record the revised text, important keyframe timing, source availability, and any opening warning. Use content observations rather than a simple good or bad label. A candidate with current animation and missing footage may be better than an older fully linked project. The missing source can often be reconnected separately, while replacing the project could discard valuable animation work.
Once you choose a base, establish a clear working revision and keep the original Auto-Save untouched. Do not continue normal production in a folder whose files are difficult to distinguish from historical backups. Also record which changes you reapply manually. This preserves a traceable relationship between recovered data and new production work, making the result easier for another motion designer to review.
Free route 3: use an existing collected project
- Locate your own collected project, handoff archive, or previous editable delivery.
- Preserve the complete folder structure in a separate recovery workspace.
- Open the included project and inspect its sources and editing milestone.
- Reuse verified assets or compositions without overwriting newer useful work.
A collected project can preserve much of the source context that a loose AEP lacks. However, collection options and external dependencies affect completeness. Check what the package actually contains. Plugins, fonts, or other linked resources may require separate legitimate access. A package that opens on the original workstation is not automatically portable to every installation. Verify the production’s real requirements rather than trusting the archive label.
Compare packaged assets with current edits
An older package may supply the correct source photograph while its project lacks the latest title animation. Keep the newer useful project and reconnect the verified packaged asset. Do not replace the entire production just because the old package has fewer missing-file warnings. Compare actual content, revision, and quality. Two assets with the same name can differ in crop, duration, or resolution.
Also inspect image sequences as groups. Check expected frame numbering, gaps, and the interpretation used by the project. A single readable frame does not prove the full sequence survived. Preserve the original folder organization and compare representative beginning and ending frames. If part of the sequence remains missing, record the exact range so the reconstruction or source-recovery task stays focused.
Free route 4: replace missing footage with a verified source
- Select the affected footage item in a working project copy.
- Locate the exact original or a verified existing project copy.
- Use the supported Replace Footage workflow rather than creating an unrelated new layer.
- Inspect all affected compositions, timing, scale, and source interpretation.
Replacing the source through the project relationship can preserve how existing layers use it. However, the replacement must match the intended content and technical properties. A different frame rate, duration, or pixel size can change the result. Compare visible content and interpretation, then test representative compositions. A missing-file warning disappearing does not prove the animation uses the right take or image sequence.
Preserve layered source relationships
A composition can depend on layers imported from a Photoshop or Illustrator source. Replacing that source with a flat export may preserve an appearance while removing the original editing relationships. Keep the layered original where available and inspect the imported structure. Also compare layer names and positions relevant to the animation. A technically readable image is not always an equivalent replacement for the asset the project originally referenced.
If only a flat reference survives, use it as a clearly labeled workaround or reconstruction source. Do not imply that it restores the original live text or separated elements. Keep the AEP’s useful animation and document the asset compromise. This lets the team produce a limited deliverable while preserving the possibility of reconnecting the correct layered source later.
Free route 5: import an existing editable project candidate
- Preserve both the current project and the historical candidate.
- Create a separate clean recovery project when that workflow fits the problem.
- Import the relevant candidate through After Effects’ supported project interface.
- Inspect the required compositions and their dependencies before accepting the salvage.
Importing an existing project into a clean project can support a controlled comparison or selective reconstruction. It does not guarantee repair of every unreadable AEP. If the application cannot read the candidate, an import may fail for the same reason. Treat it as a specific test on a copy rather than a universal fix. Preserve the exact error and compare another native backup when useful.
Avoid importing problems indiscriminately
Start with the compositions you actually need and inspect the resulting dependency structure. Duplicate source names and multiple historical versions can make a recovered project hard to maintain. Keep a clear naming scheme and compare source identity. Also avoid deleting apparently unused material until you understand its role. Expressions or nested relationships can depend on items that are not obvious from the first visible composition.
If a specific composition reproduces a failure, preserve the useful recovered work and isolate that part on another copy. Compare plugin and source dependencies before assuming corruption. Change one relevant factor at a time. This keeps the investigation interpretable and avoids mixing an environment fix, asset substitution, and project rewrite into one unreviewable recovery step.
Use rendered output as evidence with clear limits
A final movie or image sequence can preserve the visible result and help reconstruct timing, text, and composition. It does not normally contain the original AEP’s layer controls, expressions, or animation curves. Therefore, keep a render as reference rather than describing it as an editable project backup. If only the render survives, define whether the next task needs simple reuse or a full reconstruction.
For a rebuild, prioritize unique source assets and verified timing. Compare the rendered beginning, ending, and critical transitions. Also document any recreated expression or effect. A visually close reconstruction can be useful without reproducing the exact original settings. Keeping that distinction clear prevents a future designer from assuming the recovered project has the same flexibility and controls as the lost master.
Example: restore a title sequence after migration
Suppose an AEP opens after a workstation move, but the layered title source and one image sequence appear missing. A recent Auto-Save preserves the latest camera timing, while an older collected project contains the correct assets. First preserve both. Use the recent project as the base and reconnect the verified source material. Reverting to the old package would lose useful animation unnecessarily.
Next, inspect the layered source relationship, image sequence frame range, and title text. Scrub the full composition and render representative frames. If a plugin remains unavailable, preserve the original structure and create a separately labeled workaround if the delivery requires one. Finally, record the accepted project source and any substituted dependency. This creates a practical handoff without presenting a partial reconstruction as an untouched original.
Validate the recovered motion project
Check compositions, layer order, timing, keyframes, expressions, cameras, sources, fonts, and effects relevant to the deliverable. Then save, close, and reopen the accepted AEP. Render representative sections using the intended output settings. A successful preview can rely on cached material or omit a later problem, so inspect the actual saved project and its production path.
Keep damaged originals, useful Auto-Saves, collected assets, and reference renders until review finishes. Document missing dependencies and reconstructed work. Afterwards, preserve meaningful project milestones and complete source packages independently. Also test that a restored project opens from its intended destination without temporary recovery folders. This makes the accepted result portable and gives future incidents several genuine fallback sources.
Compare animation candidates by production milestones
Identify the intended composition state
Record the target composition, duration, latest text, important camera change, and a recognizable animation beat. Apply the same checklist to each AEP candidate. A project can contain several similar compositions and revisions, so the first one displayed may not be the intended recovery target. Also inspect the final edited area rather than relying only on the opening frame.
Keep candidate paths, source versions, and actual observations in a short comparison record. A note such as current timing with older title is more useful than mostly recovered. Preserve each initial state before relinking or changing effects. This makes it possible to choose the strongest base and identify exactly which remaining production changes require reconstruction.
Distinguish source and environment differences
A missing font or plugin can change the output of an otherwise useful current project. Compare the dependency inventory before discarding that candidate for an older one. Also inspect the creating application version. An unavailable feature does not necessarily mean the stored composition data vanished. Keep the source intact and test through an appropriate supported environment where legitimate access exists.
If you create a workaround, label it separately and document the limitation. A rendered replacement can support one delivery while reducing future editability. Do not silently make it the reusable master. Preserving the original composition relationships gives another designer a chance to reconnect the intended dependency later without rebuilding the entire production.
Inspect details that a preview can conceal
Expressions and linked controls
Check expressions and controls relevant to the animation rather than only their current visible result. An expression may depend on a layer name, composition, or external source that a selective recovery omitted. Also inspect values across several times. A correct frame at the start can conceal a later evaluation problem that appears only when the animation reaches another state.
If you rebuild a missing relationship, preserve the original candidate and record the change. Compare the result against a reference render, but do not infer every original parameter from visible output. Several different setups can produce a similar image. A useful reconstruction should remain understandable and editable, with its provenance clear to the next person who revises it.
Image sequence continuity
Inspect frame numbering, expected duration, and representative beginning and ending frames. A recovered directory can contain many valid images while missing a small interval. Do not assume the sequence is complete because the first frame opens. Also compare the source interpretation used by the project. A sequence at an unintended frame rate can alter timing without producing an obvious missing-file warning.
Preserve original filenames and folder boundaries during recovery. Renaming frames in bulk can make it harder to identify gaps or reconnect the correct sequence. If an interval is absent, document its exact scope and seek an independent source or controlled reconstruction. Keep the intact frames available even when the entire sequence cannot yet serve as the final production source.
Text, fonts, and layered artwork
Compare wording, line breaks, spacing, and the expected source-layer structure. A font substitution can change the design while leaving the text readable. A flat replacement for a layered asset can preserve appearance while removing independent animation controls. Inspect the actual next editing task before accepting that compromise. A final render and a reusable template have different needs.
Keep editable candidates separate from delivery exports. If you rebuild a text layer or mask, record it as new production work and compare the output at its intended size. Also preserve the original source asset where available. This prevents a successful urgent export from erasing the evidence needed to recover a more flexible master later.
Rebuild only the missing part
Combine complementary project sources
Suppose a recent Auto-Save contains the correct timing while an older collected project contains the missing source artwork. Preserve both and use the recent project as the base if its structure is sound. Reconnect the verified asset instead of reverting the entire production. Then inspect every composition that uses it, because one source replacement can affect multiple layers and scenes.
Record the selected project source, asset source, and any manual corrections. Also check for duplicate imported items that create ambiguity. A coherent recovered project should identify which source is authoritative rather than leave several similarly named candidates competing in the project panel. Keep historical evidence separately until the production owner accepts the result.
Use reference renders carefully
A rendered movie can show timing and appearance but cannot normally restore the original expression logic or separated layer controls. Use it as a reference for a bounded rebuild. Prioritize the unique content and editing flexibility required by the next task. Reconstructing every hidden control may be unnecessary for a limited archive delivery, while a template revision can require much more editable structure.
If the reference does not establish a detail, mark it for review rather than inventing an original-looking value. Keep the evidence and reconstruction notes concise. This gives the project owner a practical acceptance decision and avoids the false impression that a visually similar output proves exact restoration of the original motion-graphics setup.
Validate a portable production master
Reopen from the destination
After accepting the project and assets, reopen the AEP from its intended working location. Confirm that sources no longer depend on temporary recovery folders. Then render representative sections through the actual delivery path. This catches projects that appeared complete only because the investigator’s workstation still had resources available in unrelated folders or caches.
Also inspect output resolution, frame rate, color workflow, and audio where relevant. A successful composition preview is not a substitute for a production export. Keep a reference output associated with the accepted revision and document unresolved dependencies. This makes the handoff reviewable without requiring another designer to repeat every recovery experiment.
Protect project data and source assets independently
Create an appropriate complete source package and meaningful project milestone after acceptance. Test a restore copy without relying on the live production folder. Also retain useful final renders as a separate visual fallback. These protect different needs: editable composition data, actual media, and visible approved output. None alone guarantees a complete recovery of the other two.
Keep damaged originals and useful candidates until approval finishes. Afterwards, identify one authoritative master and follow the normal retention policy for evidence. A clear baseline reduces the risk of selecting an obsolete recovery file during the next deadline. It also gives future incidents several genuine sources instead of one rotating Auto-Save folder with uncertain asset coverage.
When PandaOffice Drecov may help
A storage scan may help when an AEP, source asset, or existing project archive is genuinely absent from supported local media. PandaOffice Drecov does not rebuild expressions from a rendered movie or guarantee repair of an unreadable proprietary project. Check current support and inspect actual candidates. Recovering a familiar project name is only the beginning of composition and dependency validation.
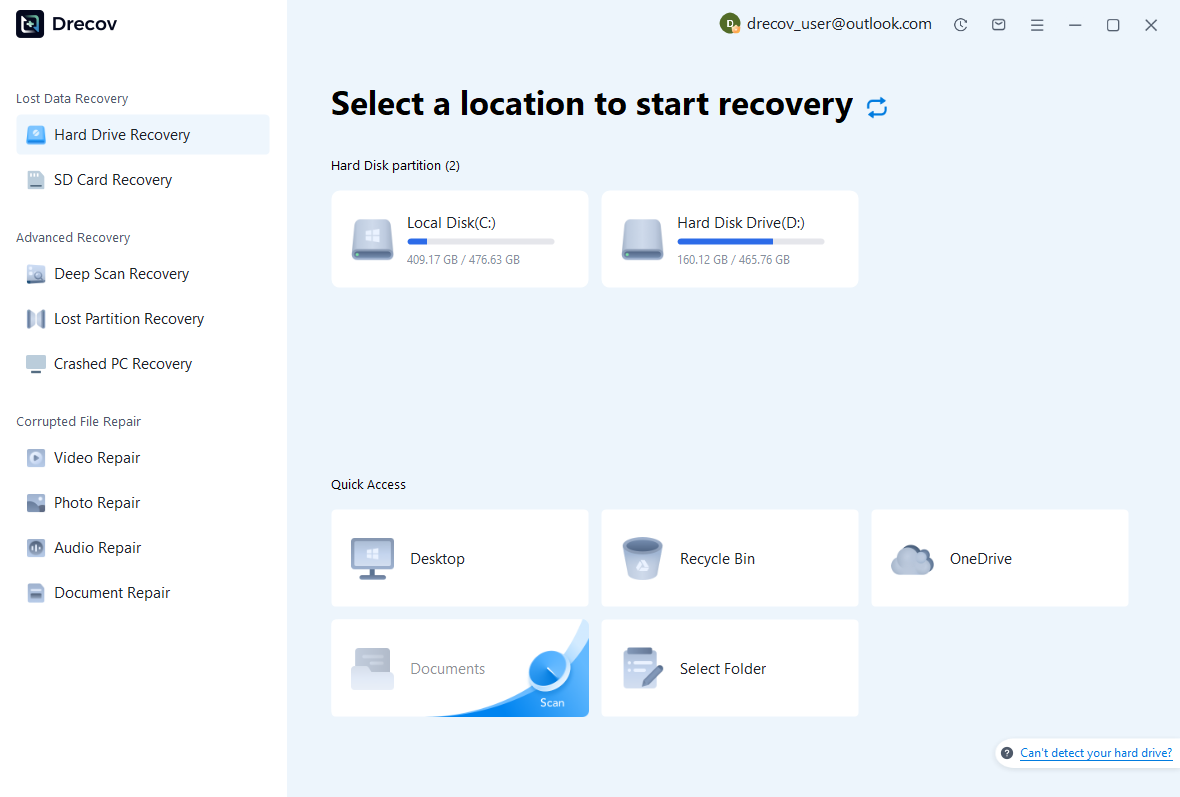
Step 1: select the production storage source
Identify whether the AEP, Auto-Saves, and original assets lived on separate disks. Select the supported source that held the missing component. Avoid rendering new files, rebuilding caches, or installing recovery software there. If the device becomes unstable, stop repeated scans and assess its condition. A healthy project disk cannot supply an original image sequence that only existed on another missing device.
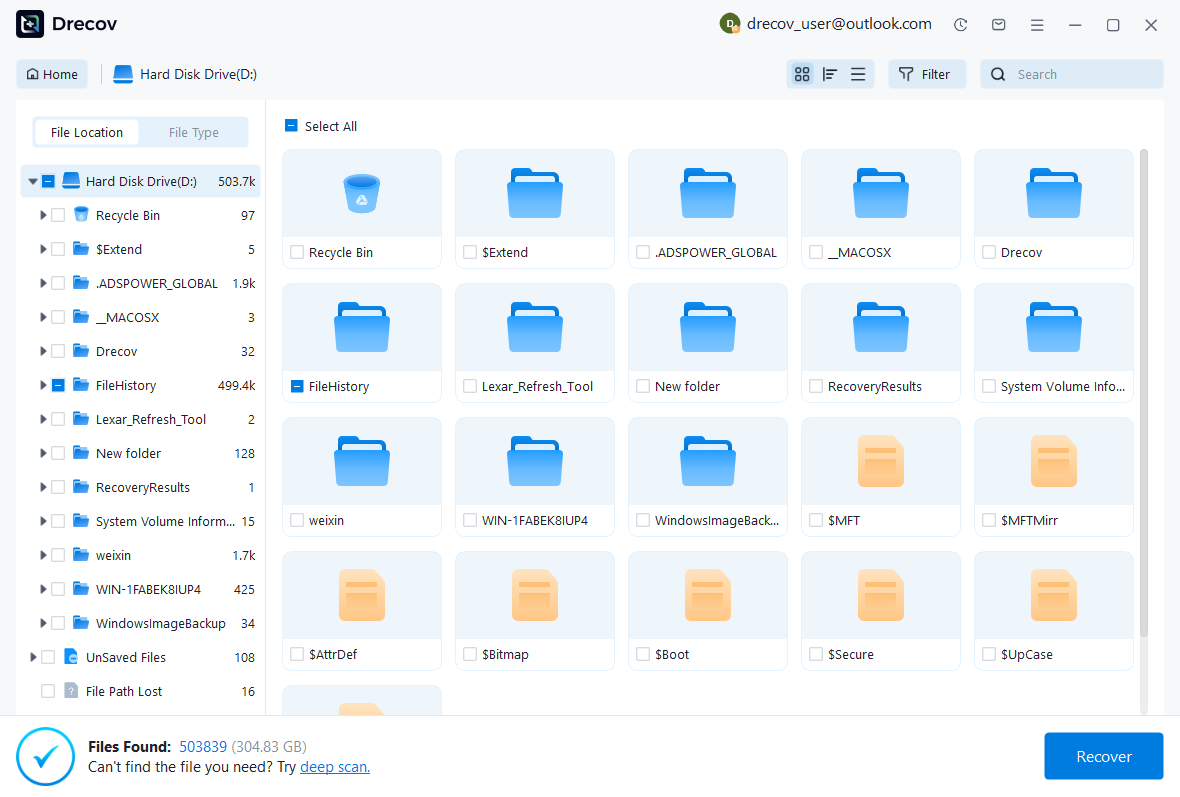
Step 2: compare projects and asset groups
Use available path, date, name, and format filters. Preserve several plausible AEP versions and keep image sequences grouped where possible. A preview may help identify content but cannot verify every composition or frame. Record candidate origins so you can reconnect the correct project milestone and source revision. A pile of similarly named files is not automatically a coherent production archive.
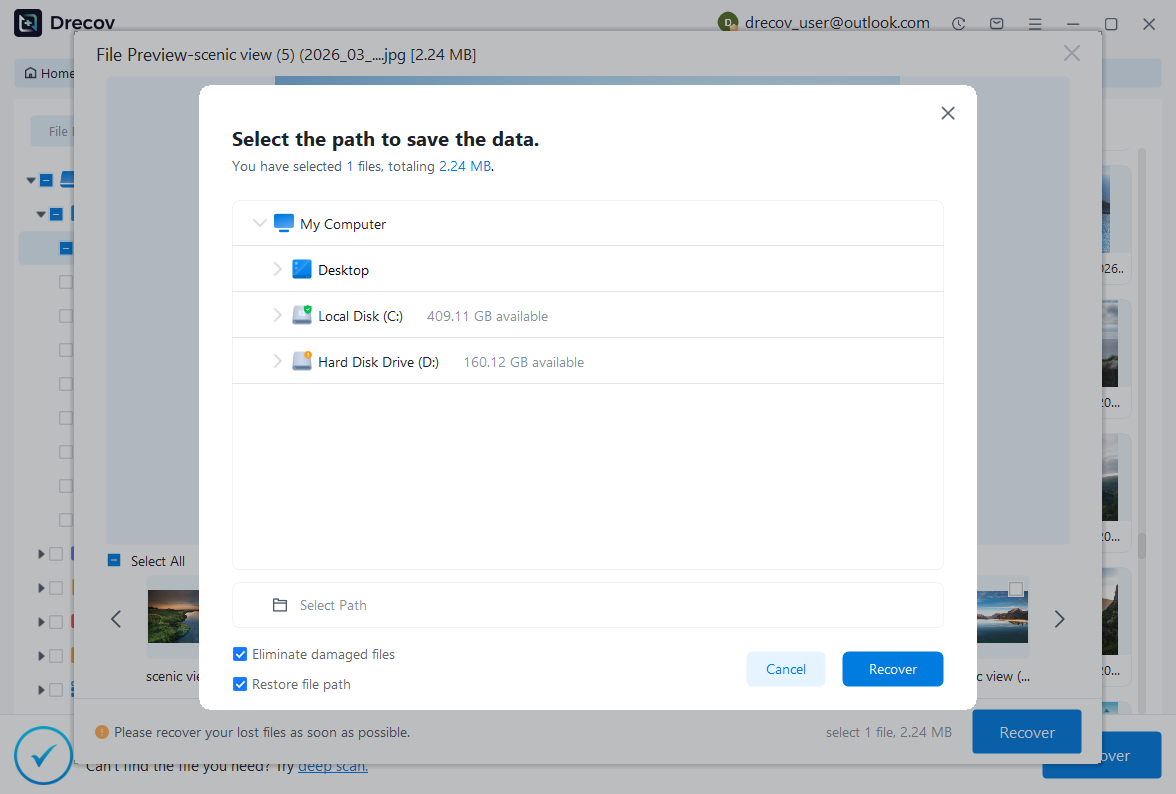
Step 3: recover elsewhere and render a test
Save useful candidates to a different healthy physical disk. Review licensing and preview limitations before purchasing. Then inspect project copies through After Effects and verify source assets in suitable applications. If a proprietary AEP has no preview, acknowledge that uncertainty. Finally, test the actual compositions and output. The recovery utility supplies candidates; native production review determines whether they restore the intended work.
Related recovery resources
Explore the relevant recovery options: Hard drive recovery, External hard drive recovery.
For another recovery case and its practical checks, read the related recovery guide.
Check the vendor guidance for the installed version: official recovery documentation 1, official recovery documentation 2.





