Home » How to Remove OneDrive from File Explorer [Step-by-Step Guide]
How to Remove OneDrive from File Explorer [Step-by-Step Guide]
Tired of the OneDrive icon cluttering your workspace? This comprehensive guide explains how to remove OneDrive from File Explorer using five proven methods, from simple unlinking to advanced registry modifications. We also cover essential data protection tips and how to use PandaOffice Drecov to ensure your important files remain safe throughout the customization process.
Managing your digital workspace is essential for productivity, yet many Windows users find their sidebars cluttered by services they don’t use. If you are looking to remove OneDrive from File Explorer, you are likely seeking a more streamlined interface or perhaps you prefer a different cloud storage provider. While Microsoft integrates its cloud service deeply into the operating system, you have the power to customize your environment.
In this comprehensive guide, we will explore every method to remove OneDrive from File Explorer, ranging from simple setting toggles to advanced registry edits. Furthermore, because modifying system settings can sometimes lead to accidental data loss, we will provide expert insights into data recovery using professional tools like PandaOffice Drecov.
Before we dive into the technical steps to remove OneDrive from File Explorer, it is helpful to understand why it is there in the first place. Microsoft designs Windows to be a “cloud-first” platform, positioning OneDrive as the central hub for your documents.
Default Integration in Windows
In modern versions of Windows, OneDrive is not just an app; it is a core system component. This integration ensures that when you save a file to your “Documents” or “Pictures” folder, it is automatically protected in the cloud. Consequently, the OneDrive icon is pinned to the navigation pane by default to encourage users to utilize their 5GB of free storage.
Automatic Sync Features
The primary reason for its constant presence is the Automatic Sync feature. This service runs in the background, monitoring changes to your files and uploading them instantly. While this provides peace of mind for many, it can be intrusive for those who prefer offline storage or third-party solutions like Dropbox or Google Drive. Therefore, learning how to remove OneDrive from File Explorer becomes a priority for power users who want full control over their file paths.
Should You Remove OneDrive from File Explorer?
Deciding whether to remove OneDrive from File Explorer depends entirely on your workflow. It is not a “one-size-fits-all” decision.
Benefits of Removing OneDrive
Cleaner File Explorer Layout: Removing the icon reduces visual clutter in the navigation pane.
Reduced Resource Usage: Disabling the sync engine can save RAM and CPU cycles, especially on older hardware.
Privacy and Control: If you do not want your files automatically uploaded to Microsoft servers, removing the integration is a key step.
Elimination of Annoying Pop-ups: You will no longer receive “OneDrive is full” or “Finish setting up your PC” notifications.
When You Should Keep It
You should probably keep OneDrive if you frequently collaborate on Office 365 documents or if you rely on the “Files On-Demand” feature to save local disk space. If you decide to proceed, ensure you have a solid backup strategy in place.
Before You Begin – Important Things to Know
Modifying system components requires a cautious approach. Before you attempt to remove OneDrive from File Explorer, please read the following distinctions carefully.
Difference Between Unlinking and Uninstalling
Unlinking: This signs you out of the OneDrive app. The app remains on your computer, and the folder remains in File Explorer, but no data is synced.
Hiding (Registry/Group Policy): This keeps OneDrive running in the background but removes the visual icon from the File Explorer sidebar.
Uninstalling: This completely removes the OneDrive application from Windows.
Backup Your Files First
This is the most critical step. When you remove OneDrive from File Explorer, especially through unlinking or uninstalling, files that were “online-only” (indicated by a blue cloud icon) will disappear from your local machine. You must ensure all important data is downloaded to your physical hard drive.
If you accidentally lose files during this process, do not panic. You can use the official OneDrive support page for basic recovery.
How to Recover Data After Removing OneDrive
Sometimes, in the rush to remove OneDrive from File Explorer, users accidentally delete folders or find that their files didn’t sync correctly before the uninstallation. This is where PandaOffice Drecov becomes an essential tool in your arsenal.
PandaOffice Drecov is a professional-grade data recovery solution designed to retrieve lost, deleted, or formatted files from Windows environments. Whether you accidentally wiped your OneDrive folder or suffered a registry error that hid your data, Drecov can scan your sectors and bring your files back.
⚠ Warning: Install it on a drive different from the one where your data was lost to prevent overwriting.
Steps to Recover Lost Files Using PandaOffice Drecov
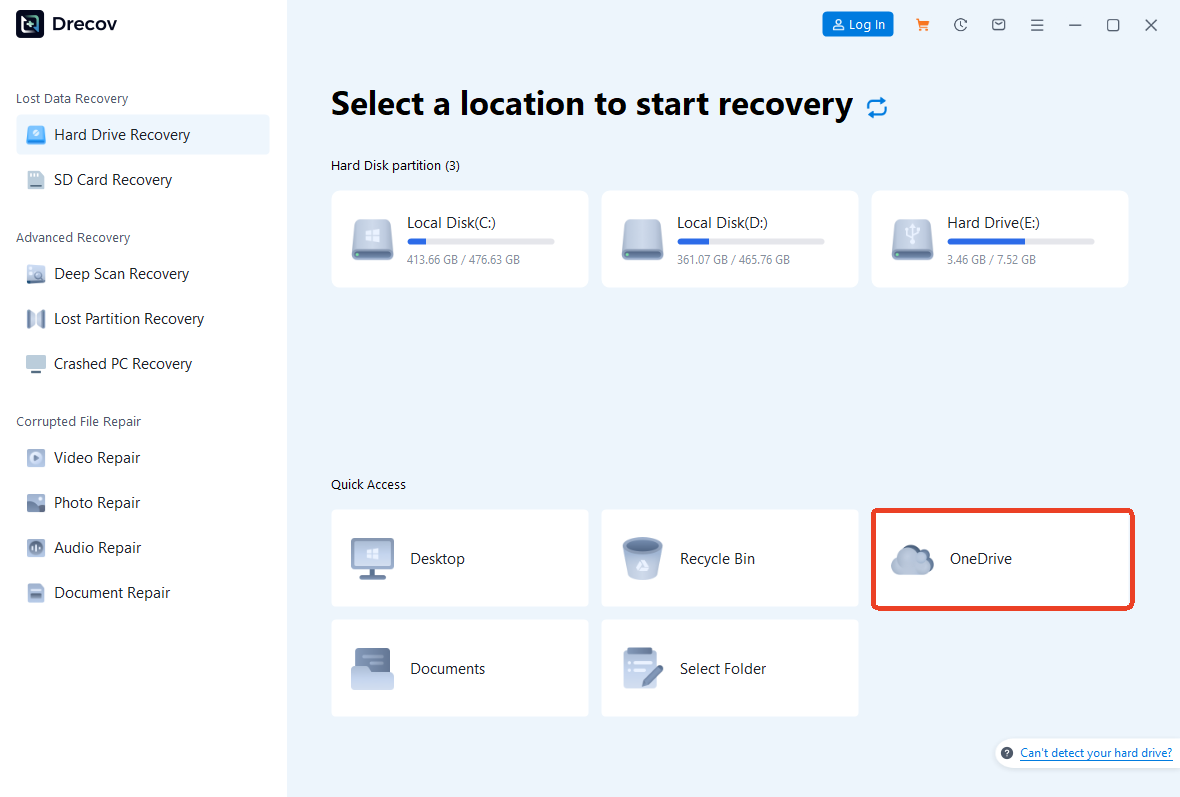
Step 1: Select the Location. Launch the software. You will see a list of drives and specific locations. Select the “C:” drive or the specific folder where your OneDrive data was previously located.
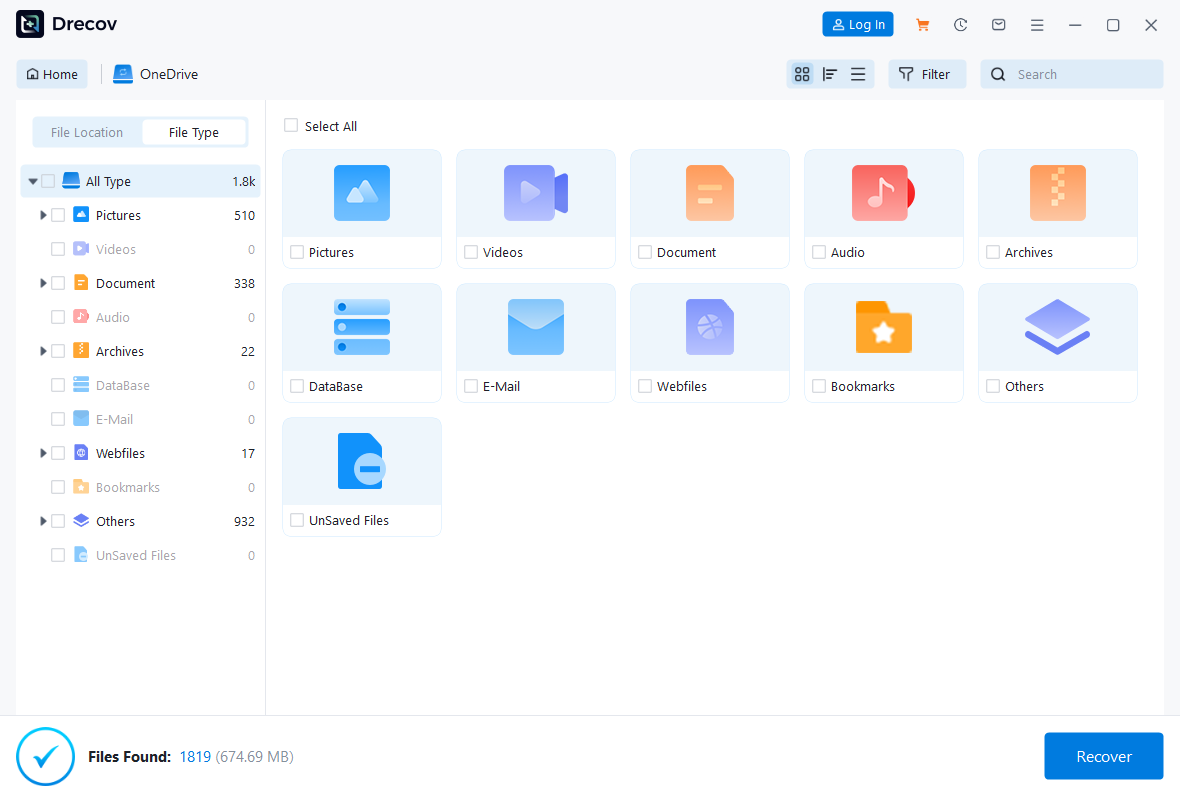
Step 2: Scan for Deleted Data. Click the “Scan” button. The software will perform a Quick Scan followed by a Deep Scan.
Warning: Do not interrupt the Deep Scan process, as this is where the software identifies fragmented files that were lost during the attempt to remove OneDrive from File Explorer.
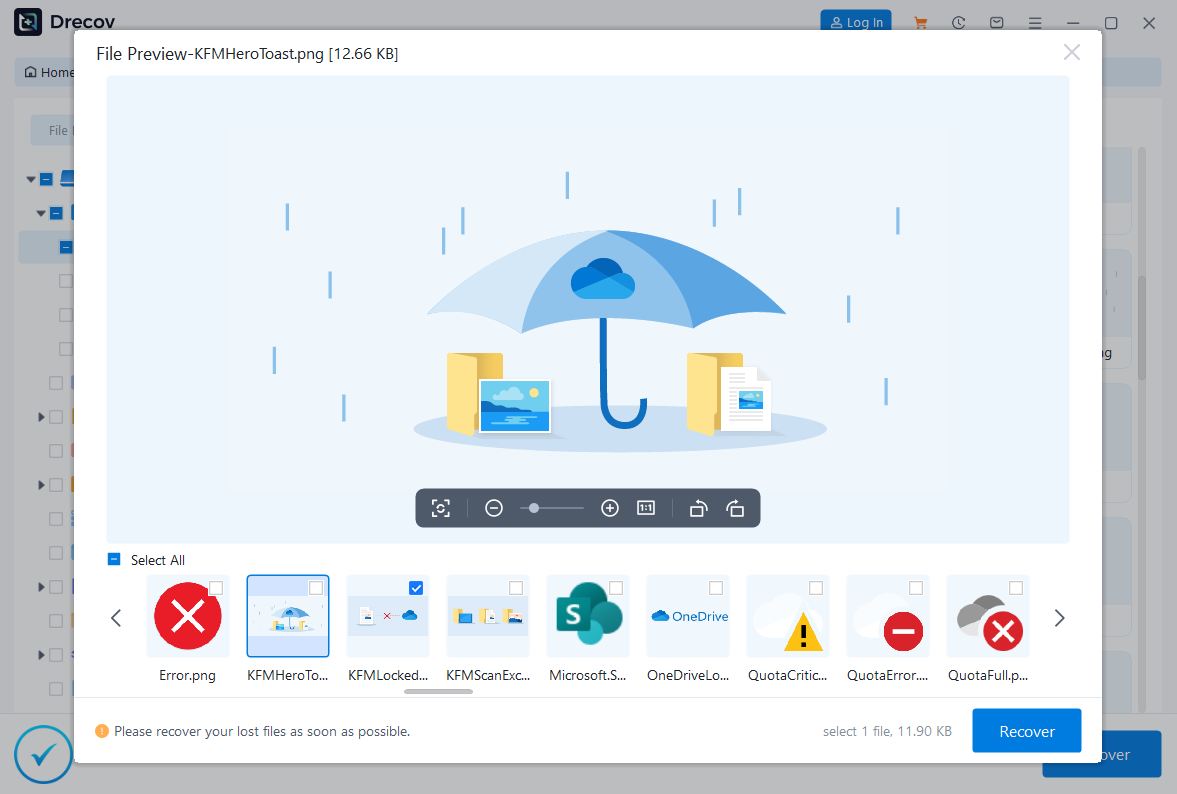
Step 3: Preview and Filter. Once the scan is complete, use the filter sidebar to search for specific file types (e.g., .docx, .jpg). You can double-click files to preview them to ensure they are intact.
Step 4: Recover and Save. Select the files you need and click “Recover”.
Key Point: Always save your recovered files to an external hard drive or a different partition to ensure data integrity.
Method 1 – Unlink OneDrive from Your PC
If you want to stop the syncing process without deleting the app, unlinking is the best first step to remove OneDrive from File Explorer functionality.
Step 1: Open OneDrive Settings
Locate the small blue or white cloud icon in your system tray (near the clock). Right-click it and select the gear icon, then click Settings.
Step 2: Unlink This PC
Navigate to the Account tab. Under the account name, you will see a link that says “Unlink this PC”. Click it and confirm your choice in the pop-up window. This effectively stops the communication between your computer and the cloud.
Method 2 – Hide OneDrive Using File Explorer Settings
If you have unlinked the account but the icon remains, you can use the built-in Folder Options to clean up your view.
Step 1: Open File Explorer Options
Open File Explorer, click the three dots (…) at the top (Windows 11) or the View tab (Windows 10), and select Options.
Step 2: Remove from Navigation Pane
While Windows doesn’t always provide a direct “Off” switch here for OneDrive, you can often uncheck “Show all folders” or “Show libraries” to simplify the view. However, for a complete removal of the icon, the Registry method below is much more effective.
Method 3 – Remove OneDrive via Registry Editor
This is the most effective “permanent” way to remove OneDrive from File Explorer without uninstalling the app. It hides the entry from the side navigation bar.
Step 1: Open Registry Editor
Press Windows + R on your keyboard, type regedit, and hit Enter. If a User Account Control prompt appears, click Yes.
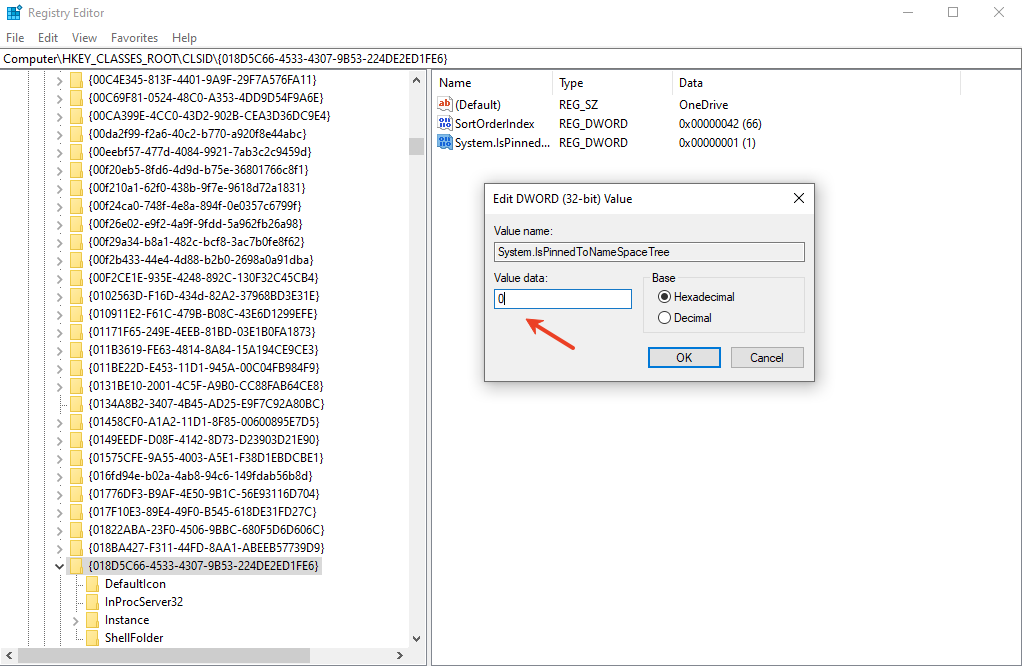
Step 2: Modify System Registry Key
Navigate to the following path in the left sidebar:
Repeat the process: change System.IsPinnedToNameSpaceTree to 0.
Step 4: Restart Your Computer
For the changes to take effect, restart your PC or restart the Windows Explorer process via Task Manager. The OneDrive icon should now be gone from your sidebar.
Method 4 – Use Group Policy Editor (Windows Pro Users)
If you are using Windows 10 Pro, Enterprise, or Education, you can remove OneDrive from File Explorer using the Group Policy Editor. This is safer than the Registry method.
Step 1: Open Group Policy
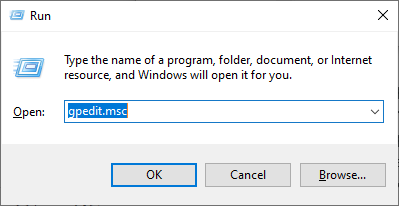
Press Windows + R, type gpedit.msc, and press Enter.
Step 2: Disable OneDrive Integration
Navigate through the folders on the left:
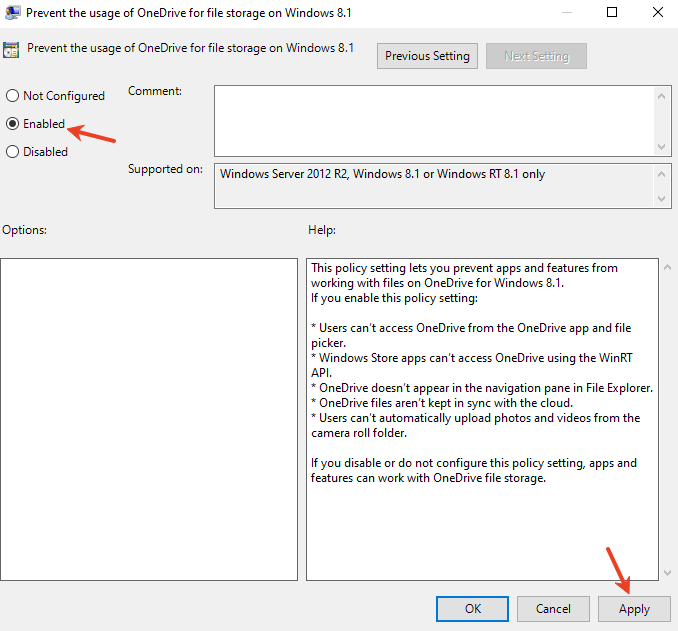
Computer Configuration > Administrative Templates > Windows Components > OneDrive.
Step 3: Enable the Restriction
Find the policy named “Prevent the usage of OneDrive for file storage”. Double-click it, select Enabled, and click Apply. This will completely disable OneDrive functionality across the system.
Method 5 – Completely Uninstall OneDrive
If you are certain you never want to use the service again, you can fully remove OneDrive from File Explorer by uninstalling the software.
Step 1: Uninstall from Settings
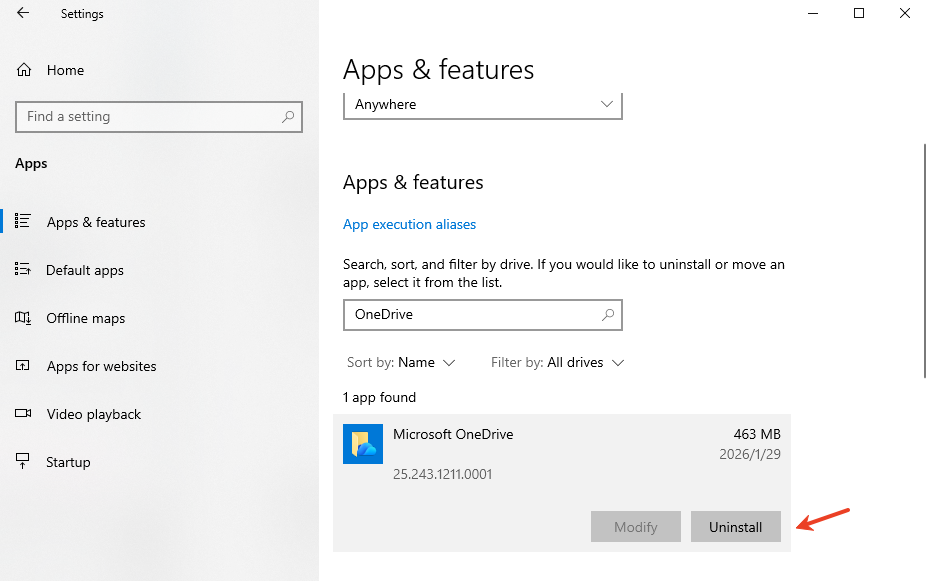
Open Settings > Apps > Installed Apps (or Apps & Features). Search for “Microsoft OneDrive,” click the three dots, and select Uninstall.
Step 2: Remove Leftover Files
Even after uninstallation, a folder usually remains. Open File Explorer and paste %UserProfile% into the address bar. Locate the OneDrive folder. If you have confirmed your files are backed up elsewhere, you can delete this folder to free up space.
How to Remove OneDrive from File Explorer in Windows 11
Windows 11 features a redesigned File Explorer that makes OneDrive even more prominent. To remove OneDrive from File Explorer in Windows 11, the most effective method is unlinking the account followed by the Registry edit mentioned in Method 3. Windows 11 also allows you to disable “OneDrive cloud suggestions” in the Start Menu settings, which further cleans up the user interface.
How to Remove OneDrive from File Explorer in Windows 10
In Windows 10, the process is slightly more straightforward as the “Uninstall” feature is less likely to be blocked by system updates. Users can simply use the Control Panel > Programs and Features to remove the app. If the icon persists, the Registry key System.IsPinnedToNameSpaceTree remains the gold standard for removal.
Additional OneDrive Data Scenarios
As you manage your cloud storage settings, you might encounter specific data challenges. It is important to handle your files correctly to avoid permanent loss. Here are some resources for common scenarios:
If you realize you deleted something important during the cleanup, follow the steps to recover OneDrive deleted files to protect your digital life.
Common Errors and How to Fix Them
OneDrive Still Appears After Registry Edit
This often happens if the “Wow6432Node” path was ignored. Ensure you have changed the value in both registry locations mentioned in Method 3.
“Access Denied” When Modifying Registry
If Windows prevents you from changing the value, right-click the {018D5C66...} key, select Permissions, and ensure your user account has Full Control.
Files Are Missing After Unlinking
This usually means the files were “Online-Only.” You will need to sign back in, change the settings to “Always keep on this device,” wait for the download to finish, and then unlink again. If they are truly gone, use PandaOffice Drecov immediately.
Is It Safe to Remove OneDrive?
Yes, it is entirely safe to remove OneDrive from File Explorer. OneDrive is an application layer sitting on top of the Windows file system. Removing it does not corrupt your OS or prevent Windows Updates from functioning. It simply treats your computer as a local-storage-first machine, which was the standard for decades before cloud integration became the norm.
How to remove OneDrive from file explorer FAQs
1. Will removing OneDrive delete my files?
No, as long as the files are fully downloaded to your PC. If you see a green checkmark next to your files, they are safe. If you see a cloud icon, they exist only on Microsoft’s servers and will disappear from your PC if you unlink without downloading them first.
2. Can I reinstall OneDrive later?
Absolutely. You can download the latest version of the OneDrive client from the official Microsoft website at any time.
3. Does removing OneDrive make my PC faster?
For most modern PCs, the difference is negligible. However, on systems with limited RAM or slow spinning hard drives, stopping the OneDrive background sync process can noticeably improve boot times and system responsiveness.
4. Why does OneDrive keep coming back after an update?
Microsoft occasionally resets default app configurations during major “Feature Updates.” If this happens, you may need to re-apply the Registry edit or uninstall the app again.
5. What is the best way to ensure I never lose data when removing OneDrive?
The best method is to copy your entire OneDrive folder to an external USB drive before you start the process of learning how to remove OneDrive from File Explorer.
Conclusion
Taking control of your operating system is a rewarding experience. When you remove OneDrive from File Explorer, you are customizing your PC to fit your specific needs rather than adhering to default manufacturer settings. Whether you choose the light approach of unlinking or the deep dive of registry editing, your File Explorer will finally look the way you want it to.
Remember, data is fragile. Always verify your backups before making system changes, and keep a tool like PandaOffice Drecov handy for those “just in case” moments.