







To merge multiple folders into one in Windows 11, create a new destination folder, copy the contents of each source folder into it, and review every same-name file prompt before replacing anything. Keep the source folders until you have opened representative files and checked counts, dates, and subfolders. This copy-first approach is easier to reverse than cutting and pasting everything at once. If your folders are in OneDrive or another synced location, pause syncing or use that service’s version history before resolving duplicate names; a local overwrite may propagate.
Decide what “merge” should mean for these folders
Two folders can have the same name and still contain different work. You may want one combined destination with every unique file, a newer version of each file, or simply one place to browse both sets. Decide this before copying. Windows File Explorer can combine directory contents, but it cannot know which of two documents with the same name has the correct text. A “replace” choice is a decision about a file, not a harmless folder-organizing button.
Write down the two source paths and the intended destination. For example, a Documents folder on the PC and a copied Documents folder on a USB drive may contain work from different dates. Check whether either source is a sync folder, a program folder, or a backup that should remain untouched. Do not merge Windows system folders or an application’s live database simply because their names match.
Before starting, open a few important files in each source. Look for the newest edits and confirm that each file is complete. A folder with a recent modification date does not guarantee that all its contents are newer. File Explorer’s Details view makes names, types, sizes, and dates easier to compare than large thumbnails do.
Prepare a destination that leaves the originals intact
Choose a healthy drive with enough free space for both source sets plus temporary working room. Create a clearly named destination, such as “Project Combined,” rather than pasting into one of the sources. If the source is on a drive that clicks, disconnects, or shows read errors, stop: repeated copying may stress unstable media. Imaging or professional recovery is safer than a normal folder merge in that situation.
Make a separate backup when the folders contain irreplaceable work. A backup is especially important if the merge involves client files, game saves, accounting data, or a synced folder. Check that the backup opens before proceeding. Avoid adding fresh work to the source folders during the merge, because a changing source makes your final comparison unreliable.
Microsoft’s File Explorer instructions describe the Copy and Paste commands in Windows 11. Use Copy for this first pass, not Cut. A source that remains in place gives you an immediate reference when a name conflict appears or a transfer fails.
Copy the first folder, then bring in the next
Copy contents, not an extra enclosing folder
Press Windows+E and open the first source folder. Select the files and subfolders you intend to combine, then choose Copy from File Explorer’s toolbar or press Ctrl+C. Open the new destination and choose Paste or press Ctrl+V. Wait for the transfer to finish and check whether Windows reported skipped items or errors. If you copied the enclosing folder itself, you may create an unwanted nested “Documents/Documents” structure; inspect the destination before continuing.
Next, open the second source and copy its intended contents into the same destination. Pause at any duplicate-name dialog. File Explorer may offer to replace files, skip them, or compare information. Do not choose one option for every conflict until you know whether repeated names represent identical files or different work.
Resolve duplicate filenames deliberately
For a small conflict set, compare file size, modification date, and content in the original source folders. Open both versions of a document if possible. If both matter, rename one copy in the destination with a meaningful suffix before continuing. A date in a filename is helpful only when you know what that date means; avoid creating dozens of “final-final” duplicates you cannot interpret later.
For many conflicts, split the merge into smaller batches by project or year. Keep a simple note of which source supplied each group. If Windows offers to replace a file, confirm the destination path shown in the prompt. A rushed “replace all” can hide a newer file under an older copy with the same name.
Check the combined result before deleting anything
Compare the destination with both source folders. Look at the top-level subfolders, total item counts, and the files you identified as most important. Counts alone are not enough because duplicate names may collapse into one destination file. Open a sample from each source and at least one file that had a name conflict. A successful paste message proves the operation finished, not that you chose the right version.
Search inside the new destination for a distinctive filename from each original folder. Check that document contents and image dimensions look right. If a video or archive matters, open it beyond its first frame or entry. When cloud sync is involved, wait for the service to finish and verify the same files through its web interface before removing local originals.
Leave the source folders untouched for a while if space allows. If you must remove them, first make a separate backup of the combined destination and verify it. Do not empty Recycle Bin immediately after cleanup. That short-lived safety net can help if you discover a missing file after the merge.
If a file vanished or the wrong version replaced it
Stop using the affected destination drive until you know what happened. Check the untouched source folder first, then Recycle Bin and available backups. If the folder lived in OneDrive, inspect version history before changing more local copies; the OneDrive version guide covers that branch. A replaced file is not the same as a deleted one, and overwritten bytes may be impossible to reconstruct.
For a local file that was deleted during cleanup, Drecov can search a stable, readable Windows drive for recoverable copies. It uses Quick Scan, Deep Scan when needed, filters, previews, and recovery to another healthy location. It does not choose the “correct” version of two same-name files for you, and it cannot guarantee recovery of overwritten data. The Recycle Bin recovery page explains the simpler deleted-file route, while the file-recovery overview covers files no longer present there. Use software scanning only after checking surviving copies and backups.
⚠ Warning: Install it on a drive different from the one where your data was lost to prevent overwriting.
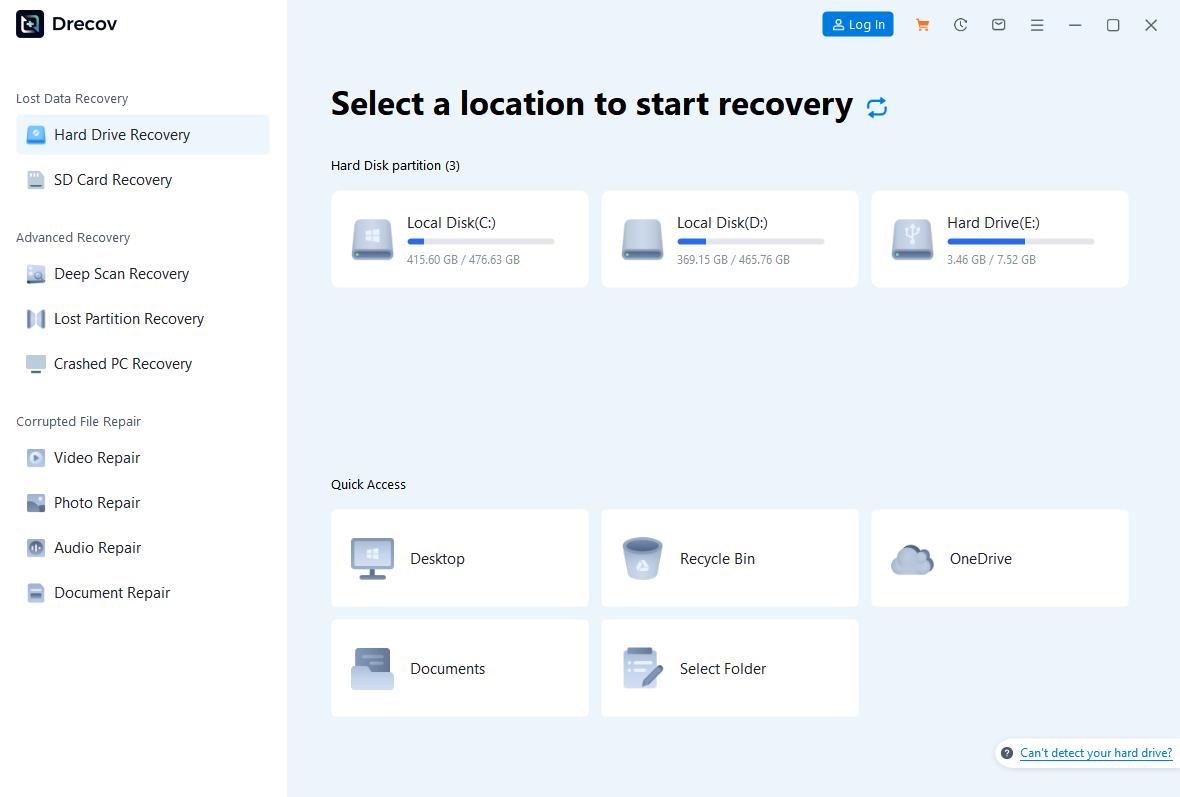
Step 1: Select the place the lost file occupied
Prepare another healthy storage destination. Do not install Drecov onto the drive that held the deleted file. Open Drecov and select the original source or destination volume where the file was last known to exist before the merge. If that drive repeatedly disconnects or reports serious read errors, stop direct scanning and consider imaging or professional help.
Step 2: Search for the missing version
Run Quick Scan first. Use the former folder, filename, file type, and dates to narrow candidates. If the missing version does not appear and the device remains stable, continue with Deep Scan. Preview documents or images where supported, but remember that a preview does not prove every page or embedded asset survived. A same-name result could be an older version, so compare content rather than filename alone.
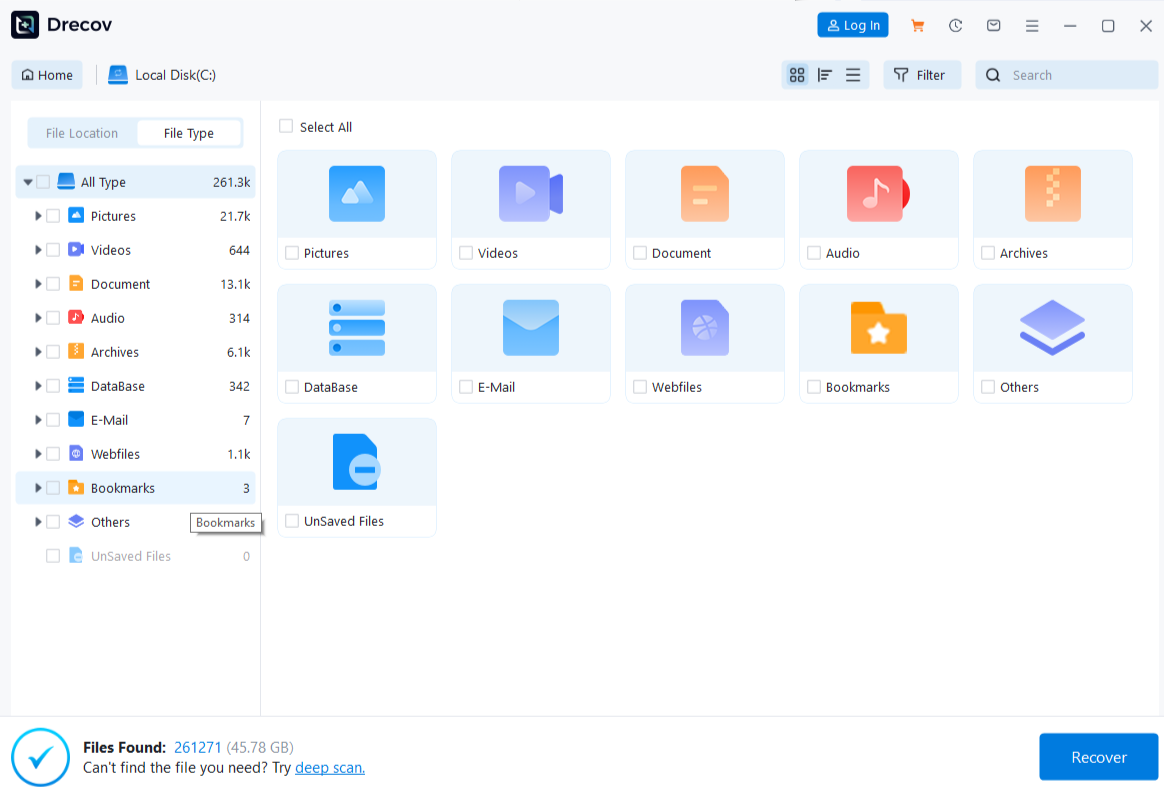
Step 3: Recover elsewhere and compare
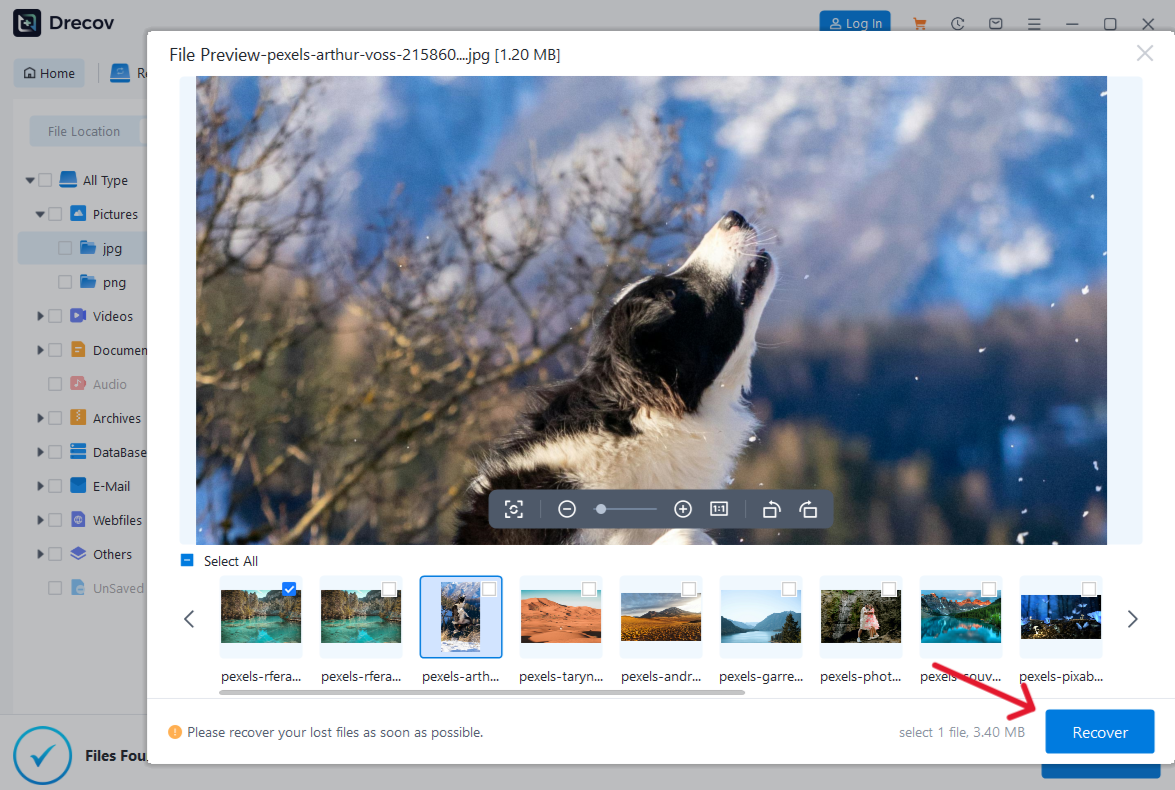
Recover candidates to the other healthy drive, never back to the affected source. If output is not where expected, check the Drecov folder or Recovery folder. Open each candidate and compare it with the surviving copies from both original folders. Only after that review should you resume cleanup or overwrite a file in the combined destination.
⚠ Warning: Install it on a drive different from the one where your data was lost to prevent overwriting.
FAQs
Does Windows 11 merge folders automatically?
File Explorer can bring their contents into one destination, but it asks you to decide what to do with same-name files. It cannot identify which version contains the work you want to keep.
Should I use Cut or Copy?
Use Copy for the first merge. Once the combined folder is verified and backed up, you can decide whether to delete the originals. Cutting removes the easy comparison point too early.
Will replacing a file send the old version to Recycle Bin?
Do not rely on that. Preserve a separate copy before approving Replace. Check backup or cloud version history if you later need the earlier contents.
Can I merge two OneDrive folders the same way?
You can copy files, but sync may propagate replacements or deletions. Check the account, sync state, and version history before resolving conflicts, then verify the result on the web.
Can Drecov restore an overwritten version?
It can search for recoverable file copies on stable storage, but fully overwritten data cannot be promised. An untouched source folder, version history, or backup is the better first check.
Conclusion
To merge folders in Windows 11 safely, copy their contents into a new destination and handle same-name files one by one. Keep the original folders until the combined result opens correctly and a backup exists. If a local file was deleted during cleanup, check surviving copies and Recycle Bin first. Drecov can help search a stable drive for recoverable files and save candidates elsewhere, but it cannot decide which document version was correct or guarantee recovery after an overwrite.
⚠ Warning: Install it on a drive different from the one where your data was lost to prevent overwriting.