







Learning how to delete old backups starts with a question that dates cannot answer: can you restore what you need from a newer copy? If a backup drive is full, identify the program that created each set, open or restore representative files from the newest usable one, and only then remove older sets through that program. Do not erase an unfamiliar folder because its timestamp looks old. It may hold the only version from before a bad edit, or a base image needed by later incremental backups.
Decide what you must still be able to restore
A backup has value because of the recovery job it can perform. A recent copy of a finished document may replace an older duplicate. It cannot necessarily replace last month’s version of a spreadsheet before an unnoticed formula error. Likewise, a current file backup may protect photographs but not return Windows and installed applications to a working state. Before deleting anything, write down the restore outcomes you still need: one recent personal-file copy, a version from before a known mistake, perhaps a full-system recovery point, and any records you must retain for work or legal reasons.
Look beyond the apparent free-space gain. If the drive that holds your backup is also the only place containing the original photos, those folders are not expendable backup duplicates. A synchronized folder can reproduce a deletion across devices; its presence does not establish an independent second copy. When in doubt, disconnect the proposed deletion target and ask whether you could still restore an important file. If the answer is no, make another verified copy first.
A sensible retention rule depends on change and consequence, not an arbitrary number of days. Keep older generations when errors may go unnoticed for weeks. For a short-lived project, you may need fewer versions after delivery, provided a tested final archive survives elsewhere. The key is to define the oldest incident you still want to reverse. A backup older than that may be removable only after you confirm it is not supporting newer sets.
Find out which backup system owns the space
Open the nearly full drive in File Explorer and inspect the top-level folder names without renaming or moving them. Then check the backup application or Windows feature that points to that destination. File History stores versions of selected personal files. A system image captures a different scope. Phone-device backups, application archives, cloud copies, and manually copied folders each have their own retention logic. You cannot safely apply one deletion method to all of them.
File History versus a system image
Search Control Panel for File History and confirm which drive it currently uses. The presence of a FileHistory folder is a clue, but the configured destination and account matter more. A system image may be managed through Backup and Restore (Windows 7) or another imaging application. Image programs can use a full image as the base for later differential or incremental sets. Deleting one large old file by hand can make newer points unusable. Use the creator’s retention or cleanup controls where available; if the application is gone, preserve the chain until you can establish its dependency structure.
Manual copies, cloud storage, and device backups
A folder you copied yourself can be inspected like ordinary files, but it may include material excluded from automated backups. Cloud versions usually belong to the cloud service’s account and retention interface, not the local disk’s Recycle Bin. A phone backup made through Apple Devices or iTunes is different again. Record the account, device name, backup date, storage location, and creating application before removing a candidate. That small inventory prevents you from deleting the wrong person’s or wrong device’s only copy.
Prove the newer backup can restore real data
A green “completed” message is not a restore test. Select a recent document, an older version of a frequently edited file, a photograph, and one larger item such as a video or archive. Recover them to a temporary folder on another healthy drive, not over live originals. Open each result in its normal application. Check the text, several photo details, the middle of the video, or sample files inside the archive. For a system image, follow the creating application’s verification and recovery-media instructions; merely browsing an image file cannot prove the computer would boot from a restore.
Microsoft’s File History instructions describe previewing previous versions and restoring to another location rather than replacing a current file. Use that safer destination during the test. If the expected version is absent, reconnect the right backup drive and check the right Windows account before concluding that the history was lost. The related guide to a missing File History drive is useful when Windows points to the wrong destination.
Also confirm that a new backup can be created now. A backup set from last week is not enough if the job has quietly failed since then. Compare the application’s latest successful run, the destination’s available space, and a recently changed file. If the test restore fails, stop the cleanup. Find the failure first or create a separate reliable backup. Removing old sets while the new one is unusable trades a visible storage warning for a hidden data-loss risk.
Remove older File History versions without deleting its structure
With the current destination connected, open Control Panel, choose System and Security, then File History. Select Advanced settings and review the saved-version retention setting and any available cleanup option. On some Windows builds the cleanup link appears as “Clean up versions”; wording can vary. Choose a cutoff only after the restore test confirms that dates beyond it are no longer needed. Read the confirmation carefully, because cleanup is not the same as hiding older versions from view.
If the cleanup control is unavailable or an old drive is no longer the active destination, do not immediately delete its FileHistory directory in Explorer. First determine whether that old drive holds versions missing from the replacement drive. Browse a sample of those versions and copy irreplaceable ones to separate storage. You may then retire the obsolete destination or use the supported controls associated with its backup set. Keep the drive disconnected during ordinary use if you are preserving it as an archive rather than an active target.
File History mainly protects configured personal-file locations; it is not proof that every app database, game save, or external drive was captured. Check a folder outside the standard profile if it matters to you. The broader external-drive backup checklist explains why a verified sample restore matters before deleting a generation. After cleanup, run File History again and restore one newly changed test file. That final check confirms the active chain still works.
Delete image, phone, and cloud backups through their own controls
System images and backup-app archives
Open the program that produced the image. Find its backup-set, retention, or manage-storage screen and inspect which full backup each later point depends on. If the interface offers “delete backup set” or “remove old versions,” use it instead of deleting one component file. For the built-in Windows Backup and Restore (Windows 7) interface, check Manage space for the relevant destination when the option exists. Review the selected backup period and read the deletion warning before confirming. Some managed or newer configurations use other interfaces, so verify the actual tool rather than following a menu path from a different product.
Keep recovery media and encryption keys with the image that requires them. A bare image file may not be useful if its password, boot medium, or storage driver is missing. When the backup drive itself clicks, disappears, or reports severe read errors, stop repeated cleanup attempts. A failing disk needs careful preservation, not a large deletion operation or an intensive verification loop.
Local phone backups and online versions
For an iPhone or iPad backup on a Windows PC, open Apple Devices, select the connected device, then use General and Manage Backups to inspect backups associated with that device. Apple’s support page explains the available delete, archive, and show-in-Explorer actions; avoid removing a MobileSync folder by guesswork. Confirm a newer backup exists and that you know whether it is local or in iCloud. Deleting a cloud backup can also change future backup behavior, so examine the cloud service’s own warning before acting.
OneDrive, Google Drive, and similar services have account-level storage, version, and trash rules. Deleting a synchronized local folder may remove it online too. Open the web interface for the correct account and confirm that the supposed newer copy is visible and downloadable before clearing an older online backup. If the account belongs to work or school, retention policies may be managed by an administrator; do not assume you can restore an item after its recycle period ends.
If you deleted the wrong local backup, preserve the remaining source
Stop writing to the drive that held the deleted backup files. Do not create a replacement backup on that same volume, run cleanup again, or install a recovery program there. Check the Recycle Bin and the backup application’s own trash or retained-version area first. If a cloud copy exists, download it to another device. An SSD may release deleted blocks through TRIM, so software recovery is uncertain; additional writes only worsen the situation. For a drive that repeatedly disconnects, has an incorrect capacity, or makes unusual noises, seek specialist help rather than running multiple scans.
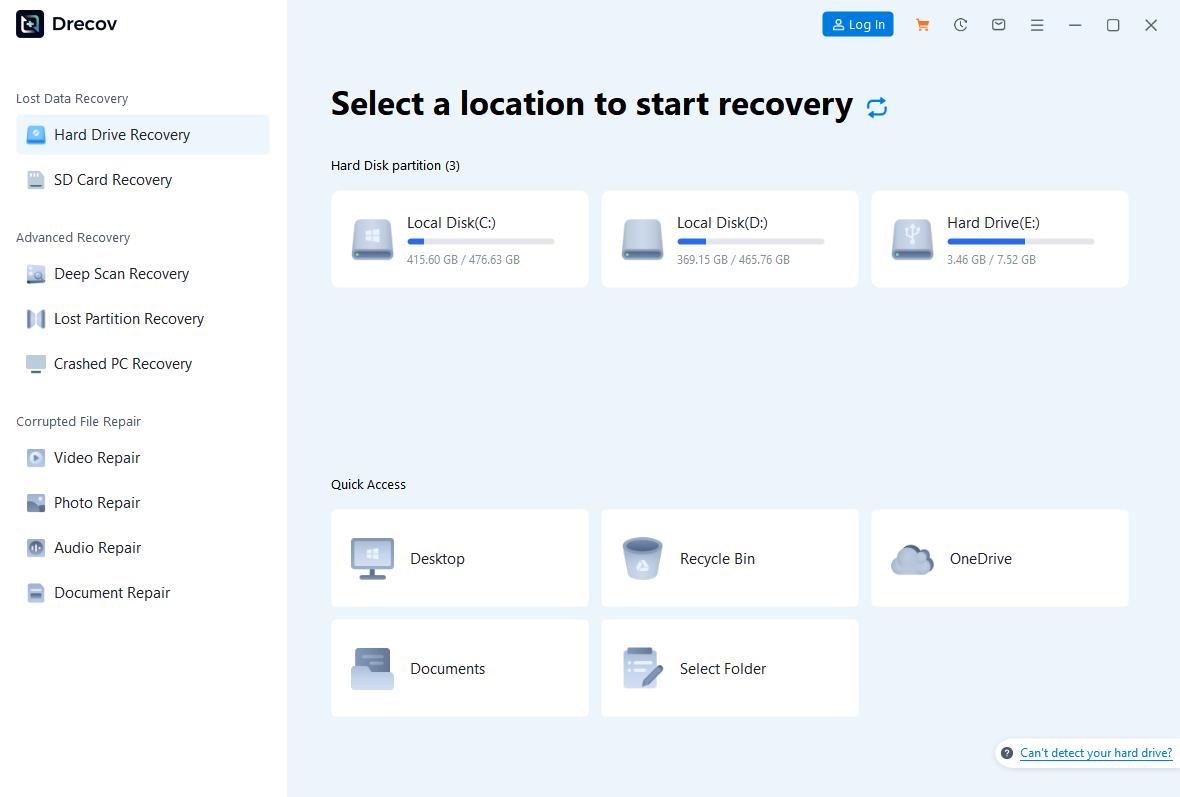
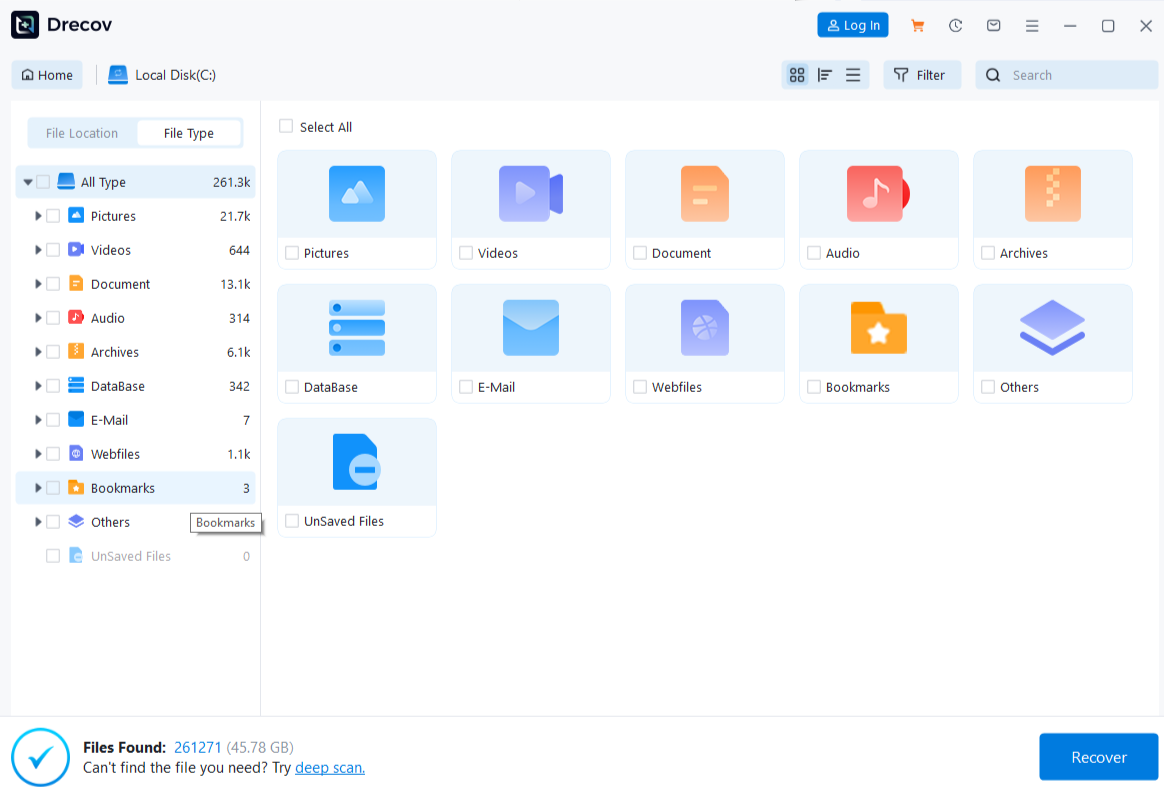
For a stable Windows-readable drive with genuinely missing local backup files, PandaOffice Drecov can search the original storage location. It offers a read-only recovery workflow, Quick Scan, Deep Scan when needed, filters, preview, and recovery to another healthy destination. Lost Partition Recovery may help locate files from a disappeared partition, but it does not rebuild a backup application’s dependency chain, repair hardware, or recreate overwritten data. If the backup relied on encrypted or incremental components, recovered files still need to be tested in the creating application.
⚠ Warning: Install it on a drive different from the one where your data was lost to prevent overwriting.
Step 1: Select the actual loss location
Prepare a second healthy physical device with enough space. Install Drecov somewhere other than the affected volume. Open it and select the original disk or partition where the backup set was deleted, using model and capacity rather than a drive letter alone. If the partition itself disappeared but the device remains stable and detectable, use the relevant Lost Partition Recovery mode instead of creating a new partition.
Step 2: Search quickly, then widen only if needed
Run Quick Scan. Look for the original backup folder, recognizable image or archive names, and the date range you recorded earlier. If important components are absent and the drive remains stable, run Deep Scan. Stop if it begins disconnecting or produces serious read errors; a professional image may be safer than another direct pass.
Step 3: Inspect candidates and save elsewhere
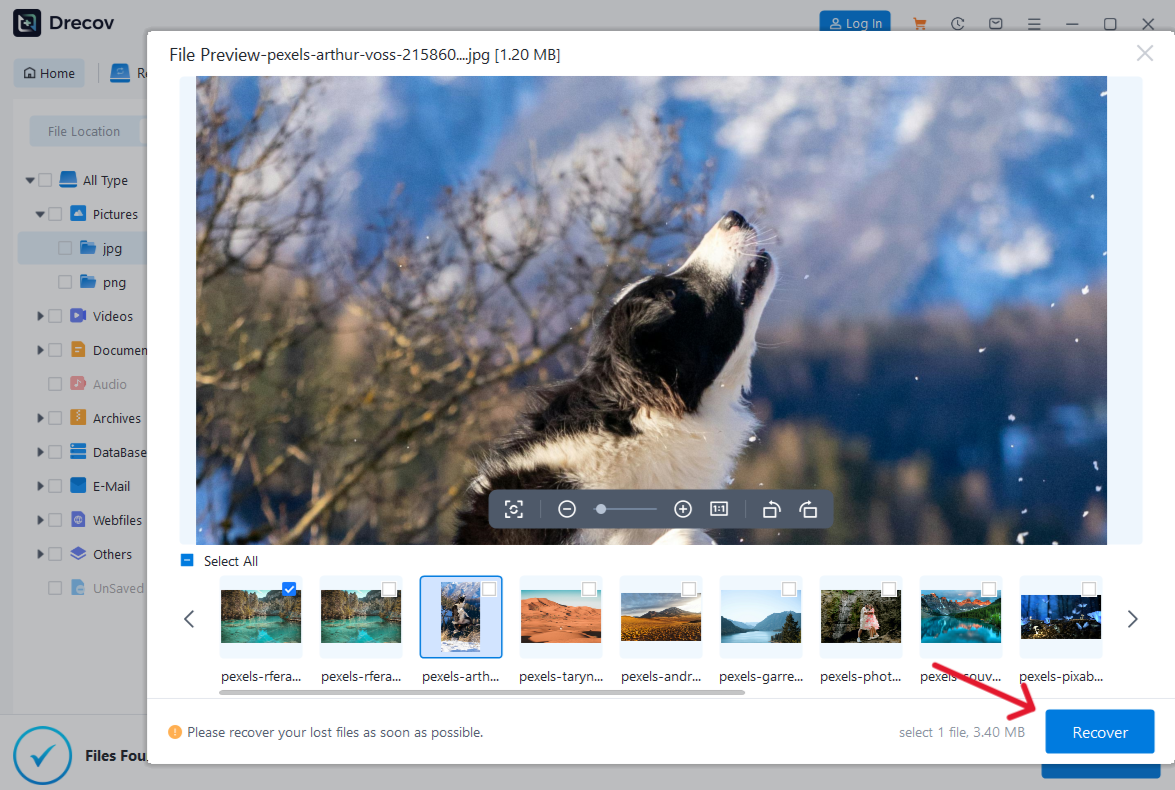
Filter or browse by previous path, file type, name, and date. Preview representative supported files where possible. Backup images may not preview as ordinary documents, so a filename match is only a candidate, not proof of a valid restore. Recover the selected set to the second healthy device, never to the source. If the output is not where you expected, check Drecov Folder or Recovery Folder on the destination. Open ordinary recovered files and test backup archives with their original application before trusting or deleting any surviving generation.
⚠ Warning: Install it on a drive different from the one where your data was lost to prevent overwriting.
FAQs
Can I delete every backup except the newest one?
Not automatically. The newest set might depend on an older full image, and it may not contain a version from before a long-undetected error. Test the restore and check the backup application’s chain before deciding.
Will deleting old backups remove the files currently on my PC?
Normally it removes recovery copies rather than live originals, but a wrong folder selection or synchronized storage can affect current files. Identify the destination and application first. Preserve a separate copy of anything you cannot replace.
Why did cleanup free less space than the listed backup size?
Some backup systems share blocks or retain dependent versions. Cloud storage may take time to recalculate, and items in a service trash can still count against a quota. Check the creator’s storage view after cleanup.
Should I format the old backup drive to start over?
Only after verifying that another destination holds everything you still need and that no older version has unique value. Formatting is a destructive reset, not a way to validate the backup.
Can recovery software reconstruct a deleted incremental backup chain?
It may retrieve some deleted component files from stable local storage, but an intact chain is not guaranteed. Validate the recovered set using the program that created it.
Conclusion
The safe way to delete old backups is to prove a newer restore, identify who created each set, and remove obsolete generations through that system’s controls. Retest protection after the space is freed. If a local backup was erased by mistake, stop writing to its original drive and check existing copies first. On a stable device, Drecov can look for missing backup files and save candidates elsewhere; only an actual restore test can show whether the resulting backup remains usable.
⚠ Warning: Install it on a drive different from the one where your data was lost to prevent overwriting.