


Have you ever spent hours filming a family vlog, downloading an essential work presentation, or saving a precious movie, only to find it has completely vanished from your system? It is an incredibly frustrating experience. You know the file is there somewhere, but no matter where you click, it seems to have vanished into thin air.
If you are currently panicking and typing “how to find video files in my computer” into your search bar, take a deep breath. You are in the right place. Files rarely disappear without a trace. Whether your video is simply hidden deep within a temporary folder, accidentally moved to an obscure directory, or unfortunately deleted, this comprehensive guide will show you exactly how to track it down.
Why Do Video Files Go Missing? Understanding the Basics
Before we dive into the step-by-step solutions, let us briefly look at why you might need to find video files in my computer in the first place. Understanding the root cause can help you choose the fastest method to get your file back.
- Accidental Relocation: You might have accidentally dragged and dropped a folder into another directory while cleaning up your desktop.
- Hidden File Attributes: Some system updates or security software automatically mark user-generated media as hidden files.
- Interrupted Transfers: If your camera or USB drive was unplugged while transferring data, the video might be sitting in a temporary cache folder.
- Accidental Deletion: The classic
DeleteorShift + Deleteshortcut might have been pressed unintentionally. - File System Corruption: Power outages or sudden system crashes can damage the index that tells your computer exactly where a video file lives.
Regardless of how your video went missing, the operating system usually leaves a trail. Let us begin with the easiest, built-in methods to locate your missing media.
Method 1: Mastering File Explorer Search
The first and most logical place to start when you want to find video files in my computer is the native Windows File Explorer. However, most users only type the basic name of the video, which fails if you cannot remember what you named the file. Instead, we can use advanced search filters to scan the entire drive specifically for video formats.
Step 1: Open This PC
Press the Windows Key + E hotkey on your keyboard to instantly open File Explorer. On the left-hand navigation pane, click on This PC to ensure your search covers all connected hard drives, partitions, and external storage devices rather than just a single folder.
Step 2: Utilize the Kind Filter
Navigate to the search bar in the upper right-hand corner of the File Explorer window. To filter out all documents, images, and system files, type the following parameter exactly:
kind:video
This command forces Windows to display every single video file format across your entire system, including MP4, MKV, AVI, MOV, and WMV.
Step 3: Refine by Date Modified
If your search yields thousands of results, you can narrow down the list. Click on the Search options menu at the top of the File Explorer ribbon (or type datemodified:today or datemodified:this week directly into the search bar). This is exceptionally helpful if you are trying to find video files in my computer that were saved or edited recently.
Step 4: Check for Hidden Files
Sometimes, Windows flags media folders as hidden. In the File Explorer top menu, click on View, hover over Show, and ensure that Hidden items is checked. If your missing video was hidden by an application, it will immediately appear in the search results with a slightly translucent icon.
Method 2: Utilizing Command Prompt to Unhide Video Files
If the standard File Explorer search fails, the files might have undergone an attribute change due to malware or a system glitch. We can use the Command Prompt to force Windows to reveal every hidden asset on a specific drive.
Step 1: Launch Command Prompt as Administrator
Click on the Windows Start menu, type cmd, right-click on Command Prompt, and select Run as administrator. This grants the operating system the necessary permissions to alter file visibility attributes.
Step 2: Target the Correct Drive
Identify the letter of the drive where you suspect the video was stored (e.g., C: drive, D: drive, or an external USB drive like E:). Type the drive letter followed by a colon and hit Enter:
D:
Step 3: Run the Attrib Command
To strip away hidden, system, and read-only attributes that might prevent you from being able to find video files in my computer, type the following precise command and press Enter:
attrib -h -r -s /s /d *.*
Note: This command instructs the system to clear the Hidden (-h), Read-only (-r), and System (-s) attributes for all files across all subdirectories (/s and /d).
Step 4: Search the Root Directory
Once the command finishes running and a new line appears, open your drive via File Explorer. Look for newly visible folders, often named “Found” or containing raw media formats, to locate your missing video.
Method 3: Deep Scanning with PandaOffice Drecov Data Recovery Software
When built-in search filters and command-line tools show no results, it usually means the file index has been deleted, or the video has been wiped from the allocation table. In these scenarios, you need professional specialized tools.
To safely bypass complex system limitations and directly read the raw data blocks on your storage drive, we highly recommend using PandaOffice Drecov data recovery software. This tool is engineered specifically to reconstruct fragmented video files that standard tools miss.
Why Choose PandaOffice Drecov Data Recovery Software?
Unlike basic recovery utilities that only look at the file index, the PandaOffice Drecov data recovery software scans the deep clusters of your hard drive. It can piece back together large video files like MP4s or high-definition MOV streams that often break apart when deleted. Furthermore, it retains an incredibly user-friendly interface, meaning you do not need an IT degree to successfully navigate it.
⚠ Warning: Never download or install the software onto the exact same drive partition where your missing video files were stored. Doing so can cause the installation files to overwrite the deleted video data blocks, making recovery impossible. If your videos were on the C: drive, install the tool on your D: drive or an external storage disk.
Here is the precise process to find video files in my computer using this utility:
Step 1: Launch the App and Select the Storage Location
Open the application. On the main home screen, you will see a clean layout listing all available Hard Disk Drives, external devices, and common locations like the Desktop or Recycle Bin. Click on the partition where you last remember seeing your video files, then click the Scan button.

Step 2: Apply the Video File Filter
As the program executes its initial quick scan and transitions into a deep scan, you do not have to wait for the entire drive to finish scanning. Use the file type filter sidebar on the left side of the screen. Click on Filter, select Video, and check the specific extensions you need, such as .mp4, .mkv, or .mov. This allows you to find video files in my computer without shifting through thousands of unrelated system logs or text documents.

Step 3: Preview and Validate the Video Quality
One of the best features of PandaOffice Drecov data recovery software is its real-time preview matrix. Double-click on any discovered video file within the scan results window. A built-in media player will open, allowing you to preview the file and ensure the video structure is fully intact before proceeding with saving it.
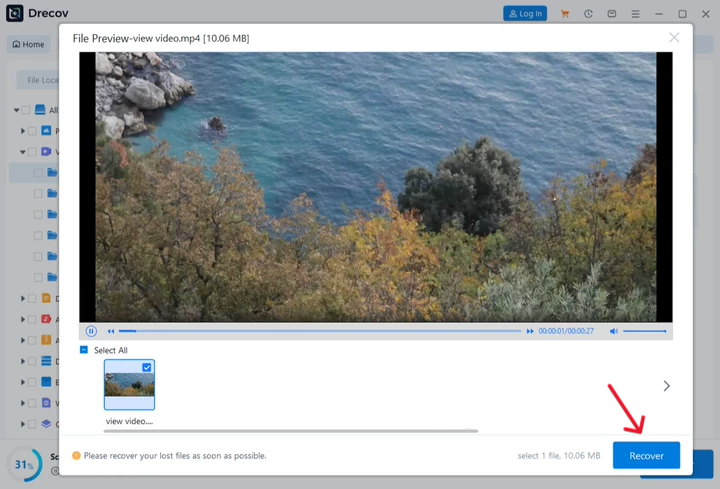
Step 4: Export and Recover to a Safe Location
Mark the checkboxes next to the specific videos you wish to reclaim. Click the prominent Recover button located in the bottom-right corner of the interface.
⚠️ Warning Prompt: When saving your recovered files, select a completely separate physical storage drive or an external hard disk. Saving the files back to the original drive could corrupt the remaining data blocks, which would ruin your chances of recovering any other lost videos.
For users running the latest Windows operating system who want to streamline their storage options and disable deep system integration features, check out our comprehensive guide on how to remove OneDrive from Windows 11 to free up extra processing power and local disk space.
On the other hand, if you notice that your web browser is missing valuable shortcuts, web links, or production logs alongside your missing video clips, you can easily restore them. Discover how to quickly resolve web browser synchronization issues by reading our detailed tutorial on how to get your Google Chrome bookmarks back.
Additionally, if you accidentally hit the wrong key and cleared out your entire browser database while trying to clean up your workspace, do not worry. You can quickly restore your browser history and important links by following our guide on how to recover deleted bookmarks in Chrome.
Pro Tips to Prevent Video Loss in the Future
Now that you know how to find video files in my computer using both built-in settings and advanced applications like PandaOffice Drecov data recovery software, let us look at a few best practices to ensure you never lose your media assets again:
- Avoid Using Shift + Delete: When cleaning out temporary clips, simply press
Delete. This sends files to the Recycle Bin rather than permanently erasing them, giving you an immediate safety net if you make a mistake. - Enable File History: Windows features a built-in automated backup system called File History. Turn this feature on via your Control Panel to regularly back up user folders like Videos, Documents, and Desktop to an external drive.
- Invest in Cloud Storage: Synchronize your primary media production folders with reputable cloud options like Google Drive or Microsoft OneDrive. This provides an off-site, real-time mirror of your files.
Summary of Methods to Find Video Files
| Complexity Level | Method Name | Best Used For |
| Beginner | File Explorer Search (kind:video) | Locating misplaced, misnamed, or hidden video files still on the drive. |
| Intermediate | Command Prompt (attrib command) | Revealing videos hidden by system glitches, malware, or app scripts. |
| Advanced | PandaOffice Drecov data recovery software | Recovering permanently deleted files, emptied recycle bins, or corrupted drives. |
Frequently Asked Questions
Can I recover a video file if my computer suddenly shut down during recording?
Yes. When a computer loses power during a video recording session, the video stream is usually saved in a temporary file cache folder. You can use PandaOffice Drecov data recovery software to run a deep scan on your primary drive, filter the results by creation date, and reconstruct the interrupted video stream.
Where does Windows store temporary video files?
Windows typically stores temporary media file fragments inside the AppData folder. You can jump directly to this directory by pressing Windows Key + R, typing %localappdata%\Temp into the Run box, and hitting Enter.
How do I look for specific video extensions like .mp4 or .mov?
If you want to find video files in my computer that match a specific file type, go to the File Explorer search bar and type ext:.mp4 or ext:.mov. This will filter out all other video formats and show you only the specific file types you want to see.
Is it safe to use third-party software to look for my files?
Using a reputable utility like PandaOffice Drecov data recovery software is entirely safe. It uses a read-only scanning process, meaning it looks for your lost files without altering, changing, or overwriting any data on your hard drive.
Conclusion
Losing track of important video files can feel overwhelming, but Windows offers several built-in tools to help you track them down. Whether you use advanced search terms in File Explorer or change file attributes with the Command Prompt, you can usually find misplaced files quickly.
If your videos were permanently deleted or lost due to a drive format, professional tools like PandaOffice Drecov data recovery software can help. By running a deep scan and using targeted file filters, you can safely find and restore your missing videos in just a few clicks. Take your time, follow the steps carefully, and you will have your videos back in no time!


