


In our fast-paced digital work environment, the Microsoft Word document remains the backbone of professional communication, academic research, and personal record-keeping. However, nothing triggers a panic quite like realizing a critical report has vanished. Whether it’s a sudden power outage, a blue screen of death, or a simple accidental click of “Don’t Save,” the question of how to retrieve word file becomes the only priority.
Losing data is undeniably stressful, but in most cases, the file is not truly gone; it is simply hidden or temporarily displaced within your system’s architecture. This comprehensive guide will walk you through every possible recovery avenue, from basic built-in features to professional-grade forensic recovery techniques.
Understanding Why Word Files Disappear
Before we explore the solutions, it is vital to understand the “why” behind data loss. This knowledge helps you choose the right recovery path and prevents further damage to the storage media.
- Accidental Deletion: The most common cause, where a user clears the file or empties the Recycle Bin.
- System Crashes: When Windows or Word freezes, the temporary bridge between the RAM and the hard drive breaks.
- Improper Shutdowns: Pulling the plug or a battery failure prevents the software from finalizing the file save process.
- File Corruption: Software bugs or failing hardware sectors can make a document unreadable.
- Malware Attacks: Ransomware or viruses may hide or encrypt your .docx files.
How to Retrieve Word File Not Saved After a Crash
One of the most frequent scenarios involves a user working diligently for hours, only for the application to close unexpectedly. If you find yourself in this situation, do not panic. Microsoft has built-in safety nets designed specifically for this.
Step 1: Use the Document Recovery Pane
When you restart Word after a crash, the software typically attempts to assist you immediately.
- Launch Microsoft Word.
- Look at the left-hand side of the screen. A Document Recovery pane should appear automatically.
- Review the timestamps of the available files.
- Click on the most recent version and immediately go to File > Save As to secure it.
Step 2: Access the “Recover Unsaved Documents” Feature
If the pane doesn’t appear, you can manually trigger the search for how to retrieve word file not saved results.
- Open a blank Word document.
- Navigate to the File tab in the upper left corner.
- Click on Info, then find the Manage Document button.
- Select Recover Unsaved Documents from the dropdown menu.
- A dialog box will open showing files in the
.asdformat. Select your file and click Open.
Retrieve Word File from Temporary Files Folder Manually
Sometimes the automated tools within Word fail to point to the right directory. In such cases, you must act as a digital detective and navigate the Windows file system directly to retrieve word file from temporary files folder locations.
Windows stores a wealth of background information in hidden folders.
- Press the Windows Key + R on your keyboard to open the Run dialog.
- Type
%AppData%\Microsoft\Wordand hit Enter. - Search for files ending in the
.asdor.tmpextension. - Note: You may need to enable “Hidden items” in the View tab of File Explorer to see these folders.
Step 2: Search the General Temp Directory
If the Word-specific folder is empty, the system-wide temp folder might hold a copy.
- Open the Run dialog again (Windows + R).
- Type
%temp%and press Enter. - Sort the files by Date Modified.
- Look for files with names starting with a tilde (
~) or a dollar sign ($). - Copy these files to your desktop and try changing their extension to
.docxto see if Word can recognize them.
Warning Prompt: Never work directly on the files inside the Temp folder. Always copy them to a safe location like “Documents” or “Desktop” before attempting to rename or open them.
Advanced Recovery: Using PandaOffice Drecov Data Recovery Software
When a file is deleted from the Recycle Bin or lost due to a formatted partition, built-in Windows tools are often insufficient. This is where professional utility comes into play. PandaOffice Drecov data recovery software is a powerful tool designed to scan the physical sectors of your hard drive to find “ghost” data that the operating system no longer sees.
Why Choose PandaOffice Drecov?
Unlike standard undelete tools, this software employs deep-scanning algorithms that reconstruct fragmented Word files. It supports various file systems including NTFS, FAT32, and exFAT.
⚠ Warning: Install the software on a different drive (e.g., a USB flash drive) than the one where the lost file was located. This prevents the installation process from overwriting the very data you are trying to save.
Step 1: Select the Location and Scan
- Launch PandaOffice Drecov.
- The main interface will display all connected drives. Select the partition (usually C:) where your Word file was stored.
- Click the Scan button. The software will perform a Quick Scan first to find recently deleted items.

Step 2: Perform a Retrieve Word File Deep Scan
If the Quick Scan does not yield results, you must initiate the retrieve word file deep scan mode.
- Select the Deep Scan option located at the bottom of the interface.
- Wait for the progress bar to complete. This process examines the drive byte-by-byte and may take significant time depending on your disk size.
- Use the Filter tool to search specifically for
.docor.docxextensions to narrow down the thousands of results.
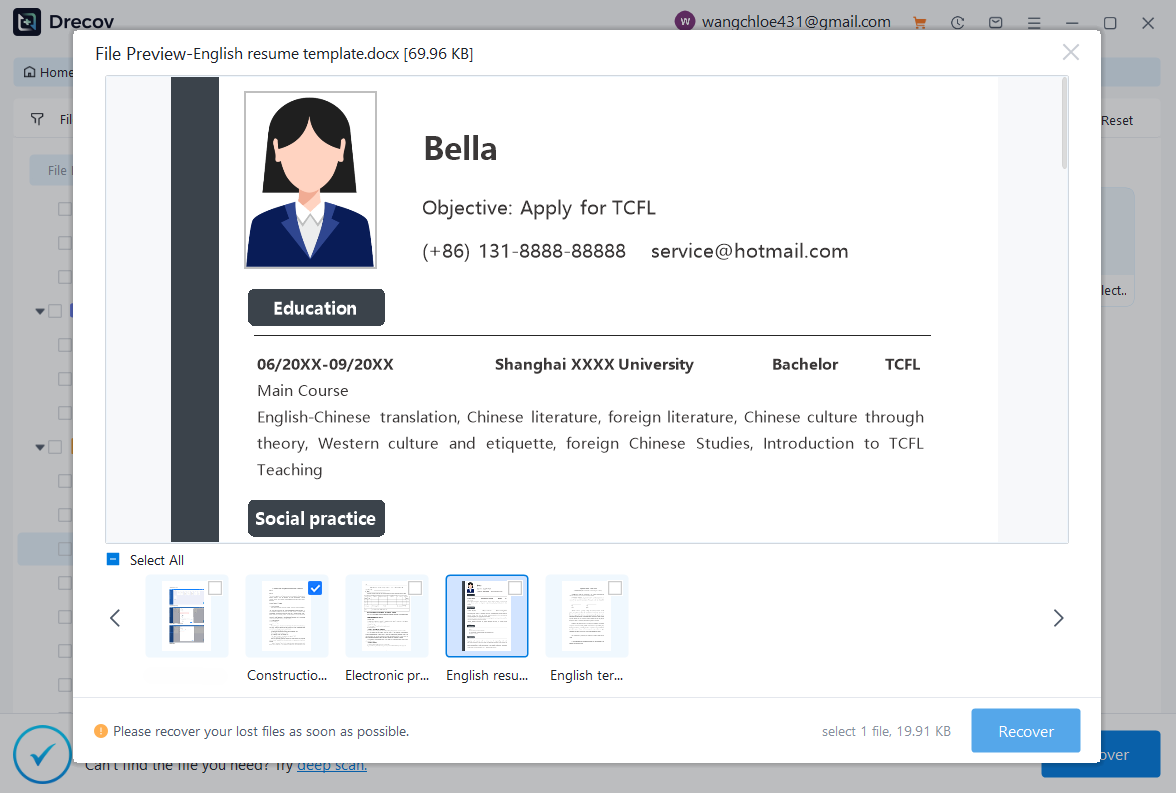
Step 3: Preview and Recover
- Once the scan is finished, browse the results.
- PandaOffice Drecov provides a Preview window. Click on a file to see its contents before committing to recovery.
- Check the boxes next to the files you need and click Recover.
- Select a destination folder—again, ensure this is on a different drive to ensure data integrity.
If you’ve noticed your computer is behaving sluggishly after a crash, you might need to restore your computer to an earlier date on Windows to stabilize the OS. Additionally, if your browser was open during the crash and you lost your research links, you can find out where the Firefox bookmarks location is to manually back them up. Finally, if you find that cloud syncing is causing more conflicts than it solves, you may want to learn how to completely remove OneDrive Personal from your system to rely on manual backups instead.
Leveraging Windows System Features for Recovery
If you are a proactive user who has enabled Windows safety features, you might find your document waiting for you in a system snapshot.
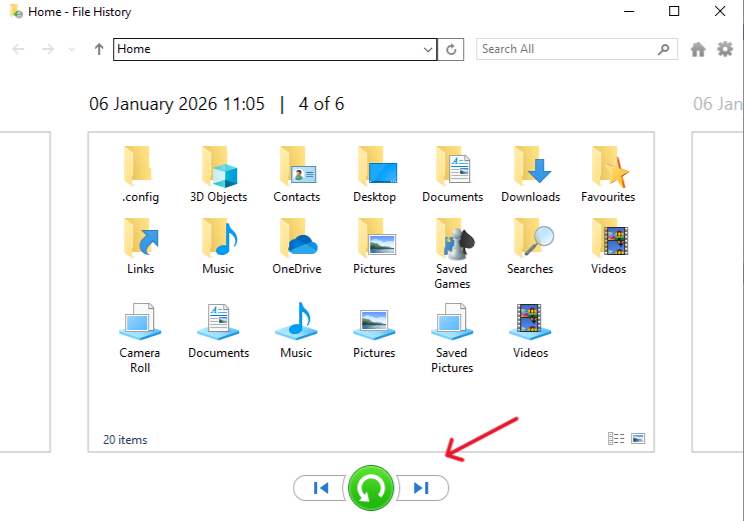
Method: Restore via File History
- Open the folder where your file used to live.
- On the top ribbon of File Explorer, click the Home tab and then the History button.
- This will open the File History vault. You can use the left and right arrows to browse through different versions of the folder in time.
- Once you find the version containing your Word file, click the green Restore icon.
Method: Using “Previous Versions”
- Right-click on the folder that contained your file.
- Select Properties.
- Navigate to the Previous Versions tab.
- If Windows has created a restore point, you will see a list of dates.
- Select a date prior to the deletion and click Open to verify the contents, then Restore.
Cloud Recovery: The OneDrive and Google Drive Advantage
In the modern era, many of us work directly out of cloud-synced folders. This adds a powerful layer of redundancy to your how to retrieve word file strategy.
Recovering from OneDrive
- Go to OneDrive.com and log in.
- Check the Recycle Bin on the left sidebar. Files deleted from your PC’s OneDrive folder stay here for 30 days.
- If the file exists but is corrupted, right-click it and select Version History. You can revert to a version from minutes or hours ago.
Proactive Prevention: How to Never Lose a File Again
The best way to retrieve word file is to ensure you never have to. Follow these “Golden Rules” of digital documentation:
- Enable AutoSave: If you have a Microsoft 365 subscription, toggle the “AutoSave” switch in the top left corner of Word. It saves changes every few seconds to the cloud.
- Adjust AutoRecover Settings: Go to File > Options > Save. Change the “Save AutoRecover information every X minutes” from 10 minutes to 1 minute.
- The 3-2-1 Backup Rule: Keep 3 copies of your data, on 2 different media types, with 1 copy kept off-site (Cloud).
- Avoid Working on USB Sticks: Flash drives are prone to sudden failure. Always copy the file to your local SSD, work on it, and copy it back to the USB when finished.
Conclusion
Mastering how to retrieve word file is a vital skill in the digital age. From the simple “Recover Unsaved Documents” button in Microsoft Word to the deep-sector analysis provided by PandaOffice Drecov data recovery software, there is almost always a way back from data loss.
The key is to remain calm, stop writing new data to your hard drive immediately, and work through the methods logically—starting from the software level and moving down to the system and hardware levels. By configuring your AutoRecover settings and utilizing cloud backups, you can transform a potential disaster into a minor, recoverable hiccup.


