


Managing a digital workspace involves more than just organizing folders; it is about creating an environment that feels intuitive and visually appealing. For many Windows users, the default desktop can feel a bit clinical. One of the most effective ways to break this monotony is to learn how to change recycle bin icon settings to match your personal aesthetic.
In this comprehensive guide, we will explore the nuances of icon customization, technical requirements for icon files, and advanced methods for those who want total control over their desktop appearance. Furthermore, because customization often involves cleaning up files, we will dive deep into professional data recovery solutions like PandaOffice Drecov to ensure your data remains safe even if you accidentally empty that newly styled bin.
Understanding Recycle Bin Icons in Windows
Default Icon Behavior
If you’ve ever looked closely at your desktop, you’ve probably noticed something subtle yet interesting about the Recycle Bin icon—it actually changes depending on whether it’s empty or full. That’s not just a design choice; it’s a built-in visual cue created by Windows to help users instantly understand the status of their deleted files. When the bin is empty, the icon appears clean and hollow. When it contains files, it looks filled, almost like a real trash can.
This dual-state behavior is part of what makes the Recycle Bin unique compared to other desktop icons. It’s not static—it reacts. And while this is helpful, it also means that to change recycle bin icon visuals effectively isn’t as simple as swapping a single image. You actually need to customize two separate states: one for empty and one for full.
Full vs Empty Icon States
Windows treats the empty and full Recycle Bin icons as separate visual assets. This means when you decide to change recycle bin icon properties, you’ll see two distinct options:
- Recycle Bin (full)
- Recycle Bin (empty)
Each one needs to be customized individually. If you skip one, Windows will continue using the default icon for that state. This can create a mismatched look that defeats the purpose of personalization. From a design perspective, this system offers flexibility. You could use two completely different icons or choose a consistent theme where both states share a similar style. It’s like designing a before-and-after visual experience right on your desktop.
Why Change the Recycle Bin Icon
Personalization and Aesthetics
Let’s be real—default desktop icons can feel a bit boring. They’ve been around for years, and while they’re functional, they don’t always match your personal style. Learning how to change recycle bin icon settings is one of the easiest ways to give your desktop a fresh, customized look.
Think of your desktop as your digital workspace. Just like you might decorate a physical desk with photos or accessories, customizing icons adds personality to your computer. Whether you prefer a sleek minimalist design, a futuristic theme, or something playful and colorful, swapping out the Recycle Bin icon can make a noticeable difference.
Productivity and Visual Clarity
Beyond aesthetics, the choice to change recycle bin icon assets can actually improve productivity. If your icons are visually distinct and aligned with your workflow, you’ll spend less time searching and more time doing. For example, you could choose a bold, high-contrast icon that stands out immediately. This makes it easier to locate the Recycle Bin when you need it. Alternatively, you might prefer a subtle icon that blends into a minimalist setup, reducing distractions.
System Requirements and Compatibility
Windows 10 vs Windows 11
The good news is that the process to change recycle bin icon sets works almost identically on both Windows 10 and Windows 11. Microsoft has kept the customization process consistent, which means you don’t need to learn a completely new method if you upgrade your system.
However, the interface may look slightly different. Windows 11, for example, has a more modern design with rounded corners and updated menus. Despite these visual changes, the core functionality remains the same. This consistency is a huge advantage for long-term users.
Icon File Format Requirements (.ico)
Before you change recycle bin icon graphics, you’ll need the right file format. Windows uses .ico files for icons. This is important because standard image formats like PNG or JPG won’t work directly.
An .ico file is specifically designed for icons and can contain multiple resolutions. This ensures your icon looks sharp at different sizes, whether it’s displayed on a high-resolution 4K monitor or a smaller laptop screen. If you download icons online, make sure they’re in .ico format. If not, you can convert them using various official Microsoft developer tools or reputable online converters.
Method 1: Change Recycle Bin Icon via Settings
This is the easiest and safest method to change recycle bin icon settings. You don’t need any technical expertise—just follow these steps carefully.
Step-by-Step Instructions to Access Settings
- Step 1: Go to your desktop and Right-click on any empty space.
- Step 2: From the context menu, select Personalize. This will open the Windows Settings app.
- Step 3: On the left-hand sidebar (or main menu in Win 11), click on Themes.
- Step 4: Look for a link labeled Desktop icon settings. On Windows 11, you may need to scroll down to find this under “Related settings.”
Applying and Saving Changes
Once the Desktop Icon Settings window is open, you are ready to change recycle bin icon visuals for both states.
- Step 1: In the list of icons, select Recycle Bin (empty).
- Step 2: Click the Change Icon… button.
- Step 3: A new window appears. Click Browse and navigate to the location of your new .ico file. Select it and click Open, then OK.
- Step 4: Now, select Recycle Bin (full) and repeat the process with the “full” version of your custom icon.
- Step 5: Click Apply, then OK to save your changes.
Method 2: Using Custom Icon Packs
If you want a cohesive look across your entire OS, icon packs are the way to go. These are collections of icons designed to match a specific theme.
Where to Find Icon Packs
You can find high-quality icon packs on design websites like DeviantArt or Flaticon. When you download these, ensure they include the .ico files necessary to change recycle bin icon states. Popular themes include minimalist monochrome, neon cyberpunk, or even retro Windows 95 aesthetics.
Installing and Applying Icons
- Step 1: Download the icon pack and extract the ZIP file to a permanent folder (like
C:\Icons). If you move the file later, the icon will disappear from your desktop. - Step 2: Follow the steps in Method 1 to reach the Desktop icon settings menu.
- Step 3: Manually point the “Empty” and “Full” states to the specific files within your new icon pack.
Method 3: Registry Editor Customization (Advanced)
For advanced users who want to change recycle bin icon settings at a system level, the Registry Editor (Regedit) provides a deeper path.
Warning: Editing the Registry can cause system instability if done incorrectly. Always create a System Restore Point before proceeding.
- Step 1: Press Win + R, type
regedit, and hit Enter. - Step 2: Navigate to the following path:
HKEY_CURRENT_USER\Software\Microsoft\Windows\CurrentVersion\Explorer\CLSID\{645FF040-5081-101B-9F08-00AA002F954E}\DefaultIcon
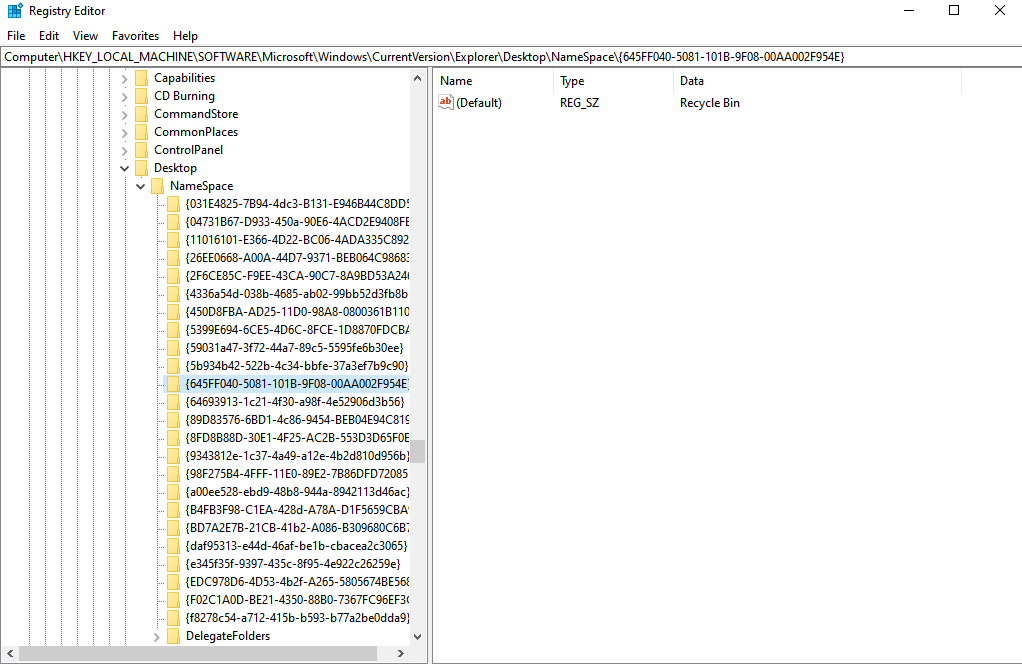
- Step 3: In the right pane, you will see entries for
(Default),empty, andfull. - Step 4: Double-click each string and enter the full path to your .ico file (e.g.,
C:\Icons\trash-full.ico). - Step 5: Close the editor and restart
explorer.exevia Task Manager to see the changes.
Crucial Step: Protecting Data During Desktop Cleanup
While learning how to change recycle bin icon displays, many users take the opportunity to empty their bin and organize their files. However, it is very common to accidentally delete a vital document during this “digital spring cleaning.” If you have emptied your bin and realized a file is missing, you need a professional recovery tool.
Introducing PandaOffice Drecov
PandaOffice Drecov is a high-performance data recovery product designed to retrieve files even after the Recycle Bin has been emptied. It supports hundreds of file formats and works on SSDs, HDDs, and external drives.
⚠ Warning: Install it on a drive different from the one where your data was lost to prevent overwriting.
How to Recover Data Using PandaOffice Drecov
- Step 1: Select Location: Open the software and select the drive where your Recycle Bin is located (usually the C: Drive).

- Step 2: Scan for Files: Click the Scan button. The software will perform a Quick Scan followed by a Deep Scan to locate fragments of deleted data.

- Step 3: Preview and Filter: Once the scan is complete, use the filter sidebar to look for specific file types (e.g., .docx, .jpg). You can preview files to ensure they are intact before recovery.

- Step 4: Recover: Select the files you need and click Recover. Choose a different destination drive (like a USB stick) to save the recovered files safely.
For more detailed strategies on handling bin-related data loss, check out these expert resources:
- How to recover files deleted from Recycle Bin: An Ultimate Guide
- How can we recover deleted files from Recycle Bin: A Pro Guide
- Step-by-step: How to recover files deleted from the Recycle Bin
Common Problems and Fixes
Icon Not Changing Immediately
Sometimes, after you change recycle bin icon settings, the desktop doesn’t update. This is usually due to the Windows Icon Cache.
- Fix: Right-click the desktop and select Refresh. If that fails, restart your computer.
Icon Reset After Theme Change
If you apply a new Windows Theme, it might overwrite your custom icons.
- Fix: Go back to Desktop icon settings and uncheck the box that says “Allow themes to change desktop icons.”
Best Practices for Desktop Customization
Consistent Icon Themes
When you change recycle bin icon styles, try to match them with your other system icons (This PC, Network, etc.). A mismatched bin can look out of place. Use “Flat” icons if you are on Windows 11 to match the OS’s “Mica” design language.
Minimalist vs Creative Layouts
- Minimalist: Use hidden labels and transparent-style icons.
- Creative: Use vibrant, high-definition .ico files that pop against your wallpaper.
Change Recycle Bin Icon FAQs
1. Can I use PNG files as icons?
No. While you can find many PNGs online, Windows requires the .ico format. Use a converter to transform your PNG into a multi-resolution .ico file.
2. Will I lose my files if I change the icon?
Not at all. Learning how to change recycle bin icon settings only affects the visual shortcut, not the data stored within the folder.
3. Can I have different icons for different users?
Yes, icon settings are stored in the user profile, so each person using the computer can have their own custom bin.
4. Why is the “Full” icon showing when the bin is empty?
This is a common bug. Often, simply deleting a dummy file and then emptying the bin again forces Windows to refresh the icon state.
5. Is it safe to use custom icons from the internet?
Generally, yes. However, ensure you are downloading raw .ico files and not .exe installers, which could contain malware.
Conclusion
Customizing your workspace is a journey that starts with small details. Learning how to change recycle bin icon displays is a simple yet powerful way to make your PC feel like your own. By understanding the dual-state nature of the bin and following the step-by-step methods outlined above, you can achieve a professional and personalized desktop. Just remember: while aesthetics are important, data safety is paramount. Always keep a tool like PandaOffice Drecov handy for those moments when customization leads to accidental deletions. Happy decorating!


