


Sharing files efficiently is essential in today’s digital world, whether you’re collaborating with a team, sending documents to clients, or simply sharing photos with friends. One of the most powerful tools for file sharing is Microsoft OneDrive. If you’ve ever wondered how to share a OneDrive file quickly and securely, this comprehensive guide will walk you through everything you need to know.
Furthermore, digital management isn’t just about sharing; it’s about safeguarding. In the event that a critical document vanishes before you can hit the share button, we will also explore professional data recovery methods to ensure your workflow remains uninterrupted.
What Is OneDrive and Why Use It for File Sharing?
OneDrive is a cloud storage service developed by Microsoft that allows users to store, access, and share files online. It integrates seamlessly with Microsoft Office tools like Word, Excel, and PowerPoint, making it an excellent choice for both personal and professional use. When you learn how to share a OneDrive file, you unlock a suite of collaborative features that traditional email attachments simply cannot match.
Key Benefits of Using OneDrive:
- Easy access from anywhere: Access your files on any device with an internet connection.
- Secure file sharing options: Control who sees your data with granular permission settings.
- Real-time collaboration: Multiple users can edit the same document simultaneously.
- Automatic syncing across devices: Changes made on your phone reflect immediately on your laptop.
- Customizable permissions: Set expiration dates and passwords for shared links.
These features make OneDrive an ideal solution for sharing files efficiently and securely. However, the process can vary slightly depending on whether you are using the web interface, the desktop app, or a mobile device.
The most common way to manage your cloud data is through the web portal. This method is universal and works on any operating system, including Windows, macOS, and Linux. Mastering how to share a file on OneDrive through your browser is the first step toward becoming a power user.
Step 1: Upload Your File
Before sharing, ensure your file is uploaded to OneDrive. Open your preferred browser and navigate to the official OneDrive login page.
- Sign in with your Microsoft account.
- Click on the Upload button at the top.
- Select Files or Folder and choose the items from your local storage.
Step 2: Locate and Select the File
Once the upload completes, find the file in your directory. You can use the search bar at the top if you have a large volume of data. Click the circular checkbox in the upper-right corner of the file icon to select it.
After selecting the file, click the Share button located in the top navigation bar. Alternatively, you can right-click the file and select Share from the context menu.
Step 4: Configure Link Settings
This is the most critical part of learning how to share a OneDrive file safely. Click the Settings gear icon or the “Anyone with the link can edit” text to modify permissions. You can choose to allow editing, set an expiration date, or add a password.
Step 5: Send or Copy the Link
- Email: Type the recipient’s name or email address and click Send.
- Copy Link: Click Copy Link to generate a URL that you can paste into Slack, Teams, or WhatsApp.
If you have the OneDrive desktop app installed, you don’t even need to open a browser. This method is much faster for daily professional tasks. Here is how to share files on OneDrive directly from your PC folders.
Step 1: Open File Explorer
Press Windows Key + E to open File Explorer. Navigate to the OneDrive folder listed in the left-hand sidebar.
Step 2: Right-Click the File
Find the document you wish to distribute. Right-click the file. Because OneDrive is integrated into Windows 11 and Windows 10, you will see a Share option with the OneDrive blue cloud icon next to it.
Step 3: Specify Recipients
A pop-up window will appear. You can enter an email address or select a contact from your “Suggested” list.
Step 4: Manage Link Permissions
Just like the web version, you can click the pencil icon to toggle between Can edit and Can view. Setting these correctly ensures that no one accidentally deletes your hard work while they are reviewing it.
Step 5: Confirm Sharing
Click Send. A notification will appear in your Windows Action Center confirming that the link has been shared successfully.
In our mobile-first world, knowing how to share a file with OneDrive while on the go is a lifesaver. Whether you are at a coffee shop or commuting, the mobile app provides full functionality.
Step 1: Open the OneDrive App
Launch the OneDrive app on your iOS or Android device. Ensure you are logged into the correct Microsoft account.
Step 2: Find Your File
Tap the Files tab at the bottom to browse your folders. Once you find the target file, tap the three vertical dots (⋮) or the Share icon (an arrow pointing out of a box) next to the file name.
Step 3: Select the Sharing Method
The app will give you options to Invite People, Copy Link, or Send File. If you choose Send File, OneDrive will attach a copy of the file to an email or message, whereas Invite People shares the cloud version.
Step 4: Set the Expiration and Security
Tap on Link Settings. Here, you can toggle the Allow editing switch. For sensitive business data, it is highly recommended to set a password even on mobile.
Choose the app you want to use to share the link (e.g., Gmail, Outlook, or SMS) and hit send.
A common question is how to share OneDrive files with people who do not have a Microsoft account. Fortunately, Microsoft has made this process quite seamless.
Step 1: Choose the “Anyone” Link Option
When you open the share dialog, select the option “Anyone with the link.” This creates a public URL.
Step 2: Security Precautions
Because anyone who gets their hands on this link can see your file, you should always:
- Set an Expiration Date.
- Set a Password and share that password via a different communication channel.
- Disable the Download option if you only want them to view the file in the browser.
Step 3: Distribute the Link
Copy the generated link and send it. The recipient will be able to view or edit the file (based on your settings) without needing to sign in or create an Outlook account.
The Nightmare Scenario: Data Loss Before Sharing
While learning how to share a OneDrive file is important, what happens if the file disappears before you can share it? Perhaps you accidentally deleted a local copy that hadn’t synced yet, or a system crash corrupted your folder.
Data loss can happen due to:
- Accidental deletion (
Shift + Delete). - Emptying the Recycle Bin.
- Formatting the wrong drive partition.
- Malware or virus attacks.
In these cases, standard OneDrive recovery might not work if the file was never successfully uploaded to the cloud. This is where professional-grade software becomes necessary.
Using PandaOffice Drecov Data Recovery Software for Lost Files
When traditional methods fail, PandaOffice Drecov data recovery software is the gold standard for retrieving lost documents, photos, and videos. It is designed to scan your local storage hardware to find remnants of files that the operating system has marked as “deleted” but are still physically present on the disk.
⚠ Warning: Never install the recovery software on the same drive or partition where the lost data was located. This prevents “overwriting,” which can make your files unrecoverable forever.
Here is the step-by-step process for using PandaOffice Drecov data recovery software to rescue your files:
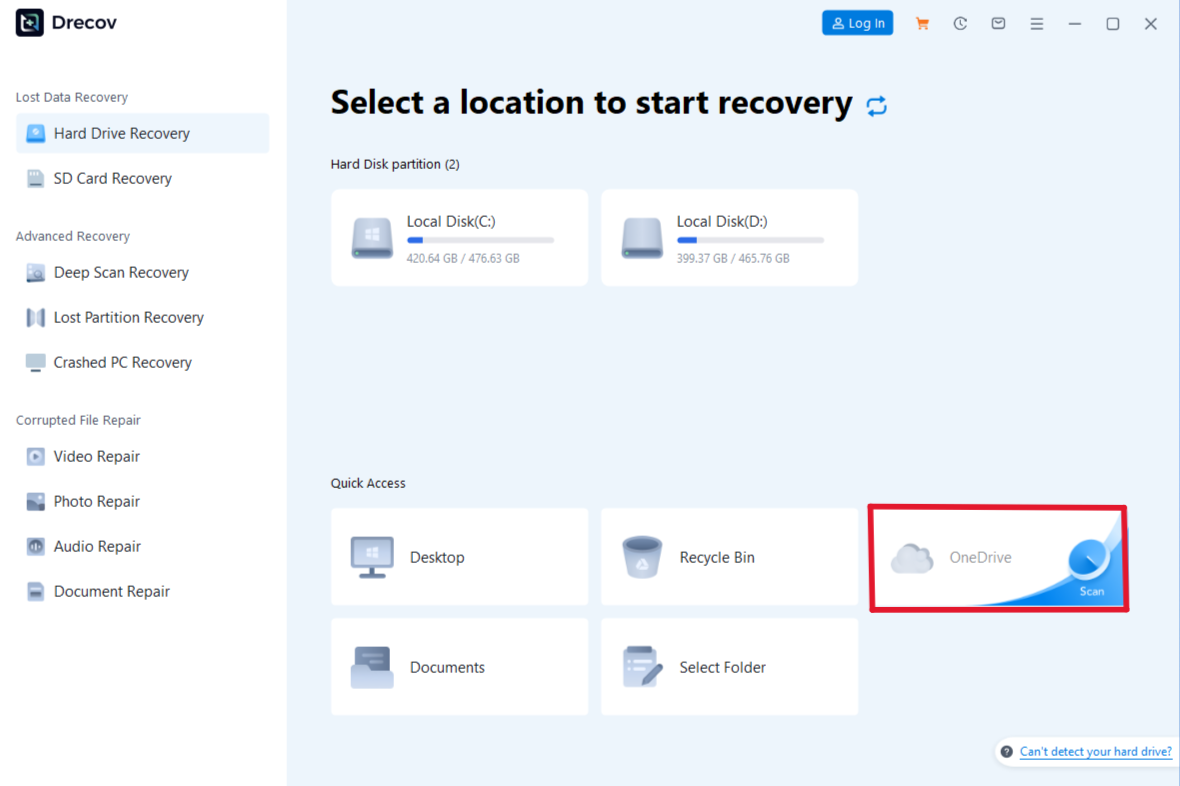
Step 1: Select the Location to Scan
Launch the program. You will see a list of available drives (C:, D:, etc.) and external devices like USB sticks. Select the folder or drive where your OneDrive local cache was stored and click Start Scan.
Step 2: Use the Deep Scan Feature
If a quick scan doesn’t find your file, enable the Deep Scan mode within the PandaOffice Drecov data recovery software interface. This process takes longer but performs a sector-by-sector analysis of the drive to piece together fragmented data.
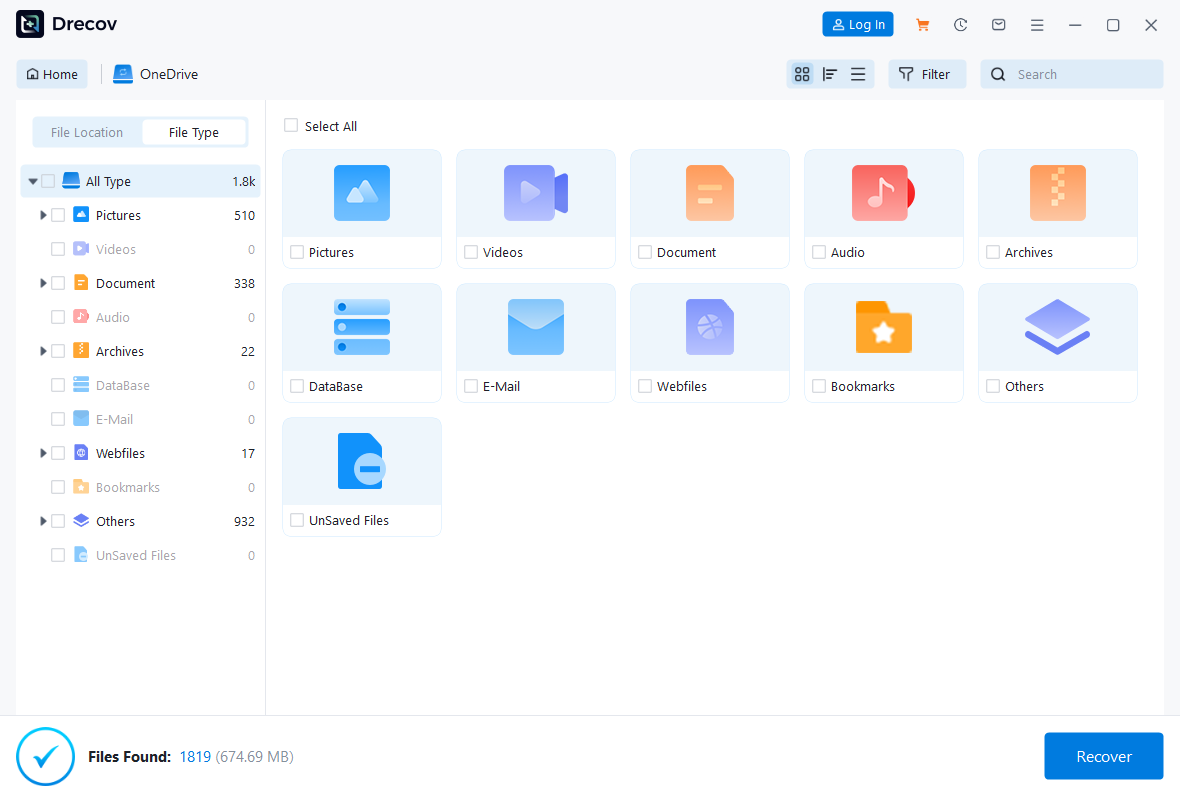
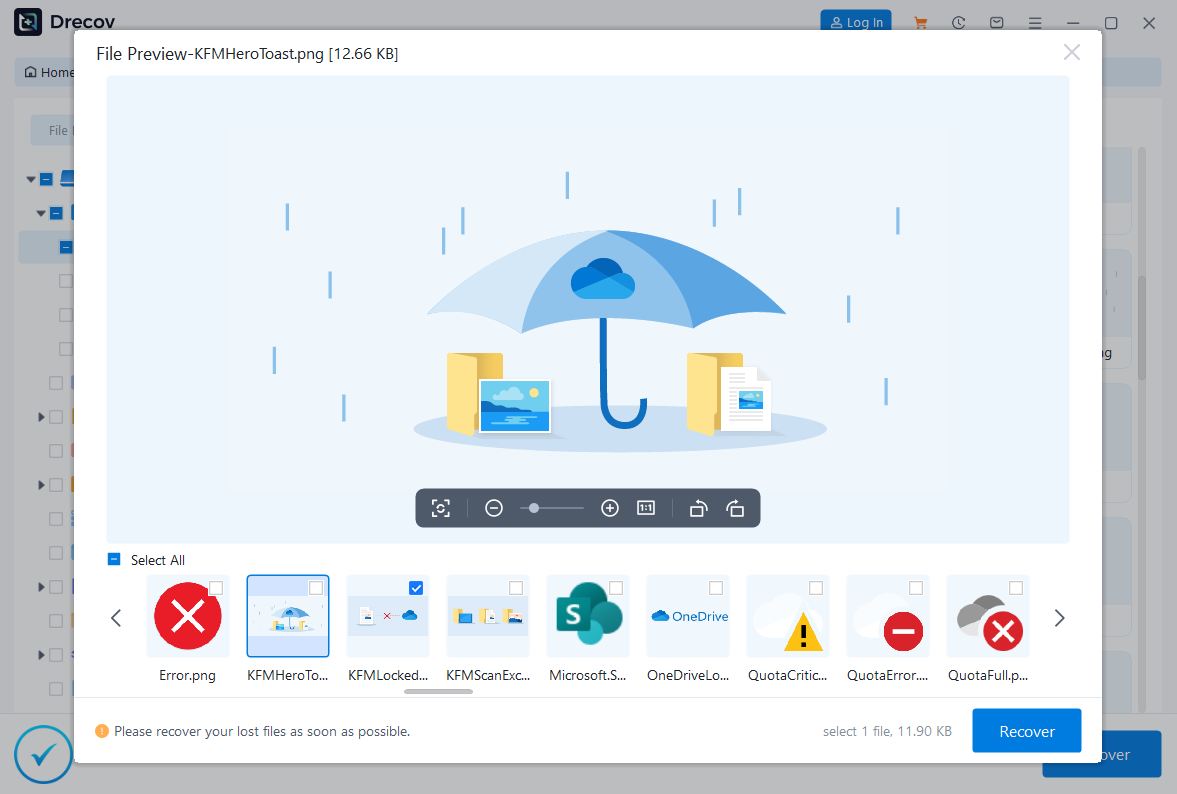
Step 3: Preview the Recovered Files
One of the best features of this tool is the preview window. Before committing to a recovery, you can click on documents or images to verify their integrity. This ensures you aren’t wasting time on corrupted file fragments.
Step 4: Recover and Save
Once you have located your missing OneDrive files, select them and click Recover.
Key Operation Point: Always save the recovered files to an external hard drive or a different partition. Once the files are safe, you can move them back to your OneDrive folder and resume learning how to share a OneDrive file.
After you have successfully recovered your files, you might also find these expert resources helpful:
- How to use Recuva to recover deleted files – 2026 Expert Guide
- How to download video from Firefox browser – 2026 Guide
- How to install drivers for USB 3.0 to HDMI adapter on Windows 11
Understanding OneDrive Sharing Permissions in Depth
Permissions are the backbone of secure collaboration. If you don’t understand permissions, your attempts at how to share a OneDrive file could lead to data leaks.
1. Anyone with the Link
- Security Level: Low.
- Best for: Public newsletters, open-source assets, or non-sensitive photos.
- Pros: No sign-in required; maximum convenience.
2. People in Your Organization
- Security Level: Medium.
- Best for: Internal memos, company handbooks, and team projects.
- Pros: Limits access to people with the same company email domain (e.g., @yourcompany.com).
3. People with Existing Access
- Security Level: High.
- Best for: Sending a reminder link to someone who already has permission to the folder.
- Pros: Does not change any security settings; it just sends a direct path.
4. Specific People
- Security Level: Highest.
- Best for: Legal documents, financial statements, and private files.
- Pros: Requires the recipient to prove their identity by signing in or using a one-time passcode sent to their email.
Sometimes, sharing a single file isn’t enough. If you are working on a large project, you need to know how to share a OneDrive file group by sharing an entire folder.
Step 1: Organize Your Data
Move all relevant files into a single folder. Naming the folder clearly (e.g., “Project Alpha – Q2”) helps recipients navigate the data.
Step 2: Access Folder Sharing
Right-click the folder in your OneDrive directory and select Share.
Step 3: Define Global Permissions
When you share a folder, the permissions apply to every file inside it. If you give someone “Edit” access to the folder, they can add, delete, or modify any file within that folder.
Step 4: Invite the Team
Enter the email addresses of your team members. You can also add a brief note explaining the contents of the folder.
Step 5: Monitor Activity
Once shared, you can see who has accessed the folder by clicking the “Information” (i) icon in the top-right corner of the OneDrive web interface. This helps you track the progress of the collaboration.
A major part of the “how to share a OneDrive file” workflow is knowing when to stop sharing. Over time, you may accumulate dozens of shared links that are no longer necessary.
How to Stop Sharing a OneDrive File
- Select the File: Locate the shared file in your OneDrive.
- Open Manage Access: Click the “Shared” status or the three dots and select Manage Access.
- Remove Links: You will see a list of links that give access. Click the “X” next to a link to delete it entirely.
- Remove Individuals: If you shared with specific people, click their name and select Stop Sharing.
- Change Permissions: You can also downgrade someone from “Can Edit” to “Can View” without removing them entirely.
Advanced Sharing Features for Power Users
If you are using OneDrive for Business or have a Microsoft 365 Personal subscription, you have access to advanced tools that make how to share a OneDrive file even more professional.
1. Password Protection
Adding a password ensures that even if an email is forwarded to the wrong person, the file remains locked. You should always communicate the password through a different medium, such as a phone call or a secure messaging app.
2. Expiration Dates
Setting an expiration date is perfect for temporary contractors or clients. Once the date passes, the link automatically becomes invalid, reducing the “attack surface” of your data.
3. Block Downloads
In the sharing settings, you can toggle “Block download.” This allows the recipient to view the document in their web browser but prevents them from saving a local copy to their computer. This is ideal for protecting intellectual property.
4. Request Files
This is a “reverse sharing” feature. You can create a link that allows others to upload files to a specific folder in your OneDrive without them being able to see what else is in that folder.
Best Practices for Secure OneDrive File Sharing
To conclude our guide on how to share a OneDrive file, let’s review the best practices that professional data managers follow:
- Audit Regularly: Every month, go to the “Shared” tab in OneDrive and see what you are currently sharing. Revoke access to anything that is no longer active.
- Use the “Specific People” Option: While “Anyone with the link” is easy, it is the least secure. Whenever possible, use specific email addresses.
- Notify Recipients Separately: Don’t just rely on the automated OneDrive email. Send a quick message to the recipient letting them know a secure link is coming their way.
- Backup Your Local Data: As we discussed with the PandaOffice Drecov data recovery software, cloud storage is not a replacement for a local backup strategy. Always keep a copy of your most important files on a separate physical drive.
Conclusion
Learning how to share a OneDrive file is a fundamental skill that enhances productivity and collaboration. By following the steps outlined in this guide—from basic web sharing to advanced permission management—you can ensure that your data reaches the right people safely and efficiently.
Furthermore, by keeping tools like PandaOffice Drecov data recovery software in your digital toolkit, you are prepared for those unexpected moments when a file goes missing before it can be shared. Whether you are a student, a freelancer, or a corporate executive, mastering the art of file sharing and data protection will serve you well in the years to come.


