


When you click “delete” on a sensitive document or an old photo, it might feel like the file disappears into a digital void. However, in the world of data architecture, nothing is ever truly “gone” the moment you hit that button. Instead, your operating system moves the item to a specific recycle bin file path. Understanding this path is the first step toward becoming a master of your own data.
Whether you are trying to free up space, troubleshoot a system error, or recover a precious memory that was accidentally tossed away, knowing the internal mechanics of your OS is vital. This guide will walk you through the hidden corridors of your hard drive, from registry keys to specialized recovery software, ensuring you never lose a file permanently again.
What Is the Recycle Bin File Path?
The recycle bin file path is the specific directory on your storage media where the operating system stores references to deleted files. Instead of erasing the data bits immediately, the OS simply re-indexes the file. It moves the file from its original folder to this hidden system area and waits for further instructions—either to restore it or to purge it forever.
Think of the recycle bin as a digital “waiting room.” Files sit there quietly, out of sight, until you decide their final fate. Unlike a visible folder like “Documents,” the recycle bin operates behind the scenes using a hidden file path that requires administrative visibility to access directly.
Understanding File Storage After Deletion
When you delete a file in Windows, the system doesn’t immediately scrub the physical sectors of your hard drive. Instead, it marks the space as “available” for new data and moves the file pointer to the recycle bin file path.
The file remains physically intact until new data—like a new software installation or a downloaded movie—overwrites those specific sectors. This “grace period” is exactly why data recovery is possible. As long as you haven’t saved new information over the old bits, the data is still there, just hiding in the recycle bin file path.
Why Knowing the Path Matters
Most users rely solely on the desktop icon. However, understanding the actual path offers deeper control for several reasons:
- Manual Recovery: If the desktop icon is corrupted or missing, you can still find your files.
- Disk Cleanup: Sometimes the Recycle Bin “bloats” and doesn’t empty correctly; manual access allows you to clear the cache.
- Forensics and Security: Knowing where data lingers helps you ensure that sensitive information is truly wiped.
Recycle Bin File Path in Windows
In modern Windows environments (Windows 10 and Windows 11), the system uses a highly structured method to manage your trash. It isn’t just one folder; it is a distributed system across all your connected drives.
Default Location Explained: $Recycle.Bin folder path in local disk C
The primary $Recycle.Bin folder path in local disk C is located at the root level of your system partition. Because this is a critical system component, Windows assigns it “Hidden” and “System” attributes.
To see it, you must go to File Explorer Options > View and uncheck “Hide protected operating system files.” Once enabled, you will see a folder named $Recycle.Bin. Inside this directory, Windows creates unique subfolders for every user on the PC. These subfolders are named using SIDs (Security Identifiers), such as S-1-5-21.... This ensures that User A cannot see or restore the deleted files of User B.
System Drive vs External Drives
A common misconception is that all deleted files go to the C: drive. In reality, every partition has its own recycle bin file path.
- System Drive (C:): Stores files deleted from your desktop and main folders.
- Secondary Drive (D:): Has its own
$Recycle.Binfolder. - External USB: When you delete a file from a thumb drive, Windows creates a hidden folder on that specific USB to store the item.
How Windows Stores Deleted Files Internally
Hidden System Folders and the recycle bin registry path windows 10
Windows doesn’t just move the file; it renames it and tracks its origin. This metadata is often managed through the registry. The recycle bin registry path windows 10 is found at:
HKEY_LOCAL_MACHINE\SOFTWARE\Microsoft\Windows\CurrentVersion\Explorer\Desktop\NameSpace\{645FF040-5081-101B-9F08-00AA002F954E}
This long string of characters is the Class ID (CLSID) for the Recycle Bin. If your icon disappears or the bin stops responding, checking this registry path is the professional way to reset the service.
File Naming Structure Inside Recycle Bin
Inside the recycle bin file path, your files are renamed. You might see files like $R12345.docx and $I12345.docx.
- The $R File: Contains the actual contents of your document.
- The $I File: Contains the “Identity” or metadata, including the original file name, its original size, and the exact date it was deleted.
How to Access the Recycle Bin File Path
Using File Explorer (Step-by-Step)
- Step 1: Open File Explorer and click on the “View” tab (or “Options” in Windows 11).
- Step 2: Select Change folder and search options.
- Step 3: Under the View tab, find “Hidden files and folders” and select Show hidden files, folders, and drives.
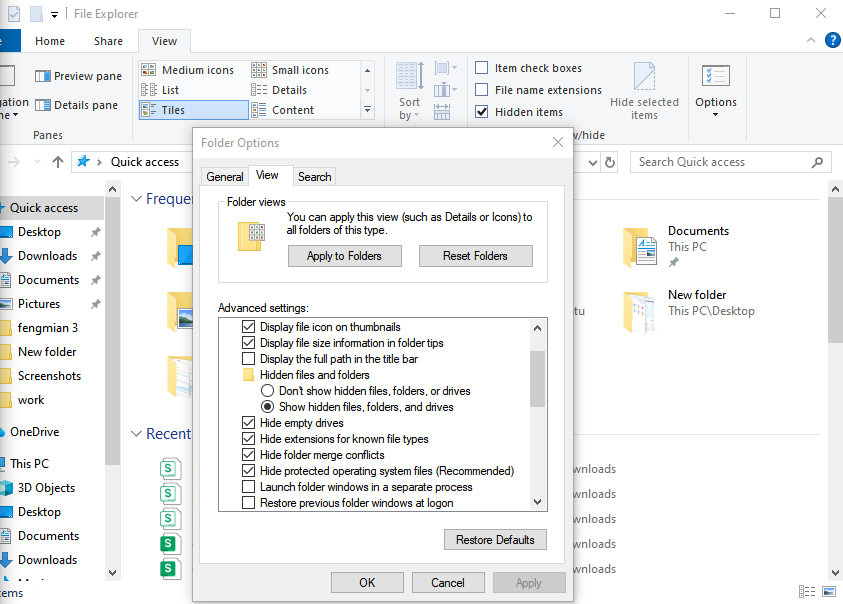
- Step 4: Uncheck Hide protected operating system files (Recommended). Click “Yes” on the warning prompt.
- Step 5: Navigate to C:$Recycle.Bin to view your deleted items.
Using Command Prompt
For those who prefer a more direct approach, the Command Prompt (CMD) allows you to bypass the GUI.
- Step 1: Press
Win + R, typecmd, and hit Enter. - Step 2: Type
cd C:\$Recycle.Binand press Enter. - Step 3: Use the command
dir /sto list all files hidden within the subdirectories.
PandaOffice Drecov data recovery software: Your Ultimate Recovery Solution
Sometimes, simply knowing the recycle bin file path isn’t enough. If you have emptied the bin or used Shift + Delete, the files are no longer in the $Recycle.Bin folder. In these critical moments, you need professional-grade tools. This is where PandaOffice Drecov data recovery software excels. It is designed to scan the raw sectors of your disk to find data that the OS has “forgotten.”
⚠ Warning: Never install recovery software on the same drive where the lost data was located. If you lost files on the C: drive, install the software on a USB drive or D: drive to prevent overwriting.
How to Recover Files Using PandaOffice Drecov
Step 1: Select the Scan Location
Launch the program. You will see a list of available drives. To recover items previously in the recycle bin file path, select the specific drive (usually Local Disk C:) and click Scan.

Step 2: Deep Scan for Permanently Deleted Files
The software will first perform a Quick Scan. If your files aren’t found, the Deep Scan will automatically initiate. This mode looks for file signatures across the entire disk surface, bypassing the recycle bin file path entirely to find fragmented data.

Step 3: Preview and Filter Results
One of the best features of PandaOffice Drecov data recovery software is the preview function. You can click on images, documents, or videos to see if they are intact before committing to the recovery.

Step 4: Execute Recovery
Select the checkboxes for the files you wish to save. Click the Recover button and choose a safe destination (an external hard drive is highly recommended).
Further Reading and Resources:
- Microsoft Support: Recycle Bin Basics
- Learn how to get your Google Chrome bookmarks back
- How to restore computer to an earlier date on Windows
- Your definitive guide on how to recover video files
Recycle Bin File Path in macOS
While our focus has been on Windows, Apple users deal with a similar structure. On macOS, the path is usually ~/.Trash.
Accessing Hidden Trash Files
On a Mac, each user has a personal .Trash folder in their home directory. However, just like Windows, external drives have their own hidden trash folders located at /Volumes/DriveName/.Trashes. To see these, you can use the shortcut Command + Shift + Period (.) in Finder.
Recycle Bin File Path on External Drives
USB and Hard Drive Behavior
When you delete a file from a USB flash drive, it often bypasses the recycle bin file path entirely on older versions of Windows, leading to permanent deletion. However, on modern NTFS-formatted external drives, Windows creates a hidden $RECYCLE.BIN folder on the root of that specific drive.
If you unplug the drive, those “deleted” files stay on the drive. They do not appear in your computer’s main Recycle Bin until the drive is plugged back in.
Security and Privacy Considerations
Since the recycle bin file path keeps your data alive, it represents a security risk. If you sell your computer without properly wiping these hidden directories, the buyer could use PandaOffice Drecov data recovery software to resurrect your deleted private documents.
To protect yourself:
- Use “Secure Empty Trash” utilities.
- Encrypt your drives using BitLocker or FileVault.
- Regularly check the recycle bin registry path windows 10 to ensure no unauthorized redirects are active.
Conclusion
The recycle bin file path is more than just a folder; it is a sophisticated safety system designed to protect us from our own mistakes. Whether it is the $Recycle.Bin folder path in local disk C or the hidden .Trashes on a Mac, these directories serve as the last line of defense for your data.
By understanding how to navigate these paths and using powerful tools like PandaOffice Drecov data recovery software, you can navigate the digital world with confidence. Remember, a file is only truly “lost” if you give up on finding it.


