


Losing an entire partition can feel like watching a digital library burn down. One minute, your flash drive is a reliable repository for your work projects and family photos; the next, it shows up as “Unallocated Space.” If you have accidentally encountered a deleted volume on usb drive scenario, take a deep breath.
While the situation is urgent, it is rarely permanent. In this comprehensive guide, we will explore the mechanics of USB partitions and provide a roadmap to getting your data back, ranging from simple built-in Windows fixes to professional-grade recovery with PandaOffice Drecov.
The Anatomy of a Deleted Volume on USB Drive
To recover data effectively, one must first understand the architecture of a USB storage device. A USB drive is not just a bucket of bits; it is structured data governed by a partition table. When you encounter a deleted volume on usb drive, you are essentially looking at a book that has had its “Table of Contents” ripped out. The chapters (your files) are still there, but the librarian (the Operating System) no longer knows where they start or end.
MBR vs. GPT: The Foundation of Your Volume
Most USB drives use one of two partitioning schemes:
- Master Boot Record (MBR): The traditional standard for drives under 2TB. It stores partition information in the very first sector of the disk.
- GUID Partition Table (GPT): The modern standard used by UEFI systems. It is more robust because it stores multiple copies of the partition table across the disk.
Understanding the “Deleted Volume” Crisis
Before we dive into the “how-to,” we must understand the “what.” A volume (or partition) is a defined segment of storage on your USB drive that the operating system treats as a separate entity. When you face a deleted volume on usb drive, you haven’t necessarily wiped the data bits yet; you have simply removed the “table of contents” that tells your computer where those bits live.
Common Causes of Volume Loss
- Accidental Deletion: Using Disk Management and clicking “Delete Volume” instead of “Format.”
- Interrupted Formatting: Removing the drive while it is being partitioned.
- File System Corruption: Raw drives often appear as a deleted volume on usb drive because the metadata is unreadable.
- Malware Attacks: Certain viruses target the Master Boot Record (MBR) or GUID Partition Table (GPT).
Initial Diagnosis and Data Preservation
Before attempting any recovery, you must follow the “Golden Rule” of data recovery: Do No Further Harm.
Immediate Actions to Take
- Stop Writing Data: The moment you realize you have a deleted volume on usb drive, stop using the device. Any new file saved to that drive could physically overwrite the sectors containing your lost data.
- Physical Inspection: Check the USB connector. If the drive is flickering or disconnecting, the issue might be hardware-based rather than a simple deleted volume on usb drive.
- Check Disk Management: Press
Windows + Xand select Disk Management. Locate your Removable Disk. If it shows a black bar labeled “Unallocated,” the volume is logically deleted. If it shows “No Media,” the flash memory chip itself may have failed.
Method 1: Assigning a Drive Letter (The “Hidden” Volume Fix)
Sometimes, the volume isn’t actually deleted; it’s just “homeless.” If your USB drive shows a healthy partition in Disk Management but doesn’t appear in File Explorer, it likely lacks a drive letter.
- Step 1: Right-click the Start button and select Disk Management.
- Step 2: Locate your USB drive in the list. Look for a bar labeled “Healthy” but without a letter (like D: or E:).
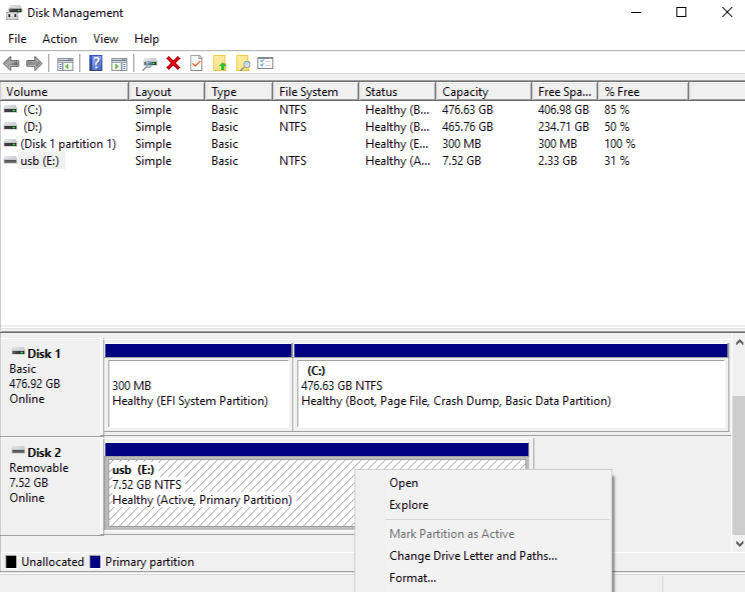
- Step 3: Right-click that specific block and select Change Drive Letter and Paths…
- Step 4: Click Add, choose a letter from the dropdown menu, and hit OK.
If the space is marked as “Unallocated,” then you are indeed dealing with a deleted volume on usb drive, and you should move to the next method.
Method 2: Using PandaOffice Drecov (The Professional Choice)
When a partition is truly gone, manual Windows tools often fall short. This is where PandaOffice Drecov shines. It is designed to scan the “raw” sectors of the physical disk to reconstruct the lost file structure of a deleted volume on usb drive.
Why Use PandaOffice Drecov?
PandaOffice Drecov uses an advanced deep-scan algorithm that bypasses the corrupted partition table. It looks for “file signatures” (unique headers for JPEGs, PDFs, etc.) to ensure that even if the volume name is gone, the files are found.
⚠ Warning: Install it on a drive different from the one where your data was lost to prevent overwriting.
Step-by-Step Recovery Process
- Step 1: Select the Physical Drive
Launch the software. Instead of selecting a drive letter, look for the “Lost Partition” section or select the physical “Disk” (e.g., Disk 2 – Generic Flash Disk). This ensures the software scans the unallocated area where the deleted volume on usb drive used to reside.

- Step 2: Initiate the Deep Scan
Click Scan. The software will first perform a Quick Scan to find recent deletions, followed automatically by a Deep Scan.

Warning: Do not disconnect the drive during this process. A Deep Scan on a 128GB drive can take 20-40 minutes depending on your port speed.
- Step 3: Filter and Preview
Once the scan is complete, use the sidebar to filter by file type (Pictures, Documents, etc.). PandaOffice Drecov allows you to double-click files to preview them. If you can see the photo or read the text in the preview, the recovery will be 100% successful.

- Step 4: Recover to a Safe Location
Select the files or the entire found volume and click Recover.
Important: Never save the recovered files back onto the same USB drive. Save them to your Desktop or an external hard drive to prevent overwriting the very data you are trying to save.
Method 3: Recovering via Command Prompt (TestDisk)
For users who are comfortable with a text-based interface, TestDisk is a powerful open-source utility often recommended by experts to fix a deleted volume on usb drive.
- Step 1: Download TestDisk and run
testdisk_win.exeas Administrator. - Step 2: Select Create to start a new log file.
- Step 3: Select your USB drive from the list and choose your partition table type (usually Intel for older drives or EFI GPT for newer, large drives).
- Step 4: Select Analyse and then Quick Search.
- Step 5: If TestDisk finds the deleted volume on usb drive, it will list it in green. Highlight it and press Write to restore the partition table.
Method4: Advanced Troubleshooting via Command Prompt (CMD)
If you believe the volume is not truly “deleted” but merely “offline” or “unmounted,” you can use the Windows Command Line to investigate further.
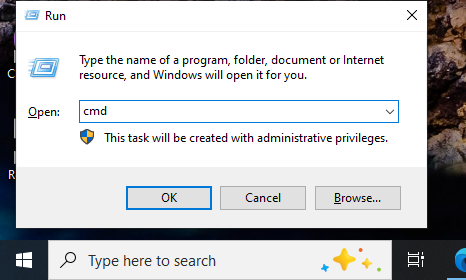
- Step 1: Open Diskpart Type
cmdin the Windows Search bar, right-click it, and select Run as Administrator. Typediskpartand press Enter.
- Step 2: Identify the Disk Type
list disk. You will see a list of all storage devices. Identify your USB drive by its size (e.g., Disk 2). - Step 3: Examine the Disk Detail Type
select disk 2(replace 2 with your drive’s number). Then typedetail disk. If the output says “ReadOnly: Yes,” this explains why the volume disappeared. If it says “No volumes found,” you are officially dealing with a deleted volume on usb drive. - Step 4: Check for Hidden Partitions Type
list partition. Sometimes, a volume is “deleted” from the OS view but the partition entry still exists. If a partition is listed, you can try to activate it by typingselect partition 1followed byassign letter=Z.
Best Practices to Avoid Volume Loss
- Always Eject Safely: Most volume deletions happen because the “Write Cache” was interrupted. Use the “Safely Remove Hardware” icon in the system tray.
- Monitor Drive Health: Use S.M.A.R.T. monitoring tools to see if your USB flash memory is nearing the end of its life cycle.
- Avoid Using “Diskpart Clean” Lightly: The
cleancommand in Windows CMD instantly turns your drive into a deleted volume on usb drive. Double-check your disk index before hitting Enter.
Expanding Your Data Recovery Knowledge
Data recovery is a broad field. Once you have managed the crisis of a deleted volume on usb drive, you might want to sharpen your skills for other common digital hiccups. Whether you are dealing with file-level deletions or hardware malfunctions, these resources provide deep-dive solutions:
- If you’ve managed to bring the volume back but realize some specific folders are still missing, check out this guide on how to recover deleted files from USB drive.
- Sometimes the volume isn’t deleted, but the hardware is acting up. If your computer isn’t recognizing the device at all, consult the USB ports not working ultimate troubleshooting guide.
- For a bird’s-eye view of all possible recovery techniques, read our complete guide to recovering deleted files from USB flash drives.
- Planning to start fresh? If you need to re-partition your drive safely, learn the 4 fast ways to format USB to FAT32, even for high-capacity 128GB sticks.
Deleted Volume On USB Drive FAQs
Q: Can I recover a deleted volume on USB drive if I already created a new one?
A: Yes, but it is much harder. Creating a new volume overwrites a small portion of the data. However, PandaOffice Drecov can often find the “remnants” of the previous volume through its signature-based deep scan.
Q: Why does my 128GB USB drive only show 32GB of unallocated space?
A: This usually happens when a drive was used as a Windows Recovery Media or a bootable Linux drive. The rest of the space is likely a “Hidden” deleted volume on usb drive. You can use the clean command in Diskpart to reset the entire disk to one large unallocated block.
Q: How do I know if my USB drive is dying?
A: If you frequently see the deleted volume on usb drive error, or if files become corrupted spontaneously, the NAND flash memory is likely wearing out. USB drives have a limited number of “write cycles.”
Conclusion
Experiencing a deleted volume on usb drive is a stressful event, but modern software like PandaOffice Drecov has made the recovery process accessible to everyone, not just IT professionals. By acting quickly and avoiding writing new data to the drive, your chances of a full recovery are incredibly high.


