


In the modern digital landscape, our web browsers serve as the central hub for both professional productivity and personal entertainment. However, this high volume of activity often leaves a “digital footprint” in the form of recently closed tabs and synchronized session data. Whether you are a professional researcher or a casual user, knowing how to delete recent tabs on Chrome is vital for maintaining your privacy and ensuring your workstation remains decluttered.
Yet, there is a flip side to this coin. In our haste to clear our tracks or tidy up our workspace, we often accidentally close vital information. This article serves as a dual-purpose masterclass: first, we will explore how to purge your history effectively; second, we will delve into the expert world of data recovery, showing you how to retrieve those precious lost sessions when things go wrong.
Understanding the Chrome Ecosystem: Tabs, History, and Sync
Before we dive into the “how-to,” we must understand what Chrome considers “Recent Tabs.” This feature is powered by the Google Sync engine, which bridges the gap between your desktop, Android, and iOS devices. While this provides seamless continuity, it also means that your browsing habits on a mobile device might be visible to someone sitting at your home computer.
When you seek to understand how to delete recent tabs on Chrome, you are essentially looking to manage three distinct data points: the local session cache, the cloud-synced history, and the physical “Recently Closed” list found in the menu.
How to Delete Recent Tabs on Chrome: Desktop, Android, and iPhone
Managing your digital footprint requires a device-specific approach. Because Chrome’s interface adapts to the operating system it inhabits, the steps to clear your data vary slightly.
Method 1: Desktop (Windows & Mac)
On a desktop, the process is highly granular. You can target specific timeframes to ensure that while your recent activity is gone, your long-term useful history remains intact.
- Step 1: Open Google Chrome and locate the three-dot menu in the upper right corner.
- Step 2: Navigate to History and then select the top History option from the sub-menu (or press Ctrl + H on Windows/Cmd + Y on Mac).
- Step 3: On the left sidebar, click Clear browsing data.
- Step 4: In the “Basic” tab, set the time range to “Last Hour” or “All Time” depending on your needs. Ensure Browsing history is checked.
- Step 5: Click Clear data. This action effectively answers the question of how to delete recent tabs on Chrome by wiping the pointers the browser uses to “re-open” them.
Method 2: Android and iOS
Mobile users often struggle with the “Tab Grid” view, which can store dozens of “ghost” tabs.
- Step 1: Tap the Tab Switcher icon (the square with a number in it).
- Step 2: To close individual tabs, swipe them to the left or right.
- Step 3: To clear the “Recent Tabs” list in the menu, tap the three dots, go to Recent Tabs, and long-press entries to remove them, or simply clear the browsing history as described in the desktop method.
The Hidden Risk: When “Delete” Goes Too Far
While learning how to delete recent tabs on Chrome is a great way to stay organized, it is incredibly common for users to realize five minutes later that they closed a tab containing a crucial, unsaved work document or a rare reference link. This is where simple browser management crosses into the territory of data recovery.
If you have cleared your history and realize you made a mistake, standard “Undo” commands will no longer work. You have transitioned from a simple UI task to a technical recovery scenario.
How to Recover Accidentally Deleted Chrome Tabs
When the standard “Ctrl + Shift + T” shortcut fails because the history has been purged, you need to look at deeper system files. Chrome stores its session data in local folders on your hard drive. If these files are still present—even if the browser doesn’t “see” them—recovery is possible.
Method 1: Using the DNS Cache (Windows Only)
If you recently deleted your tabs and haven’t restarted your computer, your computer’s Domain Name System (DNS) cache might still hold the addresses of the websites you visited.
- Step 1: Press Windows + R, type
cmd, and hit Enter. - Step 2: In the command prompt, type
ipconfig /displaydnsand press Enter. - Step 3: Scroll through the list of recently accessed domains. While this won’t restore the tab itself, it provides the URLs you need to manually reopen them.
Method 2: Google Account Activity
If you were logged into your Google Account while browsing, your “My Activity” page often retains data that the local browser history “Clear Data” command might have missed if you didn’t check the “Also clear from Google Account” box.
- Step 1: Visit myactivity.google.com.
- Step 2: Filter by date and product (Chrome).
- Step 3: Browse the timeline to find the specific pages you accidentally deleted.
Advanced Recovery: Using a Chrome Search History Recovery Tool
Sometimes, the loss is more significant than just a few tabs. If your entire Chrome profile becomes corrupted or you’ve performed a “deep clean” of your AppData folder, you will need a dedicated chrome search history recovery tool.
A professional recovery tool doesn’t just look at the browser’s interface; it scans the sectors of your hard drive for the SQLite databases that Chrome uses to store history, bookmarks, and “Recent Tab” metadata. This is a technical process, but modern software has made it accessible for the average user.
The Role of SQLite Databases in Chrome
Google Chrome utilizes a database format called SQLite. When you ask how to delete recent tabs on Chrome, the browser marks those entries in the database as “deleted,” but the actual data often remains on the disk until it is overwritten by new information. A specialized recovery tool can “see” these marked entries and pull them back from the brink of permanent deletion.
PandaOffice Drecov Data Recovery Software: The Professional Solution
When manual methods fail and you find yourself in a situation where crucial professional data was lost during a history purge, it is time to turn to PandaOffice Drecov data recovery software. This tool is specifically designed to handle complex file system recovery, including the deep-level AppData files that Chrome relies on.
PandaOffice Drecov is particularly effective because it can reconstruct fragmented database files that other tools might ignore. If you are struggling with how to delete recent tabs on Chrome and accidentally wiped your entire work session, follow these professional recovery steps:
⚠ Warning: Install it on a drive different from the one where your data was lost to prevent overwriting.
Step-by-Step Recovery with PandaOffice Drecov
- Step 1: Select the Source Drive. Launch the PandaOffice Drecov data recovery software. On the main interface, select the drive where your Chrome installation resides (usually the
C:drive).

- Step 2: Run a Deep Scan. Select the Deep Scan mode. This will allow the software to look beyond the file table and search for Chrome’s unique file signatures, such as
History,Last Tabs, andLast Session.

- Step 3: Filter by File Path. Once the scan is complete, use the search filter. Navigate to the following path within the scan results:
Users\YourUsername\AppData\Local\Google\Chrome\User Data\Default(Note: If you use multiple profiles, “Default” might be “Profile 1”).
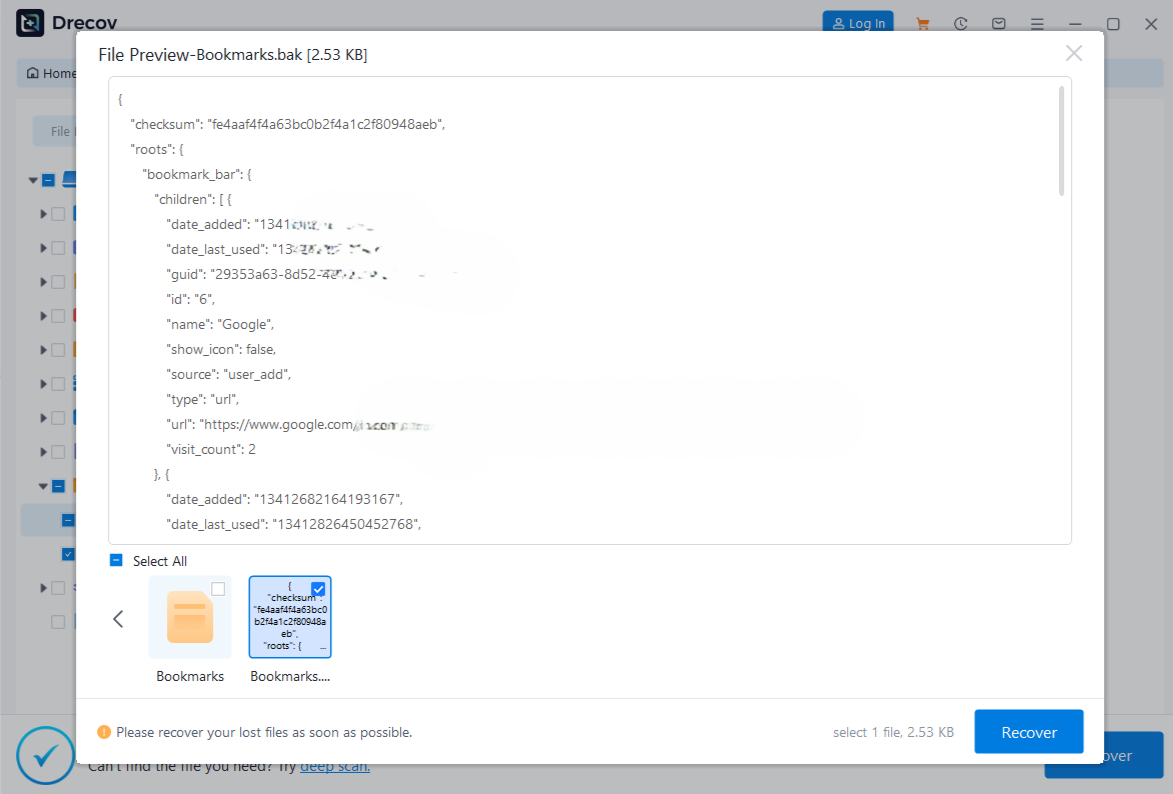
- Step 4: Preview and Recover. Look for files named
Current Session,Current Tabs, orHistory. PandaOffice Drecov allows you to preview the file’s metadata to ensure it contains the timestamps you are looking for. Select the files and click Recover to save them to a secure, external location. - Step 5: Restore to ChromeWith the browser closed, you can attempt to replace the current (empty) session files with the recovered ones. When you restart Chrome, the browser will attempt to load the recovered “Recent Tabs.”
Internal Resources for Comprehensive Recovery
Once you have mastered the art of recovering your browser data, you might realize that other parts of your digital life need a similar “spring cleaning” or recovery plan. Check out these expert guides to further your knowledge:
- If you’ve lost more than just tabs, learn how to recover deleted files from a USB flash drive.
- Managing media is just as important as managing tabs; here is the 2026 master guide on transferring photos to USB.
- For those who specifically lost their saved sites, here is how to get your Google Chrome bookmarks back.
Best Practices for Preventing Tab Loss in 2026
While knowing how to delete recent tabs on Chrome is important for privacy, and knowing how to recover them is vital for security, the best approach is a proactive one.
1. Use Tab Groups and Naming
Instead of leaving 50 tabs open, right-click a tab and select Add tab to new group. You can name these groups (e.g., “Tax Research” or “Vacation Planning”). Chrome is less likely to “drop” these from memory during a crash.
2. Enable “Continue where you left off”
Go to Chrome Settings > On startup and select Continue where you left off. This ensures that even if Chrome closes unexpectedly, your recent tabs aren’t lost to the void.
3. Frequent Backups of the “User Data” Folder
If you handle sensitive research, manually back up your User Data folder once a week. This contains your history, tabs, and preferences. If a “Delete Recent Tabs” operation goes wrong, you can simply swap the folder back.
Conclusion: Balancing Privacy and Data Integrity
In 2026, our digital footprint is larger than ever. Learning how to delete recent tabs on Chrome is a fundamental skill for anyone who values their privacy and wants a fast, responsive browser. However, the complexity of modern web data means that accidents are bound to happen.
By combining built-in Chrome tools with powerful external solutions like PandaOffice Drecov data recovery software, you can navigate the web with confidence. You now have the power to clear your clutter without the fear of losing your most important work. Whether you are looking for a chrome search history recovery tool or simply trying to tidy up your Android phone, the steps provided here ensure you are always in control of your data.


