


Understanding the Recycle Bin on Desktop
What Is the Recycle Bin?
If you’ve used a Windows computer for even a short time, you’ve definitely seen that familiar little trash can sitting on your desktop. That’s the Recycle Bin, and it plays a crucial role in how your system handles deleted files. Instead of permanently deleting files immediately, Windows sends them to this temporary holding area. Think of it like a safety net—if you accidentally delete something important, you can easily restore it without panic.
But here’s the interesting part: the Recycle Bin isn’t just a folder. It’s actually a system-managed feature that interacts directly with your storage drive. When you delete a file, Windows doesn’t erase it right away—it simply marks that space as available while keeping the file accessible in the Recycle Bin. This design allows for quick recovery, which is incredibly useful in everyday computing.
Still, not everyone finds the Recycle Bin icon useful on their desktop. Some users rarely use it, while others prefer a cleaner, distraction-free workspace. If you fall into that category, you’re probably wondering how to remove recycle bin from desktop—and yes, it’s completely possible.
Why It Appears on Your Desktop
The Recycle Bin appears on your desktop by default because Microsoft considers it a core system feature. It’s placed there for convenience, ensuring users can easily access deleted files without digging through menus. However, unlike regular icons, you can’t simply drag it to the trash or press delete to remove it. That’s because it’s protected as a system icon.
This built-in behavior can feel restrictive. You might think, “Why can’t I just delete it like any other icon?” The answer lies in system design—Windows wants to ensure that critical features remain accessible. But thankfully, Microsoft also provides ways to customize your desktop, including hiding or removing system icons like the Recycle Bin.
Why Remove the Recycle Bin Icon
Cleaner Desktop Experience
Let’s be honest—desktop clutter is real. Over time, icons pile up like papers on a messy desk. Before you know it, finding anything becomes a chore. Choosing to remove recycle bin from desktop can be a small but meaningful step toward a minimalist desktop setup.
A clean desktop isn’t just about aesthetics. It can actually improve your focus and productivity. When you remove unnecessary icons, your workspace feels more organized and less overwhelming. It’s like clearing your physical desk—you suddenly feel more in control.
Many users today prefer a streamlined look, especially with modern high-resolution displays. A single unnecessary icon can feel out of place. When you remove recycle bin desktop icons, you help create a cleaner visual environment, making your desktop feel intentional rather than cluttered.
Privacy and Security Reasons
There’s another angle that often gets overlooked: privacy. Even if you delete files, they remain in the Recycle Bin until you empty it. Anyone with access to your computer can potentially restore those files.
By deciding to remove recycle bin from desktop, you reduce visibility and make it less accessible to casual users. While this isn’t a full security solution, it adds a small layer of protection. It’s like hiding a drawer—you know it’s there, but it’s not immediately obvious to others.
How to Remove Recycle Bin from Desktop (Windows)
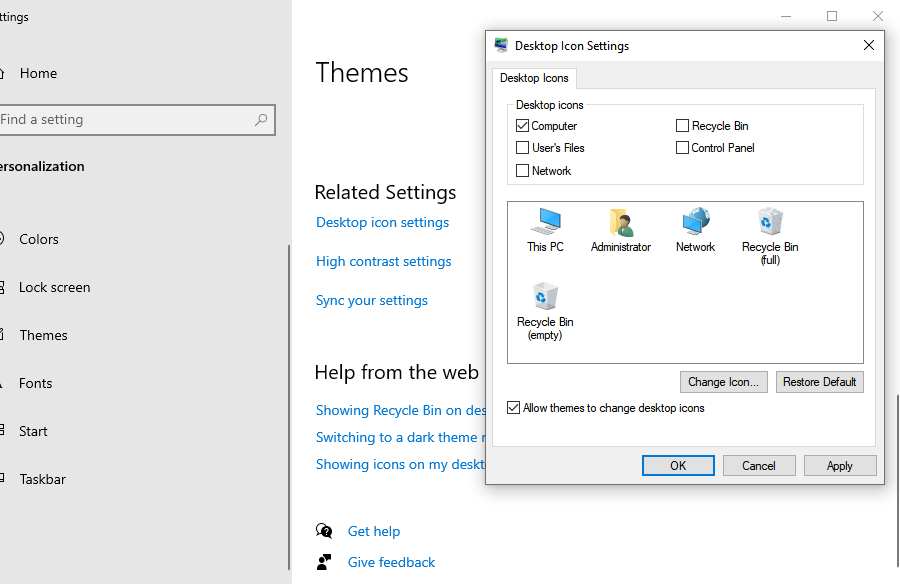
Method 1: Using Desktop Icon Settings
The easiest and safest way to remove recycle bin from desktop is through the built-in settings. You don’t need any technical skills—just follow a few simple steps.
- Step 1: Right-click on an empty space on your desktop.

- Step 2: Select Personalize from the context menu.
- Step 3: In the sidebar, click on Themes.
- Step 4: Scroll down and select Desktop icon settings (usually found under “Related Settings”).
- Step 5: Find the Recycle Bin checkbox and uncheck it.
- Step 6: Click Apply, then OK.
Once you complete these steps, the icon disappears instantly. It’s that simple. No restarts, no complicated processes—just a quick toggle. This method is ideal for most users because it’s safe and reversible. If you ever want the icon back, you can follow the same steps and check the box again.
Method 2: Using the Windows Settings App
Another way to remove recycle bin desktop icons is through the Windows Settings app directly. This method is especially useful if you prefer navigating through menus instead of right-clicking.
- Step 1: Open the Settings app by pressing Win + I.
- Step 2: Navigate to Personalization.
- Step 3: Click on the Themes tab on the left.
- Step 4: Select Desktop icon settings.
- Step 5: Uncheck the box next to Recycle Bin.
- Step 6: Confirm your changes by clicking OK.
This approach achieves the same result but offers a more guided interface. It’s perfect for users who like exploring system settings rather than using shortcuts.
How to Remove Recycle Bin Desktop Icon Using Registry Editor
Advanced Method Explained
If you’re someone who enjoys digging deeper into system customization, the Registry Editor offers another way to remove recycle bin from desktop. This method is more advanced and gives you greater control over how Windows behaves.
The Windows Registry is like the brain of your operating system. It stores settings and configurations for everything. By modifying specific entries, you can hide system icons, including the Recycle Bin. However, this method isn’t for beginners. One wrong change can cause system issues.
Safety Precautions
Before making any changes, always back up your registry. This ensures you can restore your system if something goes wrong. Avoid copying random commands from unknown sources. Stick to trusted instructions and double-check every step.
Step-by-Step Registry Guide
- Step 1: Press Win + R, type regedit, and press Enter.
- Step 2: Navigate to the following path:
HKEY_LOCAL_MACHINE\SOFTWARE\Microsoft\Windows\CurrentVersion\Explorer\Desktop\NameSpace - Step 3: Locate the folder (Key) named
{645FF040-5081-101B-9F08-00AA002F954E}. - Step 4: Right-click the key and select Delete.
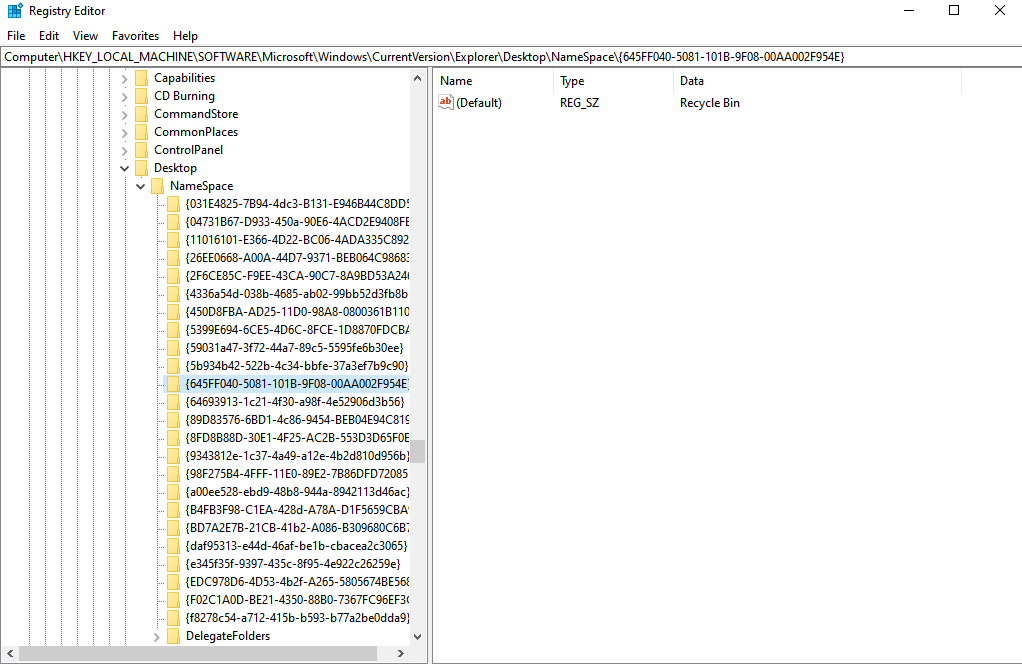
- Step 5: Restart your computer or refresh the desktop to see the changes.
Warning: Modifying the registry can be risky. Always create a System Restore point before proceeding with this method to remove recycle bin from desktop.
Removing Recycle Bin Using Group Policy
When to Use This Method
Group Policy is another advanced tool, typically used in professional or enterprise environments. If you’re managing multiple computers or want stricter control over system behavior, this method to remove recycle bin from desktop is worth considering. It allows you to enforce rules, such as hiding the Recycle Bin across all users on a specific machine.
Step-by-Step Guide
- Step 1: Press Win + R, type gpedit.msc, and press Enter.
- Step 2: Navigate to User Configuration > Administrative Templates > Desktop.
- Step 3: In the right pane, find the setting named Remove Recycle Bin icon from desktop.
- Step 4: Double-click it and select the Enabled option.
- Step 5: Click Apply and then OK.
Once activated, the icon disappears and cannot be easily restored by standard users through the normal settings menu. This provides a more permanent solution for shared environments.
The Hidden Risk: Data Loss After Removing the Icon
While learning how to remove recycle bin from desktop is great for organization, it carries a small risk. When the icon is hidden, you might forget to check it before emptying it, or you might accidentally use Shift + Delete (which bypasses the bin entirely).
If you realize you’ve lost important data after you remove recycle bin desktop icons, don’t panic. Even if the bin is emptied or the files were “permanently” deleted, they often still reside on your hard drive until they are overwritten by new data. This is where professional data recovery tools become essential.
Recovering Lost Data with PandaOffice Drecov
If you have hidden your Recycle Bin and accidentally deleted a file you desperately need, PandaOffice Drecov is the professional solution you need. It is designed to scan your storage at a deep level to find fragments of files that Windows no longer “sees.”
Why Choose PandaOffice Drecov?
Unlike standard system tools, PandaOffice Drecov uses advanced algorithms to reconstruct file structures. Whether you are recovering from an SSD, HDD, or external USB drive, it provides a high success rate even after the Recycle Bin has been emptied.
⚠ Warning: Install it on a drive different from the one where your data was lost to prevent overwriting.
Step-by-Step Recovery Guide
- Step 1: Select the Location. Launch the program. On the main interface, you will see a list of drives. Select the drive where your deleted files were originally stored (usually the C: drive if they were on the desktop).

- Step 2: Scan for Deleted Files. Click the Scan button. PandaOffice Drecov will perform a Quick Scan followed by a Deep Scan.
- Tip: Let the Deep Scan finish for the best results, as it digs into the raw sectors of your disk.

- Step 3: Preview and Filter. Once the scan is complete, use the sidebar to filter by file type (e.g., .jpg, .docx, .pdf). You can double-click files to preview them to ensure they are intact before recovery.

- Step 4: Recover Your Data. Check the boxes next to the files you want to get back. Click the Recover button and choose a safe destination (like an external drive) to save the restored files.
Important Recovery Warnings
- Stop Using the Drive: The moment you realize data is missing, stop saving new files to that drive.
- Avoid “In-Place” Recovery: Never save recovered files back to the same partition they were lost from until the process is fully complete.
Advanced Recovery Scenarios
After you have successfully mastered the steps to remove recycle bin from desktop, you might find yourself in more complex data loss situations. It is important to know how to handle these specifically:
- Restoring After Emptying: If you manually emptied the bin before hiding it, you can find detailed instructions here: How to restore Recycle Bin after empty.
- Standard File Retrieval: For a general overview of the process, check out: How to recover files deleted from the Recycle Bin.
- The Ultimate Resource: If you are facing a severe data loss crisis, consult this ultimate guide to recovering files from Recycle Bin.
For more information on system icons, you can visit the Official Microsoft Support page.
How to Restore Recycle Bin Icon
Quick Restore via Settings
If you change your mind after you remove recycle bin from desktop, restoring it is quick and easy.
- Go back to Desktop icon settings.
- Check the box for Recycle Bin.
- Click Apply.The icon will reappear exactly where it was before. This flexibility is one of the best parts of Windows customization; you’re never locked into a decision.
Restore via Registry
If you removed the icon using the Registry Editor method, you’ll need to reverse those changes. Usually, this involves right-clicking the NameSpace key and selecting New > Key, then naming it {645FF040-5081-101B-9F08-00AA002F954E}. However, if you exported a backup of the key before deleting it, simply double-click that .reg file to restore it instantly.
Common Issues and Fixes
Recycle Bin Icon Keeps Reappearing
Sometimes, the icon might come back after a system update. This happens because Windows updates may reset certain registry keys or personalization settings. To fix this, simply repeat the removal steps mentioned in Method 1. If the issue happens frequently, the Group Policy method is your best bet for a permanent fix.
Missing Desktop Icon Settings Option
If you can’t find the “Desktop icon settings” link in your Themes menu, it could be due to your version of Windows being unactivated or specific administrative restrictions. Ensure your Windows is activated to access all Personalization features.
Tips for Desktop Organization in 2026
Minimalist Desktop Setup
A minimalist desktop isn’t just trendy—it’s practical. By choosing to remove recycle bin from desktop, you create a cleaner workspace that helps you focus. Many professionals in 2026 use the “Auto-hide taskbar” feature in combination with a hidden Recycle Bin to create a completely blank canvas for their work.
Using Folders and Shortcuts
Instead of cluttering your desktop, use folders to group related files. You can also pin the Recycle Bin to your Quick Access in File Explorer. This way, you can still access your deleted files easily without having an icon taking up space on your beautiful wallpaper.
Remove Recycle Bin from Desktop FAQs
1. Can I remove the Recycle Bin permanently?
You can hide it from the desktop using the methods above, but the system feature remains active in the background to protect your files.
2. Will removing it delete my files?
No, deciding to remove recycle bin desktop icons only affects the visual shortcut. Your files remain in the storage area until you empty the bin.
3. How do I access Recycle Bin after removing it?
You can simply type “Recycle Bin” into the Windows Start search bar, or type shell:RecycleBinFolder into the File Explorer address bar.
4. Is it safe to use Registry Editor?
Yes, but only if you follow instructions carefully. Always back up your registry before making changes.
5. Does PandaOffice Drecov work on external drives?
Absolutely. It can recover data from USB sticks, SD cards, and external hard drives even if the files were deleted via a computer where the Recycle Bin was hidden.
Conclusion
Learning how to remove recycle bin from desktop is a simple yet effective way to customize your Windows experience. Whether you’re aiming for a cleaner look, better privacy, or just personal preference, there are multiple methods to achieve it. From quick settings adjustments to advanced tools like Registry Editor and Group Policy, you have full control over how your desktop looks and behaves.
Remember, a clean desktop leads to a clear mind, but always keep a reliable tool like PandaOffice Drecov nearby just in case your quest for minimalism leads to an accidental deletion!


