


We have all been there. You are clearing out old folders to save space, and in a flurry of clicks, you empty the Recycle Bin. A split second later, your stomach drops. You realize that a critical work document, a cherished family photo, or a years-long research project was inside that virtual trash can. The panic is real, and the immediate question that flashes across your mind is: how to recover files deleted from recycle bin?
Please, take a deep breath. The digital world is much more forgiving than it appears. While the bin looks empty, your data is likely still resting on your hard drive, hidden from the operating system’s “index” but physically intact. This guide is your roadmap back to digital safety. We will explore the underlying science of data storage and provide five distinct, battle-tested methods to retrieve your lost assets. Whether you are a casual user or a tech enthusiast, you will find a solution here to address the dilemma of how to recover files deleted from recycle bin.
The Science of Deletion: Why Is Recovery Possible?
Before we jump into the “how,” we must understand the “why.” To effectively master how to recover files deleted from recycle bin, you need to know what happens behind the scenes of your Windows OS.
When you “permanently” delete a file by emptying the bin or using Shift + Delete, Windows does not actually erase the binary code of that file from the magnetic or flash storage of your drive. Instead, the file system performs a “logical deletion.” It modifies the file’s header to mark the space it occupies as “available” or “unallocated.”
Think of your hard drive as a massive restaurant. Emptying the Recycle Bin is like a waiter clearing a table and marking it as “vacant” on their seating chart. The patrons (your data) are still sitting at the table, but the host doesn’t acknowledge them anymore. They only disappear when a new group of diners (new data) comes in and takes those seats. This is why timing is critical. If you stop writing new data to the drive immediately, the chances of knowing how to recover files deleted from recycle bin successfully remain incredibly high.
Common Causes of Data Loss:
- Accidental Emptying: The most common reason users search for how to recover files deleted from recycle bin.
- Shift + Delete Command: Bypassing the bin entirely.
- Automatic Cleanup: Windows Storage Sense or third-party cleaning apps automatically purging the bin.
- File Corruption: Logical errors that make the bin appear empty or inaccessible.
Solution 1: The First Response (Undo and Recycle Bin Basics)
If you haven’t closed your folder window yet, the simplest answer to how to recover files deleted from recycle bin might be a keyboard shortcut.
- Step 1: The Undo Shortcut. If the deletion just happened, press
Ctrl + Z. This “Undo” command can often reverse the last action, even moving a file back from the “ghost” state of a recently emptied bin if the system cache hasn’t refreshed.
- Step 2: Checking the Bin (The Obvious Step). Sometimes we think we emptied the bin, but we didn’t.

- Double-click the Recycle Bin icon.
- Use the Search bar in the top right corner.
- If you find the file, right-click it and select Restore.
Solution 2: The Professional Choice — PandaOffice Drecov
Once the Recycle Bin is emptied and standard ‘Undo’ options are exhausted, a specialized recovery engine becomes necessary. PandaOffice Drecov is a professional-grade suite designed to navigate unallocated space and reconstruct file signatures that Windows can no longer see. For anyone wondering how to recover files deleted from recycle bin, this tool provides a robust solution optimized for NTFS and exFAT file systems.
By scanning the ‘hidden sectors’ of your hardware, PandaOffice Drecov identifies file fragments that native tools ignore. It serves as a comprehensive safety net for:
- Accidental Desktop Deletions: Instantly retrieving files wiped from your local workspace.
- Disk Formatting Errors: Salvaging files from drives that have been completely wiped or reformatted.
- External Media Rescue: Recovering lost data from formatted or corrupted SD cards and USB flash drives.
- Sync Conflict Resolution: Reversing data loss caused by synchronization errors between your PC and the OneDrive cloud.
- Browser Metadata Recovery: Restoring lost Chrome bookmarks and other essential application data.”
CRITICAL ALERT: Do not install the software on the same drive where the deleted files were located. If your files were on the C: drive, install the software on a USB flash drive or a D: partition to prevent overwriting.
Step-by-Step Recovery with PandaOffice Drecov
- Step 1: Launch and Target. Open the application. On the intuitive main interface, you have two choices: select the specific C: Drive (where the bin resides) or select the Recycle Bin shortcut icon directly within the “Quick Access” or “Locations” section.

- Step 2: Initiate the Deep Scan. Click the Scan button. PandaOffice Drecov will perform a two-stage scan. First, a quick scan for recent file records, followed by a deep sector-by-sector analysis to find “headless” files.

- Step 3: Filter and Preview. Once the scan finishes, you might see thousands of files. Use the Filter tool to sort by file type (e.g., .pdf, .jpg, .mp4) or use the search bar to find the specific name. Double-click a file to Preview it. If you can see the image or read the text in the preview, the recovery will be 100% successful.

- Step 4: Secure Recovery. Select the checkboxes for your items and click Recover. Choose a destination folder on an external hard drive to complete the process.
Why choose this method? PandaOffice Drecov bypasses the OS limitations, making it the most robust answer to how to recover files deleted from recycle bin.
Solution 3: Windows File History (The Time-Travel Method)
Windows has a built-in “Time Machine” style feature called File History. If you had the foresight to enable this earlier, it is a free and effective way to solve how to recover files deleted from recycle bin.
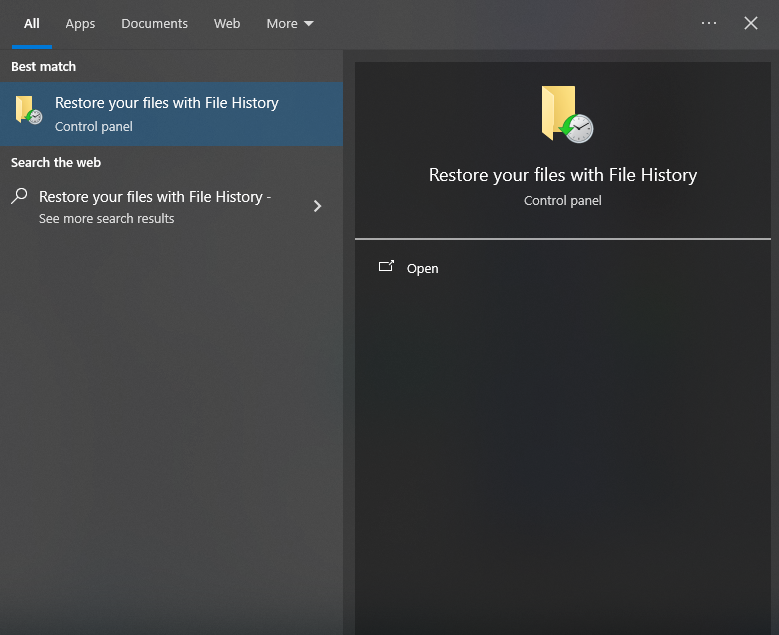
- Step 1: Click the Start menu and type “Restore your files with File History.”
- Step 2: Navigate to the folder where the deleted file was originally stored (e.g., your Desktop or Documents folder).
- Step 3: Use the left and right green arrows at the bottom of the window to scroll through different versions of that folder’s history.
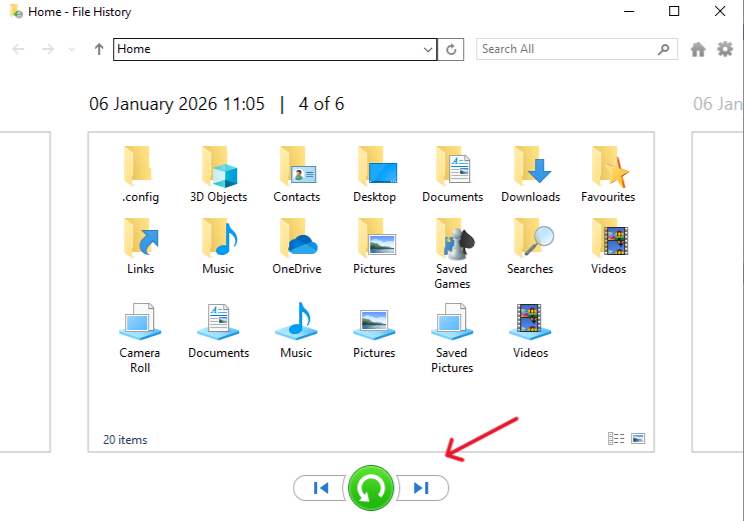
- Step 4: Once you locate the version containing your file, select it and click the green Restore icon (the circular arrow). The file will magically reappear in its original location.
Solution 4: Using Windows File Recovery (Command Line)
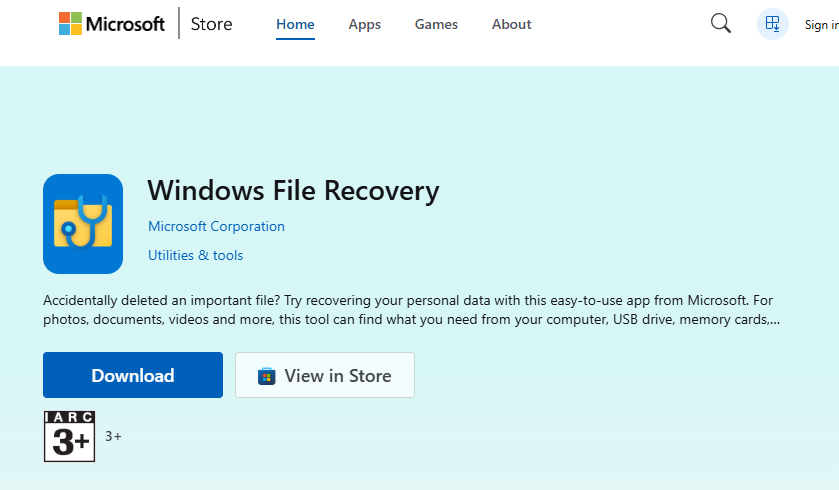
For users who prefer a more “hands-on” technical approach to how to recover files deleted from recycle bin, Microsoft provides a free tool via the Microsoft Store called Windows File Recovery (WinFR).
- Step 1: Download and launch Windows File Recovery from the Store. This will open a Command Prompt window.
- Step 2: Identify your source drive (usually
C:) and your destination drive (e.g., an external driveE:). - Step 3: Enter the recovery command. For a standard scan of the Recycle Bin area, use:
winfr C: E: /regular /n \$Recycle.Bin\
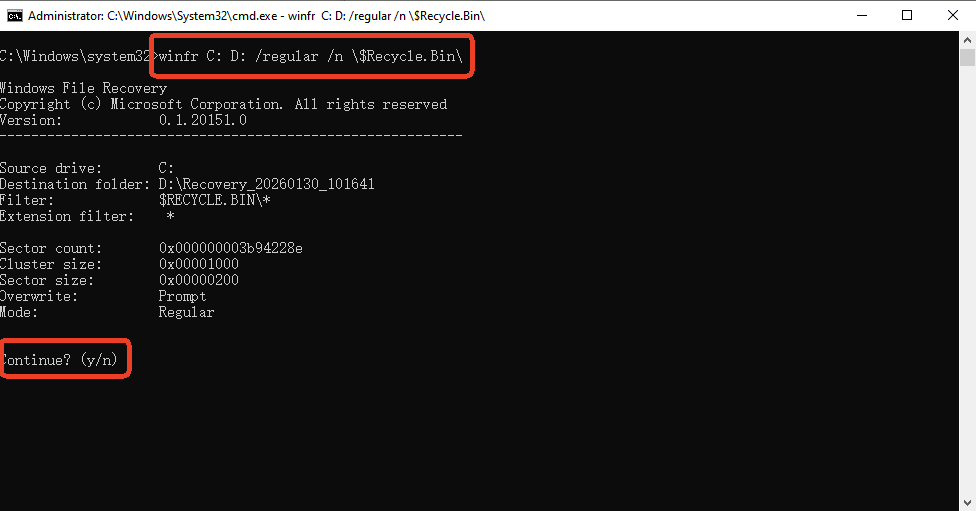
- Step 4: Type
Yto start the scan. The tool will attempt to pull files from the hidden system folder where the bin stores data.
Technical Note: This method is powerful but lacks a “Preview” function, meaning you may end up recovering a lot of “junk” files along with your target data.
Solution 5: Shadow Copies (Previous Versions)
If you have “System Protection” turned on, Windows creates “Shadow Copies” as part of its restore points. This is a subtle but effective trick for how to recover files deleted from recycle bin.
- Step 1: Right-click the folder that used to contain your file.
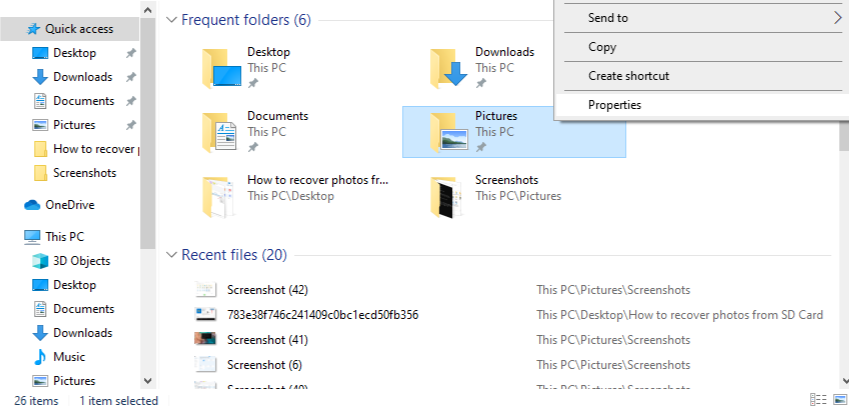
- Step 2: Select Properties from the context menu.
- Step 3: Click the Previous Versions tab.
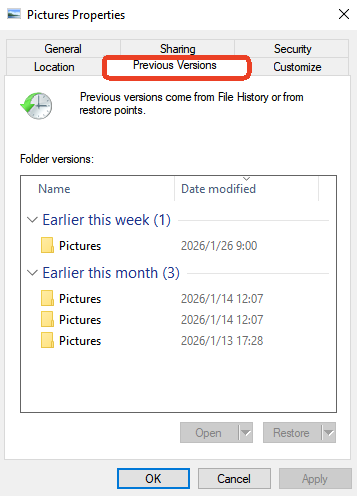
- Step 4: If restore points exist, you will see a list of folder versions with timestamps. Select one from yesterday or earlier today.
- Step 5: Click Open to verify the file is inside, then click Restore.
Comparison Table: Which Method Should You Use?
Choosing the right approach for how to recover files deleted from recycle bin depends on your specific situation.
| Recovery Method | Difficulty | Recovery Rate | Best For… |
| Recycle Bin Restore | Extremely Easy | 100% | Files not yet “permanently” deleted. |
| PandaOffice Drecov | Easy | Excellent | Emptied bins, Shift+Delete, and formatted drives. |
| File History | Medium | High | Users who pre-configured Windows backups. |
| Windows File Recovery | Hard (CLI) | Medium | Tech-savvy users wanting a free MS tool. |
| Previous Versions | Easy | Low | Situations where System Restore is active. |
Pro Tip: If the data is mission-critical, skip the experimental methods and go straight to PandaOffice Drecov. Every failed attempt with other tools could potentially write tiny amounts of log data to the drive, putting your file at risk.
Prevention: How to Future-Proof Your Data
Once you have successfully mastered how to recover files deleted from recycle bin, you likely never want to feel that panic again. Use these steps to ensure total data safety:
- The 3-2-1 Rule: Keep 3 copies of your data, on 2 different storage types, with 1 copy stored off-site (like a cloud service).
- Enable Cloud Syncing: Use OneDrive, Google Drive, or Dropbox. These services keep their own “Version History,” meaning you can recover deleted files from their web interfaces even if you wipe your local hard drive.
- Configure Storage Sense: Go to Settings > System > Storage. You can tell Windows to only empty your bin every 30 or 60 days, giving you a longer “safety window.”
- Regular Image Backups: Once a month, create a full system image using a tool like Macrium Reflect or Windows’ own System Image tool.
Deep Dive into Your Recovery Questions
1.Does “how to recover files deleted from recycle bin” work on an SSD?
It is more difficult. SSDs use a feature called TRIM. When you delete a file, TRIM tells the SSD to physically wipe the data cells to maintain high speeds. For SSD recovery, you must use PandaOffice Drecov as quickly as possible—ideally within minutes of the deletion.
2.Can I recover files if the bin was emptied a month ago?
Yes, but only if that specific area of the hard drive hasn’t been used for a new file. If your hard drive is nearly full, the chance of the old file being overwritten is much higher.
3.Why do recovered files sometimes have weird names?
When you empty the bin, Windows often loses the original filename but keeps the data. Advanced tools like PandaOffice Drecov can often rebuild the name, but in some cases, you may need to open the files to see what they are.
4.Is there a free way to get my files back?
Yes, File History and Windows File Recovery are free. However, if the files are not found there, professional software is the next logical step.
Conclusion
The journey of how to recover files deleted from recycle bin doesn’t have to end in heartbreak. As we have explored, your data remains on your drive in a “shadow state” long after the bin appears empty. By acting quickly, avoiding new data writes, and using powerful tools like PandaOffice Drecov, you can reverse even the most “permanent” deletions.
Remember: technology is a tool, and with the right knowledge, you are in control of your digital life. Start with the simplest restore methods, and if they fail, don’t hesitate to employ professional-grade scanning.


