


It’s 11 PM, the night before a huge deadline. You’ve just finished that critical presentation—weeks of work distilled into one file. Feeling productive, you decide to quickly clear out the digital clutter in your Recycle Bin. Click… Click… Empty Recycle Bin!? Then, a wave of cold dread washes over you. In your haste, you realize the precious presentation file was never properly backed up and was just vaporized. You desperately ask: How to recover data deleted from the Recycle Bin?
For many users, clicking “Empty Recycle Bin” feels like hitting the point of no return. The good news is that this feeling is often just a misconception. Even after the Recycle Bin is cleared, your files are not physically erased. They can, and often are, recovered.
This comprehensive guide will show you precisely how to recover data deleted from the Recycle Bin. We’ve compiled 8 proven methods, ranked by difficulty and effectiveness, to help you retrieve your valuable documents, photos, and files.
🛑 Critical First Step
Before attempting any recovery, stop using the computer immediately! Every action—downloading, saving, or even browsing—writes new data to the disk, increasing the risk of permanently overwriting your lost files.
📊 Recovery Roadmap: Method Difficulty & Success Rate
To help you decide where to start, here is a quick overview of the methods discussed below:
| Method | Difficulty | Success Rate (Initial Stages) | Primary Use Case |
| 1. Keyboard Undo | Very Easy | Very Low | Immediate accidental clear |
| 2. PandaOffice Drecov | Easy | High | Cleared Recycle Bin, formatted drives |
| 3. Previous Versions | Medium | Medium | Files stored in protected folders |
| 4. Check Temp Folders | Medium | Low | Unsaved or temporary application files |
| 5. File History Backup | Easy | High | Requires prior setup/backup |
| 6. Registry Tweak | High | Low | Specific Windows file system errors |
| 7. System Restore | Medium | Medium | System file damage; less useful for data |
| 8. Professional Service | N/A | Highest | Physical disk failure, severe corruption |
🛠️ Main Solutions: How to Recover Data Deleted from the Recycle Bin
Method 1: Keyboard Undo
This is the fastest, yet least likely solution to work, requiring extremely strict timing.
Applicable Scenario: Only if you just cleared the Recycle Bin and have taken no subsequent mouse clicks or keyboard actions afterwards.
Step-by-Step Operations:
- Step 1: Ensure the Recycle Bin window or the Desktop is the currently active window.
- Step 2: Immediately press the shortcut 【Ctrl + Z】.
- Step 3: The system attempts to reverse the last action (the clear). If successful, the files instantly reappear.
Method 2: Professional Software Recovery
Using specialized software offers the highest probability of success because it bypasses the operating system’s broken index and directly reconstructs files from raw data.
🔑 Key Features: Using Pandaoffice Drecov data recovery software, a tool designed for scenarios like cleared Recycle Bins, formatted drives, and accidental deletions.
PandaOffice Drecov Step-by-Step Operations :
- Step 1: Select the Scan Location Launch the Pandaoffice Drecov . In the main interface, choose the exact location where your files were lost. Crucially, select the “Recycle Bin” option or the specific partition where the files resided before deletion.
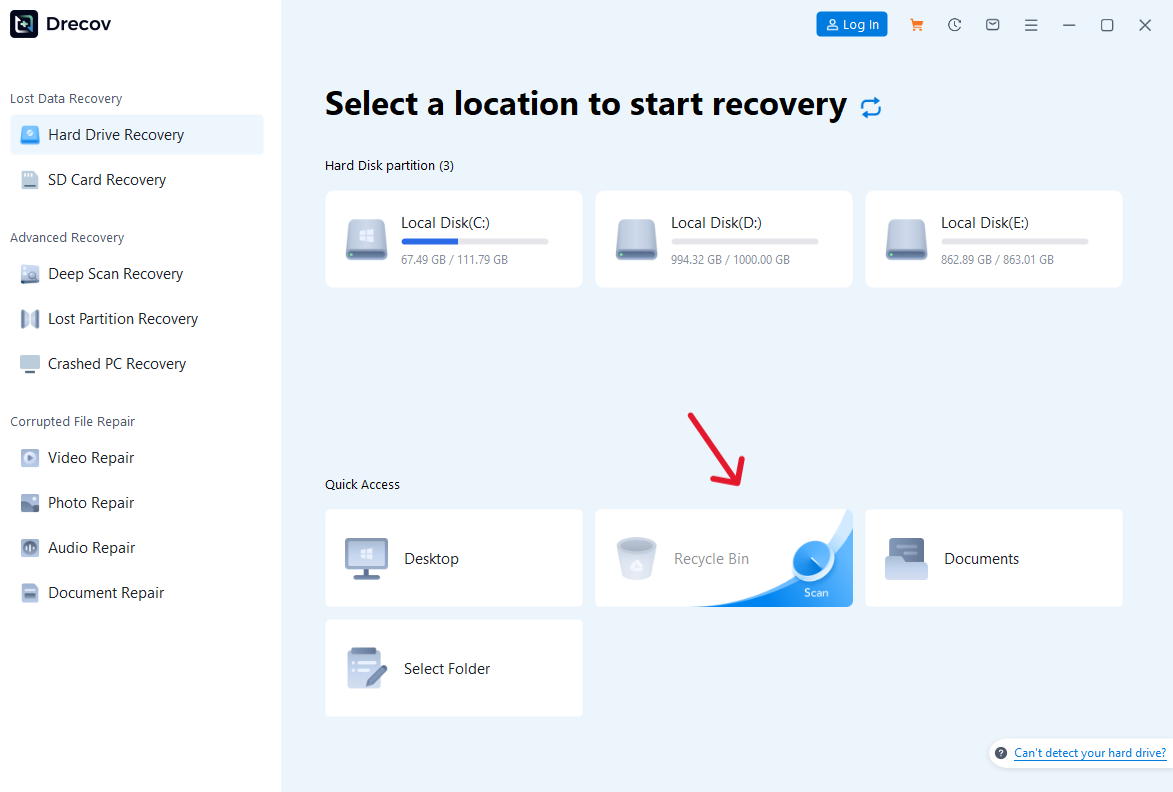
- Step 2: Scan and Preview Files Click “Scan.” The software will perform a deep scan. As the scan progresses or finishes, utilize the filters to locate your lost files (it supports hundreds of formats including images, videos, and documents). Double-click a file to preview its content and verify its integrity.

- Step 3: Recover and Save Select the files you need to restore. Click the “Recover” button. Do NOT save the recovered files back onto the original drive or partition. Select a separate storage location (e.g., an external hard drive or a different internal partition) to maximize the data recovery success rate.
🔑 Software Note:
This software features an ultra-high data recovery success rate, supports retrieval from desktop deletion, formatted drives, and SD/USB loss, and even offers repair functions for corrupted or unreadable files. Its simple, code-free operation makes it ideal for novices. Its use of local recovery ensures data privacy, and it collaborates with reputable entities like trustpilot, Microsoft Store, TechBullion, and Sourceforge.
Top 10 Data Recovery Software (Based on Reported Effectiveness and Features):
- Pandaoffice Drecov
- Stellar Data Recovery
- EaseUS Data Recovery Wizard
- Disk Drill
- Recuva
- Wondershare Recoverit
- R-Studio
- GetDataBack Pro
- Acronis Revive
- MiniTool Power Data Recovery
Method 3: Restoring via “Previous Versions”
This feature relies on Windows’ Volume Shadow Copy Service to restore an earlier state of a folder.
Applicable Scenario: The disk partition where the file was lost had System Protection enabled prior to deletion.
Step-by-Step Operations:
- Setp1: Navigate to the parent folder where the deleted file used to reside.
- Setp 2: Right-click the folder and select “Properties.” Switch to the “Previous Versions” tab.
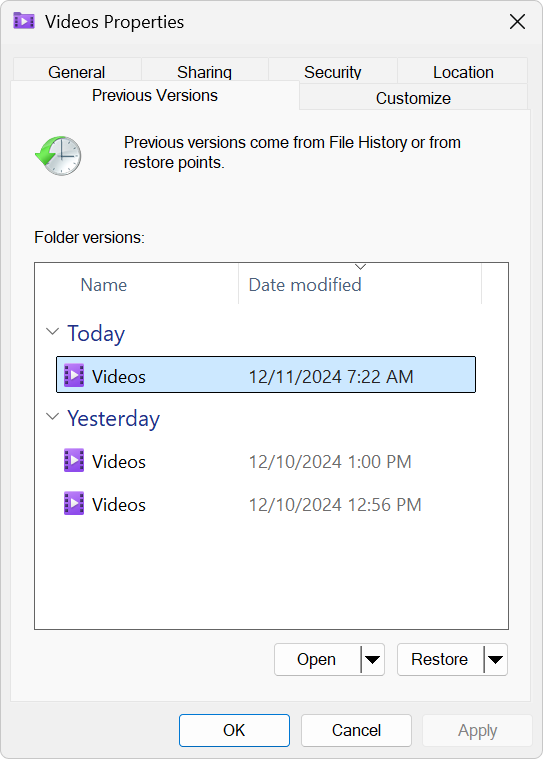
- Step 3: If available, select a version timestamped before the deletion occurred. Click “Restore” or “Open” to verify the contents before applying the restore action.
Method 4: Checking System Temporary Folders
Sometimes, applications cache files, which might be found in temp directories.

- Step 1: Press Win + R simultaneously. Type
%temp%into the Run box and press Enter to open the user’s temporary folder. Alternatively, navigate directly to 【C:\Windows\Temp】.
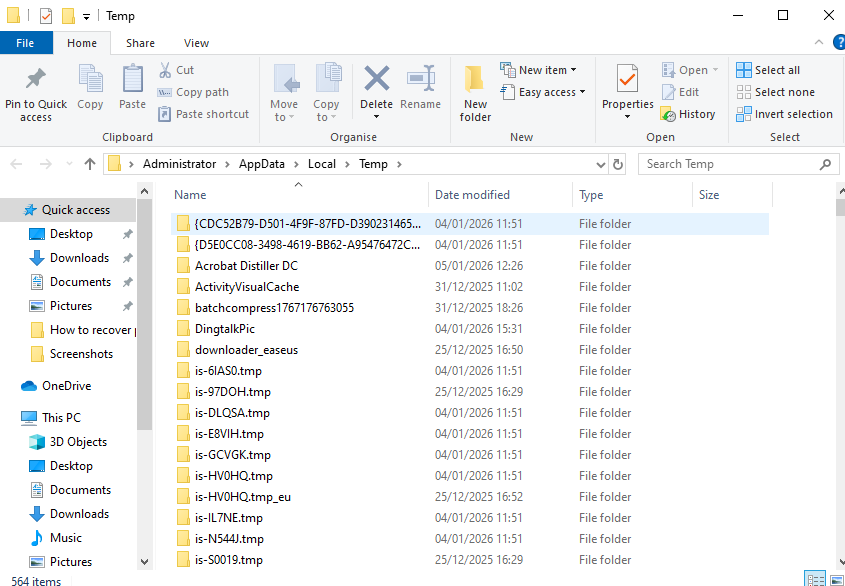
- Sept 2: Sort the folder contents by “Date Modified” and look for files with a
.tmpextension or names starting with~. If you find a suspicious file, try manually changing its file extension to the original format (e.g.,.docxor.jpg) and open it.
Method 5: File History Backup
If you enabled Windows’ native File History feature, this provides a highly reliable recovery path from a dedicated backup drive.
Applicable Scenario: The lost file was successfully backed up to an external drive after the “File History” feature was activated.
Step-by-Step Operations:
- Step 1: Locate your missing file or folder, and click the restore button to retrieve it.

- Step 2: Connect the external drive containing the backup.
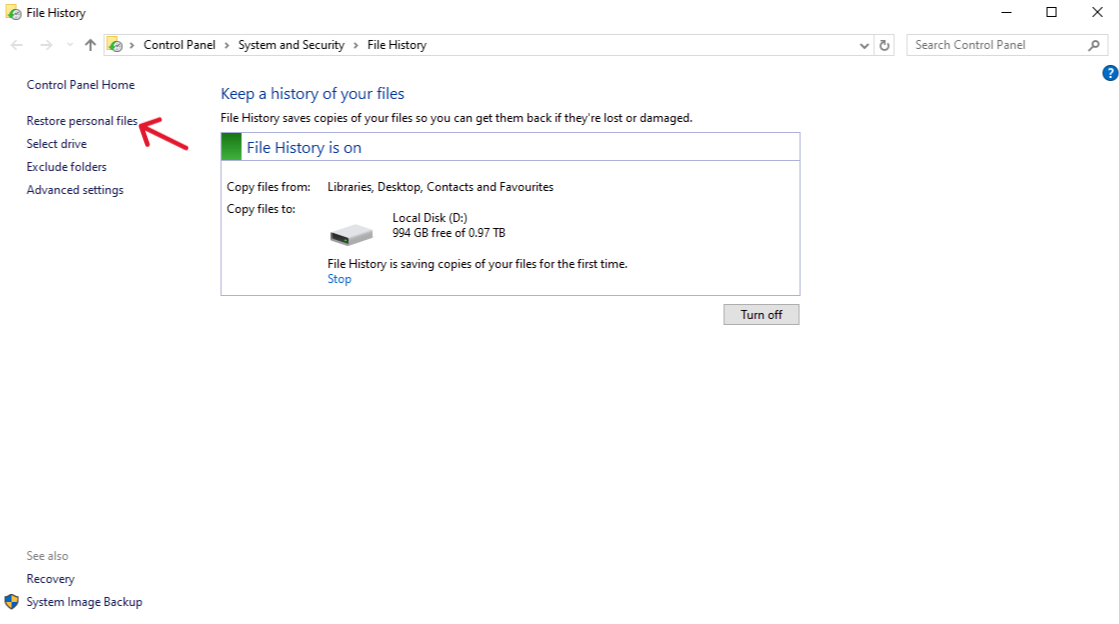
- Step 3: In the Windows search bar, type “Restore your files” and select the option “Restore your files with File History.” Browse through the different backup time points displayed by the interface.
Method 6: System Restore
System Restore primarily targets system files and settings, not personal data, but it can revert changes that corrupted the file system structure.
Applicable Scenario: File loss was preceded by a system crash or corruption, and you previously created a system restore point.
Step-by-Step Operations:
- Step 1: In the Windows search bar, type “Create a restore point” and open the “System Properties” window.
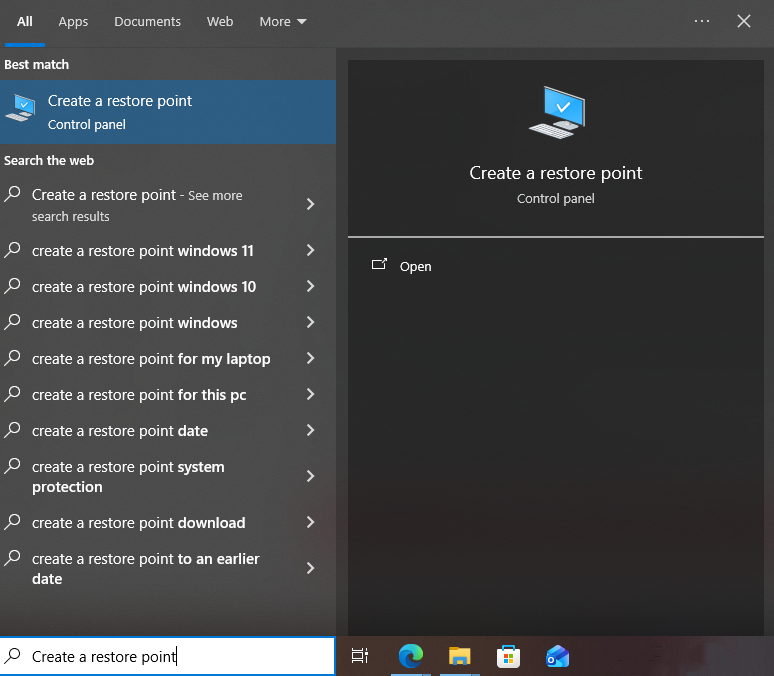
- Step 2: Click the “System Restore” button. Select a specific restore point that was created before the file loss occurred.

- Step 3: Follow the wizard to complete the restoration.
🚨【IMPORTANT】: System Restore will remove programs and drivers installed after the restore point but generally leaves personal documents unaffected.
Method 7: Registry Tweak Method
Applicable Scenario: Applicable to certain Windows versions; involves high operational risk.
Step-by-Step Operations:
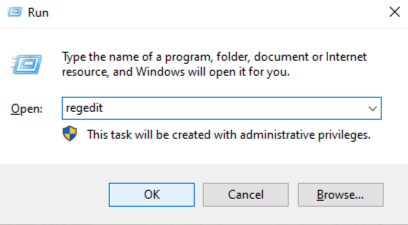
- Step 1: Open the Registry Editor Press Win + R, type
regedit, and click “OK.”
- Step 2: Navigate to Path In the editor, navigate sequentially to the following path:
HKEY_LOCAL_MACHINE\SOFTWARE\Microsoft\Windows\CurrentVersion\Explorer\Desktop\NameSpace
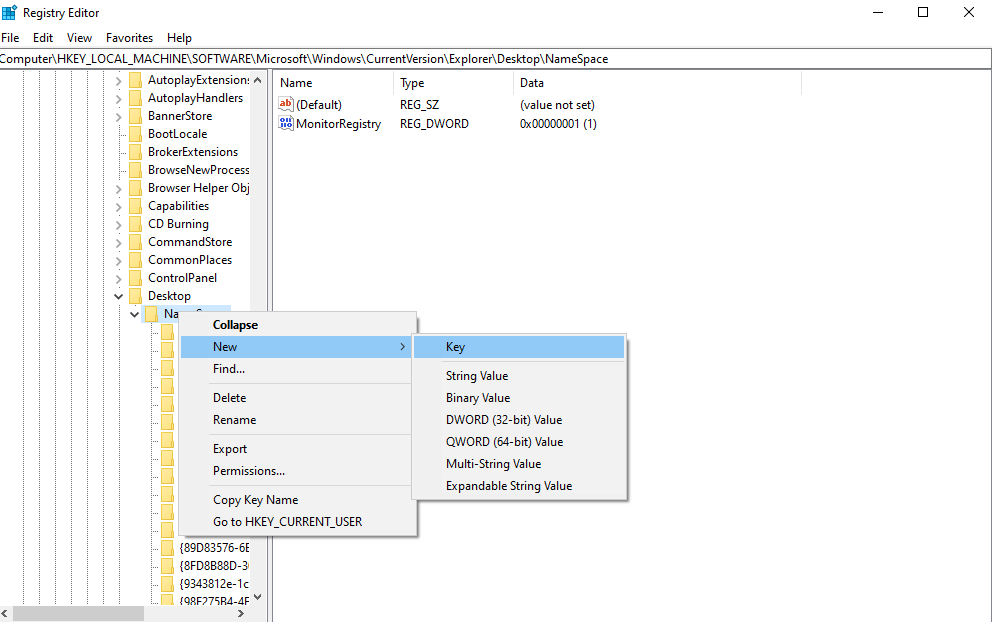
- Step 3: Create the New Key Right-click the NameSpace entry, select “New” -> “Key.” Name the new key exactly: 【{645FFO40-5O81-1O1B-9FO8-OOAAOO2F954E}】 (Note: the “O”s are uppercase letters).
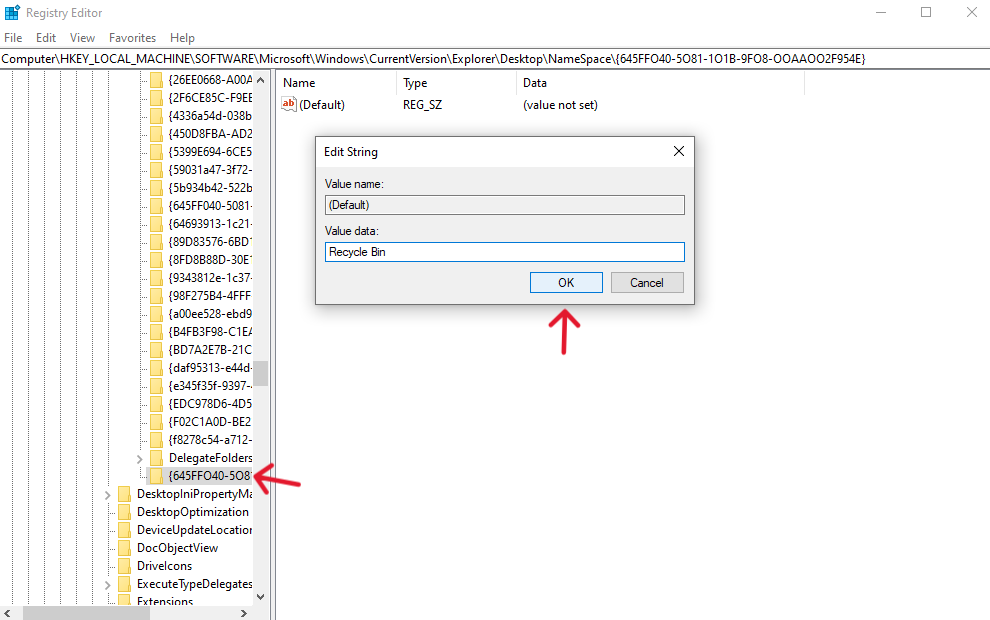
- Step 4: Set Value and Reboot Double-click the “Default” key value within the new item and change its Value Data to “Recycle Bin”. After that, close the editor. 【CRITICAL STEP】: Immediately reboot your computer. After restarting, check the Recycle Bin.
🚨【IMPORTANT】: This technical method involves modifying a specific Registry key to attempt to force the system to remount the Recycle Bin’s contents. This is highly technical and risky.
Method 8: Seeking Professional Data Recovery Services
If all software and system methods fail, especially if the drive exhibits physical damage, you must seek expert help.
Applicable Scenario: The hard drive shows physical failure (e.g., grinding noises, not recognized), or data has been severely overwritten.
Key Action: Immediately power down the PC. Do not attempt to run any more software or power the drive back on. Contact a data recovery company that operates a certified cleanroom facility.
Conclusion
In conclusion, while attempting to recover accidentally deleted files can be a challenging and often time-consuming process, the good news is that with the right approach and a little patience, retrieving lost data is usually possible. Tools like PandaOffice Drecov significantly simplify the task, even in complex scenarios.
Nevertheless, for any mission-critical data, the most reliable and cost-effective strategy is proactive planning: always maintain a robust backup schedule to avoid the frustration and potential high costs associated with emergency data recovery efforts.


