


Pop-ups are often associated with ads and distractions, but not all pop-ups are bad. Many websites rely on them for essential features like login windows, payment gateways, downloads, and customer support chats. If you’re struggling with blocked pop-ups, learning how to allow pop ups on Firefox can help you access important content without interruptions. Furthermore, in the world of technical troubleshooting, understanding how browser interfaces interact with your data is vital. Sometimes, a blocked pop-up is the only thing standing between you and a critical file download or a data recovery tool activation.
In this comprehensive guide, we’ll walk you through everything you need to know about enabling pop-ups in Mozilla Firefox, including step-by-step instructions for desktop and mobile devices, troubleshooting tips, and best practices for safe browsing. We will also explore advanced scenarios, such as when browser glitches lead to data loss and how to recover that information using professional tools.
What Are Pop-Ups in Firefox?
Pop-ups are small browser windows that open automatically while you’re browsing. They can be triggered by clicking a link, submitting a form, or visiting certain websites. While many users find them annoying, they serve functional purposes in modern web development.
Types of Pop-Ups:
- Login windows: Used by third-party authentication services (like “Log in with Google”).
- Payment verification pages: Essential for secure banking and e-commerce transactions.
- Download prompts: Often used by file-sharing sites to initiate a transfer.
- Notifications and alerts: Important for real-time updates on web applications.
While Firefox blocks pop-ups by default to protect users, you can allow them for trusted sites. Knowing how to allow pop ups on Firefox ensures that you don’t miss these critical interactions.
Why Firefox Blocks Pop-Ups by Default
Before learning how to allow pop ups on Firefox, it’s important to understand why they are blocked. Mozilla prioritizes user security and performance above all else.
Reasons:
- Prevent intrusive ads: Most pop-ups are historically used for aggressive marketing.
- Protect users from malicious content: “Malvertising” often uses pop-ups to inject scripts.
- Improve browsing experience: Fewer windows mean less clutter and faster CPU performance.
- Reduce spam and phishing attempts: Fake “system alert” pop-ups are a common tactic for scammers.
However, this protection can sometimes block useful pop-ups, leading to frustration when a site appears “broken.”
How to Allow Pop Ups on Firefox (Desktop)
Enabling pop-ups on desktop is simple and flexible. Depending on your needs, you can choose to allow them globally or on a site-by-site basis.
Method 1: Allow Pop-Ups for a Specific Website
This is the safest and most recommended method because it maintains your overall security while fixing the issue for a specific trusted domain.
- Step 1: Open Firefox and visit the website where pop-ups are blocked.
- Step 2: Look for the pop-up blocked icon (a small notification bar or an icon in the address bar).
- Step 3: Click the Options button in the notification bar or the icon itself.
- Step 4: Select “Allow pop-ups for [website name]”.
- Step 5: Refresh the page to ensure the change takes effect.
Once enabled, the website will be added to your exceptions list automatically.
Method 2: Allow Pop-Ups via Settings
If you want to manage your list of allowed sites manually or proactively add a site before visiting it, use the internal settings menu.
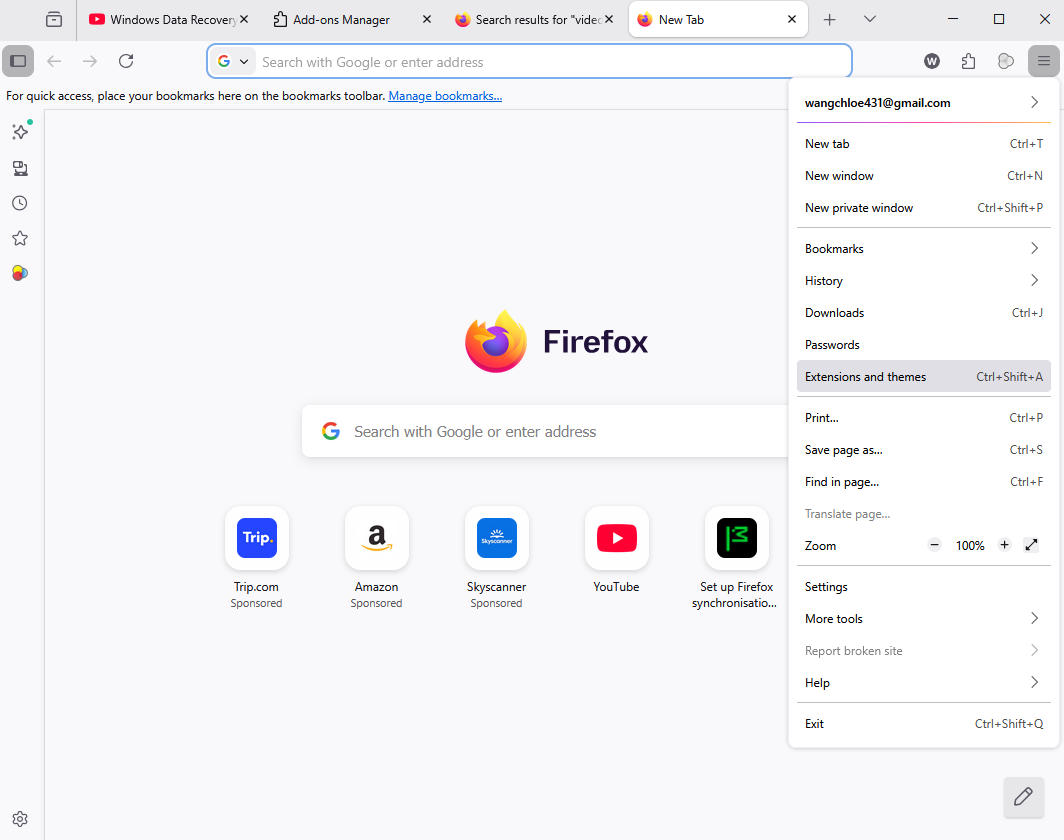
- Step 1: Open Firefox and click the menu button (three horizontal lines in the top-right corner).
- Step 2: Select Settings from the dropdown menu.
- Step 3: On the left sidebar, click Privacy & Security.
- Step 4: Scroll down to the Permissions section.
- Step 5: Find the option labeled Block pop-up windows.
- Step 6: Click the Exceptions… button next to it.
- Step 7: Enter the exact website URL you wish to allow.
- Step 8: Click Allow to add it to the list.
- Step 9: Click Save Changes at the bottom of the dialog box.
Method 3: Disable Pop-Up Blocker Completely
⚠️ Not recommended unless you are performing a specific task that requires multiple pop-ups from various sources and you have robust security software installed.
- Step 1: Navigate to Settings → Privacy & Security.
- Step 2: Locate the Permissions section.
- Step 3: Uncheck the box next to Block pop-up windows.
This allows pop-ups on all websites, which may expose you to unwanted or harmful content. Always remember to re-enable this setting once your task is complete.
Why is Firefox Still Blocking Popups After Allowing Them?
In many instances, users follow the standard procedures but find themselves asking: why is firefox still blocking popups after allowing them? This is a common pain point that usually stems from layers of security that exist beyond the basic browser toggle.
Troubleshooting Persistent Blocking
If you have already whitelisted a site but the pop-up fails to appear, consider these three culprits:
- Browser Extensions: Many users install ad-blockers like uBlock Origin or AdBlock Plus. These extensions have their own filtering lists that operate independently of Firefox’s native settings. You must disable the extension for that specific site or allow pop-ups within the extension’s own interface.
- Strict Tracking Protection: Firefox has a feature called Enhanced Tracking Protection. If set to “Strict,” it may block scripts that trigger pop-ups if those scripts are identified as trackers. Try switching to “Standard” mode by clicking the shield icon in the address bar.
- Corrupted Cache or Profiles: Occasionally, the preference file in your Firefox profile becomes buggy. Clearing your browser cache or “Refreshing” Firefox (via
about:support) can often resolve these deeper technical glitches.
If a pop-up was supposed to deliver a critical file or a digital receipt and it failed due to these glitches, you might find that you’ve lost access to that data entirely. In such cases, standard browser settings won’t help—you’ll need to look into data recovery solutions.
Data Recovery: Recovering Lost Files with PandaOffice Drecov
Sometimes, the struggle with pop-ups leads to more than just a minor annoyance. Perhaps you were in the middle of a data-sensitive operation, or a pop-up failure caused a session timeout that resulted in a lost download or a corrupted temporary file. When digital information goes missing due to browser errors or accidental deletion, professional intervention is required.
Introduction to PandaOffice Drecov Data Recovery Software
When standard troubleshooting fails, PandaOffice Drecov data recovery software is the industry-leading solution for retrieving lost, deleted, or formatted files. Whether the data loss occurred because of a browser crash while allowing pop-ups or a system-wide failure, this tool provides a powerful yet user-friendly interface to get your life back on track.
PandaOffice Drecov supports a wide range of file formats, including documents, photos, videos, and even browser-related metadata like bookmarks or history files that might have been purged during a “Refresh” operation.
⚠ Warning: Install it on a drive different from the one where your data was lost to prevent overwriting.
Steps to Recover Data Using PandaOffice Drecov
If you have realized that important files are missing after a browser-related mishap, follow these steps immediately to maximize your chances of recovery.
- Step 1: Select the Location to Scan. Launch the application. You will see a dashboard listing all available drives (C:, D:, External USBs, etc.). Select the drive or specific folder (like the “Downloads” folder where your Firefox pop-up files should have been) and click Scan.

- Step 2: Preview the Results. As the scan progresses, PandaOffice Drecov will categorize found files by type. You can use the preview feature to look at images or documents before committing to the recovery. This saves time and ensures you are restoring the correct version of the file.

- Step 3: Execute Recovery. Select the files you wish to keep and click the Recover button. Choose a safe destination on a different storage device to finalize the process.
Warning: To prevent permanent data loss, stop using the affected drive as soon as you notice files are missing. Continued web browsing or downloading new files can overwrite the “deleted” space on your hard drive, making recovery impossible even for advanced tools.
If you have accidentally wiped your system or need to revert changes, check out these helpful guides:
- How to restore computer to an earlier date on Windows – A great way to undo system changes.
- How to get your Google Chrome bookmarks back – Useful if you use multiple browsers and lost data across them.
- How to remove OneDrive from File Explorer – Help for cleaning up your file system after a recovery session.
How to Allow Pop Ups on Firefox (Android)
Mobile browsing presents unique challenges because screen real estate is limited, and settings are often tucked away in different menus. If you’re using Firefox on Android, follow these steps:
- Step 1: Open the Firefox app on your Android device.
- Step 2: Tap the menu icon (three vertical dots, usually in the bottom or top corner).
- Step 3: Tap on Settings.
- Step 4: Navigate to the General section and tap Site permissions.
- Step 5: Select Pop-ups.
- Step 6: Switch the toggle to Allowed.
Note: Some versions of Firefox for Android may categorize this under “Enhanced Tracking Protection.” If you don’t see a dedicated pop-up toggle, try adjusting your tracking protection settings to “Standard.”
How to Allow Pop Ups on Firefox (iPhone/iPad)
Firefox on iOS (iPhone and iPad) operates slightly differently because it uses Apple’s WebKit engine. However, you can still manage how the browser handles new windows.
- Step 1: Open the Firefox app.
- Step 2: Tap the hamburger menu (three lines) in the bottom right corner.
- Step 3: Select Settings.
- Step 4: Look for the Block Pop-up Windows toggle under the “General” section.
- Step 5: Switch the toggle to OFF to allow pop-ups.
Because iOS is quite restrictive, you might find that certain pop-ups are still blocked by the system-level “Content Blockers.” Ensure you check your iOS Settings -> Safari -> Content Blockers if you use global ad-blocking apps.
How to Allow Pop Ups on Firefox for Trusted Sites Only
The most balanced approach to web safety is to allow pop-ups only for specific websites. This strategy prevents you from being bombarded by spam while ensuring that your bank, school, or work portals function perfectly.
Why This Is Recommended:
- Reduces security risks: You aren’t opening the door to the entire internet.
- Prevents unwanted ads: Most sites will still have their annoying pop-ups blocked.
- Keeps browsing experience clean: You only see the windows you actually asked for.
To maintain this list, visit the Exceptions menu under Privacy & Security regularly. If you no longer use a service, remove it from the list to keep your browser lean and secure.
Common Issues When Allowing Pop-Ups
Even after mastering how to allow pop ups on Firefox, you may still face technical hurdles. Understanding these common issues will save you hours of frustration.
Problem 1: Pop-Ups Still Blocked
Sometimes the browser needs a “nudge” to recognize new settings.
- Solution: Check if the site is correctly added to the exceptions list (check for
http://vshttps://). Refresh the page using Ctrl + F5 (Windows) or Cmd + Shift + R (Mac) to clear the local cache for that page.
Problem 2: Extensions Blocking Pop-Ups
As mentioned earlier, third-party extensions are the most common reason for failed pop-up execution.
- Solution: Disable ad blockers or privacy extensions one by one to identify the culprit. Most extensions have a “Power” button in their dropdown menu to whitelist the current site.
Problem 3: Incorrect URL Added
If you manually type the URL into the exceptions list, a single typo can prevent it from working.
- Solution: Copy and paste the URL directly from the address bar into the settings field. Ensure you include the subdomain (e.g.,
portal.example.cominstead of justexample.com) if necessary.
How to Disable Pop-Ups Again
If you find that a site you previously trusted has become too intrusive, or if you accidentally enabled global pop-ups, reversing the process is simple.
- Step 1: Go to Settings → Privacy & Security.
- Step 2: Ensure Block pop-up windows is checked.
- Step 3: Click Exceptions….
- Step 4: Find the site in the list and click Remove Website or Remove All Websites.
- Step 5: Click Save Changes.
Advanced Settings for Pop-Up Control
For power users who want granular control, Firefox offers a “hidden” configuration menu. This is where you can change the fundamental way the browser handles new windows.
Using about:config
- Type
about:configin the Firefox address bar and press Enter. - Click “Accept the Risk and Continue.”
- Search for
dom.disable_open_during_load.- Setting this to
falseallows pop-ups to open even if they weren’t triggered by a user click. - Setting it to
true(default) ensures pop-ups only open when you click something.
- Setting this to
- Search for
browser.link.open_newwindow.restriction.- This integer value determines how Firefox handles new windows (0 = always follow
open_newwindow, 1 = never divert, 2 = divert unless features are specified).
- This integer value determines how Firefox handles new windows (0 = always follow
⚠️ Warning: Only modify these if you understand the risks. Messing with these settings can make your browser unstable or significantly less secure.
Security Tips When Allowing Pop-Ups
Pop-ups can sometimes be harmful, serving as a gateway for malware. Follow these safety tips to keep your data secure:
- Allow Only Trusted Websites: Only whitelist domains you recognize and need for specific tasks (like banking or government portals).
- Avoid Clicking Suspicious Pop-Ups: If a pop-up appears and claims your computer is infected with 57 viruses, do not click it. Close the window or use Alt + F4 immediately.
- Keep Firefox Updated: Mozilla frequently releases patches for “zero-day” vulnerabilities that involve pop-up exploits. Go to Menu -> Help -> About Firefox to check for updates.
- Use Antivirus Software: A dedicated security suite will scan the contents of a pop-up window before it can execute any malicious code on your system.
Benefits of Allowing Pop-Ups in Firefox
Once you understand how to allow pop ups on Firefox, you’ll notice several advantages that streamline your digital life:
- Access to login and authentication windows: Essential for users who use SSO (Single Sign-On).
- Smooth online payments: Many banks require a pop-up window for “3D Secure” verification.
- Better website functionality: Many legacy web applications used in corporate environments rely heavily on secondary windows.
- Improved user experience: No more “missing” buttons or forms that refuse to load.
Differences Between Pop-Ups and Notifications
Many users confuse pop-ups with notifications, but they are technically very different.
| Feature | Pop-Ups | Notifications |
| Appearance | Opens a full or partial browser window. | Small toast alert in the corner of the screen. |
| Trigger | Usually triggered by a script or click. | Triggered by the site pushing data (Push API). |
| Purpose | Interaction, forms, or advertisements. | Updates, messages, or news alerts. |
| Control | Controlled via “Permissions” in Settings. | Controlled via “Notifications” in Settings. |
Managing both improves your browsing control and prevents your desktop from becoming cluttered with unnecessary alerts.
Frequently Asked Questions
1. How do I quickly allow pop-ups on Firefox?
The fastest way is to look for the “blocked” icon in the address bar immediately after a pop-up is stopped. Click it and select “Allow.”
2. Why are pop-ups still blocked after enabling them?
This is usually due to a third-party extension (like an ad-blocker) or Firefox’s “Strict” Tracking Protection settings. Check your extensions first.
3. Is it safe to allow pop-ups?
It is safe as long as you only allow them for trusted, well-known websites. Never disable the blocker entirely for the whole internet.
4. Can I allow pop-ups temporarily?
Yes. You can allow a pop-up once without adding the site to your permanent exception list by selecting the “Show [URL]” option in the notification bar.
Best Practices for Pop-Up Management
To maintain a secure and smooth browsing experience in 2026 and beyond, follow these golden rules:
- Allow pop-ups only when necessary: If a site works without them, keep the blocker on.
- Regularly review exception list: Every few months, go to your settings and remove sites you no longer visit.
- Keep extensions updated: Old extensions can cause compatibility issues with new versions of Firefox.
- Monitor suspicious activity: If pop-ups start appearing on sites that never had them before, run a scan with PandaOffice Drecov or an antivirus to check for system hijacks.
Conclusion
Learning how to allow pop ups on Firefox gives you better control over your browsing experience. While Firefox blocks pop-ups by default for security reasons, enabling them for trusted sites ensures you can access important features like logins, payments, and downloads.
Whether you are navigating the desktop version or browsing on the go with your mobile device, the steps provided in this guide will help you manage your settings with ease. Furthermore, if your technical journey leads to accidental data loss, remember that tools like PandaOffice Drecov are available to ensure your important files are never truly gone. By following these best practices and staying cautious, you can enjoy a seamless, productive, and safe browsing experience on Firefox.


