


Losing access to a thumb drive can feel like a digital nightmare. Whether it’s a collection of family photos, a crucial thesis, or essential business spreadsheets, the sudden “Device Not Recognized” error is enough to cause anyone a bit of panic. However, before you assume your files are gone forever, you should know that most flash drive issues are logical rather than physical. This means you can often repair usb stick errors yourself using the right tools and techniques.
In this comprehensive guide, we will walk through everything from basic Windows troubleshooting to advanced command-line fixes. We will also explore how PandaOffice Drecov data recovery software can act as your safety net when traditional methods fail.
Understanding Why Your USB Stick Fails
Before diving into the “how-to,” it is vital to understand the “why.” USB sticks, also known as flash drives, rely on NAND flash memory. Unlike traditional hard drives with spinning platters, these have no moving parts, but they are susceptible to electronic wear, file system corruption, and physical damage.
Common symptoms that indicate you need to repair usb stick include:
- The PC asks you to “Format the disk in drive X: before you can use it.”
- The drive shows up as “Unallocated Space” in Disk Management.
- The file system is displayed as RAW.
- Windows reports that the “USB device not recognized.”
By identifying the root cause—whether it’s a corrupted partition table or a driver conflict—you can choose the most effective path for usb memory repair.
Phase 1: Basic Troubleshooting
Sometimes, the simplest solution is the right one. Before moving to complex software or command prompts, try these preliminary steps to repair usb stick connectivity.
Step 1: Check Physical Connections
The USB port on your laptop might be dusty or failing.
- Unplug the drive and insert it into a different port (preferably one directly on the motherboard if you are using a desktop).
- Avoid using USB hubs or extensions during the repair process, as they can cause voltage drops.
Step 2: Test on Another Operating System
If your Windows PC doesn’t see the drive, try a macOS or Linux machine. Occasionally, a drive formatted in a specific file system (like APFS) won’t show up correctly on Windows, leading you to believe it’s broken when it’s simply a compatibility issue.
Phase 2: Updating Drivers for USB Memory Repair
If the hardware seems fine but the computer refuses to communicate with the drive, the culprit is often an outdated or corrupted driver. This is a common starting point for usb memory repair.
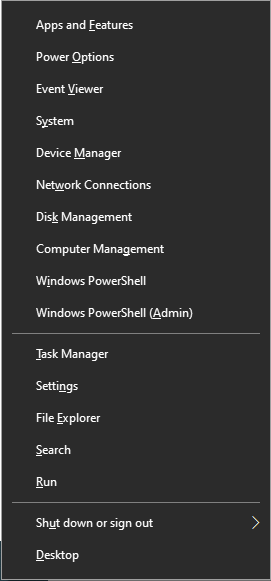
Step 1: Open Device Manager
Right-click the Start button and select Device Manager from the menu. Alternatively, press Win + X and hit M.
Step 2: Locate Universal Serial Bus controllers
Expand the section titled Universal Serial Bus controllers. Look for any entry labeled “USB Mass Storage Device” or “Unknown Device.” If you see a yellow exclamation mark, that’s your problem.
Step 3: Uninstall and Reconnect
- Right-click the problematic device and select Uninstall device.
- Confirm the action and then unplug your USB stick.
- Restart your computer.
- Plug the USB stick back in. Windows will automatically attempt to reinstall the latest drivers from the official Microsoft Update Catalog.
Phase 3: Using Windows First-Aid
Windows includes built-in utility tools designed to fix file system errors. If your drive is visible in “This PC” but won’t open, follow these steps on how to repair usb stick using the Error Checking tool.
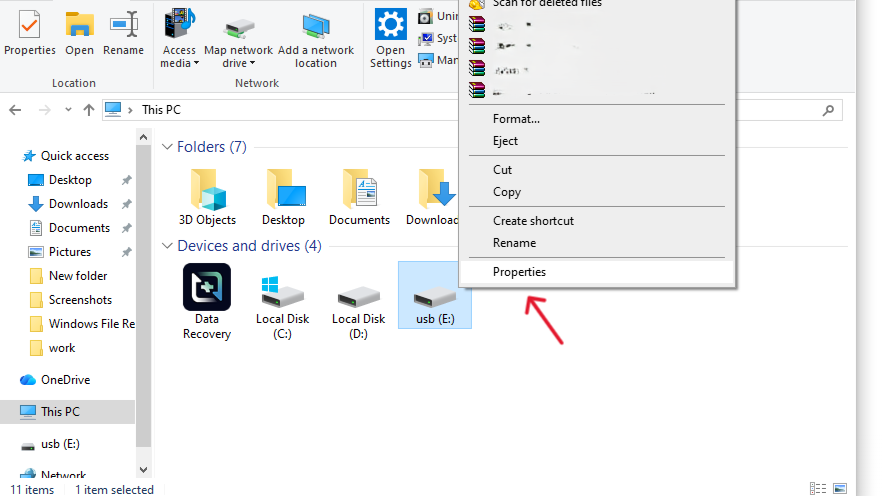
Step 1: Open Properties
Navigate to This PC, right-click on your USB drive icon, and select Properties.
Step 2: Launch the Check Tool
Click on the Tools tab. Under the “Error checking” section, click the Check button.
Step 3: Scan and Repair
Even if Windows says it hasn’t found any errors, click Scan and repair drive. The system will now look for bad sectors and directory inconsistencies. If it finds any, it will attempt to relocate the data and mark the sector as unusable to prevent future crashes.
Phase 4: Advanced Logical Fixes
When the graphical interface isn’t enough, we turn to the Command Prompt. This level of repair usb stick intervention deals with the drive’s structure at a deeper level.
Method 1: The CHKDSK Command
The chkdsk command is a powerful utility that can fix most “RAW” drive issues without losing data.
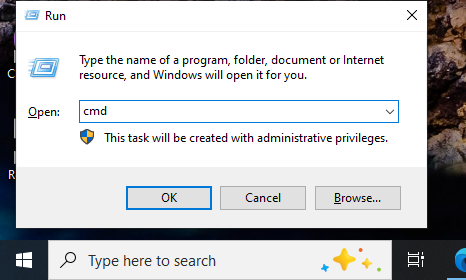
- Step 1: Press
Win + Sand type cmd. Right-click it and select Run as Administrator.
- Step 2: Type the following command:
chkdsk X: /f(Replace X with the actual letter assigned to your USB). - Step 3: Press Enter. The
/fparameter tells Windows to fix any errors it finds. If you want a more thorough scan, usechkdsk X: /f /r /x, which locates bad sectors and recovers readable information.
Method 2: Assigning a New Drive Letter
Sometimes a USB stick is “healthy” but invisible because it’s fighting another drive for the same letter.
- Press
Win + R, typediskmgmt.msc, and hit Enter. - Find your USB drive in the list.
- Right-click the partition and select Change Drive Letter and Paths.
- Click Change and pick a letter near the end of the alphabet (like Z or S).
Phase 5: Recovering Data with PandaOffice Drecov Data Recovery Software
If you have tried the methods above and the drive still shows as empty or “Not Formatted,” you must prioritize data extraction before the hardware fails completely. This is where PandaOffice Drecov data recovery software becomes indispensable.
Unlike standard repair tools that might overwrite data, PandaOffice Drecov uses a “read-only” scanning algorithm. This ensures that while you repair usb stick partitions, your original files remain untouched.
⚠ Warning: Install it on a drive different from the one where your data was lost to prevent overwriting.
Step 1: Select the USB Stick
Launch the program. On the main dashboard, you will see a list of available drives. Under the “External Devices” section, select your USB flash drive.

Step 2: Deep Scan for Files
Click the Scan button. PandaOffice Drecov data recovery software will perform a “Quick Scan” followed automatically by a “Deep Scan.”
- Quick Scan: Best for recently deleted files.
- Deep Scan: Necessary for usb memory repair scenarios where the partition table is corrupted. It searches the drive byte-by-byte for file signatures.

Step 3: Preview and Filter
One of the best features of this tool is the preview window. You can click on photos or documents to see if they are intact before committing to the recovery. Use the filter on the left sidebar to sort by file type (e.g., .jpg, .docx, .mp4).

Step 4: Recover to a Safe Location
Select the files you want to keep and click Recover.
Warning: Never save the recovered files back onto the same USB stick you are repairing. This could lead to data overwriting. Save them to your Desktop or a different external drive.
Phase 6: The “Last Resort” – How to Repair USB Stick via Formatting
If your data is safely backed up using PandaOffice Drecov data recovery software, but the drive is still acting up, a “Clean” and “Format” is the final step to make the hardware usable again.
Using Diskpart
- Open CMD as an administrator.
- Type
diskpartand press Enter. - Type
list diskto see all drives. Identify your USB (look at the size). - Type
select disk n(Replace n with your USB’s number). - Type
clean. Warning: This wipes all partition info. - Type
create partition primary. - Type
format fs=fat32 quick(orfs=ntfs quickfor larger drives). - Type
exit.
Now that your drive is revitalized, you can continue your journey into device maintenance by checking out these resources:
- How to install drivers for USB 3.0 to HDMI adapter Windows 11
- How to repair USB drive and recover data step-by-step
- How to repair corrupted USB flash drive without losing data
Summary Table: Which Method Should You Use?
| Issue | Recommended Method | Success Rate |
| Driver Error | Device Manager Reinstall | High |
| File System Error | Windows Error Checking / CHKDSK | Medium |
| RAW Drive | PandaOffice Drecov + Diskpart | High |
| Physical Damage | Professional Lab Recovery | Low (DIY) |
Repair USB Stick FAQs
1. Why does my computer say the USB is write-protected when I try to repair usb stick?
Write protection is a security feature that prevents data from being deleted or overwritten. This often happens due to a physical switch on the side of the drive or a registry setting. To fix this, you can use the Diskpart utility:
- Step 1: Open CMD as administrator and type
diskpart. - Step 2: Type
list diskthenselect disk n(your USB). - Step 3: Type
attributes disk clear readonly. This command removes the software-level lock, allowing you to proceed with a standard how to repair usb stick workflow.
2. Can I use PandaOffice Drecov if my USB stick doesn’t show up in Windows Explorer?
Yes. Often, a corrupted drive loses its drive letter or has a RAW file system, making it “invisible” to File Explorer. However, PandaOffice Drecov data recovery software communicates directly with the disk controller. As long as the drive appears in Disk Management (even as “Unallocated”), the software can usually scan it and pull your files back to safety.
3. Is it possible to repair usb stick issues caused by a “Device Descriptor Request Failed” error?
This specific error usually points to a hardware communication failure rather than a file system issue.
- Step 1: Try “Power Cycling” the motherboard by shutting down the PC and removing the power cable for 30 seconds.
- Step 2: In Device Manager, find the “Unknown USB Device” and select Update Driver -> Browse my computer for drivers -> Let me pick from a list.
- Step 3: Select Generic USB Hub and click Next. This often resets the handshake between the OS and the hardware.
4. Does formatting a drive during usb memory repair permanently delete my files?
A “Quick Format” only deletes the address table, not the actual data bits. This is why you should always use PandaOffice Drecov after an accidental format if you haven’t written new files to the drive yet. However, a “Full Format” (where you uncheck the Quick Format box) overwrites the entire drive with zeros, making data recovery virtually impossible. Always choose the “Quick” option if you hope to retrieve data later.
5. How do I know if my USB stick is physically dying or just logically corrupted?
Physical failure often presents as intermittent disconnecting, the drive getting extremely hot to the touch, or the storage capacity showing as 0MB in Disk Management. Logical corruption (which you can fix) usually presents as a “RAW” file system or “Access Denied” errors. If the drive is physically failing, software solutions cannot fix the hardware; you should immediately use PandaOffice Drecov data recovery software to grab what you can before the NAND chip expires completely.
Conclusion
Learning how to repair usb stick errors is an essential skill in our digital age. While hardware can be replaced, your data often cannot. By following this guide—starting from simple driver updates to utilizing professional tools like PandaOffice Drecov data recovery software—you can save yourself from the heartbreak of data loss. Remember to always eject your drive safely and keep multiple backups to avoid future headaches.


