


The digital age has brought us immense convenience, but it also carries a persistent risk: data loss. Whether it is a family photo album deleted by a stray click or a crucial work document lost during a system crash, the feeling of panic is universal. Fortunately, data recovery software Recuva has remained a cornerstone for users seeking a reliable, cost-effective way to bring those files back from the digital abyss.
In this comprehensive guide, we will explore everything you need to know about Recuva and modern alternatives like PandaOffice Drecov data recovery software. We will break down how these tools work, provide step-by-step instructions for every technical level, and share expert tips to ensure your recovery success rate stays as high as possible.
What Is Recuva and Why It’s Popular
Overview of Recuva Software
If you’ve ever accidentally deleted a file and felt that sudden drop in your stomach, you’re not alone. That moment—when something important disappears—is exactly where data recovery software Recuva steps in like a digital safety net. Developed by Piriform, the same team behind CCleaner, Recuva has been a household name in the Windows utility space for nearly two decades.
What makes Recuva stand out isn’t flashy design or complex AI—it’s simplicity and accessibility. The software focuses on one primary goal: recovering deleted files from storage devices such as hard drives, USB sticks, memory cards, and even MP3 players. This versatility is rare for a tool that offers a completely unrestricted free version, allowing users to scan and recover data without the common “pay-per-gigabyte” traps found in other software.
As we move through 2026, Recuva continues to hold its position because it remains lightweight. It doesn’t bloat your system with unnecessary background processes, and it gets the job done for the most common data loss scenarios. Think of Recuva as a digital archaeologist. It digs through the “forgotten” sectors of your storage—areas your operating system no longer tracks—and tries to piece your lost data back together.
Who Should Use Recuva
The beauty of data recovery software Recuva lies in its “Wizard Mode,” which makes it approachable for anyone, regardless of technical expertise. If you are a student who accidentally emptied the Recycle Bin with your thesis inside, or a hobbyist photographer who deleted a folder of JPEGs, Recuva is designed for you.
However, it is important to manage expectations. While Recuva is excellent for simple “undelete” tasks on healthy drives, it may struggle with more complex issues like partition loss or RAW file systems. For those scenarios, a more robust solution like PandaOffice Drecov data recovery software might be necessary. Nevertheless, for the average user facing a minor digital mishap, Recuva is often the first and only tool they need to download.
Key Features of Recuva
File Recovery Capabilities
At its core, data recovery software Recuva is built to handle a surprising range of file formats. Whether you are dealing with photos (JPG, PNG, RAW), videos (MP4, MOV), documents (DOCX, PDF, XLSX), or even deleted emails from Outlook or Thunderbird, Recuva can usually find them.
One unique feature is its ability to recover files from damaged or newly formatted drives. While many tools give up once a file system is “lost,” Recuva can often still see the underlying data structure. Furthermore, it includes a “Secure Overwrite” feature. This is the opposite of recovery; it allows you to permanently delete a file so that it can never be recovered, which is vital for privacy when selling a used computer.
Deep Scan Technology
If the initial “Quick Scan” fails to find what you are looking for, Recuva offers a “Deep Scan” mode. While a quick scan looks at the file allocation table (the drive’s index), the Deep Scan scours every sector of the disk to find file headers. This process takes significantly longer—sometimes hours depending on the drive size—but it is essential for finding files that were deleted long ago or whose metadata has been corrupted.
Supported Devices and File Types
Recuva is compatible with almost any rewritable media that uses Windows-supported file systems (NTFS, FAT32, exFAT). This includes:
- Internal HDD/SSD: The primary drives where your OS lives.
- External Hard Drives: Portable drives used for backups.
- SD/MicroSD Cards: Commonly used in cameras and smartphones.
- USB Flash Drives: The most common victims of “accidental formatting.”
For more information on the official technical specifications, you can visit the Official Recuva Website.
How Recuva Works
The Science Behind Data Recovery
When you delete a file on Windows, the computer doesn’t actually erase the data immediately. Instead, it marks the space that the file occupied as “available” for new data. The original 1s and 0s are still there, but the operating system has simply forgotten where they are. Data recovery software Recuva acts as a map-maker, re-indexing those “available” spaces to find the files that are still physically present on the disk.
File Overwriting Explained
The most critical factor in data recovery success is preventing “overwriting.” If you delete a file and then continue to download new movies or install new apps, the computer will write that new data over the space where your old file was. Once that happens, the old file is gone forever. This is why experts always recommend that you stop using the device immediately once you realize data is missing.
How to Use Recuva Step-by-Step
Using data recovery software Recuva is a straightforward process, but following the correct steps is vital to ensure you don’t accidentally ruin your chances of success.
Step 1: Installation and Mode Selection
Download the installer from the official site. During installation, pay attention to any bundled software offers (common in free tools). Once launched, you will see the Recuva Wizard.
- Tip: If you are an advanced user, you can skip the wizard, but for most people, it’s the safest way to proceed.
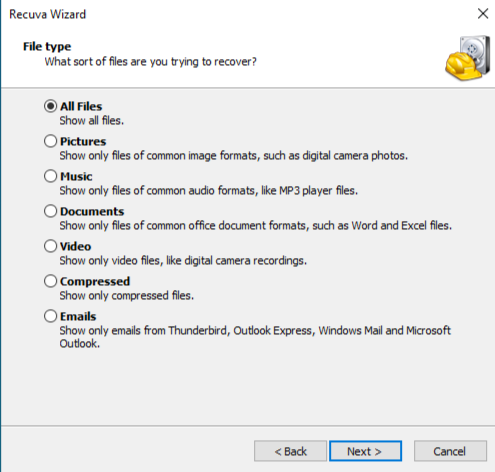
Step 2: Selecting File Types
The wizard will ask what type of files you are looking for (Pictures, Music, Documents, etc.). Selecting a specific category speeds up the scan. If you aren’t sure, select “All Files.”
Step 3: Choosing the Scan Location
Select where the files were last seen. You can choose a specific folder, the Recycle Bin, or an entire drive. Choosing “I’m not sure” will scan the entire computer, which takes much longer.
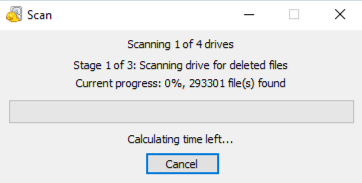
Step 4: Running the Scan
Click “Start.” If this is your first attempt, do not check “Enable Deep Scan” yet. Try the Quick Scan first. If the file is found, it will appear in a list with a color-coded status:
- Green: Excellent chance of recovery.
- Orange: Likely corrupted or partially overwritten.
- Red: Unrecoverable.
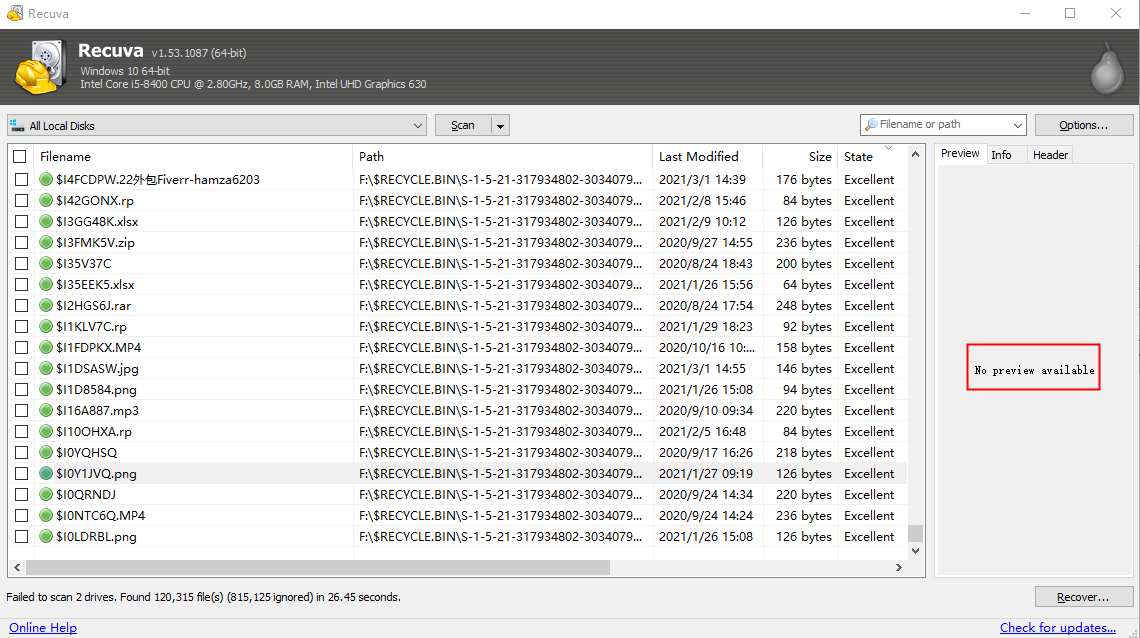
Step 5: Recovering the Data
Check the boxes next to the files you want to save and click “Recover…”.
Warning: Always save the recovered files to a different drive (e.g., save files from your C: drive to a USB stick). Saving them to the same drive can overwrite other files you are trying to rescue.
PandaOffice Drecov Data Recovery Software: A Powerful Alternative
While Recuva is a fantastic free starting point, there are times when you need more professional-grade power. This is where PandaOffice Drecov data recovery software comes into play. Drecov is designed to handle more severe data loss scenarios, such as RAW drives, crashed systems, and over 2,000 different file types.
If Recuva is the digital archaeologist, PandaOffice Drecov is the full-scale forensic team. It boasts a 99.8% recovery success rate and includes built-in repair tools for corrupted photos and videos that may have been damaged during the deletion process.
⚠ Warning: Install it on a drive different from the one where your data was lost to prevent overwriting.
Step-by-Step Guide: Using PandaOffice Drecov
Step 1: Select the Target Location
On the main screen, you will see a list of all connected drives, including external USBs and SD cards. Hover over the drive where your data was lost and click the “Scan” button.

Step 2: Intelligent Scanning and Filtering
PandaOffice Drecov data recovery software will automatically perform a comprehensive scan. You can watch the results appear in real-time. Use the filter on the left to sort by file type (e.g., Video, Photo, Document) or use the search bar if you know the file name.

Step 3: Previewing the Files
One of Drecov’s best features is the Unlimited Preview. Before you commit to recovery, double-click on a file (like a photo or PDF) to see if it’s intact. If it looks good in the preview, it will look good when recovered.

Step 4: Execute the Recovery
Select the files you need and click the blue “Recover” button. Choose a secure destination folder on a separate drive to finalize the process.
Warning Prompt: If your computer is making clicking or grinding noises, do not run any software. This indicates physical hardware failure, and software scans could cause permanent damage. Seek a professional hardware repair service instead.
Pros and Cons of Recuva
Advantages of Recuva
- Completely Free: No hidden limits on how much data you can recover in the free version.
- Ease of Use: The wizard-driven interface is perfect for non-techies.
- Portable Version: You can run it from a USB stick without installing it on the host PC, which reduces the risk of overwriting data.
- Fast Scans: The Quick Scan is remarkably efficient for recently deleted items.
Limitations You Should Know
- Windows Only: There is no official Mac or Linux version.
- Basic Engine: It struggles with complex file system corruption or lost partitions.
- Old Interface: The UI hasn’t been significantly updated in years and can feel dated compared to PandaOffice Drecov data recovery software.
- Limited Previews: It cannot preview as many file types as modern competitors.
Recuva Free vs Pro Version
Many users wonder if they should upgrade to the Professional version. Here is a breakdown of the differences:
| Feature | Recuva Free | Recuva Pro |
| Advanced File Recovery | Yes | Yes |
| Virtual Hard Drive Support | No | Yes |
| Automatic Updates | No | Yes |
| Premium Technical Support | No | Yes |
| Recovery Engine | Same | Same |
Is Recuva Pro Worth It?
For the average user, the Free version is more than sufficient. The Pro version does not actually use a “better” scanning engine; it simply adds convenience features like automatic updates and support for VHD (Virtual Hard Drives). If you are working in a professional environment or using virtual machines, the upgrade is helpful, but for home use, the free version of data recovery software Recuva is the star of the show.
Comparison: Recuva vs. PandaOffice Drecov
Choosing the right tool depends on your specific situation.
- Choose Recuva if: You just accidentally deleted a few files from a working drive and want a free, quick fix. It is the king of “Simple Undeletion.”
- Choose PandaOffice Drecov if: Your drive is showing as “RAW,” you formatted a partition by mistake, or you need to recover specific professional file types that Recuva might miss. It is also superior if you need to repair corrupted videos or photos during the recovery process.
| Metric | Recuva | PandaOffice Drecov |
| Success Rate | High (Simple cases) | Extremely High (99.8%) |
| User Interface | Classic/Dated | Modern/Intuitive |
| File Support | 500+ Types | 2,000+ Types |
| Extra Tools | Secure Deletion | Video/Photo Repair |
Real-World Performance and Success Rate
Recovery Scenarios
In 2026, the success of data recovery software Recuva often depends on the hardware.
- SSD vs HDD: Recovery is generally easier on traditional HDDs. On modern SSDs, a feature called TRIM often wipes deleted data sectors almost immediately to maintain drive speed, making recovery much harder regardless of the software used.
- Recycle Bin: Recovery from an emptied Recycle Bin is usually 100% successful if done quickly.
- USB Formats: If you perform a “Quick Format,” Recuva can usually find everything. A “Full Format” overwrites the sectors with zeros, making recovery impossible.
Factors Affecting Success
- Time: The longer you wait, the lower the chance.
- Fragmented Files: Large files (like 4K videos) are often stored in pieces across the drive. If one piece is overwritten, the whole file is broken. Tools like PandaOffice Drecov data recovery software are better at “stitching” these fragments back together.
Tips to Maximize Data Recovery Success
To ensure you get your files back, follow these “Golden Rules” of data recovery:
Best Practices
- Do Not Install Anything: If you lost data on your C: drive, do not download the recovery software to the C: drive. Use a different computer to download the “Portable” version to a USB stick.
- Use Read-Only Mode: Ensure your recovery software is not writing anything to the source drive. Both Recuva and PandaOffice Drecov are designed to be “read-only” during the scan.
- Check the Health Indicator: In Recuva, pay attention to the “State” column. If it says “Unrecoverable,” don’t waste time trying to restore it; look for a different version of the file or use a tool with file repair capabilities.
Common Mistakes to Avoid
- Rebooting Repeatedly: Every time Windows boots up, it writes log files and temporary data to the disk. This can overwrite your lost files.
- Opening Other Apps: Don’t browse the web or check email while the scan is running. Keep system activity to a minimum.
- Giving Up Too Early: If the Quick Scan fails, always try the Deep Scan. It might take three hours, but that’s a small price to pay for your lost memories.
Beyond Software: Understanding Data Locations
Sometimes, data recovery isn’t about “undeleting” but simply knowing where to look. For example, many users think they’ve lost their browser data when it has simply been moved. If you are struggling with specific application data, check out these helpful resources:
- If you’ve lost your browser history or saved sites, you might need to find where is the Firefox bookmarks location to manually back them up.
- In some cases, the best “recovery” is a time machine. Learn how to restore computer to an earlier date on Windows to undo recent system changes.
- For smart home users, accidental deletions can be devastating. Here is a guide on how to recover a Blink video deleted accidentally.
- For advanced technical troubleshooting, knowing where are Firefox bookmarks stored on your PC can help you recover data even after a partial system corruption.
Data Recovery Software Recuva FAQs
1. Can Recuva recover files from a shift-deleted folder?
Yes. When you use Shift + Delete, the files skip the Recycle Bin, but they are still physically on the drive until overwritten. Recuva is perfect for this.
2. Does Recuva work on SSDs?
Yes, but with a caveat. If the SSD has TRIM enabled, the data may be cleared by the controller very quickly after deletion. It is best to try the scan as soon as possible.
3. Is Recuva safe?
Absolutely. As long as you download it from the official Piriform/CCleaner website, it is a safe, reputable utility used by millions.
4. How long does a Deep Scan take?
On a 1TB hard drive, a Deep Scan can take between 2 to 5 hours depending on the drive’s connection speed (USB 2.0 vs. USB 3.0/USB-C).
5. Why are some files “Unrecoverable” in Recuva?
This usually means that another file has already been saved over the physical space where the old file used to be. At this point, the data is physically gone and cannot be retrieved by software.
Conclusion
Data recovery software Recuva remains an essential tool in 2026 for its unmatched value and simplicity. It provides a powerful, free solution for the most common data loss heartaches. However, as storage technology evolves and file systems become more complex, having a more advanced backup like PandaOffice Drecov data recovery software is a smart move for anyone who values their digital life.
Whether you choose the lightweight efficiency of Recuva or the professional depth of PandaOffice Drecov, the most important lesson is to act fast, stop using the drive, and always save your recovered files to a new location. With the right tools and a little patience, your “lost” data is often just a few clicks away from coming home.


