


Managing digital clutter is a fundamental skill in the modern workspace. Whether you are running out of storage space or simply organizing your professional life, knowing how to remove files from OneDrive is essential. However, the intersection of cloud synchronization and local storage often leads to a common nightmare: accidental deletion.
In this comprehensive guide, we will explore the nuances of managing your OneDrive account, detail the safest ways to remove files from OneDrive, and provide an expert-level walkthrough on using PandaOffice Drecov data recovery software to rescue any files that disappear during the process.
Understanding the OneDrive Sync Ecosystem
Before you click “Delete,” you must understand how OneDrive communicates with your computer. OneDrive uses a “Sync” engine. This means that, by default, the actions you take in your local OneDrive folder are mirrored in the cloud, and vice versa.
If you delete a file from the OneDrive folder on your PC, it moves to the Recycle Bin on both your PC and the OneDrive web portal. To manage your space effectively without losing data, you need to distinguish between removing files from your local drive and deleting them from the cloud entirely.
How to Remove Files from OneDrive: Three Strategic Methods
Depending on your goal—saving disk space or permanent deletion—the steps vary significantly. We have organized these by operational complexity, starting with the simplest native Windows features.
Method 1: Using “Free Up Space” (Local Removal Only)
This is the most efficient way to remove files from OneDrive locally while keeping them safe in the cloud. This utilizes the “Files On-Demand” feature.
- Step 1: Open File Explorer and navigate to your OneDrive folder.
- Step 2: Right-click the file or folder you wish to remove from your physical hard drive.
- Step 3: Select Free up space from the context menu.
- Step 4: Observe the status icon. It will change from a green checkmark to a blue cloud icon.
Key Point: This method does not delete the file from the cloud. It only removes the local copy, saving you gigabytes of storage.
Method 2: Deleting Files via the OneDrive Web Portal
If you want to ensure a file is gone from all synced devices, the web portal is the most direct route.
- Step 1: Log in to the OneDrive Official Website.
- Step 2: Locate the files you want to discard.
- Step 3: Select the items and click the Delete button at the top toolbar.
- Step 4: Confirm the action in the pop-up dialogue.
Method 3: Unlinking Your PC from OneDrive
If you want to remove files from OneDrive by stopping the synchronization entirely (useful for a clean slate), follow these steps:
- Step 1: Click the OneDrive cloud icon in your taskbar notification area.
- Step 2: Select the Settings gear icon > Settings.
- Step 3: Go to the Account tab and click Unlink this PC.
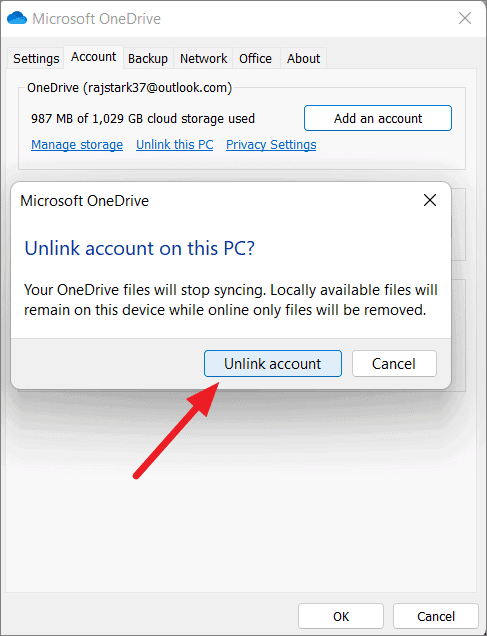
- Step 4: Confirm Unlink account. Your files will remain on the local disk but will no longer sync changes to the cloud.
The Risk of Data Loss During File Removal
Even with the best intentions, mistakes happen. You might select the wrong folder or forget that “Delete” on one device affects all others. When a file is removed from the OneDrive Recycle Bin or “Permanently Deleted” (Shift + Delete), standard Windows tools can no longer see it. This is where professional-grade intervention becomes necessary.
Recovering Lost Data with PandaOffice Drecov Data Recovery Software
When native recovery options fail, PandaOffice Drecov data recovery software serves as your ultimate safety net. Whether the files were deleted during a botched attempt to remove files from OneDrive or lost due to a system crash, Drecov uses advanced sector-scanning technology to rebuild lost data fragments.
Why Choose PandaOffice Drecov?
Unlike basic undelete tools, PandaOffice Drecov data recovery software is designed to handle complex file systems (NTFS, FAT32, exFAT) and can recover over 1,000 different file formats. It is particularly effective at finding “orphaned” files that were previously synced with cloud services.
⚠ Warning: Never install the software on the same drive where the data loss occurred. If you lost files from your C: drive, install Drecov on an external drive or a different partition to prevent overwriting the lost data.
Step-by-Step Guide to Using PandaOffice Drecov
Follow these steps precisely to maximize your chances of a successful recovery.
- Step 1: Select the Target LocationLaunch the program. On the main interface, you will see a list of available drives. Select the drive where your OneDrive folder was located (usually the
C:\Users\[Username]\OneDrivepath).

- Step 2: Deep Scan InitiationClick the Scan button. PandaOffice Drecov data recovery software will first perform a Quick Scan for recently deleted items, followed automatically by a Deep Scan.
- Key Point: The Deep Scan may take time depending on your disk size. Do not interrupt this process, as it is searching for file headers in the unallocated space of your drive.

- Step 3: Filter and PreviewOnce the scan is complete, use the sidebar to filter by file type (e.g., Photos, Documents). Drecov allows you to Preview files before recovery. If you can see the preview, the file is 100% recoverable.

- Step 4: Execute RecoverySelect the files you wish to restore and click Recover. Choose a destination folder on a different drive to save your restored files.
Further Reading and Resources:
- How to remove OneDrive from File Explorer: Step-by-step guide
- How to disable a folder from OneDrive and recover lost files
- Advanced OneDrive Troubleshooting and Removal
Advanced Troubleshooting: OneDrive Sync Conflicts
Sometimes, the reason you want to remove files from OneDrive is due to persistent sync errors. If a file refuses to be deleted or keeps reappearing, you may need to reset the OneDrive application.
- Press
Windows Key + Rto open the Run dialog. - Type the following command precisely:
%localappdata%\Microsoft\OneDrive\onedrive.exe /reset - Press Enter. This will restart the sync engine and often resolves “ghost file” issues.
Expert Tips for Data Safety
- Always Check the Bin: Before assuming a file is lost, check the OneDrive Web Recycle Bin. Items stay there for 30 days (personal accounts) or 93 days (work/school accounts).
- Use Version History: If you didn’t mean to remove files from OneDrive content but rather just revert a change, right-click the file and select Version History. This allows you to restore an older version without needing third-party software.
- Regular Backups: While OneDrive is a sync service, it is not a true backup. Periodically use PandaOffice Drecov data recovery software to audit your drives and ensure your most important local data is secure.
Remove Files From Onedrive FAQs
Yes. If you are the owner of a shared folder and you choose to remove files from OneDrive by deleting them, those files will disappear for everyone who has access. However, if you only use the “Free up space” option, the files remain accessible to your collaborators in the cloud and on their local devices. If a collaborator accidentally deletes a shared file, you can use PandaOffice Drecov data recovery software on the original host computer to scan for the local cache of that file and restore it for the whole team.
2. Can I remove files from OneDrive without deleting them from my local PC?
This requires a specific sequence to “break” the sync connection for those files. First, move the files out of the OneDrive folder to a local directory (like your desktop or a custom folder on the C: drive). Once the files are moved, OneDrive will see them as “deleted” from the cloud, but they will remain safe on your local hard drive. If you find that files were lost during this move-and-sync process, run a scan with PandaOffice Drecov data recovery software to locate any fragments lost during the file transfer.
3. Why do files I remove from OneDrive keep reappearing after a few minutes?
This is usually caused by a sync conflict or a secondary device (like a tablet or another laptop) re-uploading the data. To fix this:
- Step 1: Turn off OneDrive on all your secondary devices.
- Step 2: Remove files from OneDrive via the web portal at onedrive.live.com.
- Step 3: Clear the OneDrive cache on your main PC.
- Step 4: Turn the other devices back on one by one.
4. Does PandaOffice Drecov data recovery software work on SSDs used with OneDrive?
Yes, but speed is critical. Most modern laptops use SSDs with a feature called TRIM, which wipes data marked as deleted to maintain drive speed. If you accidentally remove files from OneDrive on an SSD, stop using the computer immediately. Run PandaOffice Drecov data recovery software from a bootable USB or an external drive to bypass standard system processes and catch the data before the TRIM command permanently erases the sectors.
5. What is the difference between “Delete” and “Remove from list” in OneDrive?
In the “Recent” files view, “Remove from list” only hides the shortcut from your dashboard; it does not affect the actual data. However, if you navigate to the actual file location and select “Delete,” you are performing a functional command to remove files from OneDrive storage. If you confuse the two and realize you’ve deleted a file instead of just hiding it from your recent list, check the online Recycle Bin first, then proceed to deep-sector recovery using professional tools.
Conclusion
Learning how to remove files from OneDrive is about more than just clicking delete; it’s about managing your digital footprint across multiple platforms. By using the “Free Up Space” feature for local management and the web portal for global management, you can keep your storage lean and organized.
If a mistake occurs, remember that your data is rarely truly gone. With the powerful scanning algorithms of PandaOffice Drecov data recovery software, you can reverse accidental deletions and maintain total control over your digital life.


