


Installing a fresh operating system is often the ultimate solution for a sluggish PC or a corrupted system. Whether you are building a high-end gaming rig or reviving an old laptop, learning how to install windows 11 from usb is a fundamental skill in the digital age. This method is faster, more reliable, and more flexible than traditional disc-based installations.
However, before we dive into the technical “how-to,” we must address the most critical aspect of any OS installation: your data. Reinstalling Windows often involves formatting drives, which can lead to permanent data loss if you aren’t careful. In this guide, we will walk through the entire process—from hardware checks to advanced data recovery techniques using professional tools like PandaOffice Drecov.
Understanding Windows 11 USB Installation
Before you begin, it is vital to understand what happens behind the scenes when you install windows 11 from usb. Unlike an “In-place Upgrade” which keeps your files, a USB installation is typically used for a “Clean Install.” This means the installer will wipe the target partition to ensure no old system bugs interfere with the new setup.
What a Bootable USB Drive Is
A bootable USB drive is a standard flash drive that has been specially formatted to include an “ISO” image and a bootloader. When you power on a computer, it typically looks at the internal hard drive to find an operating system. By creating a bootable USB, you tell the computer to ignore the internal drive momentarily and run the Windows Setup environment stored on the flash drive instead.
Why Installing Windows 11 from USB Is Popular
The popularity of this method stems from its versatility. If your computer suffers from a “Blue Screen of Death” (BSOD) and won’t boot into Windows, a USB installer is your only gateway to repair or reinstall the system. Furthermore, USB 3.0 and 3.1 speeds allow you to install windows 11 from usb in a fraction of the time it took with older DVD technology.
Windows 11 System Requirements Before Installation
Microsoft raised the bar for hardware security with Windows 11. If your hardware doesn’t meet these specs, the installer may block your progress.
Minimum Hardware Requirements
| Component | Requirement |
| Processor | 1 GHz or faster with 2+ cores on a compatible 64-bit processor |
| RAM | 4 GB minimum (8 GB highly recommended for smooth performance) |
| Storage | 64 GB or larger storage device |
| System Firmware | UEFI, Secure Boot capable |
| TPM | Trusted Platform Module (TPM) version 2.0 |
| Graphics | Compatible with DirectX 12 or later with WDDM 2.0 driver |
Checking Compatibility Using PC Health Check
Before you spend time downloading files, you should verify your hardware. Microsoft offers the official PC Health Check app to automate this. If the tool reports that your PC isn’t compatible due to TPM 2.0, you might need to enable this setting in your BIOS/UEFI.
What You Need Before Installing Windows 11
Preparation is 90% of the work. If you rush into the process without the right tools, you risk a failed installation or, worse, a “bricked” system that won’t boot at all.
USB Flash Drive Requirements
To successfully install windows 11 from usb, you need a drive with at least 8 GB of capacity. However, a 16 GB or 32 GB USB 3.0 drive is the “sweet spot” for speed and reliability.
Warning: The creation process will format the USB drive. This means every single file currently on that thumb drive will be deleted. If you have important documents on the USB, move them to the cloud or another drive first.
Downloading the Official Windows 11 Installation Files
Always source your files from the official Microsoft Download page. Avoid third-party “lite” versions or “pre-activated” ISOs found on torrent sites, as these often contain malware or stripped-down security features that leave your data vulnerable.
Creating a Bootable Windows 11 USB Drive
There are two primary ways to prepare your media. The first is the official route, and the second is the “power user” route.
Using the Media Creation Tool
This is the most “foolproof” method for most users.
- Step 1: Plug your USB drive into a working PC.
- Step 2: Download the “Create Windows 11 Installation Media” tool from Microsoft.
- Step 3: Run the
.exefile and accept the license terms. - Step 4: Select “Use the recommended options for this PC” (unless you are installing for a different computer with a different language).
- Step 5: Choose “USB flash drive” as the media to use.
- Step 6: Select your drive from the list and click “Next.” The tool will now download Windows 11 and flash it to the drive.
Alternative Method Using Rufus
If you need to install windows 11 from usb on an older computer that lacks TPM 2.0 or Secure Boot, Rufus is the gold standard. Rufus allows you to check boxes that bypass these hardware requirements, though Microsoft does not officially recommend this for long-term stability.
Data Recovery: The Safety Net Before and After Installation
One of the biggest fears when users install windows 11 from usb is losing their personal files—photos, work documents, and saved games. Sometimes, users accidentally format the wrong partition during setup. Other times, the USB drive itself might fail during the process.
This is where PandaOffice Drecov becomes an essential part of your toolkit. It is a professional-grade data recovery software designed to handle complex data loss scenarios, including partition loss during OS installation.
⚠ Warning: Install PandaOffice Drecov on a functioning computer. If your main PC is down, you can connect your hard drive to another computer as an external drive.
Recovering Data with PandaOffice Drecov
If you realized you forgot to back up a folder after you already started the installation, or if the installation failed and your drive shows as “Raw,” follow these steps:
- Step 1: Select the Location. Open the software and select the drive or specific partition where your lost data was located.

- Step 2: Deep Scan. Click the “Scan” button. The tool uses advanced algorithms to look past the “formatted” layer to find the original file structures.
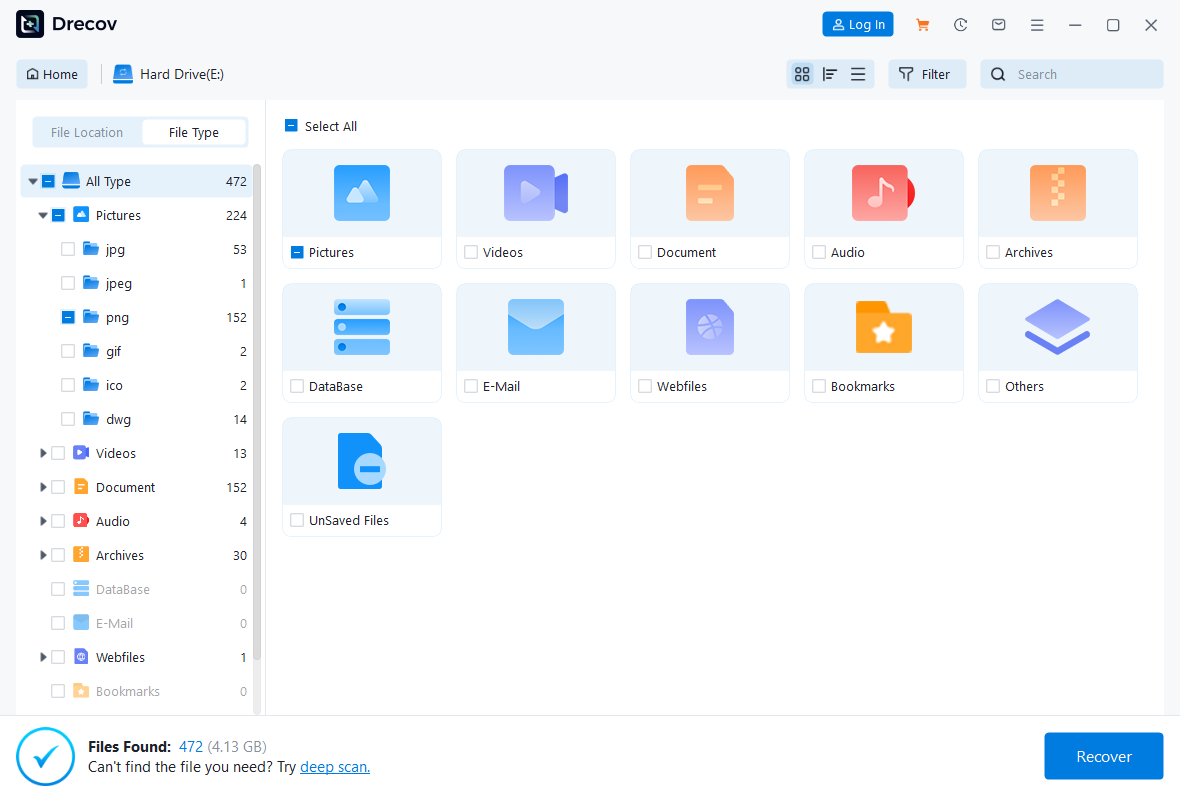
- Step 3: Preview and Filter. Once the scan completes, you can preview photos or documents to ensure they are intact.

- Step 4: Recover. Select the files you need and click “Recover.”
Key Warning: Always save the recovered files to a different drive (like an external HDD) to avoid overwriting the very data you are trying to save.
After securing your data, you might find these resources helpful if you encounter hardware-specific issues during the process:
- How to repair corrupted USB flash drive without losing data
- USB ports not working: Ultimate troubleshooting guide
- Reinstall Windows 10 from USB: Fix errors and speed up your PC
Preparing Your Computer for USB Installation
Your computer won’t automatically know to look at the USB drive. You have to “invite” it to do so through the BIOS or UEFI settings.
Entering BIOS or UEFI Settings
BIOS (Basic Input/Output System) is the software that starts before Windows. To enter it, you must press a specific key immediately after hitting the power button.
- Common Keys: F2, F10, F12, or DEL.
- Tip: If your computer boots too fast to catch the key, hold the “Shift” key while clicking “Restart” in your current Windows menu. Go to Troubleshoot > Advanced options > UEFI Firmware Settings.
Changing Boot Order to USB
Inside the BIOS, navigate to the Boot tab using your keyboard. You will see a list of devices (Hard Drive, Network, USB).
- Step 1: Use the arrow keys to select your USB drive (often labeled as “Removable Device” or the brand name of the USB).
- Step 2: Move it to the very top of the list.
- Step 3: Go to the Save & Exit tab and select “Save Changes and Reset.”
Installing Windows 11 from the USB Drive
Once your PC restarts, it should see the USB drive and display a message: “Press any key to boot from USB…” Press a key immediately.
Starting the Windows Setup Wizard
The Windows 11 logo will appear, followed by a language selection screen.
- Step 1: Select your language, time, and keyboard method. Click “Next” then “Install Now.”

- Step 2: If you have a product key, enter it. If you are reinstalling on the same PC, click “I don’t have a product key”—Windows will automatically reactivate via the digital license stored on your motherboard once you’ve finished.
- Step 3: Choose the “Custom: Install Windows only (advanced)” option. This is the core step to install windows 11 from usb correctly.
Partitioning the Hard Drive
This is the most technical part of the process. You will see a list of “Drives” and “Partitions.”
- Step 1: If you want a truly clean slate, select each partition on “Drive 0” and click Delete until you only see “Drive 0 Unallocated Space.”
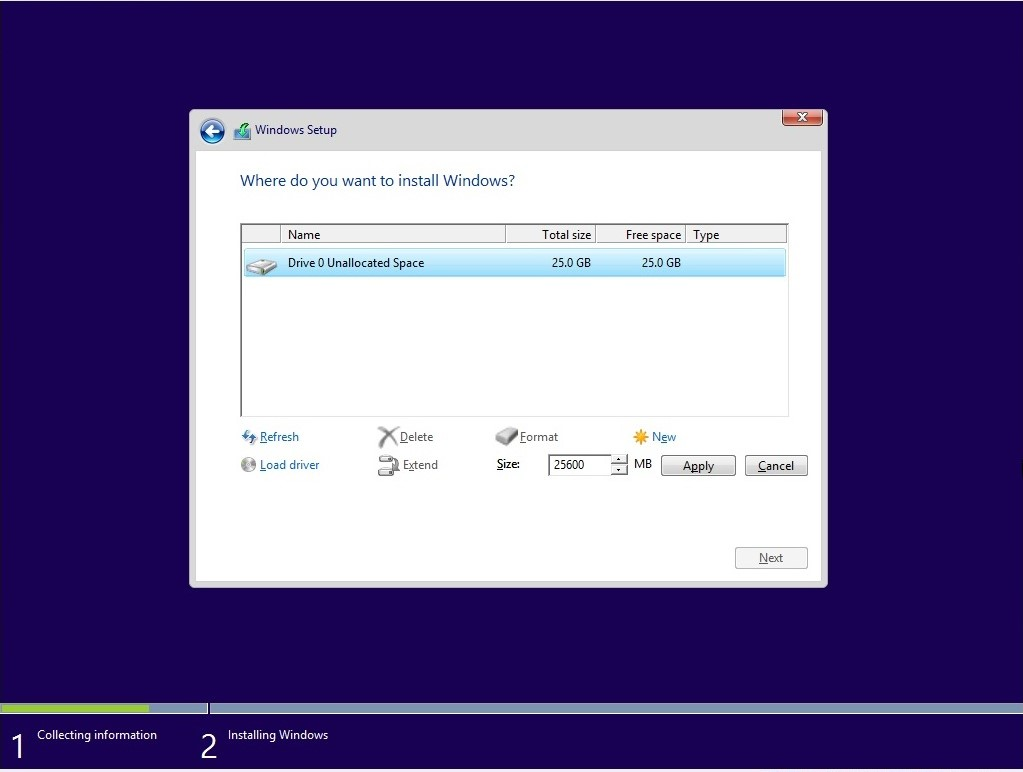
- Step 2: Select that unallocated space and click Next. Windows will automatically create the necessary system partitions (EFI, MSR, Primary).
Warning: Deleting partitions erases all data on that specific physical drive. Ensure you have used PandaOffice Drecov to back up anything important before clicking delete!
Completing Windows 11 Installation
Now, the computer will begin copying files. This usually takes 10 to 20 minutes on an SSD. The computer will restart several times. Note: Once the first restart happens, you can safely unplug the USB drive so the computer doesn’t accidentally loop back into the installer.
Post-Installation Setup
Once the “Out of Box Experience” (OOBE) begins, you’ll be greeted by a friendly setup screen.
- Region and Keyboard: Confirm your location.
- Naming your PC: Give your computer a name.
- Microsoft Account: Windows 11 Home requires a Microsoft account and internet connection. Pro users can sometimes bypass this, but using an account helps sync your settings and recovery keys.
- Privacy Settings: We recommend reviewing these carefully and turning off “Diagnostic Data” or “Tailored Experiences” if you prefer more privacy.
Installing Drivers and Updates
Even though Windows 11 is smart, it might not have the latest “brain” for your specific hardware.
- Step 1: Go to Settings > Windows Update and click “Check for updates.” This will pull in essential security patches.
- Step 2: Visit your motherboard or laptop manufacturer’s website (e.g., Dell, ASUS, HP) to download specific drivers for your chipset, audio, and Wi-Fi.
- Step 3: If you have a dedicated GPU (Nvidia or AMD), download the latest drivers directly from their sites to ensure maximum gaming and video performance.
Boot Windows 11 from a flash drive FAQs
1. Can I install Windows 11 from USB on a Mac?
Yes, but only on Intel-based Macs using Boot Camp Assistant. Newer M1/M2/M3 Macs require virtualization software like Parallels.
2. My USB drive isn’t showing up in the BIOS. What do I do?
Ensure “Secure Boot” is enabled and “Legacy Support” or “CSM” is disabled, as Windows 11 requires UEFI mode. Also, try a different USB port, preferably one on the back of the motherboard if using a desktop.
3. What if the installation gets stuck at 0%?
This often indicates a hardware issue with the USB drive or the destination SSD. Try recreating the installation media on a different USB stick.
4. Is it free to install Windows 11 from USB?
The download and installation media are free. However, you still need a valid license (Product Key) to activate Windows and access all features.
5. How do I recover files if Windows won’t start after the install?
If the installation fails and your files are missing, use PandaOffice Drecov from a different PC to scan your drive. It can often find files even if the partition table was partially rewritten.
Conclusion
Learning how to install windows 11 from usb is more than just a technical chore; it is the best way to ensure your computer runs at peak performance. By following this guide, you have learned how to check hardware compatibility, create a bootable installer, navigate the BIOS, and safely manage your disk partitions.
Most importantly, you now know that data loss doesn’t have to be permanent. With tools like PandaOffice Drecov, you have a safety net that protects your digital life even when system installations go wrong. Take your time, follow the steps precisely, and enjoy the clean, modern interface of your freshly installed Windows 11.


