







Mozilla Firefox is a premier web browser celebrated for its robust security. However, continuous browsing accumulates extensive digital clutter that can compromise your privacy and slow down your device. Learning how to clear the history in firefox is the ultimate solution to optimize performance and safeguard your personal data. By following a few simple steps, you can easily purge cached files, trackable cookies, and search records to ensure a faster, more secure online experience.
What Is Browsing History in Firefox?
To fully grasp data cleanup routines, it helps to understand browser mechanics. Firefox does more than record website URLs. Instead, it runs a complex relational database. This system logs distinct forms of information simultaneously.
Your local profile stores these data categories:
- Visited Web Pages: This chronological, time-stamped archive tracks every URL. It also saves webpage titles and visit counters.
- Cached Website Content: These are local copies of heavy images. They include CSS sheets and scripts downloaded to speed up page loads.
- Cookies and Site Data: These small, server-issued text files track active login states. They also save virtual shopping carts and site preferences.
- Active Logins and Sessions: These active security tokens save your progress. They prevent you from typing passwords on every page refresh.
- Search and Form History: This is a clear record of search bar terms. It also logs text strings typed into form fields.
- Download Logs: This active ledger tracks your downloaded items. It contains filenames, file sizes, and source URLs.
Technical Solutions: How to Clear the History in Firefox
To accommodate all technical skill levels, we have organized the following solutions sequentially, ranging from quick everyday keyboard shortcuts to advanced automated controls and deeply integrated data recovery mechanics.
Method 1: The Express Keyboard Shortcut Sequence
For the vast majority of web users, utilizing the integrated keyboard shortkey engine is the absolute fastest way to trigger the primary data deletion panel without navigating through multiple dropdown configurations.
- Step 1: Double-click your desktop icon to launch the Mozilla Firefox browser application, ensuring all open tabs have saved your active work.
- Step 2: Execute the global system hotkey combination based entirely on your specific operating system:
- On Windows or Linux machines: Firmly press and hold down Ctrl + Shift + Delete simultaneously.
- On macOS devices: Hold down Command + Shift + Delete at the exact same time.
- Step 3: The specialized Clear Recent History dialog box will instantly populate on your screen. Locate the Time range to clear drop-down selection at the top of the window, and choose your desired timeframe (options include: Last Hour, Last Two Hours, Last Four Hours, Today, or Everything).
- Step 4: Navigate to the lower half of the interface and click the small checkbox indicators to manually choose exactly which data blocks you wish to discard (such as Browsing & Download History, Cookies, Cache, and Form & Search History).
- Step 5: Move your cursor directly over the prominent Clear Now button situated at the bottom right-hand corner of the panel and click it once. The menu will immediately close, and your designated records are instantly expunged from the active user profile database.
Method 2: Manually Removing Specific Individual Websites
There are many scenarios where you might wish to eliminate evidence of visiting a single, specific website without wiping out your entire month of legitimate corporate research history. Firefox includes a built-in management console specifically for this surgical purpose.
- Step 1: Look towards the absolute top-right corner of the active Firefox user interface and locate the application menu icon, which appears as three horizontal stacked parallel lines. Click this icon once.
- Step 2: From the contextual vertical drop-down menu that appears, click directly on the option clearly labeled History.
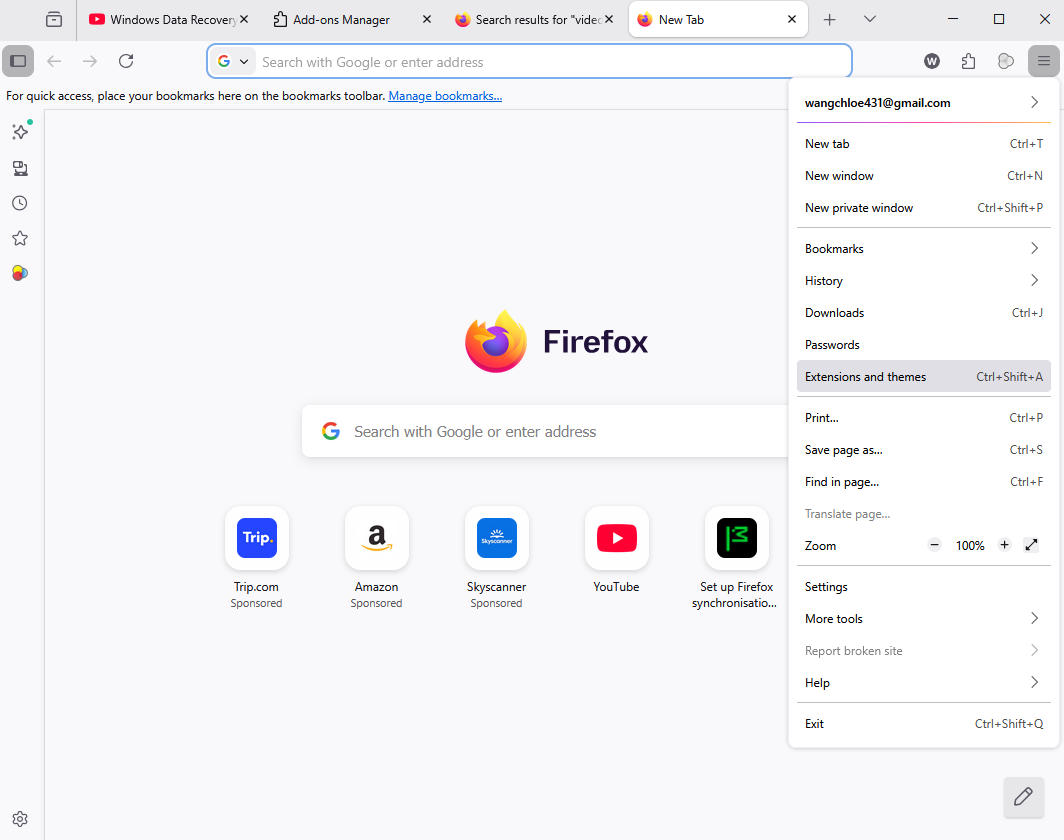
- Step 3: Look towards the bottom of this newly opened secondary panel and select the link labeled Manage History (or alternatively, skip the menus entirely by pressing Ctrl + Shift + H on Windows or Command + Shift + H on macOS). This action instantly launches the comprehensive, standalone Library window.
- Step 4: Move your eyes to the search input field positioned at the top right of the Library panel. Type in the explicit name or core domain keyword of the specific website you want to target (e.g., “socialmedia”). The system will update in real-time to isolate only those matching logs.
- Step 5: Browse through the filtered results list, right-click directly on the problematic entry you wish to remove, and click Delete Page. If you wish to wipe out absolutely every single trace of that entire domain name in one click, select Forget About This Site from the contextual menu instead.
Method 3: Isolating and Clearing the Local Cache Database
If you want to leave your active, logged-in user accounts completely untouched but need to fix a visual page rendering glitch or free up local drive storage, targeting the cache container while bypassing history catalogs is your ideal path forward.
- Step 1: Open up the main Firefox menu by clicking the three horizontal lines in the upper right quadrant of your browser, then select Settings (represented by a classic gear icon).
- Step 2: Cast your eyes over to the left-hand vertical navigation sidebar menu and click directly on the tab marked Privacy & Security.
- Step 3: Scroll slowly down through the primary settings pane until you successfully locate the section labeled Cookies and Site Data.
- Step 4: Click directly on the button labeled Clear Data… situated on the right side of this interface zone.
- Step 5: A dedicated mini-dialog box will pop open. Uncheck the box titled Cookies and Site Data to ensure your active web sessions remain safe. Keep a checkmark active next to Cached Web Content.
- Step 6: Click the blue Clear button. The browser will instantly dump all temporary internet imagery and code files from your hard disk drive.
Method 4: Deleting Trackable Web Cookies and Active Session Site Data
Cookies are frequently used by modern tracking networks to follow your physical identity across multiple distinct digital domains. Wiping them out forces advertising networks to look at your machine as a completely new user.
- Step 1: Click the three horizontal lines icon to reveal the application options, and choose Settings.
- Step 2: Click directly on the Privacy & Security subsection on the left sidebar navigation layout.
- Step 3: Track down the Cookies and Site Data area once again, and click the Clear Data… control mechanism.
- Step 4: This time, adjust the checkbox parameters so that Cookies and Site Data is actively checked, while ensuring Cached Web Content is disabled if you only want to affect cookies.
- Step 5: Click the Clear button at the base of the interface panel.
- Step 6: A secondary warning alert box will display on your screen, reminding you that clearing cookies will log you out of almost every active online account. Confirm your true intent by clicking Clear Now.
Method 5: Configuring Advanced Automated History Purging upon Exit
For individuals who want to lock down their privacy without manually clicking through menus every single evening, Firefox can be instructed to clean up its own database files every time you close the application window.
- Step 1: Navigate directly to the Firefox settings array by clicking the primary three-line application icon and selecting Settings.
- Step 2: Click into the Privacy & Security dashboard zone.
- Step 3: Scroll down until you cross into the section explicitly titled History. Locate the primary drop-down menu situated next to the text option labeled Firefox will, and change it from “Remember history” to Use custom settings for history.
- Step 4: Look beneath the freshly populated security configurations and place a checkmark into the checkbox titled Clear history when Firefox closes.
- Step 5: With that box checked, click the adjacent Settings… button located on the right.
- Step 6: A specialized checklist window will appear. Carefully check the exact types of historical parameters you want Firefox to automatically scrub from your computer upon closure (such as Active Logins, Browsing History, and Form Data). Click OK to permanently save your automation rule.
Method 6: Activating Native Private Browsing Mode Preventatively
The ultimate way to handle browser history management is to prevent the browser from saving any history records onto your physical computer storage platter in the first place. This can be achieved by utilizing Firefox’s highly secure, built-in Private Browsing layer.
- Step 1: Launch your active Firefox browser instance normally.
- Step 2: Initiate the specialized private mode engine instantly by utilizing the official platform-specific hotkey command structures:
- For Windows/Linux environments: Hold down Ctrl + Shift + P.
- For Apple Mac operating systems: Hold down Command + Shift + P.
- Step 3: A brand new, dark-themed browser window will launch on your desktop screen, prominently featuring a distinctive purple mask emblem in the top title area.
- Step 4: Browse the web naturally within this specific window. While this session remains active, Firefox will safely hold all cookies, search inputs, and history indices in volatile random access memory (RAM). The moment you close out this window completely, that dynamic memory allocation is wiped clean, leaving zero traces behind on your system.
To further cross-reference the native navigation methodologies across alternative browsers or learn more about optimizing system architectures, you can review official web insights via the Mozilla Support Portal or find guidance on external engineering columns such as the UpbeatGeek Guide on Web Data Maintenance.
Data Preservation: The Risks of Data Bloat and Accidental Deletion
While understanding how to clear the history in firefox gives you control over your local privacy, it also uncovers an important reality about data security. Data deletion can be a double-edged sword.
When you delete files using standard browser operations, the system alters the database indices within the profile folder. If things go wrong, or if you accidentally format a drive while attempting to clear deep system caches, standard recovery methods within the browser will fail. This is exactly where advanced data recovery platforms prove essential.
Advanced Data Recovery via PandaOffice Drecov Data Recovery Software
When standard browser restore features fail, or manual cleanups purge vital files, you need specialized tools. Sector-level file restoration tools are required. PandaOffice Drecov data recovery software solves this problem. It deep-scans raw storage sectors easily. It locates unallocated file headers quickly. The tool carefully reconstructs deleted databases.
This is true for mechanical hard drives. It also applies to advanced solid-state drives (SSDs). Even external flash memory is supported. PandaOffice Drecov data recovery software bypasses operating system roadblocks. Finally, it safely extracts your critical records. Below is the step-by-step methodology to utilize this recovery program safely.
⚠ Warning: Install it on a drive different from the one where your data was lost to prevent overwriting.
The Complete Recovery Process
- Step 1: Double-click the desktop icon to launch the main program interface. Select the exact local drive volume where your browser data resided (usually the primary boot drive, C: Drive on Windows machines) and click the Scan button.

- Step 2: The tool will automatically initiate an immediate dual-layer scanning mechanism. It begins with a Rapid Scan phase to catch recent file changes, immediately followed by a sector-by-sector Deep Scan that searches for fragmented files hidden deep within the unallocated spaces of the storage device.

- Step 3: Once the scanning process completes, use the left-hand folder tree structure to navigate directly to your local file paths. For typical Firefox browser configurations, look for the following path structures to find your profiles:
- On Windows systems:
C:\Users\[YourUsername]\AppData\Roaming\Mozilla\Firefox\Profiles\
- On Windows systems:
- Step 4: Look inside these recovered profile folders for specific database files such as places.sqlite (which holds your complete history and bookmarks) or search for your lost local download files. Click the preview button on the file entries to inspect their structural integrity before finalized extraction.
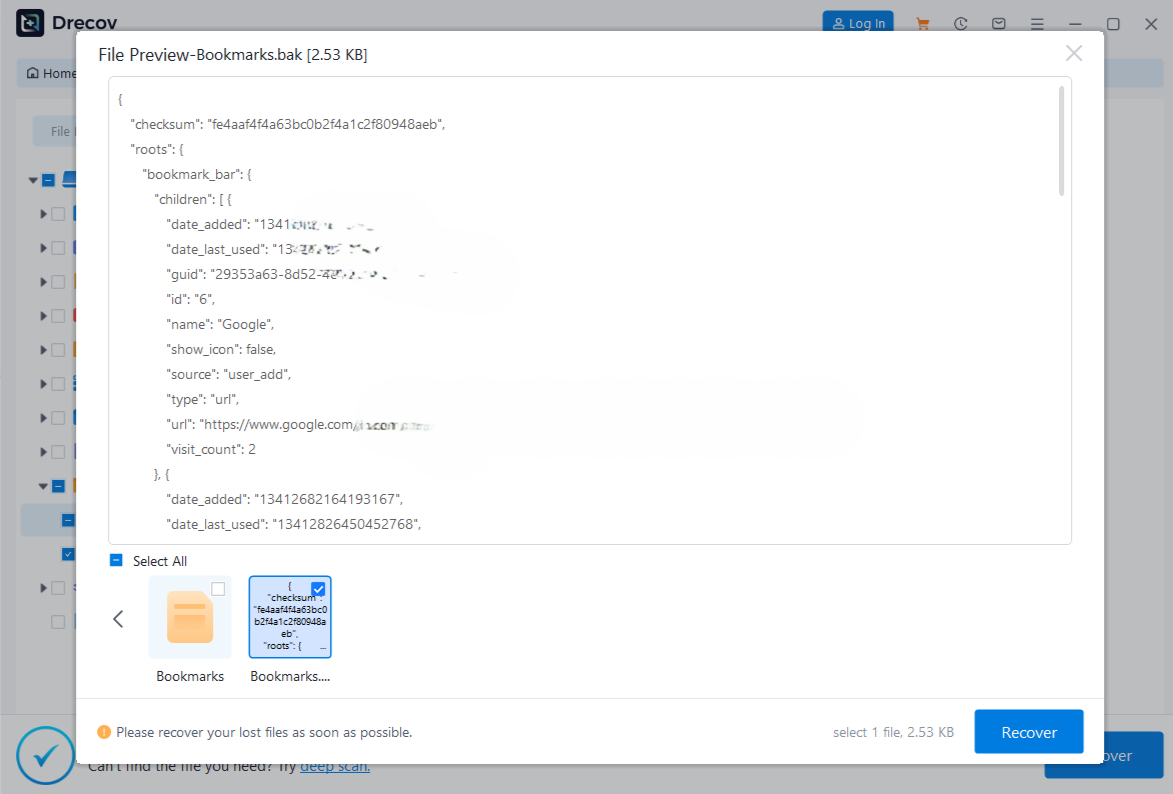
- Step 5: Click the checkboxes right next to the critical items you wish to salvage, and then click the prominent Recover button located at the bottom-right corner of the layout. Select a safe, completely separate storage destination (like an external USB drive) to save the restored files.
Internal Platform References
If you are currently managing data maintenance and security tasks across other hardware platforms or external storage drives in your workspace, review our specialized technical guides to ensure seamless operations:
- For users working with cloud-integrated operating systems, find our definitive tutorial on safety cleanups by following our guide on how to factory reset a Chromebook step-by-step.
- If you have accidentally lost important files while moving or clearing external portable storage drives, learn the proper extraction techniques by reading our complete guide to Micro SD card file recovery.
Comprehensive Structural Data Comparisons
To help you easily distinguish between standard local browser maintenance and deeper data storage adjustments, look over this detailed technical comparison table:
| Main Operational Objective | Primary File System Footprint | Reversibility via Standard Browser Controls | Recommended Recovery Action |
| Clear Browsing History | Modifies tables inside local places.sqlite files | Extremely low without structural data backups | Deploy PandaOffice Drecov data recovery software to extract older system file shadow copies |
| Purge Local Cache Data | Erases compressed file elements within the cache2/entries folder | Fully irreversible via native web browser channels | Execute sector scan if critical local source files were lost |
| Delete Saved Web Cookies | Clears individual text strings inside the cookies.sqlite container | Irreversible; requires re-authentication on live servers | Re-login to servers manually to generate fresh site tokens |
| Complete System Partition Format | Completely zeroes out partition file allocation tables across the drive | Entirely impossible to reverse through standard OS menus | Run deep sector scan instantly using advanced data recovery tools |
How to clear the history in firefox FAQs
Does learning how to clear the history in firefox also delete my saved passwords?
No, it does not do so by default. When you execute the shortcut or use the settings menu, passwords and saved login credentials are treated as a completely separate category called Active Logins or Saved Logins. Unless you explicitly check the specific box to delete logins, your saved passwords will remain securely encrypted inside your local login storage file.
Why does a website load slower the first time I open it after clearing my history?
This happens because you cleared your local cache. When the cache is filled, Firefox loads heavy static elements like banners, logos, and stylesheets directly from your local hard drive, which takes mere milliseconds. Once cleared, the browser is forced to download every single piece of asset code from the website’s remote server all over again. Sequential visits will speed up once the local cache is rebuilt.
Can I restore my browser history if I accidentally clicked “Clear Everything”?
Once you clear your history within the application, Firefox permanently overwrites those specific database slots within its working environment. Your best chance for recovery is to immediately close the browser to prevent any new data writes, and run a raw file restoration process using PandaOffice Drecov data recovery software to look for deleted shadow copies of your profile folder.
Conclusion
Mastering how to clear the history in firefox is a vital skill. It optimizes browser speed, fixes annoying bugs, and secures your digital privacy. You can use quick shortcuts, remove individual site logs, or automate cleanups upon exit. Firefox provides flexible built-in options to keep your digital space clean.
At the same time, maintaining a healthy browser ecosystem requires a smart approach to broader data security. If an accidental click or an over-aggressive cleanup ever purges critical files or research data, you are not out of options. Specialized tools like PandaOffice Drecov data recovery software bridge the gap between privacy maintenance and absolute data protection, ensuring your important information remains recoverable even when standard systems fail.






