


Managing digital storage effectively is a skill that saves time, reduces stress, and prevents system crashes. If you use Microsoft OneDrive, you likely appreciate how it bridges the gap between your local hardware and the cloud. however, the default settings are not always ideal for everyone. If your primary drive is nearly full, you must learn how to change OneDrive folder location to maintain a healthy system.
In this comprehensive guide, we will explore the nuances of changing OneDrive folder location and dive deep into data recovery strategies. Whether you are a casual user or a tech enthusiast, mastering the OneDrive change folder location process ensures your data remains accessible and safe.
Understanding OneDrive Folder Basics
What Is OneDrive and How It Works
If you’ve ever used Microsoft OneDrive, you already know it’s more than just a cloud storage tool—it’s like your digital backpack that follows you everywhere. Every file you store in OneDrive gets synced across your devices, meaning you can access your documents, photos, and videos from your laptop, phone, or even a web browser. It quietly runs in the background, syncing files in real time so you don’t have to worry about manually transferring anything.
Here’s the interesting part: OneDrive isn’t just “in the cloud.” It actually creates a local folder on your computer where files are stored and synced. Think of this as a bridge between your device and the cloud. Whenever you drop a file into that folder, it’s automatically uploaded. When you edit a file, it syncs those changes instantly. It feels seamless, almost invisible—until you start running out of space or want more control over where those files live.
Default OneDrive Folder Location Explained
By default, OneDrive installs its folder in your user directory—typically on your main system drive (usually the C: drive on Windows). The standard path is usually C:\Users\[YourUsername]\OneDrive. This is convenient for a quick setup, but it can quickly become a problem if your system drive has limited storage. Imagine installing a bunch of apps, saving high-resolution photos, and suddenly your computer slows down because the drive is nearly full.
The default location is chosen for simplicity, not flexibility. It assumes that your primary drive is the best place for everything, which isn’t always true. Many users have secondary drives, external storage, or SSD/HDD combinations that would work better for large cloud folders. Once you understand where OneDrive stores your files by default, you’re already halfway to mastering how to change location of OneDrive folder.
Why You Might Want to Change OneDrive Folder Location
Storage Space Optimization
Let’s be honest—storage space is one of those things you never think about until it becomes a problem. Suddenly your system starts lagging, updates fail, and you’re left wondering what’s eating up all your disk space. Often, OneDrive is a silent contributor because it syncs everything locally by default.
When you change OneDrive folder location to a secondary disk (like a D: or E: drive), you feel like you are opening a window in a stuffy room. You instantly free up space on your primary drive, allowing your operating system to breathe again. This is especially helpful if you’re using a smaller SSD for your OS while relying on a larger, high-capacity HDD for mass storage.
Performance and Organization Benefits
Beyond storage, performance is another big reason to consider changing OneDrive folder location. When your main drive is overloaded, your computer slows down because the OS struggles to manage temporary files and system caches. Moving large synced files to a secondary drive reduces the strain on your primary hardware.
There’s also the organizational aspect. Maybe you prefer keeping all your documents on a dedicated physical drive or want your work files separate from personal system data. Adjusting the folder location lets you structure your digital life in a way that makes sense to you. It’s a small change, but it makes a big difference in how you interact with your files every day.
Things to Know Before Moving OneDrive Folder
Sync Considerations
Before you jump into the technical steps, there’s one thing you need to understand: syncing logic. OneDrive is constantly communicating with the cloud. If you move the folder while the app is actively trying to upload a file, you might face file corruption or sync errors.
The key is to properly “Unlink” your account first. This ensures that OneDrive pauses syncing and doesn’t get confused when the folder location disappears from its original path. Think of it like moving houses; you wouldn’t start transporting furniture while people are still sleeping in the beds. You coordinate the move carefully to avoid chaos.
Backup and Data Safety Tips
Even though OneDrive is designed to protect your data, it’s always smart to have a backup before making structural changes. Technology is reliable—until it isn’t. A simple backup ensures that you won’t lose anything important if the move is interrupted by a power surge or a system crash.
I highly recommend copying your most critical files to a physical USB drive or a different cloud service before you change location of OneDrive folder. This “belt and braces” approach is the hallmark of a data recovery expert.
Step-by-Step Guide to Change OneDrive Folder Location (Windows)
If you are ready to proceed with the OneDrive change folder location process on Windows 10 or Windows 11, follow these steps precisely.
Step 1: Unlinking Your OneDrive Account
You must stop the synchronization process before moving any files.
- Look for the white or blue OneDrive cloud icon in your system tray (bottom right corner of the taskbar).
- Right-click the icon and select the Settings (gear icon).
- In the window that opens, navigate to the Account tab.
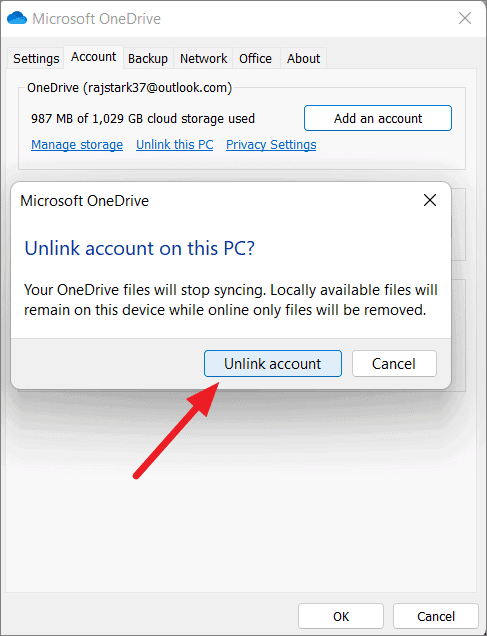
- Click the link that says Unlink this PC.
- Confirm by clicking Unlink account in the pop-up. Now, OneDrive will stop syncing, but your files remain on the hard drive.
Step 2: Moving the OneDrive Folder
Now that the app is disconnected, you can move the physical data.
- Open File Explorer ($Win + E$).
- Navigate to your current OneDrive folder (usually
C:\Users\[YourUsername]\). - Select the OneDrive folder, right-click it, and select Cut (or press $Ctrl + X$).
- Navigate to your new desired location (e.g.,
D:\Storage\). - Right-click in the new location and select Paste (or press $Ctrl + V$).
Warning: Ensure the destination drive has enough space to accommodate the entire folder. Do not interrupt the transfer.
Step 3: Reconnecting OneDrive to New Location
Now you must tell the app where the files have gone.
- Open the OneDrive app again from your Start menu.
- Sign in with your Microsoft account credentials.
- After signing in, you will see a screen titled “This is your OneDrive folder.” Do not click Next yet.
- Click the Change location link at the bottom left of the window.
- Browse to the new location where you pasted the folder in Step 2 and select it.
- When prompted that a OneDrive folder already exists in this location, click Use this folder.
- Complete the setup process. OneDrive will now verify the files and resume syncing from the new path.
Changing OneDrive Folder Location on Mac
Differences from Windows
Mac users follow a very similar logic, but the interface and file paths differ. On macOS, OneDrive usually resides in the /Users/[YourUsername]/ directory. The “Unlink” and “Relink” method remains the most stable way to change OneDrive folder location on Apple devices.
Step-by-Step Instructions for macOS
- Step 1: Click the OneDrive icon in the top Menu Bar and select Preferences.
- Step 2: Go to the Account tab and click Unlink this Mac.
- Step 3: Open Finder and locate your OneDrive folder.
- Step 4: Drag and drop (or move) the folder to your new location, such as an external SSD or a different partition.
- Step 5: Open the OneDrive app and sign back in.
- Step 6: On the “This is your OneDrive folder” screen, click Choose OneDrive folder location and point it to the new directory.
Alternative Method: Using Symbolic Links
What Are Symbolic Links
A symbolic link (or symlink) is an advanced file system feature. It acts as a transparent shortcut. To the Windows OS, it looks like the folder is in the original C: drive, but the data is physically stored on another drive.
When to Use This Method
You should use this method only if you are an advanced user and the standard “Unlink/Relink” method fails for a specific application dependency. It involves using the Command Prompt ($cmd$) and the mklink command. For most people, the standard method to change location of OneDrive folder is safer and easier to manage.
Advanced Data Recovery: Using PandaOffice Drecov
Sometimes, during the process of changing onedrive folder location, files can go missing due to accidental deletion, interrupted transfers, or drive errors. This is where professional-grade tools like PandaOffice Drecov become essential.
PandaOffice Drecov is a powerful data recovery solution designed to retrieve lost or deleted files from SSDs, HDDs, and even synced cloud directories. If you realize that some files didn’t make it to the new location, follow these steps to recover them.
⚠ Warning: Install it on a drive different from the one where your data was lost to prevent overwriting.
Step 1: Select the Source Drive
On the main screen, you will see a list of available drives. Select the drive where the OneDrive folder was originally located (usually the C: drive). Click the Scan button.
Key Point: Drecov uses deep-scan technology to find file fragments that the OS can no longer see.

Step 2: Filter and Preview Files
Once the scan is complete, use the search bar or the file-type filters (Photos, Documents, Videos) to find your missing OneDrive files. PandaOffice Drecov allows you to preview files before recovering them, ensuring you get the right version.

Step 3: Recover to a Safe Location
Select the files you wish to restore and click the Recover button.
Warning Prompt: Always save the recovered files to a different physical drive (like a USB stick or the new OneDrive location) to ensure data integrity.
Troubleshooting Common Issues
Sync Errors After Moving Folder
If you see a red “X” on your files after you change OneDrive folder location, it usually means the path permissions are incorrect. Ensure that your Windows user account has “Full Control” permissions over the new folder location. You can check this by right-clicking the folder > Properties > Security.
Missing Files or Duplicate Files
Sometimes OneDrive might start downloading files you already moved, creating duplicates. This happens if the “Relink” step wasn’t handled correctly. If this occurs, pause syncing, delete the duplicates manually, and ensure the local folder matches the cloud version exactly before resuming.
For more detailed recovery steps, check out these resources:
- How to recover deleted OneDrive folder data
- Comprehensive technical guide for OneDrive recovery
- Ultimate guide on OneDrive file restoration
- Recovering deleted files on OneDrive: A comprehensive guide
Best Practices for Managing OneDrive Storage
Using Files On-Demand
You don’t always need to change onedrive folder location if your only goal is saving space. The “Files On-Demand” feature allows you to see all your files in File Explorer without actually downloading them until you need them.
- Online-only: Does not take up space on your computer.
- Locally available: Downloads when you open the file.
- Always keep on this device: Stays on your hard drive for offline use.
Organizing Files Efficiently
A cluttered OneDrive is a slow OneDrive. Periodically audit your folders. If you have large archives that you rarely access, consider moving them to an external cold-storage drive and removing them from the sync list entirely. This keeps your active OneDrive folder lean and fast.
Pros and Cons of Changing OneDrive Location
Advantages
| Feature | Benefit |
| Disk Management | Keeps the system drive (C:) free for OS updates and software. |
| Data Isolation | Separates personal data from system files, making OS reinstallation easier. |
| Hardware Longevity | Spreads read/write cycles across multiple drives. |
Drawbacks
| Issue | Consideration |
| Manual Effort | Requires unlinking and re-syncing, which takes time. |
| External Risks | If moved to an external drive, OneDrive will error out if the drive is unplugged. |
| Sync Time | The initial re-indexing of a large folder can take several hours. |
Change Onedrive Folder Location FAQs
1. Can I change OneDrive folder location without unlinking?
Technically, you could try moving the files while the service is off, but it often leads to registry errors and sync conflicts. Unlinking is the official and safest method recommended by experts.
2. Will I lose files when changing the location?
No. Moving a folder is a local file operation. As long as you don’t delete the original folder before the move is confirmed, your data is safe. Using a tool like PandaOffice Drecov provides an extra safety net.
3. Can I move OneDrive to an external drive?
Yes, but the drive must be formatted as NTFS (for Windows) or APFS/HFS+ (for Mac). Also, the drive must be permanently connected; if you unplug it, OneDrive will stop working until it is reattached.
4. Does changing location affect sync speed?
Sync speed is mostly determined by your internet connection. However, moving the folder to a faster SSD can improve the speed at which OneDrive “indexes” or “checks” for changes in local files.
5. Is this process reversible?
Absolutely. You can follow the same steps to move the folder back to the C: drive or any other location at any time.
Conclusion
Mastering the ability to change OneDrive folder location is a vital skill for anyone looking to optimize their digital workspace. By following the structured steps—unlinking, moving, and reconnecting—you can ensure your files are stored exactly where you want them.
Furthermore, by understanding tools like PandaOffice Drecov, you add a layer of professional security to your data management routine. Whether you are freeing up space on an SSD or organizing a massive archive of work documents, the control is now in your hands. Remember to always backup your data before making major changes, and your OneDrive experience will be smoother than ever.


