


In the modern digital workspace, cloud integration is often seen as a blessing. However, when your system slows to a crawl or your privacy feels compromised, knowing how to stop OneDrive sync becomes a critical skill. Whether you are looking for a temporary reprieve or a permanent divorce from the cloud, this guide will walk you through every method available, including how to recover data if things go sideways.
What Is OneDrive Sync and Why It Happens
How OneDrive Sync Works
If you’ve ever noticed files uploading or downloading automatically on your computer, you’ve already experienced OneDrive sync in action. Essentially, OneDrive constantly mirrors your local files to the cloud so you can access them from any device. It sounds convenient—and it is—but that convenience comes with trade-offs. Every time you save, edit, or move a file inside your OneDrive folder, the system immediately starts syncing it online.
This process runs quietly in the background, often without you realizing how much bandwidth or system resources it’s using. According to Microsoft support documentation, OneDrive sync is designed to be continuous, ensuring your files are always up-to-date across devices. Think of it like a conveyor belt that never stops moving. Even if you’re not actively doing anything, it keeps working behind the scenes. And while that’s great for backup and accessibility, it can become frustrating when you want full control over your files.
Why It Runs Automatically
So why does OneDrive sync automatically in the first place? The short answer is: convenience and data protection. Microsoft built OneDrive to ensure your important files are always backed up and accessible, even if your device crashes or gets lost.
By default, OneDrive integrates deeply with Windows, syncing folders like Desktop, Documents, and Pictures automatically. This means your files are constantly uploaded without needing manual intervention. While this is helpful for beginners, advanced users often find it intrusive. The real issue? You don’t always get to decide when syncing happens. That’s why learning how to stop OneDrive sync becomes essential if you want better control over performance, storage, and privacy.
Why You Might Want to Stop OneDrive Sync
Performance Issues and Slowdowns
Let’s be honest—nothing is more annoying than a slow computer when you’re trying to get work done. OneDrive syncing can quietly consume CPU, disk usage, and internet bandwidth. In fact, reports have shown that continuous syncing can noticeably affect system performance, especially on lower-end devices.
Imagine trying to upload a large video file while also browsing the web or playing a game. Suddenly, everything feels sluggish. That’s OneDrive working overtime in the background. Pausing or stopping sync can instantly free up resources, making your system feel faster and more responsive. It’s like turning off a running engine when you don’t need it—simple, but effective.
Privacy and Storage Concerns
Not everyone is comfortable storing their files in the cloud. Some users prefer to keep sensitive data strictly local. Others worry about storage limits, especially if they’re using a free OneDrive plan with limited space.
There’s also the issue of unwanted uploads. You might accidentally sync personal files, large folders, or even system backups without realizing it. Over time, this can clutter your cloud storage and make file management confusing. When you turn off OneDrive sync, you give yourself back control. You decide what stays local and what goes online.
How to Pause OneDrive Sync Temporarily
Step-by-Step Guide for Windows
If you just want a quick break from syncing to save bandwidth for a video call or a download, pausing is the easiest solution.
- Step 1: Look for the OneDrive cloud icon in your Windows system tray (bottom right corner near the clock). If you don’t see it, click the upward arrow to show hidden icons.
- Step 2: Click the icon to open the activity center, then click the gear icon (Help & Settings).
- Step 3: From the menu that appears, hover over or click Pause syncing.
- Step 4: Choose a duration that fits your needs: 2 hours, 8 hours, or 24 hours.

Once selected, the icon will change to show a “pause” symbol, and all data transfers will cease immediately.
When to Use Pause Sync
Pausing is perfect when you need short-term relief. Maybe your internet is slow, or you’re uploading something important elsewhere. It’s also useful when troubleshooting issues like stuck uploads or syncing errors. Think of it like hitting the “pause” button on a video. Everything stops—but nothing is lost.
How to Stop Syncing Specific Files or Folders
Selective Sync Settings Explained
How do I stop OneDrive from syncing only specific items? Sometimes, you don’t want to stop everything—just certain heavy folders like “Pictures” or “Videos.” Selective sync lets you choose exactly what stays on your local drive and what lives only in the cloud.
- Step 1: Open OneDrive Settings from the cloud icon in the taskbar.
- Step 2: Go to the Account tab.
- Step 3: Click the Choose folders button.
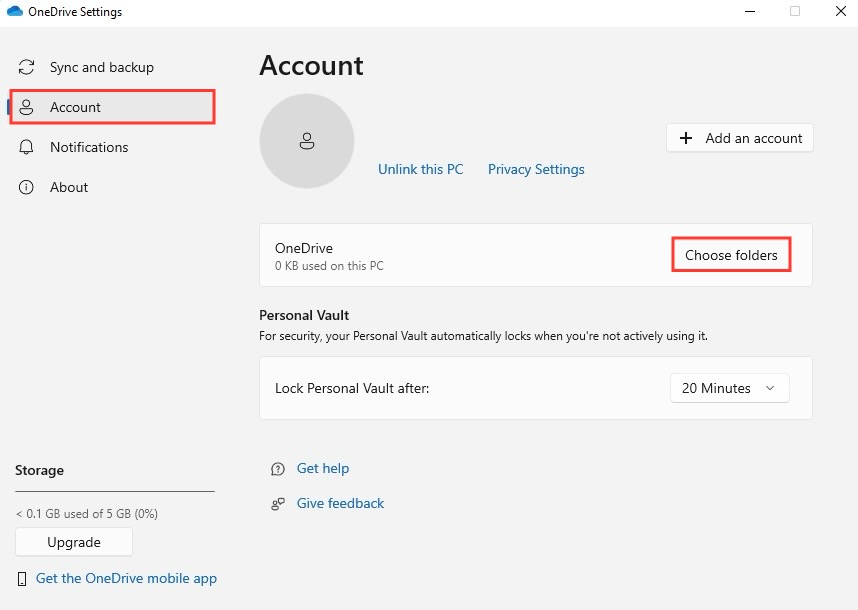
- Step 4: Uncheck any folders you do not want to sync to your local computer.
Pro Tip: Unchecking a folder here makes it “online-only.” It won’t take up space on your hard drive, but it remains accessible via the OneDrive website.
Managing Backup Folders
OneDrive often hijacks your Windows system folders. To regain control:
- Step 1: Open OneDrive Settings and navigate to the Sync and backup tab.
- Step 2: Click Manage backup.
- Step 3: Toggle the switches to Off for Desktop, Documents, or Pictures.
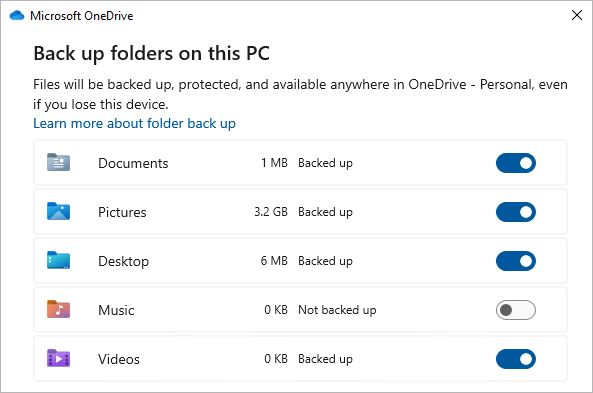
- Step 4: Confirm your choice. Note that your files may appear to “disappear” from your desktop; they are actually moved to a “OneDrive” folder and must be moved back manually.
How to Stop OneDrive Sync Completely
Unlink Your PC or Mac
If you want to know how to stop OneDrive sync permanently without deleting the app, unlinking your account is the gold standard.
- Step 1: Click the OneDrive icon and select the gear icon (Settings).
- Step 2: Navigate to the Account tab on the left sidebar.
- Step 3: Click the blue link that says Unlink this PC.
- Step 4: A confirmation box will appear; click Unlink account to finalize the process.
What Happens After Unlinking
Once unlinked, your files remain on your computer and in the cloud—but they no longer sync. It’s like cutting the connection between two devices. You can still access your files online anytime via OneDrive.com, but changes made locally won’t update the cloud, and vice versa. This is the safest way to “quit” the service without losing data.
How to Quit OneDrive to Stop Sync Instantly
Quick Exit Method
If you need an immediate stop because the app is hogging resources:
- Step 1: Click the OneDrive icon in the taskbar.
- Step 2: Click the gear icon.
- Step 3: Select Quit OneDrive.
- Step 4: Confirm by clicking Close OneDrive in the pop-up window.
This stops all syncing activity instantly. However, it’s temporary—restarting your computer or the app will resume syncing unless you change the startup settings.
How to Disable OneDrive Startup
Prevent OneDrive from Launching Automatically
To ensure OneDrive doesn’t start up every time you turn on your PC:
- Step 1: Right-click the Start button and select Task Manager (or press
Ctrl + Shift + Esc). - Step 2: Click the Startup apps tab (icon looks like a speedometer).
- Step 3: Find Microsoft OneDrive in the list.
- Step 4: Right-click it and select Disable.
Now, OneDrive will only run if you manually click the application icon.
How to Uninstall OneDrive
When You Should Remove It Completely
If you have decided that you never want to use the service again, you can turn off OneDrive sync for good by removing the application.
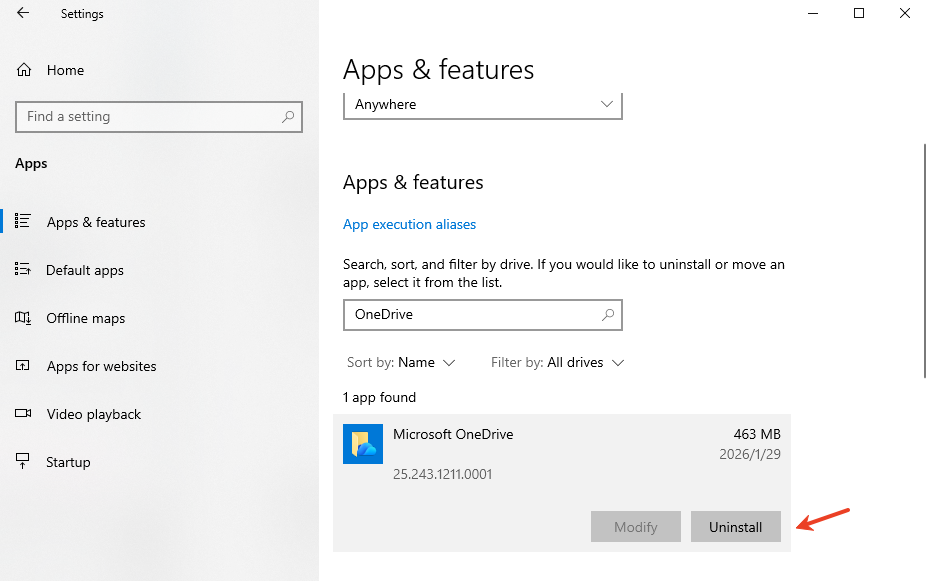
- Step 1: Press the Windows Key + I to open Settings.
- Step 2: Go to Apps > Installed apps.
- Step 3: Scroll down to find Microsoft OneDrive.
- Step 4: Click the three dots (…) and select Uninstall.
Data Recovery: Using PandaOffice Drecov
Sometimes, when users try to turn off OneDrive sync or manage their folders, files can accidentally be deleted or “lost” during the transition. If you find that your files vanished after unlinking or moving folders, do not panic. PandaOffice Drecov is a professional-grade data recovery tool designed to retrieve lost local data with ease.
Install it on a drive other than the one where you lost the data to prevent overwriting.
How to Recover Lost Files with PandaOffice Drecov
- Step 1: Select the Location. Launch the software. You will see a list of drives and specific locations. Select the folder where your OneDrive files were previously stored (usually
C:\Users\[Username]\OneDrive).

- Step 2: Scan for Deleted Data. Click the Scan button. The tool will perform a Quick Scan followed by a Deep Scan to locate fragments of files that were deleted during the sync-stopping process.

- Step 3: Preview and Filter. Once the scan is complete, use the filter sidebar to find specific file types (like .docx or .jpg). You can double-click files to preview them before recovery to ensure they aren’t corrupted.

- Step 4: Recover to a Safe Spot. Check the boxes next to the files you need and click Recover. Choose a destination on an external hard drive or a different partition to save your restored data.
Warning: Never save recovered files back to the same partition they were lost from. This can lead to permanent data corruption.
After you have secured your data, you might want to explore further optimizations:
- Learn how to fix “Save As” stuck on OneDrive
- Full guide to uninstalling OneDrive on Mac or Windows
- The right way to delete OneDrive without losing work
- Updated 2026 guide for Windows 11 OneDrive removal
Comparison Table of All Methods
| Method | Difficulty | Permanent | Best For |
| Pause Sync | Very Easy | No | Temporary bandwidth relief |
| Selective Sync | Easy | Partial | Keeping cloud files off your PC |
| Unlink Account | Medium | Yes | Stopping sync while keeping the app |
| Quit App | Very Easy | No | Immediate CPU/RAM relief |
| Disable Startup | Medium | Yes | Preventing auto-launch |
| Uninstall | Medium | Yes | Complete removal |
Common Problems and Fixes
OneDrive Keeps Syncing After Pause
If you notice that how to stop OneDrive sync didn’t stick, it’s likely because the timer expired. Pausing is only a temporary solution. If you need a permanent stop, you must either unlink the account or disable the startup in Task Manager.
Files Reappear or Resync
This often happens if you have multiple devices signed into the same account. If you delete a file on PC A while PC B is still syncing, OneDrive might think the file is “missing” and re-download it. Ensure you turn off OneDrive sync on all devices if you want to manage files purely locally.
Best Practices Before Stopping Sync
Before you click that unlink button, follow these safety steps:
- Check Sync Status: Ensure the cloud icon shows “Up to date.” If it’s still “Processing,” you might lose the latest changes to your documents.
- Manual Backup: Copy your most important folders to an external USB drive.
- Check Online: Log into OneDrive via your browser to confirm that your cloud-only files are actually there.
Stop Onedrive Sync FAQs
1. Does stopping OneDrive sync delete my files?
No, stopping the sync simply breaks the connection. Your files stay where they are—some on your PC, and some in the cloud. However, if you haven’t downloaded “online-only” files, you won’t be able to open them without an internet connection.
2. Can I stop syncing only one folder?
Yes, use the Selective Sync feature. By unchecking a folder in the “Choose Folders” menu, you stop it from syncing to your current device.
3. Is it safe to uninstall OneDrive?
It is safe as long as you have confirmed that your files are either stored locally or backed up elsewhere. Windows 10 and 11 will function perfectly fine without it.
4. Why does OneDrive keep turning back on?
Microsoft often re-enables OneDrive during major Windows updates. If it reappears, you may need to go back into Task Manager and disable it in the Startup tab again.
5. What is the fastest way to stop syncing?
Right-click the icon and select Quit OneDrive. It takes less than five seconds and stops all network activity immediately.
Conclusion
Mastering how to stop OneDrive sync is essential for any Windows user who values system performance and data sovereignty. Whether you choose to turn off OneDrive sync for a few hours or uninstall the service entirely, the power lies in your hands. Remember to always verify your backups before making major changes, and if a file goes missing, tools like PandaOffice Drecov are there to bridge the gap between loss and recovery.


