


Introduction to Installing Windows 10 on a New Hard Drive
Why You Might Need to Install Windows 10 on a New Hard Drive
Upgrading to a new hard drive is a common scenario for improving storage, speed, or system reliability. Installing Windows 10 on a fresh drive ensures a clean start, free from previous system errors, malware, or software clutter.
Keywords in context: Users often search for phrases like how to install windows 10 on a new hard drive or how to reinstall windows 10 on new hard drive when preparing for upgrades or replacing old disks.
A new hard drive offers several advantages:
- Faster read/write performance, especially with SSDs
- Increased storage capacity
- Elimination of old system clutter and potential corruption
⚠️ Warning: Before beginning, ensure all critical files are backed up. Installing Windows will erase all data on the drive.
Understanding the Types of Hard Drives
New users may choose between traditional HDDs or SSDs. HDDs offer higher storage at lower cost, whereas SSDs provide significant speed benefits, reducing boot and load times.
Modern motherboards typically support both SATA and NVMe drives. Understanding your system’s compatibility is crucial before starting installation.
Common Reasons for Installing Windows on a New Hard Drive
Upgrading Storage or Performance
Upgrading to a new hard drive is often prompted by performance issues with an existing drive. Users notice slow boot times, long application loading, or insufficient space for applications and files.
A fresh installation of Windows 10 on a new hard drive maximizes performance and reliability. Users also frequently search for how to install windows 10 new hard drive to ensure they follow best practices.
Replacing a Failed or Corrupt Hard Drive
Hard drives fail due to age, physical damage, or software corruption. Installing Windows on a replacement drive restores full system functionality.
⚠️ Warning: Avoid connecting the failing drive to your system after replacement to prevent accidental data overwriting or further corruption.
Starting Fresh After Malware or System Errors
A clean installation on a new hard drive removes malware and resolves persistent system errors. This method ensures that no residual problems affect the new system.
Preparing for Windows 10 Installation
Required Tools and Equipment
Before installing Windows 10 to a new hard drive, gather:
- Windows 10 ISO file or bootable USB drive
- Compatible screwdriver for hardware installation
- Internet connection for updates and drivers
- External storage for backups (optional but recommended)
Creating a Bootable USB Drive
- Download the official Windows 10 ISO.
- Use a tool like Rufus or the Media Creation Tool to make a bootable USB.
- Ensure the USB has at least 8GB of storage.
⚠️ Warning: The USB drive will be formatted during this process; backup any important data.
Method 1: Installing Windows 10 on a New Hard Drive Using BIOS Boot
Test Environment
- PC: Custom build, Intel i7 processor
- Storage: 1TB SSD
- File Types: System installation only
- Loss Scenario: Brand-new hard drive, no existing OS
Steps to Install Windows 10
- Insert the bootable USB into the PC.
- Enter BIOS/UEFI by pressing F2 or Delete during startup.
- Set USB as the first boot device.
- Save and exit BIOS.
- Windows setup will launch automatically.
- Follow prompts to select language, region, and edition.
- Choose Custom Installation and select the new hard drive.
- Click Next to begin installation.
- After installation, configure user accounts and preferences.
This method ensures a clean installation without interference from previous systems.
Method 2: Using a Windows 10 ISO for Installation
Test Environment
- PC: Laptop, Windows 10 compatible
- Storage: 512GB SSD
- File Types: Full OS installation
- Loss Scenario: New SSD, no existing OS
Steps to Install Windows 10
- Mount the ISO on a separate PC to create a bootable USB.
- Connect the USB to the target PC.
- Boot from the USB drive via BIOS settings.
- Select Install Windows 10 on setup screen.
- Delete existing partitions if present and format the new drive.
- Proceed with installation and configuration.
⚠️ Warning: Deleting partitions will remove all previous data on the target drive.
Method 3: Reinstalling Windows 10 Using Media Creation Tool
Test Environment
- PC: Desktop, Windows 10 Pro license
- Storage: New 2TB HDD
- File Types: Operating system and drivers
- Loss Scenario: Replacement hard drive, previous OS corrupted
Steps to Reinstall Windows 10
- Download Media Creation Tool from Microsoft.
- Run the tool and select Create installation media for another PC.
- Choose USB flash drive as installation media.
- Connect USB to the PC and boot from it.
- Follow the prompts to install Windows 10 on the new hard drive.
- Complete configuration after installation.
This method is ideal when performing how to reinstall windows 10 new hard drive scenarios.
Method 4: Installing Windows 10 with PandaOffice Drecov to Recover Important Data
Test Environment
- PC: Custom build, Intel i9, 1TB NVMe SSD
- File Types: Complete system image backup
- Loss Scenario: Upgrade to new SSD while retaining data from old drive
PandaOffice Drecov can create a system image from an existing installation and restore it to a new hard drive. This allows installation without losing personalized settings and applications.
Steps to Install
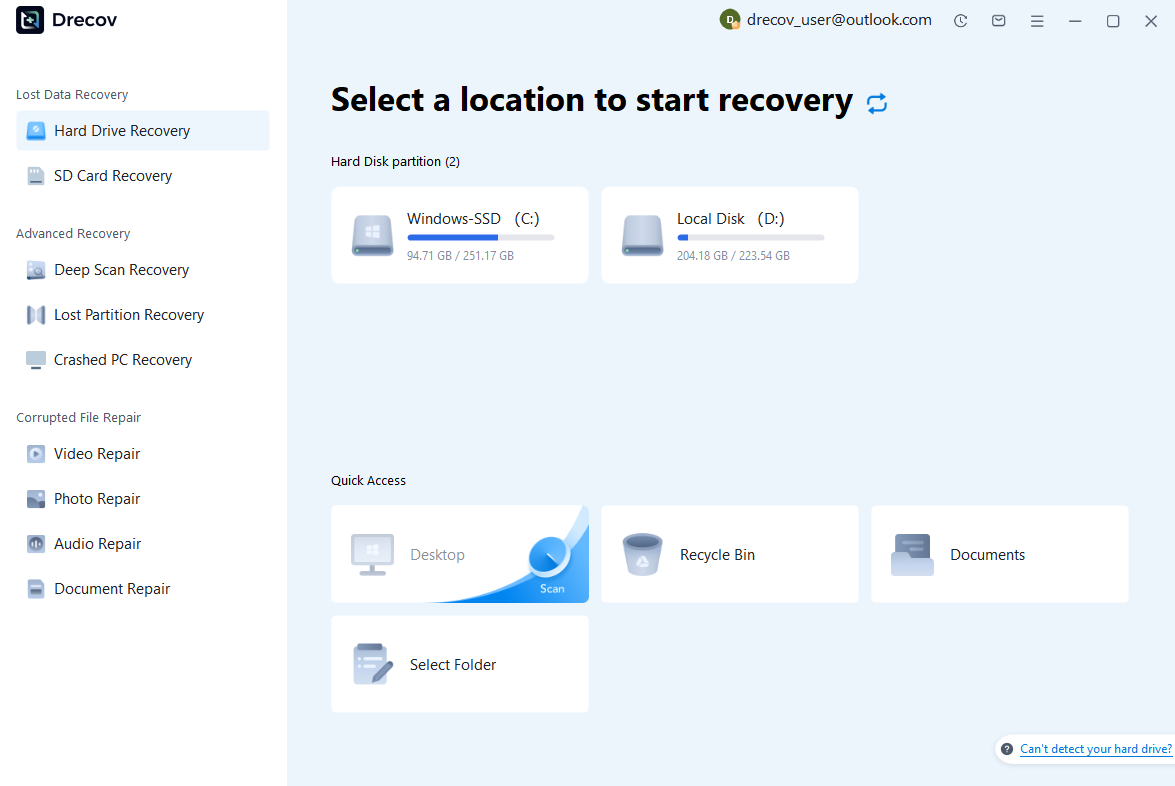
Step 1: Scan the Storage Device (SD Card / Hard Drive / USB)
Connect your device (SD card, HDD/SSD, or USB drive) to your computer and launch PandaOffice Drecov. Select the target device and start the scan. The software will perform a quick scan and deep scan to detect lost or deleted data.
Step 2: Locate and Preview Lost Files
After scanning, browse the detected files and use the preview feature to check recoverable data. You can preview documents (Word, Excel, PDF), photos, and videos to ensure file integrity before recovery.
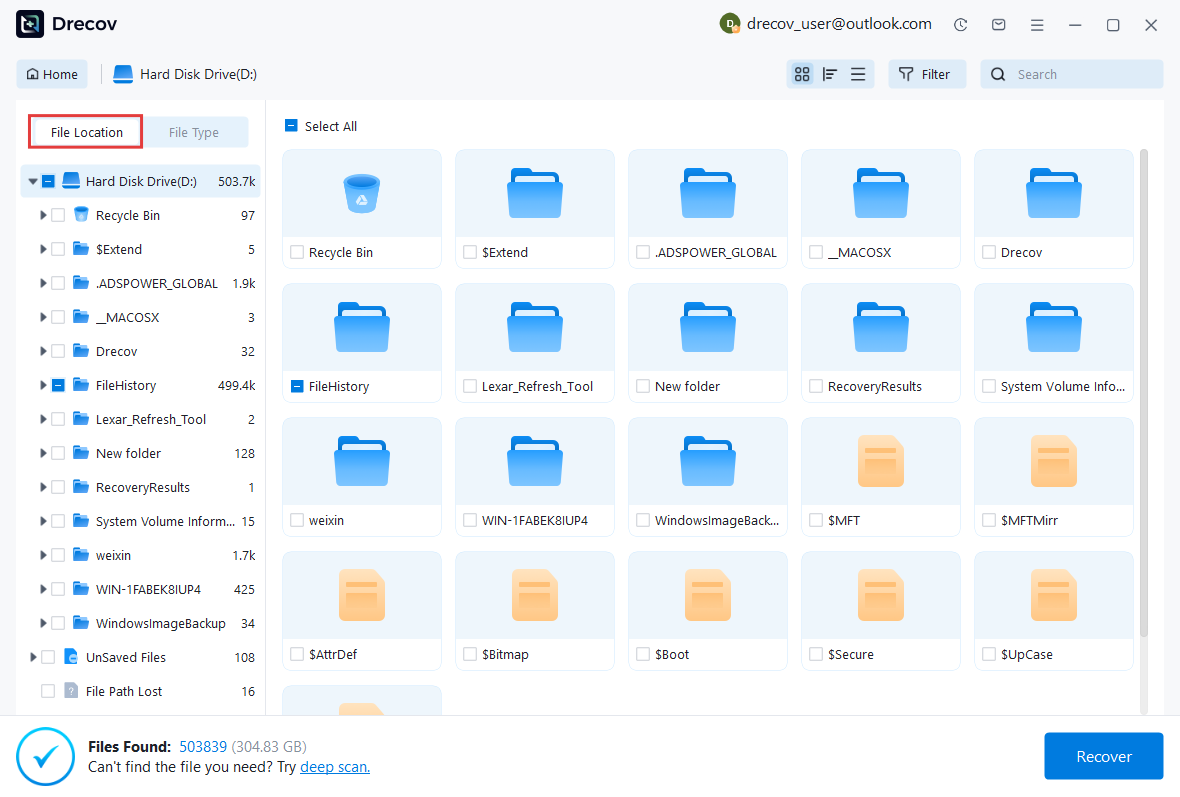
Step 3: Recover and Save to a New Location
Select the files you want to restore and click recover. Save all recovered data to a different drive or location (not the original device) to avoid overwriting lost data.

Why Choose PandaOffice Drecov Recovery Software?
PandaOffice Drecov offers a fast, secure, and user-friendly solution for recovering lost files across multiple scenarios. Whether you need email recovery, ZIP File Recovery, format data recovery, or help to recover deleted drafts Outlook, the software provides reliable recovery performance for both personal and business users.
PandaOffice Drecov supports recovery from formatted hard drives, SSDs, USB drives, SD cards, and external storage devices. Its advanced scanning engine can locate deleted archives, damaged ZIP files, lost Outlook drafts, and accidentally removed documents with high accuracy. For users searching for how to find deleted messages in Teams, PandaOffice Drecov can also help recover exported chat files, attachments, and related local cache data when available.
Key advantages include:
- Deep scan technology for complex data loss situations
- Support for emails, archives, videos, photos, and office documents
- Recovery from accidental deletion, formatting, corruption, and system crashes
- Easy preview before restoring files
- Compatible with Windows and multiple storage devices
Unlike complicated enterprise recovery tools, PandaOffice Drecov keeps the recovery process simple. Users can scan, preview, and restore files in just a few steps without technical expertise.
Whether you are dealing with lost Outlook drafts, corrupted ZIP archives, formatted drives, or missing communication data, PandaOffice Drecov provides an efficient and practical recovery experience designed to minimize downtime and protect important files.
UEFI and GPT Configuration for Modern Windows Systems
Understanding UEFI vs Legacy BIOS
After completing Windows installation on a new storage device, the next critical step is ensuring the system is running in the correct firmware mode. Modern computers use UEFI (Unified Extensible Firmware Interface) instead of legacy BIOS.
UEFI provides several advantages for systems where users perform tasks like install windows 10 to new hard drive:
- Faster boot performance
- Support for large-capacity drives
- Improved security through Secure Boot
- Better compatibility with GPT partition style
GPT (GUID Partition Table) replaces the older MBR system and allows more flexible partition structures.
Configuring UEFI Properly
- Enter BIOS/UEFI settings during startup
- Switch boot mode from Legacy to UEFI
- Enable Secure Boot if supported
- Ensure system disk is formatted as GPT
- Save settings and restart
⚠️ Warning: Changing partition style incorrectly may prevent Windows from booting.
Optimizing Disk Structure on a New Hard Drive Setup
Single Drive vs Multi-Drive Architecture
Once Windows is installed, users often optimize storage layout depending on usage needs. A common configuration is:
- SSD for system installation
- HDD for personal files and backups
This structure improves performance and organization, especially for users searching how to install windows on a new hard drive in workstation environments.
Best Partition Strategy
Recommended partition layout:
- C Drive: Windows system files
- D Drive: Applications and games
- E Drive: Documents, media, backups
Benefits include:
- Faster system response
- Easier file management
- Reduced risk of system corruption affecting personal data
Boot Performance Optimization Techniques
Adjusting Boot Priority Order
Correct boot order ensures faster startup and avoids conflicts:
- Enter BIOS/UEFI settings
- Locate Boot Priority section
- Set primary drive (Windows SSD) as first option
- Disable unused boot devices if necessary
This is especially important after performing how to install windows 10 on a new hard drive setups involving multiple disks.
Reducing Startup Load
Windows often loads unnecessary applications during startup, which slows down boot speed.
Steps to optimize:
- Open Task Manager
- Navigate to Startup tab
- Disable non-essential applications
- Restart system
⚠️ Warning: Do not disable drivers or security-related services.
Driver Management and Hardware Stability
Installing Essential Drivers
After a fresh Windows installation on a new hard drive, missing drivers may cause hardware instability.
Critical drivers include:
- Chipset drivers
- Graphics drivers
- Audio drivers
- Network drivers
Proper driver installation ensures system compatibility and stability.
Updating Firmware and Device Software
Hardware manufacturers frequently release updates that improve performance and fix bugs.
Recommended updates:
- Motherboard BIOS updates
- SSD firmware updates
- GPU driver updates
These updates are essential for users completing how to reinstall windows 10 on a new hard drive scenarios.
System Security and Update Management
Windows Update Optimization
Keeping Windows updated ensures long-term system stability:
- Open Settings
- Navigate to Windows Update
- Install all critical updates
- Restart system regularly
Windows updates also improve compatibility with new hardware and software.
Security Configuration After Installation
Key security settings:
- Enable Windows Defender real-time protection
- Activate firewall rules
- Turn on SmartScreen filtering
- Use secure login methods (PIN or password)
These steps help protect newly installed systems from threats.
Performance Tuning After Installing Windows 10
SSD Performance Optimization
For systems installed on SSDs:
- Enable TRIM support
- Avoid unnecessary defragmentation
- Keep at least 10–20% free space
- Move large files to secondary storage
These steps improve long-term SSD performance and lifespan.
Memory and Virtual Memory Adjustment
Optimizing system memory improves responsiveness:
- Open System Properties
- Go to Performance Settings
- Adjust virtual memory manually if needed
- Assign paging file to faster drive when possible
This is particularly useful for users working with how to install windows to a new hard drive in performance-critical environments.
System Maintenance and Long-Term Stability
Regular Disk Health Monitoring
After installation, maintaining drive health is essential:
- Use built-in Windows tools like CHKDSK
- Monitor SMART status for disk health
- Check for bad sectors periodically
Early detection prevents future data loss or system failure.
Storage Cleanup and Optimization
Recommended maintenance tasks:
- Remove temporary files regularly
- Use Storage Sense for automation
- Clear system cache periodically
- Organize files into structured directories
Backup Strategy for Installed Systems
Creating Reliable Backup Plans
Even after a fresh installation, backups are essential:
- Create system restore points regularly
- Use external drives for full system images
- Store critical files in cloud services
These precautions ensure recovery options if issues arise after how to install windows 10 in a new hard drive setups.
Preventing Future System Failures
Best practices include:
- Avoid installing unnecessary software
- Keep drivers updated
- Monitor system performance
- Maintain sufficient free disk space
Final Optimization Summary
After installing Windows 10 on a new hard drive, system performance and stability depend heavily on post-installation configuration. Key areas include:
- Proper UEFI and GPT setup
- Optimized disk partitioning
- Controlled startup programs
- Updated drivers and firmware
- Regular system maintenance
- Strong backup strategy
When these steps are followed, users achieve a fast, stable, and reliable Windows environment suitable for both personal and professional use.


