


Understanding Hard Drive Erasure and Data Security
What Does It Mean to Erase a Hard Drive?
Erasing a hard drive involves permanently removing data so that it cannot be accessed or recovered later. Many users assume deleting files or formatting a drive completely removes information, but in reality, data often remains stored on the disk until it is overwritten.
This is why secure drive wiping has become increasingly important. Whether you plan to sell a computer, donate an old device, recycle storage hardware, or retire company equipment, simply deleting files may leave sensitive information exposed.
Modern drive eraser software uses specialized overwrite techniques that replace existing data with random values or predefined patterns. This process significantly reduces the likelihood of successful recovery.
A properly erased drive helps protect:
- Personal documents
- Financial records
- Business files
- Customer information
- Password databases
- Photos and videos
Understanding how secure erasure works is the first step toward protecting your privacy and preventing unauthorized access to old data.
Why Simple Deletion Is Not Enough
When a file is deleted, Windows usually removes only its directory reference. The actual file contents often remain intact on the storage device.
As a result, recovery tools may restore:
- Deleted documents
- Photos
- Videos
- Emails
- Databases
Even after emptying the Recycle Bin, substantial portions of the data may remain recoverable.
Secure wiping tools solve this problem by actively overwriting storage sectors rather than simply marking them as available.
When You Should Use Drive Eraser Software
There are many situations where secure erasure is recommended:
- Selling a used computer
- Donating hardware
- Replacing storage devices
- Returning leased equipment
- Removing confidential information
- Preparing business systems for disposal
In these situations, hard drive eraser software provides a much higher level of protection than traditional file deletion methods.
Why Permanent Drive Wiping Matters
Risks of Leaving Recoverable Data on a Drive
Improperly erased drives can expose sensitive information long after ownership changes.
Potential risks include:
- Identity theft
- Financial fraud
- Privacy violations
- Corporate data leaks
- Regulatory compliance issues
A discarded drive may still contain years of personal or professional information that could be recovered with readily available tools.
For businesses, data breaches resulting from improperly disposed hardware can be extremely costly.
Situations That Require Secure Erasure
Permanent data destruction is particularly important in the following scenarios:
- Employee laptop replacement
- Company asset retirement
- Device recycling programs
- Server decommissioning
- Computer resale
In each case, protecting stored information should be a top priority.
Users should also consider secure erasure before reinstalling operating systems on devices that previously contained confidential files.
Choosing the Right Data Destruction Method
Different situations require different erasure strategies.
Common options include:
- Formatting
- Secure overwrite utilities
- Manufacturer Secure Erase commands
- DiskPart cleaning
- Physical destruction
The most appropriate method depends on:
- Storage type
- Security requirements
- Time constraints
- Device condition
⚠️ Warning: Once secure erasure begins, recovering data may become impossible. Verify backups before proceeding.
How to Erase a Hard Drive Safely and Permanently
Method 1: Format the Hard Drive Before Disposal
Formatting removes file system structures and prepares the drive for future use.
Although formatting alone may not provide maximum security, it is often the first step in a drive-cleaning process.
Steps
- Connect the target drive.
- Open File Explorer.
- Right-click the drive.
- Select Format.
- Choose the desired file system.
- Confirm the operation.
Users may choose between quick and full formatting options.
Test Environment
- Windows 11 Pro
- 1TB SATA HDD
- NTFS File System
- Local Administrator Account
This method is suitable when preparing drives for reuse but should be combined with additional wiping methods for sensitive information.
Method 2: Use Built-In Windows Reset and Drive Cleaning
Windows provides a built-in reset feature capable of removing files and reinstalling the operating system.
Recent versions include drive-cleaning options that improve data removal effectiveness.
Steps
- Open Settings.
- Select System.
- Choose Recovery.
- Click Reset This PC.
- Select Remove Everything.
- Enable drive-cleaning options.
- Confirm and start the process.
Test Environment
- Windows 11 Home
- 512GB SSD
- UEFI System
- TPM Enabled
This method is useful when preparing a computer for transfer to another owner.
Method 3: Wipe a Drive with Dedicated Hard Drive Eraser Software
Dedicated wiping applications provide stronger protection than standard formatting.
Many users consider these tools the best hard drive eraser software because they support advanced overwrite methods and complete drive sanitization.
Common capabilities include:
- Multi-pass overwriting
- Scheduled wiping
- Entire-drive erasure
- Free-space cleaning
- Verification reports
Steps
- Install a trusted wiping utility.
- Select the target drive.
- Choose an overwrite standard.
- Confirm the operation.
- Allow the wiping process to finish.
- Review verification results.
Test Environment
- Windows 10 Pro
- 2TB HDD
- GPT Partition Layout
- Mixed User Data
These tools are often preferred when maximum privacy protection is required.
⚠️ Warning: Full-drive wiping can take several hours on high-capacity storage devices.
Method 4: Use DiskPart to Clean a Drive
DiskPart is a built-in Windows command-line utility that allows users to manage disks, partitions, and volumes. It can also be used to remove partition information and prepare a drive for reuse.
While DiskPart is not a full replacement for dedicated eraser hard drive software, it remains a useful option for users who prefer built-in tools.
Steps
- Press Windows + X.
- Open Command Prompt or Windows Terminal as Administrator.
- Type:
diskpart
- Display available drives:
list disk
- Select the target drive:
select disk X
- Remove partition information:
clean
- Exit DiskPart.
The command removes existing partition structures, making the drive appear unallocated.
Test Environment
- Windows 11 Pro
- 1TB SATA HDD
- GPT Disk
- Administrator Account
DiskPart is particularly useful when preparing drives for repartitioning or operating system installation.
Method 5: Recover Important Files with PandaOffice Drecov Before Erasing
Before permanently erasing any storage device, users should confirm that no important files remain on the drive. Once secure wiping procedures are completed, data recovery may no longer be possible.
PandaOffice Drecov can help identify deleted, hidden, or recoverable files before drive sanitization begins. This step helps prevent accidental destruction of valuable information.
Steps
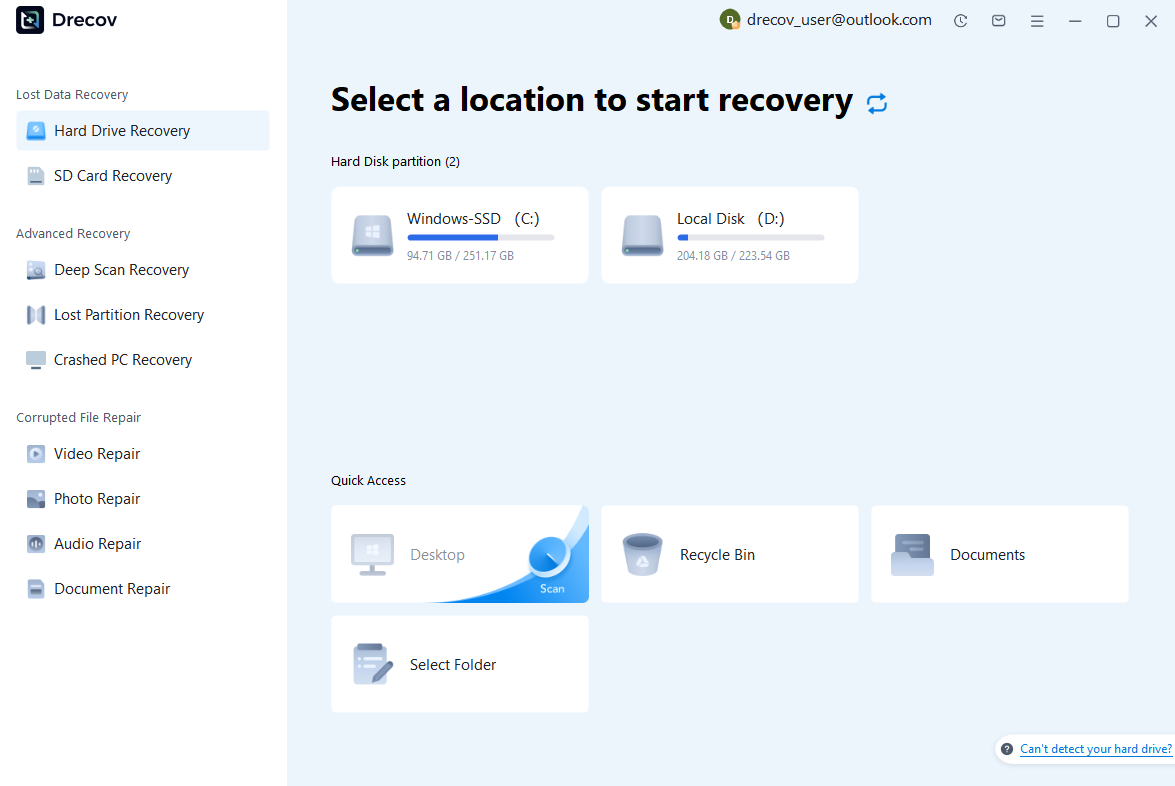
Step 1: Connect the Drive / USB)
Connect your device (SD card, HDD/SSD, or USB drive) to your computer and launch PandaOffice Drecov. Select the target device and start the scan. The software will perform a quick scan and deep scan to detect lost or deleted data.
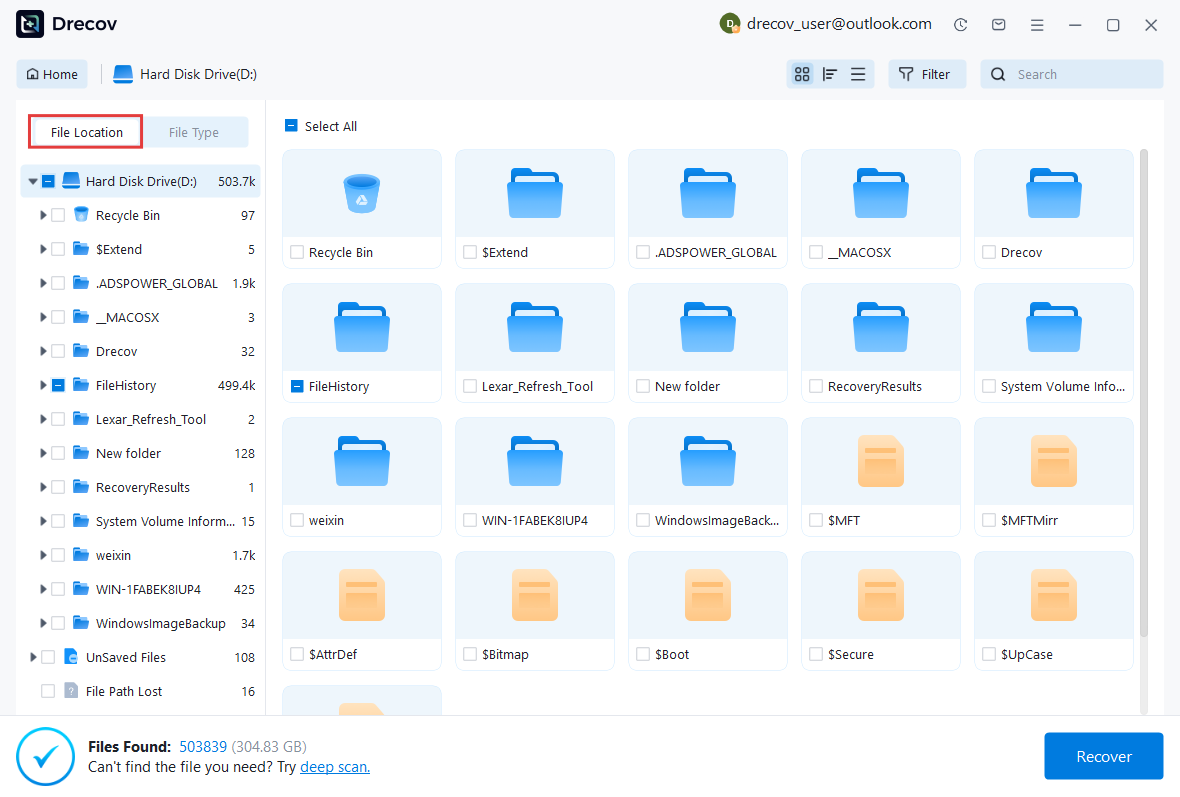
Step 2: Locate and Preview Lost Files
After scanning, browse the detected files and use the preview feature to check recoverable data. You can preview documents (Word, Excel, PDF), photos, and videos to ensure file integrity before recovery.
Step 3: Recover and Save to a New Location
Select the files you want to restore and click recover. Save all recovered data to a different drive or location (not the original device) to avoid overwriting lost data.

Why Choose PandaOffice Drecov Recovery Software?
PandaOffice Drecov offers a fast, secure, and user-friendly solution for recovering lost files across multiple scenarios. Whether you need email recovery, ZIP File Recovery, format data recovery, or help to recover deleted drafts Outlook, the software provides reliable recovery performance for both personal and business users.
PandaOffice Drecov supports recovery from formatted hard drives, SSDs, USB drives, SD cards, and external storage devices. Its advanced scanning engine can locate deleted archives, damaged ZIP files, lost Outlook drafts, and accidentally removed documents with high accuracy. For users searching for how to find deleted messages in Teams, PandaOffice Drecov can also help recover exported chat files, attachments, and related local cache data when available.
After recovery, test the file again. If the audio stream was damaged because of storage issues, a recovered version may play normally.
This method is particularly useful when only a few files exhibit audio problems while VLC works correctly with all other media.
This method can help users recover files from floppy disk storage after accidental deletion, formatting, or logical corruption.
Common recoverable data includes:
- Photos
- Videos
- Office documents
- Email files
- Archives
- Audio files
Test Environment
- Windows 11 Pro
- 1TB NVMe SSD
- NTFS File System
- Mixed Personal Data
This precaution is especially important before using hard drive eraser software or physically destroying storage devices.
Method 6: Use Secure Erase Tools for SSDs
Solid-state drives operate differently from traditional hard drives. Because SSDs use wear-leveling technology, standard overwrite techniques may not always affect every storage cell as expected.
For this reason, many SSD manufacturers provide dedicated Secure Erase utilities.
Benefits include:
- Faster erasure
- Better SSD compatibility
- Factory-reset style cleaning
- Reduced recovery potential
Steps
- Identify the SSD manufacturer.
- Download the manufacturer’s management utility.
- Locate the Secure Erase feature.
- Follow on-screen instructions.
- Restart the system if required.
- Confirm drive status afterward.
Test Environment
- Windows 11 Home
- 1TB NVMe SSD
- Manufacturer SSD Utility
- UEFI Firmware
Many experts consider Secure Erase the preferred SSD sanitization method because it works directly with drive firmware.
Method 7: Physically Destroy the Drive for Maximum Security
When dealing with highly sensitive information, physical destruction remains the most definitive data disposal method.
Organizations often physically destroy drives containing:
- Financial records
- Government data
- Legal documents
- Medical information
- Proprietary business files
Common destruction methods include:
- Industrial shredding
- Crushing
- Degaussing (for magnetic drives)
- Drilling through platters
Steps
- Verify all required backups exist.
- Disconnect the drive.
- Remove the device safely.
- Apply an approved destruction method.
- Dispose of components according to local regulations.
Test Environment
- Enterprise HDD
- SATA Storage Devices
- End-of-Life Hardware
- Data Disposal Process
Physical destruction is generally used when organizations require the highest possible level of security.
⚠️ Warning: A physically destroyed drive cannot be restored. Verify backups carefully before proceeding.
Best Practices for Hard Drive Erasure
Verify Important Data Before Wiping
One of the most common mistakes users make is erasing drives before checking whether important information remains stored on them.
Before using drive eraser software, consider:
- Reviewing personal folders
- Checking cloud synchronization status
- Verifying backups
- Exporting browser data
- Saving license keys
Taking a few minutes to verify files can prevent permanent data loss.
Businesses should also document backup procedures before beginning large-scale hardware retirement projects.
Understand HDD and SSD Differences
Traditional hard drives and solid-state drives require different approaches to secure deletion.
For HDDs:
- Overwriting is highly effective.
- Multi-pass wiping may be used.
- Data resides on magnetic platters.
For SSDs:
- Wear-leveling affects overwrite behavior.
- Secure Erase commands are preferred.
- TRIM influences recoverability.
Understanding these differences helps users choose the most appropriate sanitization strategy.
Confirm Erasure Results
Verification is a critical step after drive wiping.
Recommended verification methods include:
- Running recovery scans
- Checking partition status
- Reviewing software logs
- Confirming drive initialization
Successful verification helps ensure sensitive data is no longer accessible.
Organizations frequently require verification reports for compliance and auditing purposes.
⚠️ Warning: Never assume a drive has been securely erased without validating the results.
Frequently Asked Questions
Can Data Be Recovered After a Drive Is Erased?
The answer depends on how the drive was erased.
If files were only deleted or a quick format was performed, recovery may still be possible using specialized tools.
However, after secure overwriting, Secure Erase procedures, or physical destruction, recovery becomes significantly more difficult and often impossible.
Recovery likelihood depends on:
- Erasure method
- Storage technology
- Drive condition
- Amount of overwritten data
What Is the Best Hard Drive Eraser Software?
The best hard drive eraser software depends on individual requirements.
Important evaluation factors include:
- Security standards
- Ease of use
- Verification features
- Drive compatibility
- SSD support
- Reporting capabilities
Users should select a solution that matches both their security requirements and technical experience level.
Is Disk Eraser Software Free Available?
Yes. Several disk eraser software free options are available for personal and professional use.
Free solutions often provide:
- Basic overwrite functions
- File deletion tools
- Free-space wiping
- Partition removal
However, advanced features such as compliance reporting or enterprise management may require commercial software.
Should SSDs Be Erased Differently?
Yes.
Because SSDs use flash memory technology, standard overwriting may not always interact with storage cells in the same way it does on hard drives.
Most manufacturers recommend:
- Secure Erase utilities
- Firmware-based sanitization
- Drive management software
These approaches generally provide more reliable SSD cleanup results.
How Long Does Secure Drive Erasure Take?
The duration depends on:
- Drive capacity
- Storage type
- Overwrite method
- System performance
Examples:
- Small SSDs may take minutes.
- Large HDDs may require several hours.
- Multi-pass wiping can significantly increase completion times.
Users should plan accordingly when preparing devices for disposal or transfer.
Final Thoughts
Selecting the Best Erasure Method for Your Drive
Securely erasing a storage device is one of the most important steps in protecting personal and business information. Simply deleting files or formatting a drive often leaves recoverable data behind, creating unnecessary privacy and security risks.
In this guide, we explored several methods for wiping storage devices, including Windows reset features, DiskPart cleaning, dedicated drive eraser software, SSD Secure Erase utilities, and physical destruction techniques. Each approach offers different levels of security depending on the storage technology and intended use of the device.
Before initiating any erasure process, users should verify that valuable files have been backed up or recovered. Using PandaOffice Drecov to identify and restore important files before sanitization can help prevent accidental data loss.
Whether you’re searching for hard drive eraser software, evaluating disk eraser software free solutions, or looking for the best hard drive eraser software for secure disposal, choosing the right method is essential. By combining proper verification, appropriate wiping techniques, and responsible device management, users can confidently protect sensitive information and ensure storage devices are safely prepared for reuse, resale, or retirement.


