


In the world of modern computing, the desktop is your digital sanctuary. For many users, a cluttered screen filled with icons leads to a cluttered mind. Among the most persistent icons is the Recycle Bin, a staple of the Windows operating system since its earliest iterations. While this icon serves a vital purpose, you might find yourself wondering how to get rid of recycle bin on desktop to achieve that sleek, minimalist aesthetic.
Whether you are a professional designer seeking a distraction-free environment or a casual user who prefers using search functions over desktop shortcuts, removing this icon is a common customization. In this comprehensive guide, we will explore every method to hide this icon, explain what happens to your data afterward, and delve into professional data recovery solutions like PandaOffice Drecov should you accidentally lose files in the process.
Understanding the Role of the Recycle Bin
What the Recycle Bin Actually Does in Windows
The Recycle Bin is one of the most recognizable icons on a Windows desktop. It works like a safety net for deleted files. Instead of removing files immediately from your computer’s hard drive, Windows moves them into a protected system folder known as the Recycle Bin so you can restore them later if needed. This simple system prevents accidental data loss and gives users a second chance before files are permanently erased from the storage media.
Think of the Recycle Bin as a digital trash can in your office. When you throw something away, it doesn’t disappear instantly; it stays in the bin until the janitor empties it. Windows uses the same concept. According to official Microsoft Windows , deleted files remain in the Recycle Bin until the allocated storage limit is reached or the user empties it manually.
Because the Recycle Bin plays such an important role in file management, Microsoft places its icon on the desktop by default. This makes it easy to access and manage deleted files quickly. Still, not everyone likes having it there. Some users prefer a clean, minimal desktop with fewer icons and distractions.
Why Some Users Want to Remove It From the Desktop
Many people want a minimalist desktop workspace. Just like a tidy physical desk improves focus, a clutter-free computer desktop can make it easier to work. Research suggests that a significant percentage of Windows users customize or remove default desktop icons to improve productivity and aesthetics.
There are several reasons users decide how to get rid of recycle bin on desktop:
- Aesthetics: They prefer a clean desktop layout without system icons.
- Efficiency: They use keyboard shortcuts (like
Shift + Delete) or File Explorer instead. - Privacy: They want to hide the list of recently deleted items on shared computers.
- Accident Prevention: They want to avoid accidentally opening or emptying it during daily tasks.
Another reason is visual simplicity. If you work with many applications or files, extra icons can make your desktop feel chaotic. Learning how to get rid of recycle bin on desktop is a quick way to simplify your workspace without affecting how Windows actually handles deleted files.
Is It Safe to Remove the Recycle Bin Icon?
What Happens When You Hide the Recycle Bin
A common misconception is that removing the Recycle Bin from the desktop disables it completely. That’s not true. When you remove the icon, you’re only hiding the shortcut, not deleting the feature itself.
Windows continues to send deleted files to the Recycle Bin in the background. You just won’t see the icon on your desktop anymore. This is similar to removing an app shortcut from your phone’s home screen. The app still exists—it’s simply out of sight.
Here’s what still happens when you delete files after hiding the icon:
- Files still go to the hidden Recycle Bin folder.
- You can still restore deleted files via File Explorer.
- The system still manages deleted storage normally based on your settings.
- The background process remains fully functional.
In other words, removing the icon does not impact system performance, storage management, or the technical ability to perform file recovery.
Can You Restore the Recycle Bin Later?
Yes, restoring it is extremely easy. If you decide later that you want the icon back, Windows allows you to re-enable it in just a few seconds through the Desktop Icon Settings menu. This flexibility is one of the reasons many users feel comfortable hiding it. You’re not making a permanent change; you’re simply adjusting how the desktop looks. Windows keeps all the functionality intact so you can restore the icon whenever you want.
Quickest Way to Remove the Recycle Bin From Desktop
Using Desktop Icon Settings
The easiest and safest way to address how to get rid of recycle bin on desktop is through Desktop Icon Settings. This option is built directly into Windows 10 and Windows 11 and requires no advanced technical knowledge.
Instead of modifying system files or editing the registry, you simply uncheck a box in the settings panel. This instantly hides the icon from your desktop while leaving the system feature untouched. Windows links desktop system icons—like This PC, Network, Control Panel, and Recycle Bin—to theme settings.
Step-by-Step Instructions
Follow these steps to remove the Recycle Bin icon:
- Step 1: Press Windows + I on your keyboard to open the Settings menu.
- Step 2: Click on Personalization in the sidebar or main menu.
- Step 3: Select Themes from the list of options.
- Step 4: Scroll down (or look at the right sidebar) and click Desktop icon settings.
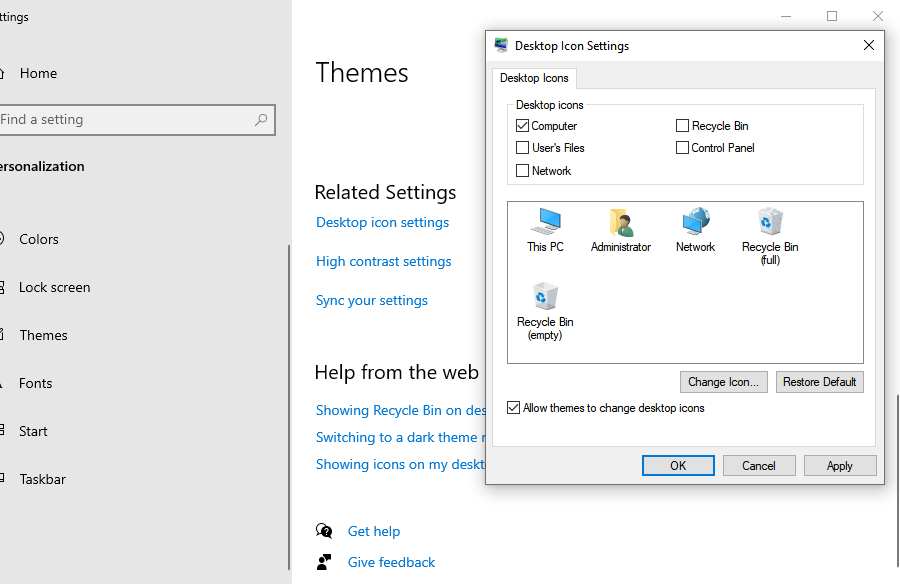
- Step 5: In the pop-up window, uncheck the box next to Recycle Bin.
- Step 6: Click Apply and then OK to save your changes.
Once you complete these steps, the Recycle Bin icon disappears immediately from your desktop. No restart is required, and you can always reverse the change later by following the same path.
Remove Recycle Bin Using Windows Personalization Settings
Accessing the Themes Menu
Another way to remove the Recycle Bin icon is through the Personalization menu, which controls the visual appearance of Windows. This section lets you adjust wallpapers, colors, themes, fonts, and desktop icons. When you open Personalization settings, you’ll find a tab called Themes. This section includes the link to Desktop Icon Settings. Although it looks like a simple visual preference, it actually controls whether system icons appear on your desktop.
This design allows Windows to maintain consistent icon visibility even when switching themes. If you change themes later, your desktop icon preferences will remain the same. This is often where people ask, “where is the recycle bin” if it disappears after a theme update; usually, it’s just a toggle in this menu.
Unchecking the Recycle Bin Option
Inside the Desktop Icon Settings window, you’ll see several system icons listed with checkboxes. These usually include:
| System Icon | Purpose |
| This PC | Access drives, devices, and hardware. |
| User’s Files | Quick access to your personal folders. |
| Network | View and manage network devices. |
| Control Panel | Traditional system settings. |
| Recycle Bin | Storage for deleted files. |
Simply remove the checkmark next to Recycle Bin, then apply the changes. The icon disappears instantly. This method is recommended for most users because it is quick, safe, and easily reversible.
Removing the Recycle Bin Using Group Policy Editor
When to Use Group Policy
The Group Policy Editor method is usually used in business or professional environments. It allows administrators to enforce system settings across multiple computers in a domain. For example, an IT department might remove the Recycle Bin icon from employee desktops to maintain a standardized interface. This approach is available on Windows Pro, Enterprise, and Education editions.
Step-by-Step Group Policy Method
If you have the appropriate Windows version, follow these steps:
- Step 1: Press Windows + R, type
gpedit.msc, and hit Enter. - Step 2: Navigate to User Configuration > Administrative Templates > Desktop.
- Step 3: In the right pane, find the setting named Remove Recycle Bin icon from desktop.
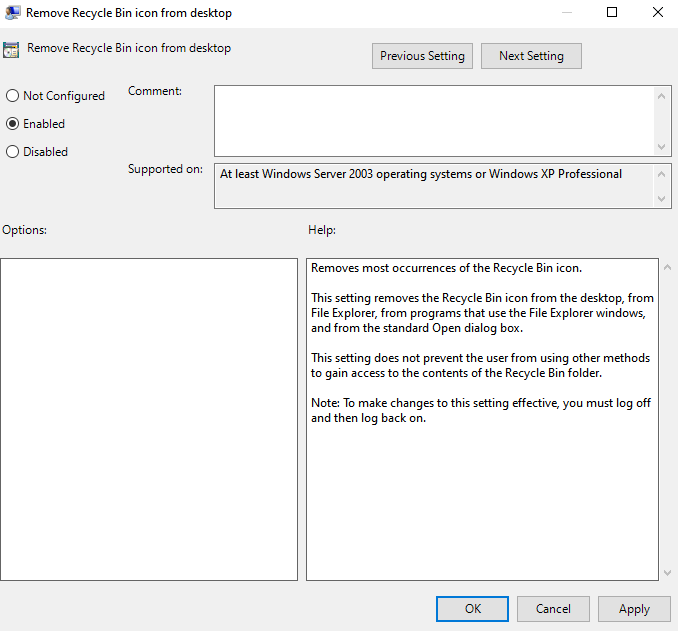
- Step 4: Double-click it and set the policy to Enabled.
- Step 5: Click Apply and restart your computer (or refresh the desktop).
Once applied, the Recycle Bin icon disappears and cannot be re-enabled by normal users through the Settings menu until the policy is changed back to “Not Configured” or “Disabled.”
Removing Recycle Bin Using Registry Editor
Understanding Windows Registry Changes
The Windows Registry is a database that stores low-level configuration settings for the OS and applications. Advanced users sometimes modify it to control features not easily accessible through the normal interface. Editing the registry allows you to hide the Recycle Bin icon by modifying specific system values.
Warning: This method should be used carefully. Incorrect changes in the registry can cause system instability. Always back up the registry before making modifications.
Registry Method Explained
The registry method involves locating the Recycle Bin GUID, which identifies the icon in Windows.
- Step 1: Press Windows + R, type
regedit, and press Enter. - Step 2: Navigate to:
HKEY_LOCAL_MACHINE\SOFTWARE\Microsoft\Windows\CurrentVersion\Explorer\Desktop\NameSpace. - Step 3: Locate the key named
{645FF040-5081-101B-9F08-00AA002F954E}. - Step 4: Right-click the key and select Delete.
- Step 5: Restart your computer to apply the changes.
After restarting, the Recycle Bin icon disappears from the desktop. If you ever need to bring it back using this method, you would need to recreate the registry key, which is why the Settings method is generally preferred.
PowerShell Method to Hide the Recycle Bin
Running Commands Safely
PowerShell is a powerful command-line tool that allows users to automate tasks. Advanced users can hide the Recycle Bin by running a registry command through PowerShell.
- Step 1: Right-click the Start button and select Windows PowerShell (Admin).
- Step 2: To hide the icon, enter a command that modifies the
HideDesktopIconsregistry value. - Step 3: Restart Windows Explorer via Task Manager to see the change.
PowerShell is especially useful for IT professionals who need to manage multiple computers at once or for users who prefer scripts over clicking through menus.
What Happens to Deleted Files After Removing the Icon
How Windows Handles Deleted Files
Removing the desktop icon does not change how Windows deletes files. Files continue to be stored in the Recycle Bin until the system clears space. Windows automatically deletes older files when the bin reaches its storage limit, ensuring that the system does not waste disk space.
You can still restore files from the Recycle Bin as long as they haven’t been permanently deleted (emptied). If you realize you’ve lost something important and the bin was emptied, that’s when you’ll need specialized recovery tools.
How to Access the Recycle Bin After Removing It
How Find Recycle Bin and Access It via File Explorer
Many users ask, “how find recycle bin” once the icon is gone? Even if the icon is hidden, you can still open the Recycle Bin easily using these methods:
- Start Menu Search: Press the Windows key and type “Recycle Bin.” It will appear in the search results.
- File Explorer Address Bar: Open any folder, click the small arrow in the address bar, and select Recycle Bin from the dropdown.
- Run Command: Press Windows + R and type
shell:RecycleBinFolder.
Many power users rely on search instead of desktop icons because it’s faster and keeps the desktop clean.
Restoring the Recycle Bin Icon
Bringing It Back to Your Desktop
If you ever change your mind, restoring the Recycle Bin is simple and follows the reverse of the removal process.
- Step 1: Open Settings (Windows + I).
- Step 2: Go to Personalization > Themes.
- Step 3: Open Desktop Icon Settings.
- Step 4: Check the box for Recycle Bin.
- Step 5: Click Apply.
The icon will instantly reappear on your desktop exactly where it was before.
Tips for Keeping a Clean Desktop
Organizing Files Efficiently
Learning how to get rid of recycle bin on desktop is just one step toward a cleaner workspace. Consider these additional tips:
- Use folders: Group related files together instead of letting them sit individually on the desktop.
- Pin apps to the taskbar: Keep your most-used programs just a click away without needing desktop shortcuts.
- Hide all icons: Right-click the desktop, select View, and uncheck Show desktop icons for an instantly blank slate.
- Use search: Get into the habit of using the Windows key to find files and apps instantly.
Think of your desktop as your digital desk. The fewer items scattered across it, the easier it is to stay focused.
Common Mistakes Users Make When Removing the Recycle Bin
Misunderstanding Icon vs Feature
One of the most common misunderstandings is believing that removing the icon deletes the feature. It doesn’t. Another mistake is trying to delete the Recycle Bin icon like a normal file. Windows protects system icons, so they cannot be removed via the “Delete” key.
Instead, they must be hidden using the Desktop Icon Settings, Group Policy, or Registry methods discussed earlier. Understanding this difference prevents unnecessary troubleshooting and anxiety about lost data.
Professional Data Recovery: Using PandaOffice Drecov
Sometimes, in the process of cleaning up your desktop or managing your files, you might accidentally empty the Recycle Bin or use Shift + Delete on a file you actually needed. When a file is permanently deleted from Windows, it isn’t gone immediately; the space it occupied is simply marked as “available.”
This is where PandaOffice Drecov comes in. It is a professional-grade data recovery tool designed to retrieve lost, formatted, or deleted files with a high success rate.
⚠ Warning: Install it on a drive different from the one where your data was lost to prevent overwriting.
How to Recover Files with PandaOffice Drecov
If you have accidentally emptied your bin while trying to figure out how to get rid of recycle bin on desktop, follow these steps to get your data back:
- Step 1: Select Location. Launch the software. You will see a list of drives. Select the drive where your Recycle Bin was located (usually the C: drive) or select the “Recycle Bin” option directly if available in the interface.

- Step 2: Scan for Data. Click the Scan button. PandaOffice Drecov will perform a Quick Scan followed by a Deep Scan to locate every recoverable fragment of your deleted files.

- Step 3: Preview and Filter. Once the scan completes, use the filter sidebar to look for specific file types (e.g., .jpg, .docx). You can click on files to preview them and ensure they are intact.

- Step 4: Recover. Select the files you want to save and click Recover.
Warning: Always save recovered files to an external drive or a different partition to ensure the recovery process is successful.
More Data Recovery Insights
Managing your desktop is about more than just aesthetics; it’s about data integrity. If you’ve hidden your icon and then realized you accidentally emptied it, don’t panic. There are specialized workflows for these specific scenarios.
For more detailed information on managing your deleted data, check out these helpful resources:
- How to Restore Recycle Bin After Emptying It
- How to Recover Files Deleted from the Recycle Bin
- Windows 10 & 11: How to Remove the Recycle Bin from Desktop
FAQs
1. Can I permanently delete the Recycle Bin in Windows?
No. Windows does not allow users to permanently delete the Recycle Bin feature because it is a core system function. You can only hide the desktop icon.
2. Does removing the Recycle Bin icon affect deleted files?
No. Files you delete will still go to the Recycle Bin and can still be restored unless you manually empty it or the system reaches its storage limit.
3. How do I open the Recycle Bin after removing the icon?
You can search for Recycle Bin in the Start menu or access it through the File Explorer address bar.
4. Is it possible to remove all desktop icons at once?
Yes. Right-click the desktop, go to View, and uncheck Show desktop icons. This hides every icon, including the Recycle Bin, for a completely clean look.
5. Can I automatically delete files without using the Recycle Bin?
Yes. You can right-click the Recycle Bin, go to Properties, and select “Don’t move files to the Recycle Bin.” Alternatively, you can use the Shift + Delete shortcut to bypass the bin entirely.
Conclusion
Getting rid of the Recycle Bin on your desktop is surprisingly simple. Whether you want a minimalist workspace, fewer distractions, or better privacy on a shared computer, Windows provides multiple ways to hide the icon.
The easiest method is through Desktop Icon Settings, which lets you remove the icon in seconds without affecting the system. Advanced users can also use Group Policy, Registry Editor, or PowerShell for more granular control. The key thing to remember is that removing the icon does not remove the feature itself. Deleted files will still go to the Recycle Bin and can still be restored if needed.
With just a few clicks, you can create a cleaner desktop while keeping all the safety benefits of the Recycle Bin. If things go wrong and you lose data permanently, professional tools like PandaOffice Drecov are always available to help you recover what’s lost.


