


Cloud storage is a double-edged sword. While Microsoft OneDrive offers seamless synchronization across devices, many users find it intrusive, resource-heavy, or simply unnecessary for their specific workflow. However, the process to remove OneDrive is often fraught with anxiety. Will my files disappear? Where did my Desktop folder go?
If you have ever asked yourself, “How do I remove OneDrive without losing my life’s work?” you are in the right place. This comprehensive guide explores the nuances of unlinking, disabling, and uninstalling OneDrive, while prioritizing the safety of your data through advanced recovery techniques and professional tools like PandaOffice Drecov.
Understanding the OneDrive Ecosystem Before You Act
Before we dive into the “how-to,” we must understand the “why.” OneDrive isn’t just a folder; it is a service deeply integrated into Windows 11 and 10. When you decide to remove OneDrive, you aren’t just deleting an app; you are changing how your file system handles your local “User” folders (Documents, Pictures, and Desktop).
Why Users Choose to Remove OneDrive
- Storage Limits: The free 5GB tier fills up quickly, leading to constant “Storage Full” notifications.
- Privacy Concerns: Some users prefer keeping sensitive data strictly on local hardware.
- System Performance: OneDrive’s background syncing can consume significant CPU and bandwidth.
- File Conflicts: Versioning errors can sometimes lead to duplicated or corrupted files.
How to Remove OneDrive: A Multi-Tiered Approach
Depending on your technical comfort level and your ultimate goal, there are several ways to approach this. We will start with the safest methods and move toward permanent removal.
Method 1: Unlinking Your PC (The Safest Start)
If you want to stop the syncing process but keep the application installed for future use, “Unlinking” is the best path. This effectively signs you out and stops the communication between your hard drive and the cloud.
- Step 1: Locate the OneDrive icon (the little blue or white cloud) in your system tray near the clock.
- Step 2: Right-click the icon and select the Settings (gear icon).
- Step 3: Navigate to the Account tab.
- Step 4: Click the link that says Unlink this PC.
- Step 5: Confirm your choice in the pop-up window.
Warning: Once unlinked, files that were “Online-only” will vanish from your local File Explorer. They still exist at OneDrive.com, but they are no longer on your disk.
Method 2: How Do I Remove OneDrive via Windows Settings?
For those who want the application gone entirely, the standard Windows uninstallation process is the most straightforward route.
- Step 1: Press the Windows Key + I to open Settings.
- Step 2: Go to Apps > Installed Apps (or “Apps & features” on Windows 10).
- Step 3: Scroll down or use the search bar to find Microsoft OneDrive.
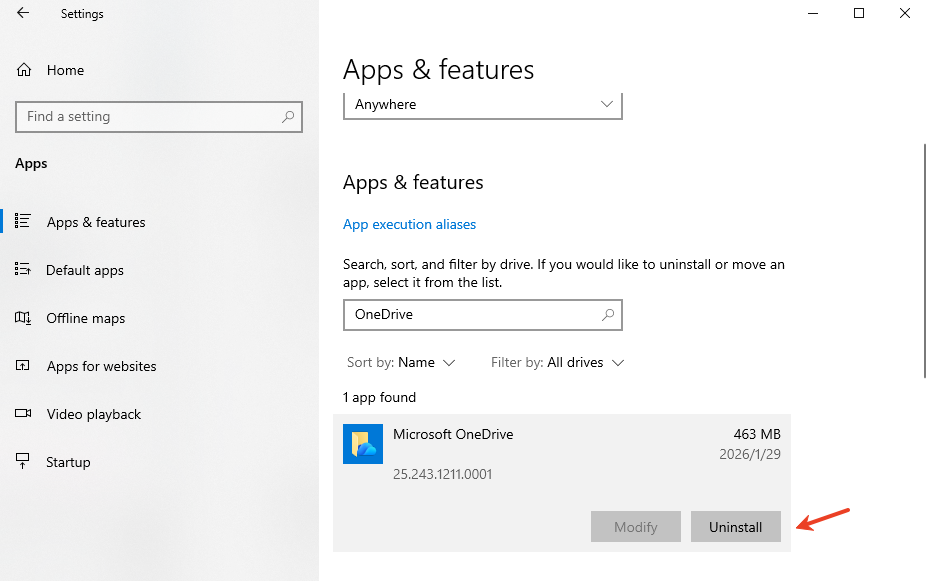
- Step 4: Click the three dots (or the app name) and select Uninstall.
- Step 5: Follow the prompts to complete the removal.
The Hidden Danger: Data Loss During Removal
When you remove OneDrive, Windows often reverts your file paths. If OneDrive was “protecting” your Desktop, removing it might leave your Desktop empty. This is where most users panic. They assume their files are deleted. In reality, they are often tucked away in a cached folder or remained in the cloud but didn’t download before the software was wiped.
Recovering Lost Files with PandaOffice Drecov
If you uninstalled the software and realized your “Documents” folder is now empty, you need a professional-grade recovery solution. PandaOffice Drecov is designed specifically for these high-stress scenarios. It can scan the deep sectors of your hard drive to find the local cached copies of files that OneDrive might have “cleaned up” during the uninstallation process.
Why Use PandaOffice Drecov?
- Deep Scan Technology: It goes beyond simple recycle bin recovery.
- File Preview: You can see your photos and documents before committing to the recovery.
- High Success Rate: It handles NTFS, FAT32, and exFAT file systems with ease.
⚠ Warning: Install it on a drive different from the one where your data was lost to prevent overwriting.
Step-by-Step Recovery with PandaOffice Drecov
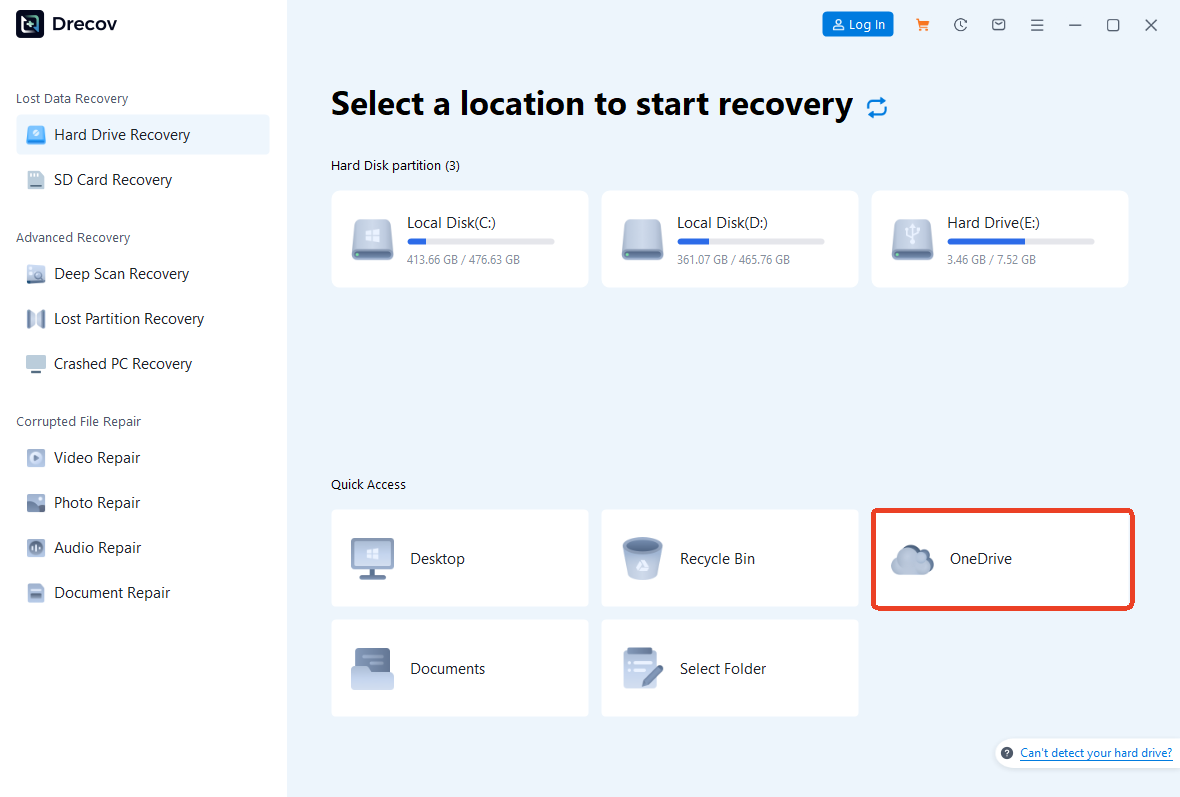
- Step 1: Select the Location
Launch the software. You will see a list of drives. Select your C: Drive (or the specific partition where OneDrive was located) to begin the search.
- Step 2: Run the Scan
Click Scan. The tool will perform a “Quick Scan” followed by a “Deep Scan.” For OneDrive-related losses, let the Deep Scan finish to ensure it finds the metadata of the unlinked files.
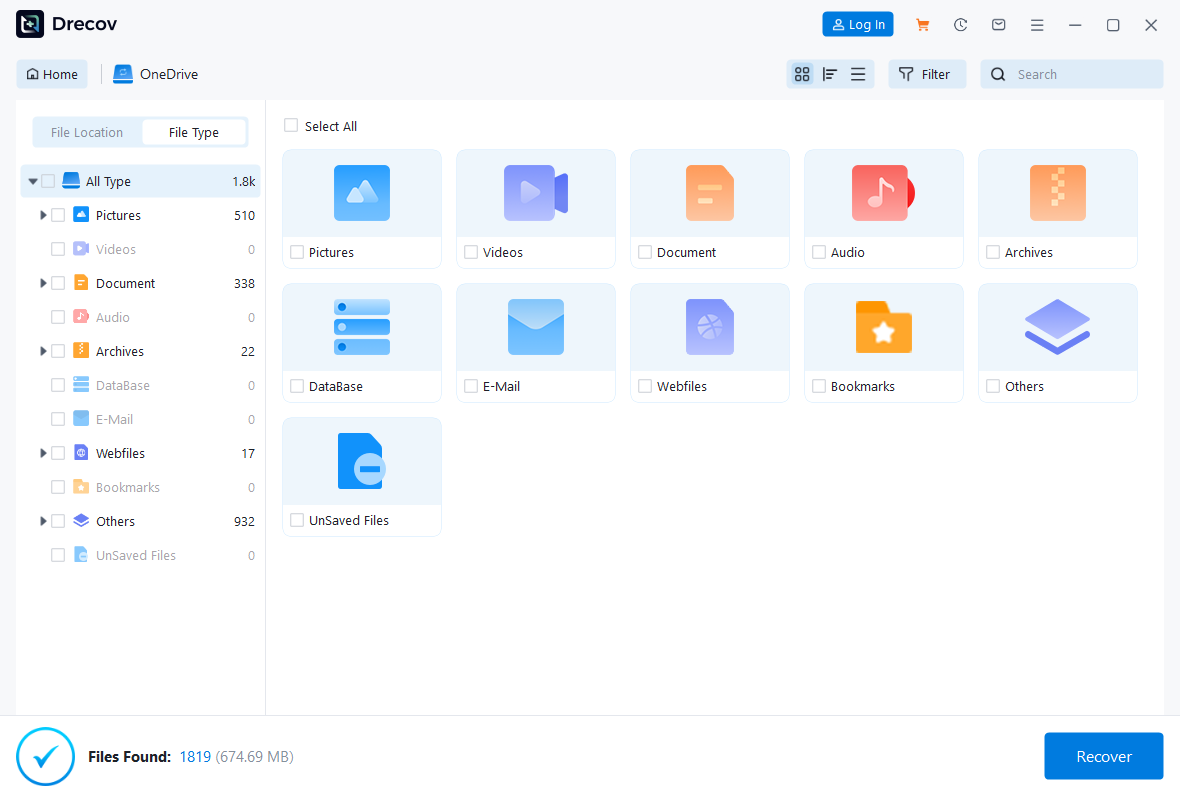
- Step 3: Filter and Preview
Use the search bar in PandaOffice Drecov to look for specific file extensions like .docx, .jpg, or .pdf. Double-click files to preview them.
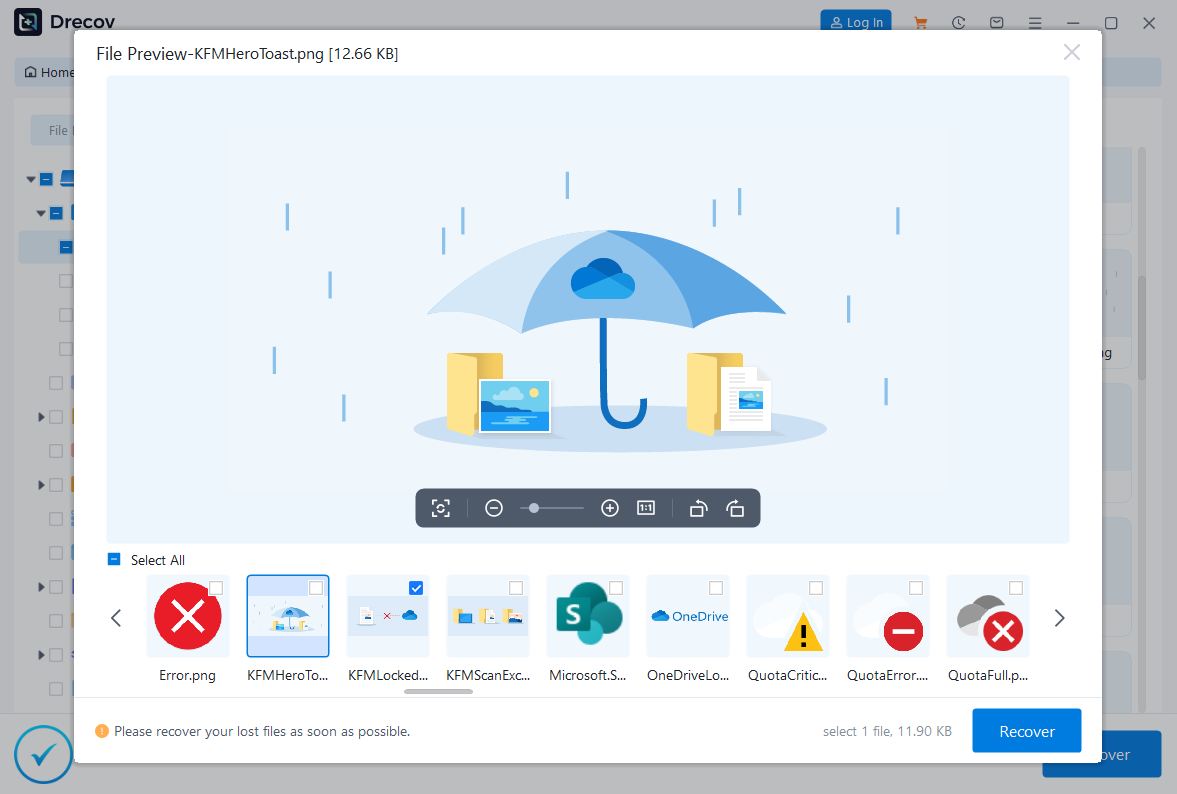
- Step 4: Recover to a Safe Zone
Select the files you need and click Recover.
Important: Save these files to an external USB drive or a different partition to ensure the integrity of the data.
Advanced: How to Remove OneDrive Permanently Using Registry Editor
For power users who find that OneDrive keeps reinstalling itself after Windows updates, the Registry Editor offers a more permanent “kill switch.”
⚠ Warning: Editing the Registry can be risky. Always create a System Restore point before proceeding.
- Step 1: Press Windows Key + R, type
regedit, and hit Enter. - Step 2: Navigate to the following path:
HKEY_LOCAL_MACHINE\Software\Policies\Microsoft\Windows
- Step 3: Right-click the Windows folder, select New > Key, and name it
OneDrive. - Step 4: Inside the new OneDrive key, right-click the right pane and select New > DWORD (32-bit) Value.
- Step 5: Name it
DisableFileSyncNGSCand set its value to 1. - Step 6: Restart your computer.
This registry tweak tells Windows that the OneDrive file sync engine is strictly forbidden from running.
Managing Your Data Post-OneDrive
Once you successfully remove OneDrive, you need a new strategy for data safety. Dependence on a single local drive is dangerous. Consider these alternatives:
- Manual External Backups: Use an external SSD once a week.
- Alternative Cloud Services: Services like Google Drive or Dropbox often have different syncing behaviors that users find less intrusive.
- NAS (Network Attached Storage): For the ultimate privacy, host your own cloud at home.
Common Scenarios and Solutions
Even after you remove OneDrive, you might encounter specific sync-related headaches. Here are some resources to help you navigate the aftermath:
- Unsyncing without Loss: If you haven’t deleted the app yet but want to stop the folders from merging, learn how to unsync OneDrive without losing data.
- Windows 11 Specifics: Windows 11 handles OneDrive differently than previous versions. If you are on the latest OS, check out this guide on how to disable Microsoft OneDrive permanently in Windows 11/10.
- Accidental Deletions: If you realized you deleted a file inside the OneDrive folder before removing the app, follow these steps to recover deleted files from OneDrive successfully.
Frequently Asked Questions About How to Remove OneDrive
Navigating the transition away from cloud storage often brings up specific technical hurdles. Here are the most common questions users ask when they decide to remove OneDrive from their daily workflow.
Will I lose my files if I remove OneDrive from my computer?
This is the most common fear. If you remove OneDrive by unlinking or uninstalling the app, your files stay safe in the cloud at OneDrive.com. However, if you chose the “Files On-Demand” setting to save disk space, those files are not physically on your hard drive—they are just “shortcuts.” To avoid data loss, you must right-click your OneDrive folder and select “Always keep on this device” before you begin the removal process. If you’ve already uninstalled and find files missing, using a recovery tool like PandaOffice Drecov can help scan for local cached fragments.
How do I remove OneDrive from File Explorer after uninstalling?
Sometimes, even after you successfully remove OneDrive, the folder icon lingers in the File Explorer sidebar like a ghost. This is usually due to a leftover registry key.
- Step 1: Press Windows Key + R, type
regedit, and hit Enter. - Step 2: Navigate to
HKEY_CLASSES_ROOT\CLSID\{018D5C66-4533-4307-9B53-224DE2ED1FE6}. - Step 3: Find the item System.IsPinnedToNameSpaceTree.
- Step 4: Double-click it and change the value from 1 to 0.
- Step 5: Restart File Explorer, and the icon should be gone.
Can I remove OneDrive without affecting my Microsoft Office apps?
Yes. Many users worry that they must remove OneDrive and lose access to Word or Excel. While Office apps default to saving in the cloud, you can change your settings to save to “This PC” by default. Go to File > Options > Save in any Office program and check the box that says “Save to Computer by default.” This allows you to keep your productivity suite while keeping your file system local.
What should I do if OneDrive won’t let me sign out or unlink?
If the app is frozen or the “Unlink this PC” button is greyed out, you may need to reset the app.
- Step 1: Press Windows Key + R.
- Step 2: Copy and paste this command:
%localappdata%\Microsoft\OneDrive\onedrive.exe /resetand press Enter. - Step 3: After the icon disappears and reappears, try to remove OneDrive again using the standard settings menu.
How do I remove OneDrive from starting up automatically?
If you don’t want to fully delete the app but want to stop it from slowing down your boot time:
- Step 1: Right-click the Taskbar and select Task Manager.
- Step 2: Go to the Startup apps tab.
- Step 3: Find Microsoft OneDrive, right-click it, and select Disable.
Conclusion
Deciding to remove OneDrive is a significant step toward taking control of your local environment. Whether you chose to do it for performance, privacy, or simplicity, the key is to move slowly. Always ensure your local copies are verified before hitting that uninstall button.
If things go sideways and your files seem to have vanished into the digital ether, don’t panic. Tools like PandaOffice Drecov are designed to be your safety net, catching your data before it’s gone for good. By following the steps outlined above, you can enjoy a OneDrive-free experience without the fear of data loss.


