


Have you ever experienced that heart-stopping moment? You are tidying up your desktop, selecting old folders, and hitting “Empty Recycle Bin” with a sense of accomplishment. Then, a cold shiver runs down your spine. You realize that the “Old Photos” folder you just purged actually contained the only copies of your graduation ceremony, or perhaps a vital project report due tomorrow.The screen is empty. The bin icon is clean. Your stomach drops. You might be asking yourself: “Is it completely hopeless? Is there any way to achieve recovery from recycle bin deleted files once the trash has been emptied?”
The short answer is: No, it is not hopeless. In fact, your files are likely still sitting exactly where you left them, hiding in plain sight. Let’s pull back the curtain on how your computer handles “deletion” and show you how to get your data back.
🔍 Why “Deleted” Doesn’t Mean “Gone”
To understand how recovery from recycle bin deleted files works, we need to think of your computer’s hard drive like a massive library.
When you save a file, the computer does two things:
- It writes the actual content (the “text” of the book) onto the disk.
- It creates an entry in a digital “Table of Contents” (called the Master File Table or MFT) so the system knows where that file starts and ends.
When you empty the Recycle Bin, Windows does not take a digital shredder to your files. Instead, it simply crosses out the entry in the Table of Contents. It tells the computer: “This space is now ‘available.’ You can write new information here whenever you want.”
As long as you haven’t saved a new movie, downloaded a huge game, or installed heavy software, that original “text” is still sitting on the disk. It is just invisible to the Windows File Explorer. Recovery from recycle bin deleted files is essentially the process of rebuilding that Table of Contents entry before new data overwrites the old “pages.”
⚠️ The “Golden Rules” of Data Survival
Before we jump into the steps, you must follow these two rules. If you ignore them, even the best software won’t be able to help you.
- 1️⃣ STOP using the computer immediately: Every click, every web search, and every background update writes small amounts of data to your drive. If the system decides to use the “available” space where your deleted file lives, that file is gone forever.
- 2️⃣ Recover as soon as possible: Time is your enemy. The longer the computer stays on, the higher the risk of background processes overwriting your lost data. The faster you attempt recovery from recycle bin deleted files, the higher your success rate will be.
3 Proven Methods for Recovery from Recycle Bin Deleted Files
Method 1: The Professional Powerhouse – PandaOffice Drecov Data Recovery Software
If you want the highest success rate without needing a degree in computer science, PandaOffice Drecov Data Recovery Software is the gold standard. It is designed to be “plug-and-play” for office workers and home users alike.PandaOffice Drecov is a versatile powerhouse designed to address almost any data loss scenario. This tool handles it all, whether you are dealing with:
- Accidental Desktop Deletions: Instantly retrieving files wiped from your local workspace.
- Disk Formatting Errors: Salvaging files from drives that have been completely wiped or reformatted.
- External Media Rescue: Recovering lost data from formatted or corrupted SD cards and USB flash drives.
- Sync Conflict Resolution: Reversing data loss caused by synchronization errors between your PC and the OneDrive cloud.
- Browser Metadata Recovery: Restoring lost Chrome bookmarks and other essential application data.”
One of its biggest “superpowers” is its ability to fix files that appear corrupted or “won’t open”—it can often repair the internal code during the recovery process. Plus, with partnerships involving Microsoft Store, Trustpilot, and TechBullion, you can trust that your data stays local and private.
Step-by-Step Guide for PandaOffice Drecov:
- Step 1: Select the Location. Launch the software. On the main dashboard, you will see a list of drives and common locations. Click on the “Recycle Bin” icon to tell the software exactly where to start digging.

- Step 2: Scan and Preview. Click the “Scan” button. The software will perform a lightning-fast “Quick Scan” followed by a “Deep Scan.” You don’t have to wait for it to finish! You can browse the results in real-time. Use the Preview feature to see if your photo or document is intact.

- Step 3: Recover and Save. Check the boxes next to the files you want. Click the “Recover” button.
🚩 Crucial Tip: A pop-up will ask where to save the files. Never save them back to the same drive (usually C:) where they were lost. Use a USB drive or an external hard disk to prevent overwriting!
While the written steps above provide a clear roadmap, seeing the process in action can make your recovery efforts even more confident. To help you visualize the exact clicks and interface features mentioned, we have prepared a comprehensive video guide below. This step-by-step walkthrough demonstrates the real-time scanning power of PandaOffice Drecov, ensuring you can follow along easily from the first scan to the final file restoration
Method 2: The “Time Machine” Approach – Windows File History
If you are someone who keeps Windows updated, you might already have a built-in safety net. Windows has a feature called “File History” that takes snapshots of your folders at regular intervals. If this was turned on before you emptied the bin, recovery from recycle bin deleted files is built right into your system.
Step-by-Step Guide for File History:
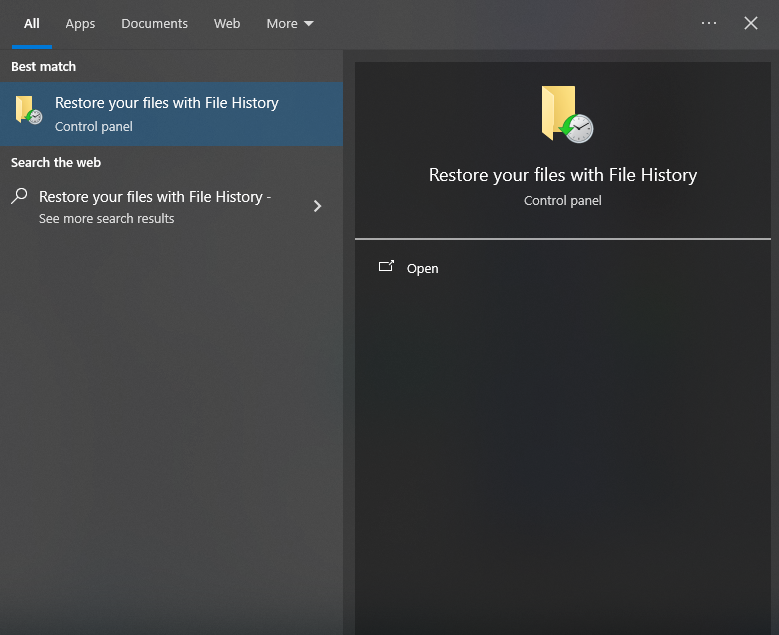
- Step 1: In the Windows search bar (bottom left), type “Restore your files with File History” and hit Enter.
- Step 2: A window will open showing your backed-up folders (Desktop, Documents, etc.). Navigate to the folder where the deleted file originally lived.
- Step 3: Use the left and right arrows at the bottom to “scroll back in time” to a version of the folder from yesterday or last week.
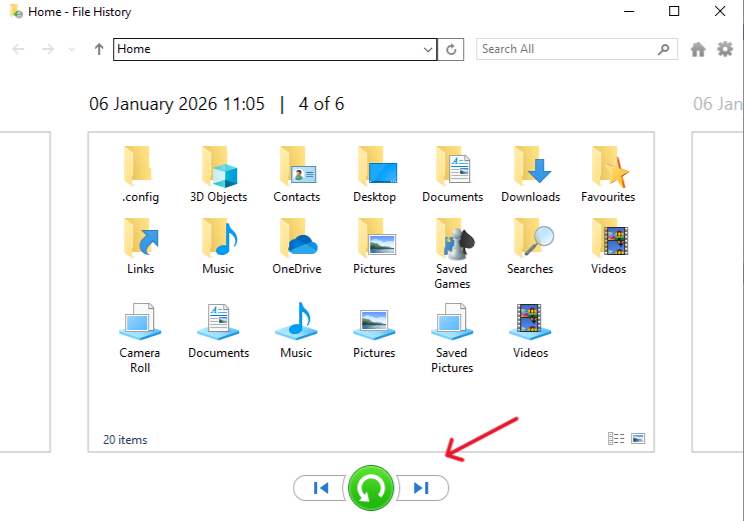
- Step 4: Once you see your missing file, select it and click the Green circular arrow button. Windows will put the file back in its original home.
The Catch: This only works if you had an external drive plugged in and “File History” toggled to “On” before the accident happened.
Method 3: The Manual Deep-Dive – Restoring Previous Versions (Shadow Copies)
Sometimes, Windows creates “Shadow Copies” as part of a system restore point. While this isn’t a dedicated recovery from recycle bin deleted files tool, it can sometimes work like magic for folders that were recently modified.
Step-by-Step Guide for Previous Versions:
- Step 1: Go to the folder that used to contain the deleted files (for example, your “Pictures” folder).
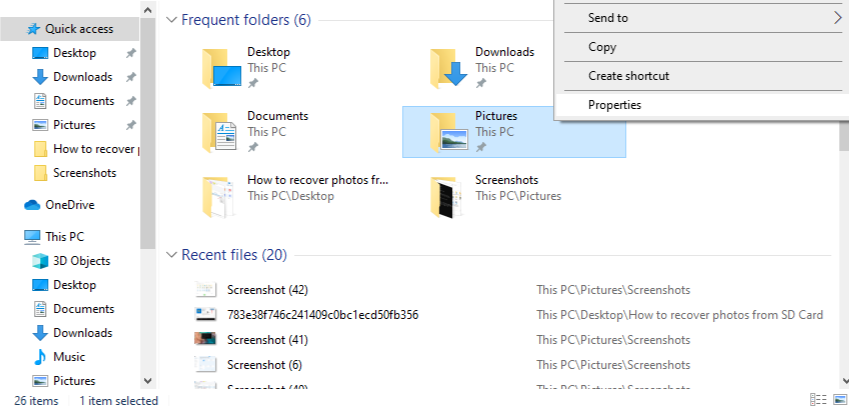
- Step 2: Right-click the folder and select “Properties”.
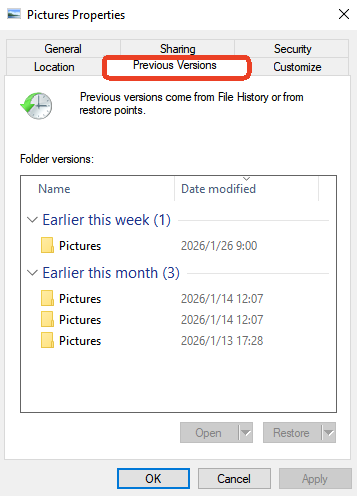
- Step 3: Click on the tab labeled “Previous Versions”.
- Step 4: If there are restore points available, they will be listed by date. Select a version from before the deletion and click “Open” to check the contents.
- Step 5: If your files are there, drag them out to a safe location (like a USB drive).
The Catch: If you have “System Protection” turned off in your Windows settings, this list will be empty.
📊 Summary Comparison: Which Method Should You Use?
| Feature | PandaOffice Drecov | File History | Previous Versions |
| Success Rate | Very High | Medium (Requires Backup) | Low (Requires Restore Point) |
| Ease of Use | ✨ Simple (3 Steps) | Moderate | Moderate |
| File Support | 1000+ Types | All | All |
| Works after Emptying Bin? | Yes | Yes (If pre-configured) | Sometimes |
| Best For | Professional & Urgent | Prepared Users | System Errors |
Proactive Measures and Strategies to Prevent Data Loss ✨
While the technology for recovery from recycle bin deleted files has become highly sophisticated, “prevention is always better than a cure.” To avoid falling into a state of panic in the future, it is highly recommended that you develop the following simple yet extremely effective digital habits:
- 1️⃣ Enable Windows Automatic Backup:First and foremost, navigate to
Settings > Update & Security > Backupand ensure that “File History” is toggled on. By doing so, the system will automatically save copies of your documents, desktop, and pictures. Consequently, even if you empty the trash, you can use these snapshots like a “time machine” to retrieve previous versions. - 2️⃣ Configure Cloud Synchronization:In addition to local backups, utilize cloud tools such as OneDrive, Google Drive, or PandaOffice Cloud. When you set important folders to “Cloud Sync,” your data gains an extra layer of protection. Even if local files are accidentally deleted and the bin is purged, you can still log into your cloud dashboard and recover them from the online trash folder.
- 3️⃣ Exercise Caution with Shortcuts:Furthermore, try to break the habit of using
Shift + Delete. Giving your data a “buffer period” in the Recycle Bin often mitigates 90% of the risks associated with accidental operations. - 4️⃣ Perform Regular Disk Maintenance:Another key point is to use built-in system tools to scan your disk for errors periodically. Sometimes, data loss is caused by logical disk errors rather than accidental deletion; therefore, maintaining hardware health can significantly reduce the probability of data corruption.
- 5️⃣ Keep Professional Tools Ready:Lastly, consider keeping a portable version of PandaOffice Drecov Data Recovery Software on a dedicated USB drive. When an accident occurs, you can run it immediately, thereby avoiding the risk of overwriting data that usually occurs when downloading new software after the loss.
💡 Conclusion
In conclusion, facing the awkward situation where files are accidentally deleted and the trash is emptied does not have to be a disaster. As discussed throughout this article, the underlying logic of recovery from recycle bin deleted files proves that as long as the data has not been physically overwritten, it remains silently in a corner of the disk waiting to be “awakened.”
To summarize, modern technology provides multiple safety nets, ranging from simple built-in “Previous Versions” to professional-grade solutions like PandaOffice Drecov Data Recovery Software. Specifically for non-technical users, choosing a tool like PandaOffice Drecov—which offers a simple interface, strong compatibility, and local privacy protection—is undoubtedly the most efficient way to rescue precious memories and vital office documents.
✨ Final Core Reminder: The ultimate key to a successful recovery lies in “speed” and “silence.” Specifically, you must stop all write operations immediately and launch your recovery program as fast as possible. Ultimately, we hope this guide helps you navigate digital emergencies and ensures your missing files return safely to your computer!


