


“Actually, the data you just ‘deleted’ never truly left your SD card.”
Most people believe that once they click “Delete” or “Format,” their photos are tossed away like trash in a bin. However, if we look at the underlying storage logic, you have merely torn out the “Table of Contents” of a book. The actual content remains on the “bookshelf.” As long as you immediately remove the card and stop writing new data, there is a 98% success rate in retrieving those files. Today, we are going to discuss how to recover deleted photos from sd cards using the professional-grade utility, PandaOffice Drecov, to conduct a “deep-sea salvage” from the bottom of your storage.
Understanding the Architecture of SD Card Data Loss
Before diving into the recovery steps, it is essential to understand why learning how to recover deleted photos from sd cards is scientifically possible. Every memory card—whether it is a MicroSD in your smartphone or a high-speed CFexpress card in your DSLR—uses a File System (such as FAT32 or exFAT).
This system acts as a map. When you delete a photo, the operating system simply marks the space as “available.” The electrons representing your wedding photos or travel videos stay physically etched on the NAND flash chips. They only disappear when new data (a new photo or a system log) physically overwrites those specific cells. This is why the first rule of digital forensics is: Stop all activity immediately.
Why PandaOffice Drecov is the Industry Standard for Storage Restoration
In the crowded market of file retrieval tools, PandaOffice Drecov has emerged as a leader due to its proprietary Smart-Scan Algorithm. While basic freeware might find the file name but fail to open the corrupted data, Drecov specializes in “fragment stitching.” This is particularly vital for 4K video recovery, where camera metadata often splits across multiple sectors.
Key Advantages of Professional Recovery Tools:
- High-Fidelity Preview: Users can view high-resolution images before committing to the final export.
- Sector-Level Deep Scanning: It bypasses the corrupted file system to read raw data signatures.
- Multi-Device Synergy: It supports brands ranging from SanDisk and Lexar to specialized cards used in DJI drones and GoPro cameras.
- Versatility: It recovers photos, videos, audio, compressed files (ZIP/RAR), and even system files like EXEs.
- Accidental deletion from your computer desktop.
- Files lost after emptying the Recycle Bin.
- Data loss from disk formatting.
- Accidental deletion or formatting of SD cards/U disks.
- Sync error occurring with deleted OneDrive files
- Privacy First: All recovery happens locally on your machine, so you don’t have to worry about your private data leaking to the web.
Comprehensive Guide: How to Execute SD Card File Retrieval
To ensure the highest possible recovery rate, follow this systematic guide. Using a computer (Windows or Mac) is mandatory, as mobile-based recovery apps often lack the processing power to handle deep-sector analysis.
Step 1: Physical Isolation and Connection
The moment you realize data is missing, toggle the physical “Lock” switch on the side of your SD card (if available) to read-only mode.
Action: Connect your SD card to your computer using a high-quality USB 3.0 or USB-C card reader. Avoid using the camera-to-USB cable method, as camera interfaces often restrict low-level disk access. Launch the PandaOffice Drecov application. The software will automatically detect all connected volumes.
🚨 CRITICAL WARNING: If your computer asks, “The disk needs to be formatted before you can use it,” click CANCEL. Formatting at this stage can complicate the retrieval process by overwriting the original file headers.
Step 2: Advanced Partition and Device Selection
On the main dashboard of the recovery utility, you will see a list of internal and external drives.
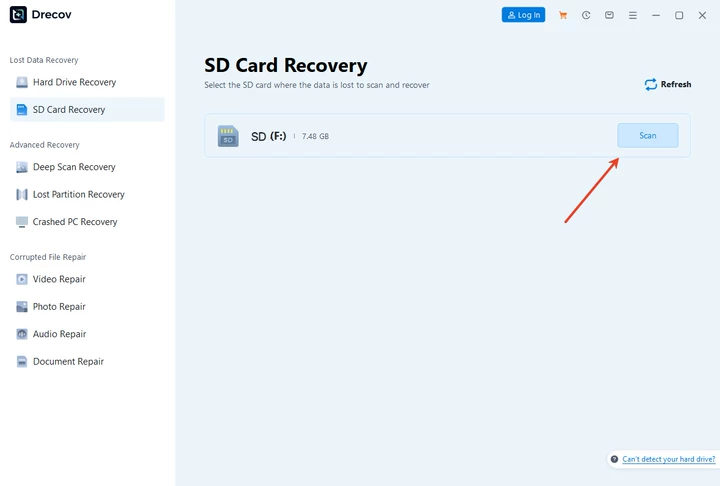
- Locate your SD card under the “External Devices” section. It is often identified by its brand name or its capacity (e.g., “Generic-SD 64GB”).
- Select the drive. You can also choose to scan specific locations like the “Recycle Bin” if the deletion happened while the card was connected to the PC.
Step 3: Configuring the Intelligent Scanning Mode
PandaOffice Drecov offers different scanning depths depending on the severity of the data loss.
- Click the “Start Scan” button. The software initiates a “Quick Scan” to find recently deleted files.
- However, for formatted cards or “unrecognized” errors, the software will automatically transition into a “Deep Scan.”
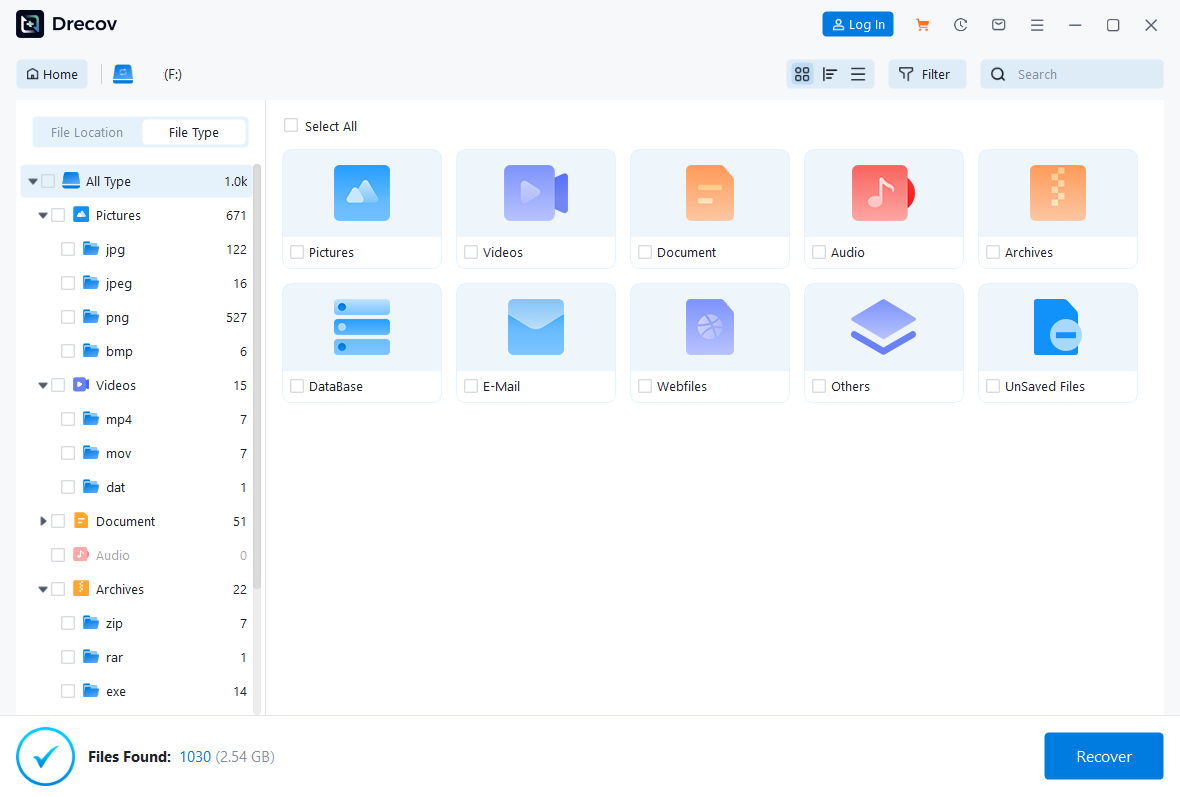
🔍 Pro Tip: Use the “File Type Filter” on the sidebar. If you only need to recover .MOV or .CR3 (Canon Raw) files, selecting these specific extensions will significantly reduce the time required to sort through thousands of recovered fragments.
Step 4: Real-Time Content Analysis and Preview
One of the most powerful features of professional memory card restoration software is the ability to see the data during the scan.

- As the scan progresses, files will populate the results window. You do not need to wait for the 100% completion if you already see the files you need.
- Double-click on any image or document. If the preview displays correctly, it proves that the data blocks are intact and the file is 100% recoverable.
Step 5: Secure Export and Data Relocation
Once you have identified and checked the boxes for the files you wish to rescue, it is time for the final “salvage” operation.
- Click the “Recover” button. A window will appear asking for a destination path.
🚨 MANDATORY SAFETY RULE: Never, under any circumstances, save the recovered files back onto the same SD card you are scanning. If the recovery process fails midway, saving data back to the card will permanently overwrite the remaining lost files. Always save to your computer’s local hard drive or a different external SSD.
Advanced Troubleshooting: Managing “RAW” Drives and Corrupted Files
Sometimes, the standard process of how to recover deleted photos from sd cards faces obstacles like a “RAW” file system. If your computer sees the SD card but labels it as “Unallocated,” the “map” of your card is gone.
In this scenario, PandaOffice Drecov ignores the map entirely. It scans the raw binary code of the card, looking for “signatures” (the unique code that tells a computer “this is a JPEG”). This “Deep Sea Salvage” is why professional tools have such a high success rate compared to free alternatives.
Proactive Maintenance: Shielding Your Digital Memories
While tools like PandaOffice Drecov provide a reliable safety net, building a “prevention-first” workflow is the best way to handle your media.
1. The Power of “In-Camera Formatting”
Every camera manufacturer has a slightly different way of writing data. Formatting your card in a Windows PC and then putting it into a Sony camera can lead to “Database Errors.” Always format the card inside the camera you intend to use. This ensures the file system is optimized for that specific hardware.
2. Avoid the “Fill-to-Burst” Habit
Flash memory requires “breathing room” to perform wear-leveling (the process of moving data around to prevent chip wear). If you fill an SD card to 99%, the controller works overtime, increasing the risk of a write-error that crashes the entire file table. Aim to swap cards when they reach 90% capacity.
3. The Safe Ejection Protocol
It is tempting to pull the card out the moment the “Transferring” bar disappears on your screen. However, operating systems often use “Write Caching,” meaning they might still be finalizing background tasks. Always click “Safely Remove Hardware” or “Eject” before physically pulling the card.
Conclusion
Data recovery is a science, not a game of luck. By understanding that your files remain physically present on the SD card, you can approach the situation with calm, professional logic.
- Stop using the card to prevent overwriting.
- Connect via a dedicated reader to a stable PC/Mac environment.
- Deploy a high-success tool like PandaOffice Drecov to scan the storage architecture.
- Preview to verify the integrity of the data.
- Relocate your salvaged memories to a secure, new location.
Digital memories are the currency of the modern age. Whether it is a professional shoot or a personal milestone, knowing how to recover deleted photos from sd cards ensures that a moment of accidental deletion doesn’t turn into a permanent loss.


