


I would like to remove those two superfluous RE partitions (5 & 6 – referring to the screenshot in the mentioned thread) that were created by the two failed attempts. Windows’ disk management only shows “Help” when I right-click those partitions. I guess one can only delete those two partitions using diskpart, right? Or is there some “expert-mode” for “Computer Management” => “Disk Management”?—from Microsoft Store
A recovery partition is a special section of a hard drive created by the operating system or computer manufacturer. It stores tools used to restore or repair the system when serious problems occur. While this partition can be useful, many users eventually want to remove recovery partition sections to free up disk space or reorganize their storage.
For example, when upgrading storage, expanding system partitions, or restructuring a disk layout, the recovery partition may block available space. In such cases, users begin searching for how to remove recovery partition safely without damaging the operating system.
This guide explains everything you need to know about remove windows recovery partition operations. You will learn why these partitions exist, when it is safe to remove them, and several reliable ways to perform recovery partition Windows 10 remove procedures.
⚠️Warning: Removing a recovery partition permanently deletes built-in troubleshooting tools. Always create a system backup before proceeding.
Understanding the Windows Recovery Partition
What a Recovery Partition Does in Windows
A recovery partition is a hidden section of the disk that contains important system repair files. Windows automatically creates this partition during installation, and many computer manufacturers add their own recovery environment as well.
These partitions usually contain:
- Windows Recovery Environment (WinRE)
- Startup repair tools
- System reset utilities
- Troubleshooting options
When the operating system fails to start correctly, Windows uses the recovery partition to access these tools. This allows users to repair the system without reinstalling Windows manually.
Depending on the device, recovery partitions can range from 500 MB to several gigabytes. Although they are relatively small, they still occupy valuable disk space.
In some systems, multiple recovery partitions may exist due to operating system upgrades or disk cloning. As a result, users sometimes look for ways to remove windows recovery partition duplicates that are no longer required.
Understanding the function of this partition helps answer a common question: can I remove recovery partition safely?
The answer depends on whether you have alternative recovery options such as installation media or system backups.
Reasons Users Decide to Remove Recovery Partition
Common Situations That Lead to Partition Removal
There are several practical reasons why people choose to remove recovery partition sections from their drives.
One of the most common motivations is limited storage capacity. On smaller SSDs, every gigabyte matters. Removing unused recovery partitions can free up space for applications or files.
Another reason involves disk partition management. When users want to expand the system partition or merge storage volumes, the recovery partition may sit between partitions and prevent resizing operations. In these situations, learning how to remove healthy recovery partition becomes necessary.
Users who maintain regular system backups may also decide to remove the partition. If you already use external backup drives or cloud recovery solutions, the built-in recovery partition may become redundant.
Operating system upgrades can also create extra partitions. For instance, upgrading Windows may generate a new recovery environment while leaving the old one unused. This often leads users to research how to remove a healthy recovery partition that is no longer active.
⚠️Warning: Removing the wrong partition could disable the Windows recovery environment entirely.
Before performing any recovery partition Windows 10 remove operation, it is important to verify whether the partition is still used by the system.
Preparation Before Removing a Recovery Partition
Essential Steps to Protect Your Data
Before attempting to remove recovery partition, careful preparation can prevent serious problems.
The first step is to confirm that you have an alternative way to repair or reinstall Windows. This could include:
- A Windows installation USB
- A system image backup
- External recovery media
Without one of these options, removing the recovery partition may leave you without a built-in recovery method if the system fails.
Next, identify the correct partition. Windows typically labels it as Recovery Partition, and it usually does not have a drive letter assigned.
You should also ensure that you have administrator privileges, since partition operations require elevated permissions.
Another recommended precaution is creating a full backup of important files before modifying disk partitions.
Preparation checklist:
- Back up critical data
- Verify the correct partition
- Ensure administrator access
- Prepare Windows recovery media
⚠️Warning: Disk operations can affect boot configuration if performed incorrectly.
Taking these precautions helps ensure that any attempt to remove windows recovery partition is performed safely.
Methods to Remove a Healthy Recovery Partition
The following solutions explain how to remove the recovery partition using different Windows tools and recovery strategies.
Method 1: Remove Recovery Partition Using Disk Management
Test environment:
Windows 11 Home (23H2), 512GB NVMe SSD, GPT partition table, desktop PC.
Windows includes a built-in graphical disk utility called Disk Management. It allows users to manage partitions, assign drive letters, and in some cases delete partitions.
Steps to attempt remove recovery partition using Disk Management:
- Right-click the Start menu and select Disk Management.
- Locate the partition labeled Recovery Partition.
- Right-click the partition.
- If available, choose Delete Volume.
- Confirm the deletion.
Once completed, the space will appear as Unallocated. You can then expand another partition to use the free space.
However, Windows often prevents this operation because the recovery partition is protected. When this happens, the Delete Volume option may be unavailable.
In such situations, users usually switch to command-line tools to complete the process.
Disk Management is still the simplest place to begin when researching how to remove recovery partition, because it allows you to visually confirm the disk layout before making changes.
Method 2: Remove Recovery Partition Using DiskPart
Test environment:
Windows 10 Pro (22H2), 1TB SATA SSD, laptop configuration.
DiskPart is a powerful command-line tool that allows advanced disk operations. It can remove protected partitions that cannot be deleted through graphical utilities.
Follow these steps to perform recovery partition Windows 10 remove using DiskPart.
- Press Win + X and open Command Prompt (Admin) or Windows Terminal (Admin).
- Launch DiskPart:
diskpart
- Display available disks:
list disk
- Select the target disk:
select disk 0
- Display partitions:
list partition
- Identify the recovery partition and select it:
select partition X
- Delete the partition:
delete partition override
The override parameter forces Windows to remove protected partitions.
After deletion, the space becomes unallocated and can be merged with adjacent partitions.
⚠️Warning: DiskPart commands execute immediately and cannot be undone. Double-check disk and partition numbers before deleting anything.
This method is widely used when users search how to remove a healthy recovery partition that Windows refuses to delete.
Method 3: Verify Disk Structure Before Removing the Partition with Pandaoffice Drecov
Download DrecovTest Environment:
Windows 11 Pro (23H2), 1TB NVMe SSD, GPT partition structure, administrator account enabled.
Before performing any disk modification, many users prefer to verify the disk structure to ensure that important files will not be affected. Although recovery partitions usually contain only system repair files, incorrect partition operations can impact nearby storage areas.
A safe approach is to scan the disk using Pandaoffice Drecov, which helps detect existing partitions and identify hidden or inaccessible data before deletion.
Steps to verify the disk before attempting how to remove healthy recovery partition:
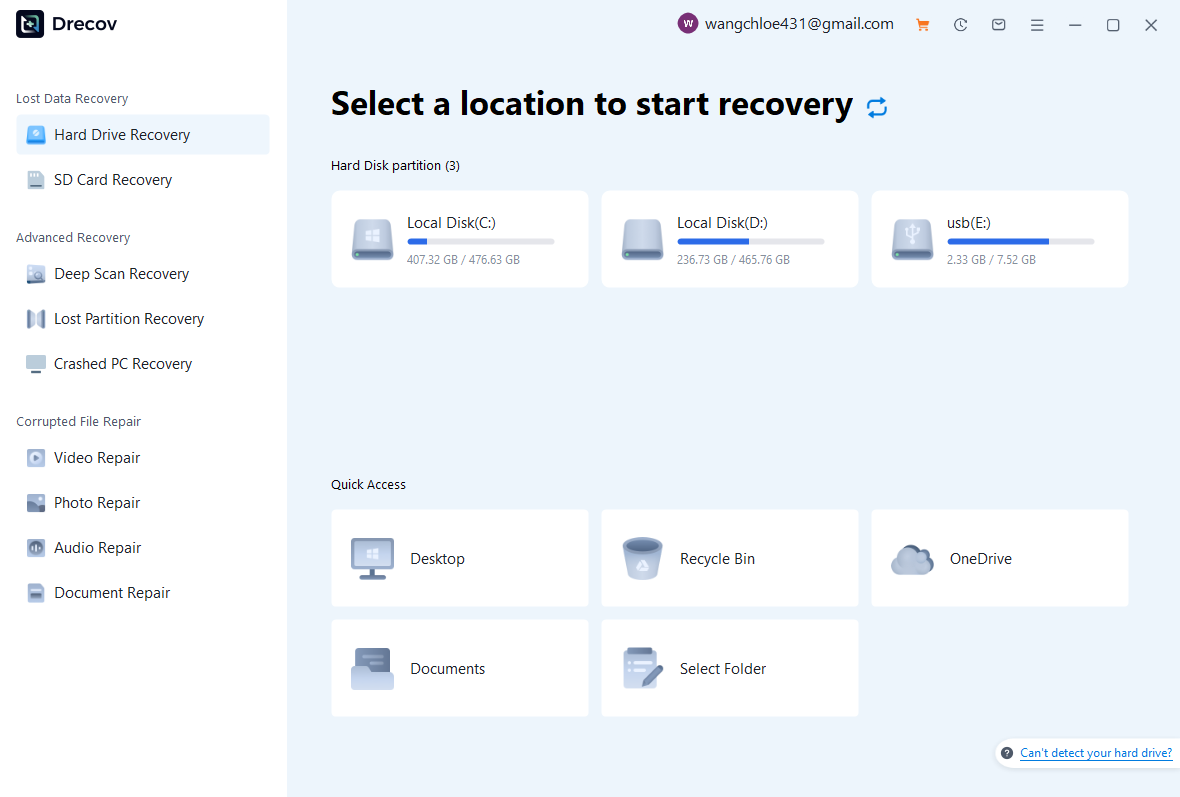
- Install and launch Pandaoffice Drecov on your computer.
- Select the disk containing the recovery partition.
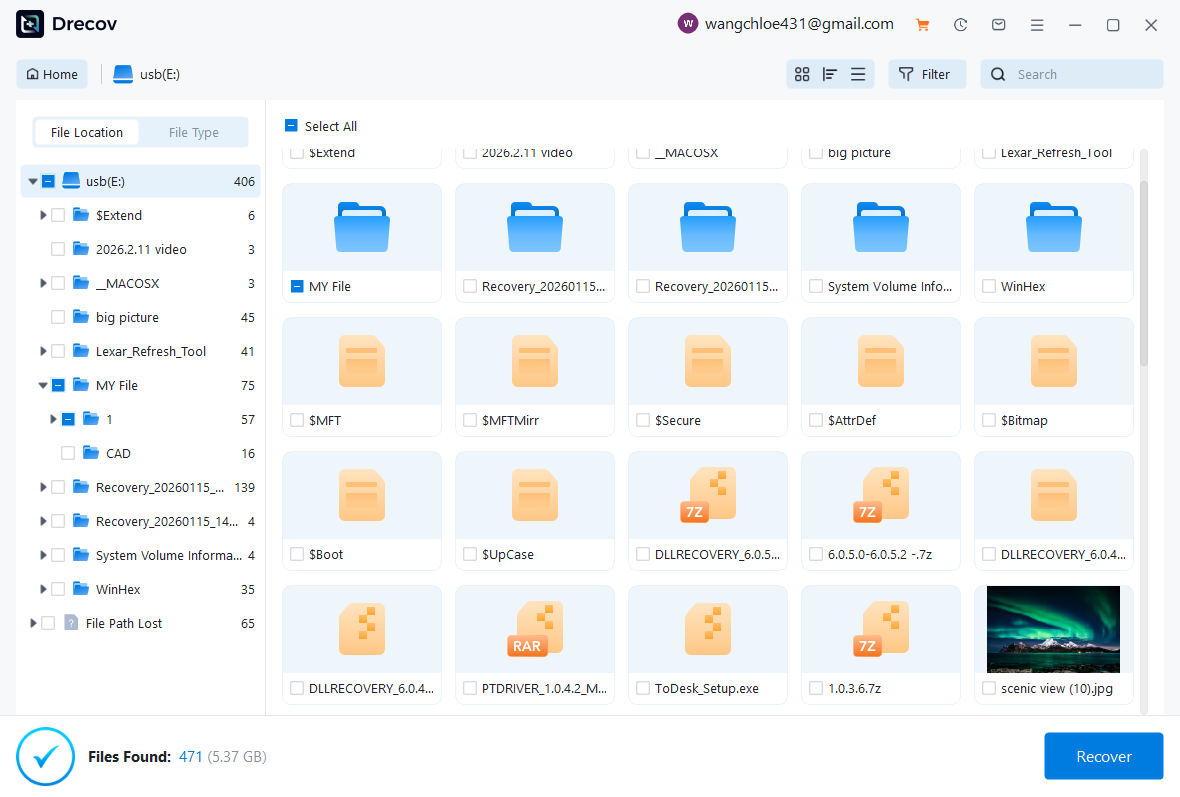
- Start a disk scan to analyze partition structures.
- Confirm which partition is labeled as the recovery partition.
- After verification, proceed with partition removal using Windows tools.
The scanning process helps prevent mistakes when performing remove windows recovery partition operations. If a partition is deleted accidentally, the software can also attempt file recovery.

Why Choose Pandaoffice Drecov?
Data loss can occur unexpectedly due to accidental deletion, system crashes, formatting errors, or software failures. Whether you need to restore Windows previous date, perform recover Excel files,or handle deleted PowerPoint recovery, Pandaoffice Drecov provides a reliable and efficient solution designed to restore important documents quickly and safely.
Pandaoffice Drecov is a professional PowerPoint Recovery Software that supports recovery for multiple document types, including Excel spreadsheets, Word documents, and PowerPoint presentations. With advanced scanning technology, the software can detect and recover files even after deletion, formatting, or unexpected system shutdowns. This makes it an ideal tool for users who urgently need Document Recovery from hard drives, SSDs, USB drives, memory cards, and other storage devices.
One of the key advantages of Pandaoffice Drecov is its intelligent deep-scan engine. It carefully analyzes storage sectors to locate lost or hidden files that standard recovery tools often miss. Whether you accidentally deleted a presentation and require deleted PowerPoint recovery, or you lost critical spreadsheets and need to recover Excel files, the software provides fast scanning and high recovery success rates.
The software also features a user-friendly interface that allows beginners and professionals alike to complete recovery tasks in just a few steps. Users can preview recoverable files before restoring them, ensuring that only the needed data is recovered. In situations where files were lost due to system errors, the software can also help recover documents after attempts to restore Windows previous date.
Many users researching can I remove recovery partition safely prefer verifying disk structure first to reduce the risk of data loss.
⚠️Warning: Disk scanning does not change the partition, but deleting a partition afterward permanently removes its contents.
Method 4: Disable Windows Recovery Environment Before Deleting the Partition
Test Environment:
Windows 10 Pro (22H2), 512GB SSD, standard laptop configuration.
In some systems, Windows blocks deletion because the partition is actively used by the Windows Recovery Environment (WinRE). When this happens, you must temporarily disable WinRE before attempting to remove the partition.
Steps for performing how to remove a healthy recovery partition after disabling WinRE:
- Open Command Prompt with administrator privileges.
- Check the status of the recovery environment:
reagentc /info
- Disable Windows Recovery Environment:
reagentc /disable
- Launch DiskPart:
diskpart
- Display available disks:
list disk
- Select the disk containing the recovery partition:
select disk 0
- View the partitions on the disk:
list partition
- Select the recovery partition:
select partition X
- Remove the partition:
delete partition override
After completing the process, the space becomes unallocated and can be used to expand other partitions.
⚠️Warning: Disabling WinRE temporarily removes system repair features until it is enabled again.
This method is often necessary when users search how to remove the recovery partition that Windows protects.
Method 5: Remove Recovery Partition Using PowerShell Commands
Test Environment:
Windows 11 Enterprise, 2TB SSD, GPT disk configuration, workstation environment.
PowerShell provides advanced disk management commands that allow administrators to manage partitions directly through scripts. This method is especially useful when working with multiple systems.
Steps for performing recovery partition Windows 10 remove using PowerShell:
- Open Windows Terminal as Administrator.
- Switch to the PowerShell environment if necessary.
- Display available disks:
Get-Disk
- Check partitions on the target disk:
Get-Partition -DiskNumber 0
- Identify the recovery partition number.
- Remove the partition:
Remove-Partition -DiskNumber 0 -PartitionNumber X
- Confirm the command when prompted.
After execution, the partition space becomes unallocated and can be merged with other volumes.
PowerShell is often used by system administrators managing enterprise environments where automated scripts perform remove recovery partition operations across multiple devices.
⚠️Warning: PowerShell commands execute immediately and may not include multiple confirmation prompts.
Frequently Asked Questions About Removing Recovery Partition
Can I remove recovery partition without affecting Windows
Yes, in many situations you can remove recovery partition without damaging the operating system, as long as alternative recovery options are available. For example, a Windows installation USB drive or a system image backup can replace the built-in recovery tools.
However, once you remove windows recovery partition, Windows will no longer have a local recovery environment stored on the disk. If the system fails to start, you may need external recovery media to repair the operating system.
For this reason, many users prepare a bootable Windows installation drive before performing how to remove recovery partition operations.
Why can’t I remove the recovery partition in Disk Management
Some users attempt to remove recovery partition using the Disk Management utility but find that the Delete Volume option is unavailable.
This usually happens because the partition contains files used by the Windows Recovery Environment (WinRE). Windows protects these system partitions to prevent accidental removal.
When this situation occurs, command-line utilities such as DiskPart or PowerShell are typically required to complete the recovery partition Windows 10 remove process.
What happens after removing the recovery partition
After you remove recovery partition, the disk space previously occupied by that partition becomes unallocated space.
You can then:
- Extend an existing partition
- Create a new volume
- Merge the space with another partition
Many users perform how to remove a healthy recovery partition when they want to expand their system drive or reorganize disk storage.
How large is a typical Windows recovery partition
Most recovery partitions created by Windows are relatively small, typically between 500MB and 1GB. However, some computer manufacturers include additional recovery partitions that can take several gigabytes.
If multiple recovery partitions appear after system upgrades, users sometimes decide to remove the recovery partition that is no longer used.
Conclusion
Recovery partitions are designed to provide built-in repair tools for Windows systems. However, many users eventually decide to remove recovery partition sections to reclaim storage space or reorganize disk layouts.
This guide explained several safe ways to remove windows recovery partition, including:
- Using Disk Management
- Deleting partitions through DiskPart
- Verifying disk layout with Pandaoffice Drecov
- Disabling Windows Recovery Environment
- Managing partitions using PowerShell
Each method addresses different system configurations and helps users understand how to remove healthy recovery partition safely.
⚠️Warning: Always create backups and confirm the correct partition before performing disk modifications.
By following these steps, users can confidently manage disk partitions and safely perform how to remove the recovery partition tasks without risking important data.


