


Understanding SSD Initialization Before First Use
What Does It Mean to Initialize an SSD?
Before a computer can use a storage device, Windows needs information about how the disk will be organized. This process is known as initialize ssd. Initialization creates the disk structure that allows partitions and file systems to be added later.
Many users search for how to initialize ssd after installing a new drive because Windows often detects the hardware but cannot use it immediately. Until initialization is completed, the SSD may appear as “Unknown” or “Not Initialized” in Disk Management.
The process itself does not install Windows or create usable storage space. Instead, it prepares the drive for partition creation and formatting.
Typical scenarios requiring initialization include:
- Installing a brand-new SSD
- Replacing an older drive
- Connecting a secondary SSD
- Rebuilding storage configurations
- Resolving partition table corruption
Once completed, the drive can be partitioned and assigned a drive letter for normal use.
Why New SSDs Require Initialization
Manufacturers generally ship storage devices without active partitions. As a result, Windows recognizes the hardware but cannot store files on it until configuration is completed.
This is why many users search for:
- how to initialize a new ssd
- how to initialize new ssd
- initialize new ssd
The initialization process establishes either a GPT or MBR partition table, allowing Windows to manage data storage properly.
Without this step:
- The SSD may not appear in File Explorer.
- New partitions cannot be created.
- Files cannot be stored on the drive.
GPT vs MBR Partition Styles Explained
When initializing a drive, Windows usually requests a partition style selection.
The two primary options are:
GPT (GUID Partition Table)
- Supports drives larger than 2TB
- Supports more partitions
- Required for many modern systems
- Recommended for Windows 11
MBR (Master Boot Record)
- Compatible with older systems
- Supports drives up to 2TB
- Common in legacy environments
For most modern computers, GPT is the preferred choice.
Common Reasons an SSD Requires Initialization
Brand-New SSD Installation
The most common reason users need to initialize ssd drive hardware is because the SSD has never been configured before.
A newly installed drive often appears in Disk Management with one of the following statuses:
- Unknown
- Not Initialized
- Unallocated
This behavior is completely normal and does not indicate a hardware problem.
After initialization, the SSD becomes ready for partition creation and formatting.
SSD Showing as Unallocated
An SSD may also require initialization after partition information has been removed or damaged.
Possible causes include:
- Disk corruption
- Improper removal
- Failed partition operations
- Operating system issues
- Hardware migration
In these situations, Windows may no longer recognize the partition structure correctly.
Disk Not Appearing in File Explorer
Many users believe their SSD is defective because it does not appear inside File Explorer.
However, File Explorer only displays volumes that have:
- A valid partition
- A file system
- An assigned drive letter
An uninitialized SSD lacks these elements and therefore remains invisible to standard browsing tools.
⚠️ Warning: Do not initialize a drive containing important data until you verify whether files need to be recovered first.
How to Initialize an SSD in Windows
Method 1: Initialize SSD Using Disk Management
Disk Management provides the simplest solution for users learning how to initialize an ssd on modern Windows systems.
Steps
- Press Windows + X.
- Select Disk Management.
- Locate the uninitialized SSD.
- Right-click the disk label.
- Choose Initialize Disk.
- Select GPT or MBR.
- Click OK.
After initialization, the drive will appear as unallocated space and can be partitioned.
Test Environment
- Windows 11 Pro 24H2
- 1TB NVMe SSD
- UEFI System
- GPT Partition Style
This method works well for most users because it requires no command-line experience.
Method 2: Initialize SSD with DiskPart Commands
Advanced users often prefer DiskPart because it provides direct control over disk management operations.
This method is useful when graphical tools fail or administrative scripting is required.
Steps
- Open Command Prompt as Administrator.
- Launch DiskPart:
diskpart- View available disks:
list disk- Select the SSD:
select disk X- Initialize the drive:
convert gptor
convert mbr- Exit DiskPart.
Once complete, the SSD is ready for partition creation.
Test Environment
- Windows 11 Enterprise
- 2TB SSD
- GPT Configuration
- Administrative Account
DiskPart provides greater flexibility but requires careful drive selection.
Method 3: Create a New Volume After Initialization
After completing the ssd initialize process, users must create a usable volume before the drive appears in File Explorer.
Steps
- Open Disk Management.
- Right-click the unallocated space.
- Select New Simple Volume.
- Specify the volume size.
- Assign a drive letter.
- Select NTFS formatting.
- Complete the wizard.
Once formatting finishes, the SSD becomes fully accessible for file storage.
Test Environment
- Windows 10 Pro
- SATA SSD
- GPT Partition Table
- NTFS File System
This step is required regardless of whether the SSD was initialized through Disk Management or DiskPart.
⚠️ Warning: Formatting a volume removes existing file system structures. Verify that no important data remains before proceeding.
Method 4: Fix SSD Detection Issues Before Initialization
Sometimes Windows cannot initialize a drive because the SSD is not being detected properly. Before attempting additional initialization procedures, verify that the hardware connection is functioning correctly.
Common causes of SSD detection problems include:
- Loose SATA cables
- Faulty power connections
- Incorrect BIOS settings
- Outdated motherboard firmware
- Defective adapters or enclosures
Steps
- Shut down the computer completely.
- Disconnect the power source.
- Verify all SSD cables are securely connected.
- Enter BIOS or UEFI settings.
- Confirm the SSD appears in storage devices.
- Save settings and reboot.
- Open Disk Management again.
If the SSD appears in BIOS but not in Windows, additional driver troubleshooting may be required.
Test Environment
- Windows 11 Pro
- SATA SSD
- Intel Motherboard
- UEFI Firmware
This procedure often resolves situations where users believe they cannot initialize ssd drive hardware because the drive does not appear at all.
Method 5: Recover Important Data with PandaOffice Drecov Before Reinitializing
In some situations, Windows displays a message requesting disk initialization even though the SSD previously contained data.
This may occur because:
- Partition tables became corrupted.
- File system structures were damaged.
- Hardware errors interrupted access.
Before performing initialization, users should attempt data recovery if valuable files may still exist.
PandaOffice Drecov can scan inaccessible SSDs and recover files before disk reconfiguration takes place.
Steps
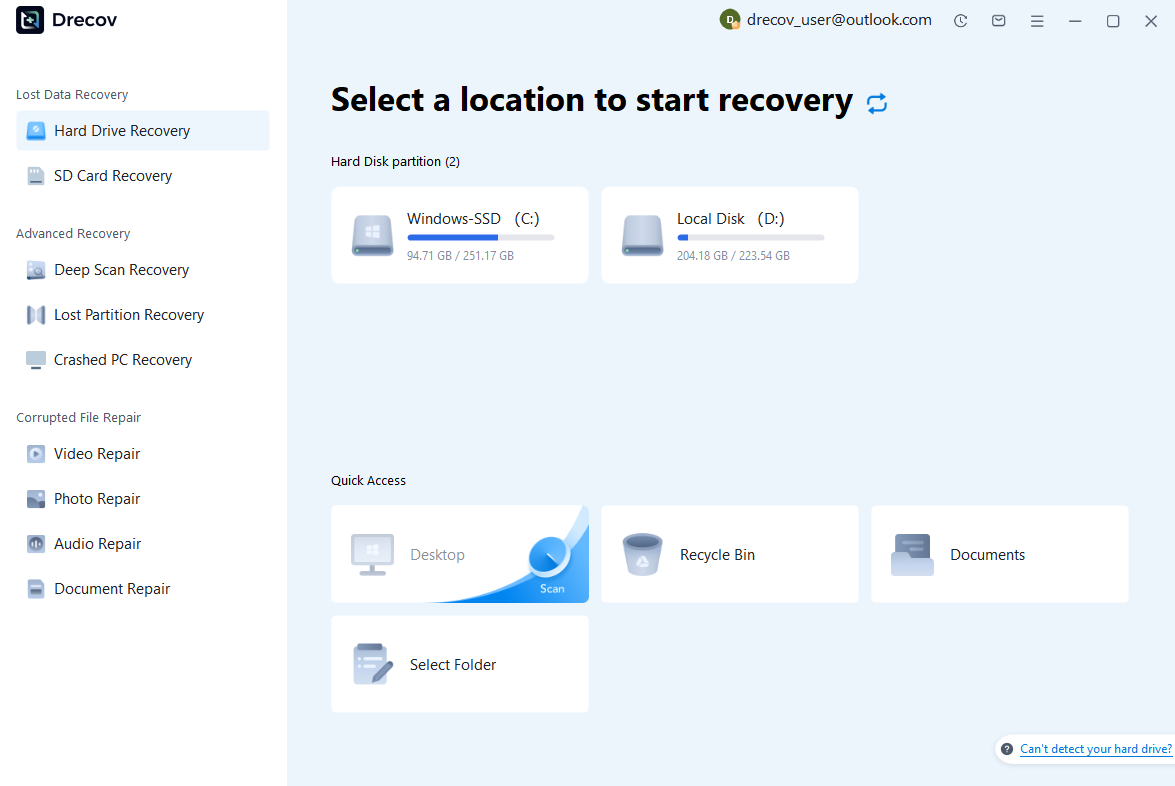
Step 1: Connect the Drive / USB)
Connect your device (SD card, HDD/SSD, or USB drive) to your computer and launch PandaOffice Drecov. Select the target device and start the scan. The software will perform a quick scan and deep scan to detect lost or deleted data.
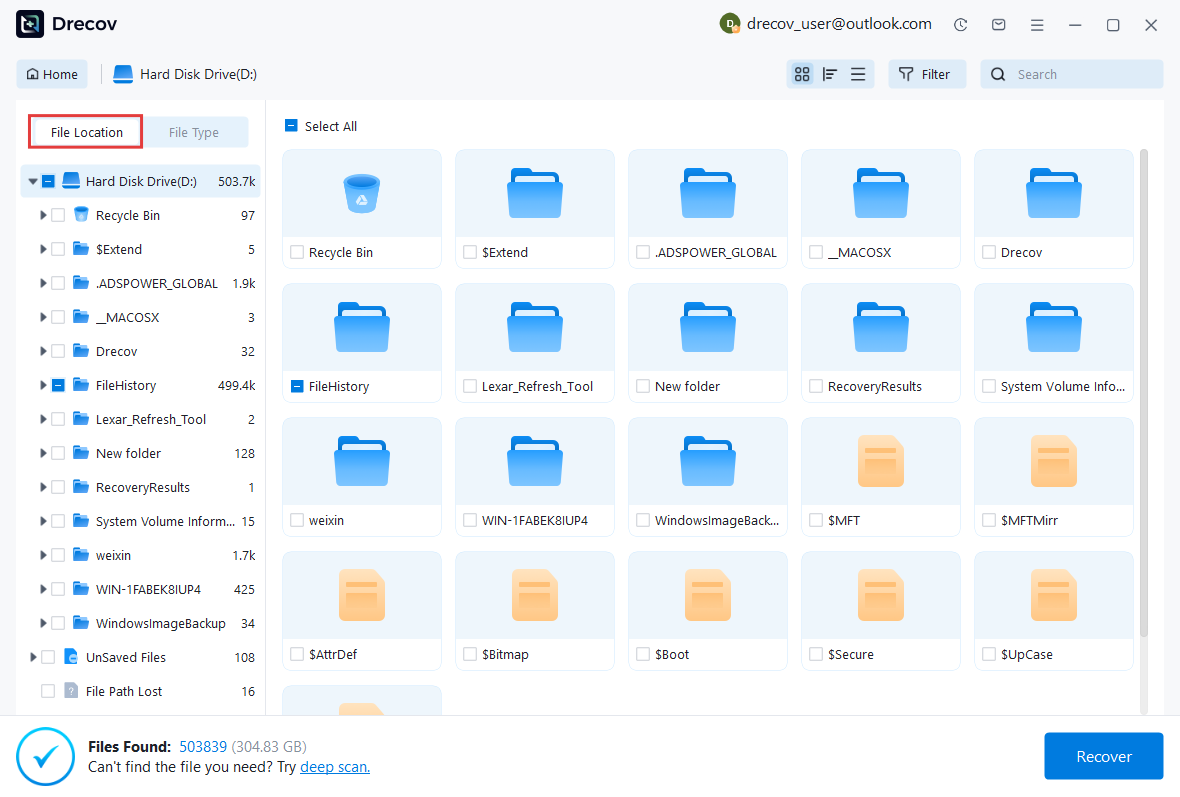
Step 2: Locate and Preview Lost Files
After scanning, browse the detected files and use the preview feature to check recoverable data. You can preview documents (Word, Excel, PDF), photos, and videos to ensure file integrity before recovery.
Step 3: Recover and Save to a New Location
Select the files you want to restore and click recover. Save all recovered data to a different drive or location (not the original device) to avoid overwriting lost data.

Why Choose PandaOffice Drecov Recovery Software?
PandaOffice Drecov offers a fast, secure, and user-friendly solution for recovering lost files across multiple scenarios. Whether you need email recovery, ZIP File Recovery, format data recovery, or help to recover deleted drafts Outlook, the software provides reliable recovery performance for both personal and business users.
PandaOffice Drecov supports recovery from formatted hard drives, SSDs, USB drives, SD cards, and external storage devices. Its advanced scanning engine can locate deleted archives, damaged ZIP files, lost Outlook drafts, and accidentally removed documents with high accuracy. For users searching for how to find deleted messages in Teams, PandaOffice Drecov can also help recover exported chat files, attachments, and related local cache data when available.
After recovery, test the file again. If the audio stream was damaged because of storage issues, a recovered version may play normally.
This method is particularly useful when only a few files exhibit audio problems while VLC works correctly with all other media.
This method can help users recover files from floppy disk storage after accidental deletion, formatting, or logical corruption.
Recoverable content may include:
- Documents
- Photos
- Videos
- Archives
- Project files
- Business data
Test Environment
- Windows 11 Pro
- 1TB NVMe SSD
- Corrupted Partition Table
- NTFS Storage
This precaution helps prevent accidental data loss when Windows unexpectedly requests initialization.
⚠️ Warning: If the SSD previously contained important files, avoid immediate initialization until recovery options have been evaluated.
Method 6: Initialize SSD Through Device Manager Troubleshooting
Device Manager can help identify hardware or driver issues that prevent storage devices from functioning correctly.
If Disk Management cannot access the SSD properly, reviewing Device Manager may reveal warning indicators.
Steps
- Press Windows + X.
- Open Device Manager.
- Expand Disk Drives.
- Locate the SSD.
- Check for warning icons.
- Right-click the device.
- Select Update Driver.
- Restart the computer.
Once Windows recognizes the SSD correctly, return to Disk Management and attempt initialization again.
Test Environment
- Windows 10 Pro
- SATA SSD
- Standard AHCI Controller
- Updated Storage Drivers
This method can be useful when hardware is detected but remains inaccessible for normal disk management operations.
Method 7: Update Storage Drivers and Reinitialize the SSD
Outdated storage drivers occasionally interfere with disk recognition and management processes.
Users searching for how to initialize ssd windows 11 or how to initialize ssd windows 10 sometimes discover that driver updates resolve the issue immediately.
Steps
- Open Device Manager.
- Expand Storage Controllers.
- Locate the storage controller.
- Select Update Driver.
- Install available updates.
- Reboot the system.
- Reopen Disk Management.
- Initialize the SSD if required.
Updated drivers improve compatibility between Windows and storage hardware.
Test Environment
- Windows 11 Home
- PCIe NVMe SSD
- Microsoft Storage Controller
- Internet Connection Available
After updating drivers, initialization procedures often proceed normally.
Best Practices After SSD Initialization
Format the SSD Correctly
Initialization only prepares the disk structure. To make the SSD usable, a file system must also be created.
Most Windows users should select:
- NTFS for general storage
- exFAT for cross-platform compatibility
Formatting choices affect:
- File size limits
- Compatibility
- Security features
- Performance characteristics
Choosing the appropriate format ensures the SSD performs efficiently for its intended purpose.
Optimize SSD Performance
After users initialize new ssd hardware successfully, performance optimization can help maximize lifespan and responsiveness.
Recommended practices include:
- Enable TRIM support.
- Maintain free disk space.
- Avoid excessive write operations.
- Install firmware updates.
- Use manufacturer management utilities.
Modern SSDs require minimal maintenance, but these practices can improve long-term reliability.
Monitor SSD Health Regularly
Storage devices naturally experience wear over time.
Monitoring tools can provide information about:
- Remaining lifespan
- Temperature
- Read/write errors
- Firmware status
- Drive health metrics
Regular monitoring allows users to identify problems before serious failures occur.
⚠️ Warning: Unexpected health warnings may indicate an increased risk of data loss. Create backups immediately if errors appear.
Frequently Asked Questions
How to Initialize SSD Windows 11?
Users asking how to initialize ssd windows 11 can typically complete the process using Disk Management.
The basic workflow is:
- Open Disk Management.
- Locate the SSD.
- Select Initialize Disk.
- Choose GPT.
- Create a partition.
- Format the volume.
This method works for most new SSD installations on Windows 11 systems.
How to Initialize SSD Windows 10?
The procedure for how to initialize ssd windows 10 is very similar.
Steps include:
- Open Disk Management.
- Select the uninitialized SSD.
- Choose GPT or MBR.
- Complete initialization.
- Create a new volume.
- Format the partition.
Windows 10 supports both GPT and MBR partition styles.
Can I Initialize an SSD Without Losing Data?
It depends on the situation.
For a brand-new SSD, there is no data to lose.
However, if Windows requests initialization for a drive that previously contained files, initialization may complicate recovery efforts. Users should attempt recovery first if important information may still be present.
This is why evaluating recovery options before proceeding is recommended.
Why Does Windows Ask Me to Initialize SSD Drive?
Windows may display an initialization request when:
- The SSD is brand new.
- The partition table is missing.
- Disk metadata is corrupted.
- Storage structures cannot be recognized.
In many cases, this message is normal and simply indicates that the drive requires configuration before use.
Should I Choose GPT or MBR?
For most modern systems, GPT is recommended because it offers:
- Better compatibility with Windows 11
- Support for larger drives
- More partition flexibility
- Improved reliability
MBR is generally reserved for older hardware and legacy operating systems.
Final Thoughts
Preparing an SSD for Long-Term Reliability
Learning how to initialize ssd hardware is one of the first tasks users encounter after installing a new storage device. Although the process may seem technical at first, Windows provides several straightforward methods that make SSD setup relatively simple.
In this guide, we examined what it means to initialize ssd, why Windows may request initialization, and how to complete the process using Disk Management, DiskPart, Device Manager, and driver troubleshooting techniques. We also covered related topics such as how to initialize a new ssd, how to initialize an ssd, how to initialize ssd windows 11, how to initialize ssd windows 10, and solutions for situations where Windows cannot detect the drive correctly.
Before initializing any SSD that previously contained data, users should verify whether recovery is necessary. PandaOffice Drecov can help retrieve important files before reconfiguration takes place, reducing the risk of accidental data loss.
By choosing the appropriate partition style, creating properly formatted volumes, maintaining updated drivers, and monitoring SSD health regularly, users can ensure their storage devices remain reliable and perform efficiently for years to come.


