


If you have been using Windows 10 for a while, you’ve probably noticed OneDrive quietly working in the background, syncing files and occasionally reminding you to back things up. It’s Microsoft’s built-in cloud storage service, dIf you have been using Windows 10 for a while, you’ve probably noticed OneDrive quietly working in the background, syncing files and occasionally reminding you to back things up. It’s Microsoft’s built-in cloud storage service, designed to keep your files accessible from anywhere—your laptop, phone, or even a web browser. However, many users on communities like Reddit frequently discuss the best ways to manage system resources
, often seeking advice on how to disable onedrive windows 10 to stop intrusive background services. Whether you want to save bandwidth or reclaim privacy, learning how to disable onedrive windows 10 is the first step toward a more streamlined desktop experience.esigned to keep your files accessible from anywhere—your laptop, phone, or even a web browser. Sounds convenient, right? And for many people, it absolutely is.
Understanding OneDrive in Windows 10
What OneDrive Does
From a technical standpoint, OneDrive operates as a background process that continuously monitors file changes and uploads them in real time. This means it is always “on,” even when you are not actively using it. For users who prefer complete control over their data and system performance, this behavior can be more annoying than helpful. Consequently, many users search for how to disable OneDrive Windows 10 to regain manual control over their file management.
How It Integrates with Windows
OneDrive is not just another app—it’s deeply integrated into Windows 10. You will find it embedded in File Explorer, set to launch on startup, and sometimes even prompting you during system setup. It’s like a built-in assistant that assumes you want cloud syncing from day one. This tight integration is both a strength and a weakness. On one hand, it makes file sharing and backup seamless. On the other hand, it makes learning how to disable OneDrive Windows 10 feel a bit like untangling wires behind a desk—possible, but slightly tricky if you don’t know where to start.
Why Disable OneDrive?
Privacy and Data Concerns
Let’s talk about privacy for a moment. When OneDrive syncs your files, they are stored on remote servers. Even though Microsoft uses encryption and security measures, some users simply prefer keeping their data offline. It’s like choosing between storing your valuables in a bank vault versus keeping them at home—you might trust the system, but you still want full control. For businesses, freelancers, or anyone handling sensitive data, knowing how to disable OneDrive Windows 10 can reduce the risk of accidental uploads or unauthorized access. You don’t have to worry about files being synced without your knowledge.
Performance and System Resources
Another big reason people choose to how disable OneDrive is performance. Since it runs in the background, it uses CPU, RAM, and network bandwidth. On high-end systems, you might not notice much difference. But on older or budget machines, that extra load can slow things down. Imagine trying to run a race while carrying a backpack—you can still move, but it’s not as smooth or fast. Learning how to disable OneDrive Windows 10 removes that “extra weight,” allowing your system to run more efficiently.
Storage Limitations
OneDrive’s free plan comes with limited storage (usually 5GB). Once you hit that limit, you will either need to upgrade or stop syncing files. For users who prefer not to pay for cloud storage, this can be a dealbreaker. Instead of constantly managing cloud space, many people choose to how disable OneDrive and rely on external drives or other storage solutions.
Method 1: Pause OneDrive Sync
Steps to Pause Sync
If you are not ready to fully commit to how to disable OneDrive Windows 10, pausing sync is a quick and easy option.
- Step 1: Look for the white or blue cloud icon in your system tray (bottom right corner of your screen).
- Step 2: Right-click the icon.
- Step 3: Select Help & Settings.
- Step 4: Choose Pause syncing. You can select 2, 8, or 24 hours.

Key Point: This is a temporary measure. Syncing will resume automatically after the selected time expires.
When to Use This Method
Pausing sync is ideal for short-term situations. It doesn’t remove OneDrive or change its settings permanently, so it is safe and reversible. If you are just testing whether OneDrive is affecting performance or if you are on a metered connection, this is a good starting point for how to disable OneDrive Windows 10 temporarily.
Method 2: Unlink OneDrive Account
How can I disable OneDrive by unlinking?
Unlinking your account is a more effective step than just pausing. This stops the connection between your PC and the Microsoft servers without deleting the application itself.
- Step 1: Right-click the OneDrive icon in the system tray.
- Step 2: Click Settings.
- Step 3: Go to the Account tab.
- Step 4: Click Unlink this PC.
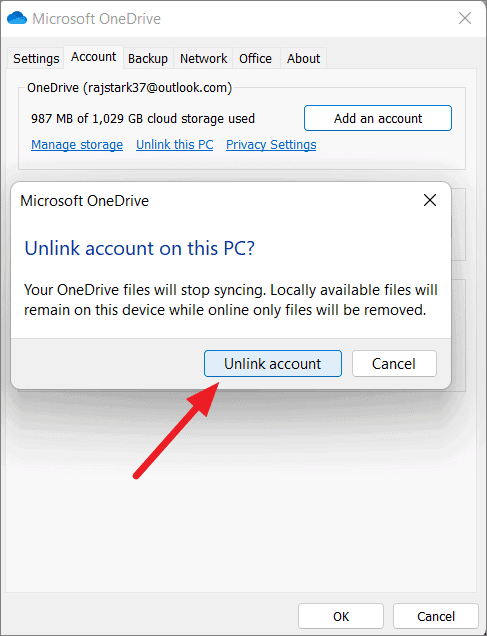
- Step 5: Confirm by clicking Unlink account in the pop-up window.
Effects of Unlinking
Once unlinked, OneDrive essentially becomes inactive. It won’t sync, but it may still be installed on your system. Your existing files remain on your device, but no new changes will be uploaded. This is a common answer for those asking how can I disable OneDrive without deleting the program entirely.
Method 3: Disable OneDrive Startup
Using Task Manager
If you want to know how to disable OneDrive Windows 10 from running every time you turn on your computer, Task Manager is your friend.
- Step 1: Press Ctrl + Shift + Esc to open Task Manager.
- Step 2: Click on the Startup tab (if you don’t see tabs, click “More details”).
- Step 3: Find Microsoft OneDrive in the list.
- Step 4: Right-click it and select Disable.
Impact on Performance
Disabling startup can significantly improve boot times and reduce background activity. Your system will feel lighter and more responsive, especially if you have multiple startup programs. This is a vital step in how disable OneDrive for a cleaner user experience.
Method 4: Disable via Group Policy
Step-by-Step Instructions
If you are using Windows 10 Pro or Enterprise, you can use the Local Group Policy Editor. This is a powerful way to implement how to disable OneDrive Windows 10 at a system level.
- Step 1: Press Win + R, type
gpedit.msc, and hit Enter. - Step 2: Navigate to:
Computer Configuration->Administrative Templates->Windows Components->OneDrive. - Step 3: In the right pane, double-click Prevent the usage of OneDrive for file storage.
- Step 4: Select the Enabled radio button.
- Step 5: Click Apply and then OK.
Who Should Use This Method
This method is best for advanced users or IT administrators who want a permanent, hard-coded solution. It completely disables OneDrive functionality, including its appearance in File Explorer.
Method 5: Disable via Registry Editor
Registry Steps
For Windows 10 Home users who do not have access to Group Policy, the Registry Editor is the go-to tool for how to disable OneDrive Windows 10.
- Step 1: Press Win + R, type
regedit, and press Enter. - Step 2: Navigate to the following path:
HKEY_LOCAL_MACHINE\SOFTWARE\Policies\Microsoft\Windows\OneDrive(If the OneDrive folder isn’t there, right-click the Windows folder, select New > Key, and name it OneDrive). - Step 3: Right-click in the right pane, select New > DWORD (32-bit) Value.
- Step 4: Name it
DisableFileSyncNGSC. - Step 5: Double-click it and set the Value data to
1.
Warning: Editing the registry is like performing surgery on your system—precise and risky. Always back up your registry before making changes. A single mistake can cause system instability.
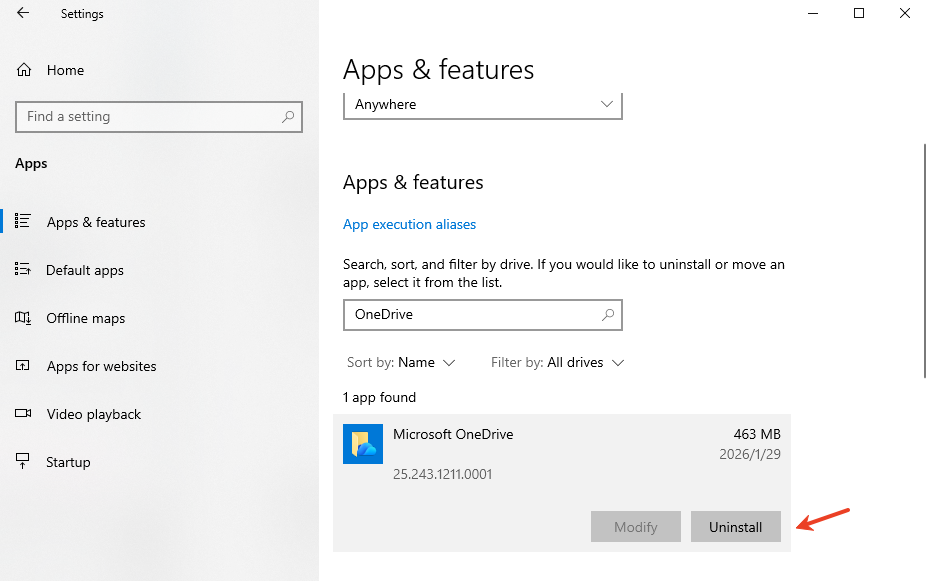
Method 6: Uninstall OneDrive
Using Settings
If you are certain you don’t need the service, the most direct approach to how to disable OneDrive Windows 10 is to uninstall it.
- Step 1: Click the Start menu and go to Settings (gear icon).
- Step 2: Select Apps and then Apps & features.
- Step 3: Search for Microsoft OneDrive.
- Step 4: Click on it and select Uninstall.
Command Prompt Option
Sometimes the standard uninstall fails. You can force the removal via Command Prompt:
- Step 1: Type
cmdin the Windows search bar, right-click, and Run as Administrator. - Step 2: Type
taskkill /f /im OneDrive.exeto stop the process. - Step 3: Type
%SystemRoot%\SysWOW64\OneDriveSetup.exe /uninstall(for 64-bit Windows) or%SystemRoot%\System32\OneDriveSetup.exe /uninstall(for 32-bit) and hit Enter.
Recovering Lost Data: PandaOffice Drecov
When you are learning how to disable OneDrive Windows 10, things can sometimes go wrong. You might accidentally delete a local folder thinking it was just a cloud shortcut, or unlinking your account might leave you confused about where your files went. This is where PandaOffice Drecov comes in.
PandaOffice Drecov is a professional-grade data recovery tool designed for everyday users. It specializes in recovering files that have been deleted, formatted, or lost due to syncing errors.
⚠ Warning: Install it on a drive different from the one where your data was lost to prevent overwriting.
How to Use PandaOffice Drecov
If you find that your files have vanished after attempting how to disable OneDrive Windows 10, follow these steps:
- Select Location: Choose the drive where your OneDrive folder was located (usually the C: drive).

- Scan: Click the “Scan” button. The tool will use advanced algorithms to find traces of “ghost” files left behind.

- Preview and Recover: Browse the list of found files. You can preview images and documents to ensure they are intact. Select the files you need and click Recover.
Pro Tip: Always save recovered files to a different drive (like a USB stick) to prevent overwriting the data you are trying to save!
For more detailed guides on managing your files during this process, check out these resources:
- How to delete OneDrive the right way and not lose your work
- Turn off OneDrive sync without losing files
- Remove OneDrive from File Explorer guide
Comparison of Methods
| Method | Ease of Use | Permanence | Best For |
| Pause Sync | Very Easy | Temporary | Quick fixes/Metred data |
| Unlink Account | Easy | Medium | Stopping cloud uploads |
| Disable Startup | Easy | Medium | Better system performance |
| Group Policy | Medium | Permanent | Advanced users/Windows Pro |
| Registry Editor | Advanced | Permanent | Windows Home users |
| Uninstall | Easy | Permanent | Full removal of the app |
What Happens After Disabling OneDrive
When you successfully execute how to disable OneDrive Windows 10, your files aren’t deleted, but the way they are managed changes. You will now rely entirely on local storage. This means no automatic cloud backups and no cross-device syncing. It is like switching from autopilot to manual control—you gain flexibility, but you take on more responsibility for your own backups.
Your system may also feel faster and less cluttered. Background processes are reduced, and startup times improve. For many users, this trade-off is worth it for the peace of mind.
Disable Onedrive Windows 10 FAQs
1. Can I reinstall OneDrive later?
Yes. If you decide you need cloud storage again after following the steps for how to disable OneDrive Windows 10, you can download it from the official Microsoft website.
2. Will disabling OneDrive affect Windows updates?
No. Windows Update operates independently. Learning how to disable OneDrive Windows 10 will not break your system’s ability to receive security patches.
3. Are my files safe after disabling OneDrive?
Yes, as long as they are stored locally. However, we recommend using an external hard drive for manual backups once cloud syncing is off.
4. Which method is safest for beginners?
Unlinking your account or disabling the startup process are the safest ways to achieve how to disable OneDrive Windows 10 without risking system errors.
5. Does uninstalling OneDrive free up space?
It frees up the space used by the application itself, but the files previously synced will still occupy space on your hard drive unless you delete them manually.
Conclusion
Mastering how to disable OneDrive Windows 10 is all about reclaiming control over your personal computing environment. Whether your motivation is privacy, system speed, or simply avoiding annoying pop-ups, the methods outlined above provide a clear path forward.
From simple tweaks like pausing sync to advanced registry edits, you now have the tools to tailor Windows 10 to your specific needs. Just remember to keep your data safe and use tools like PandaOffice Drecov if you ever run into a digital emergency.


