


Overview of Installing Windows on a New SSD Drive
Understanding Windows installation on SSD systems
Installing Windows on a new SSD has become one of the most effective ways to significantly improve overall system performance. Compared with traditional hard drives, SSDs provide faster boot times, quicker file access, and improved system responsiveness. This is why many users search for install windows 10 on new ssd when upgrading their computers.
When performing a windows 10 install on ssd, the process can be done either through a clean installation or system migration. A clean installation means setting up Windows from scratch, while migration involves transferring an existing system from a hard drive to an SSD.
Modern systems such as Windows 10 and Windows 11 fully support SSD installation, making it easier for users to perform installing windows on a new ssd without complex manual configuration. However, proper preparation is essential to avoid data loss or boot errors.
The installation process involves several key components:
- BIOS/UEFI configuration
- Disk initialization (GPT or MBR)
- Windows installation media
- Boot sequence setup
Understanding these components ensures a smooth installation process and prevents common issues such as drive detection failure or incorrect boot configuration.
Why SSD installation improves system performance
Test environment: Windows 10 system + SATA HDD vs NVMe SSD comparison setup
Upgrading to SSD is one of the most impactful hardware improvements for any computer system. Users searching for install windows 10 on new ssd drive are usually motivated by performance issues such as slow boot times or lagging applications.
SSDs use flash memory instead of mechanical disks, which eliminates physical read/write delays. This results in:
- Faster system startup
- Quicker application loading
- Improved multitasking performance
- Reduced system freezing
When performing a windows 10 install on new ssd, users typically notice performance improvements immediately after installation. Even older systems benefit significantly from SSD upgrades.
In gaming environments, SSDs reduce loading times dramatically. In productivity environments, they enhance workflow efficiency by reducing delays in software execution.
Because of these advantages, SSD installation has become a standard upgrade process for both personal and professional computers.
⚠️Warning: Preparation before installing Windows on SSD
Before starting any installation process, it is extremely important to back up all important data. Even when performing install ssd on windows 10, incorrect disk selection or formatting can lead to permanent data loss.
Key precautions include:
- Backup documents, photos, and system files
- Verify SSD is properly connected
- Ensure power stability during installation
- Double-check target disk selection
Users should also ensure that they are not installing Windows on the wrong drive, especially when multiple storage devices are connected.
Reasons for Installing Windows on a New SSD
System upgrade from HDD to SSD
Test environment: Windows 10 desktop PC + 1TB HDD + 500GB SSD
One of the most common reasons users search install windows 10 on new ssd is to upgrade from a traditional hard drive. HDDs tend to slow down over time due to fragmentation and mechanical wear.
Upgrading to SSD solves these issues by providing:
- Faster data access speed
- Lower system latency
- Improved reliability
- Better overall responsiveness
In most upgrade scenarios, users choose to migrate their system or perform a fresh windows 10 install on ssd to fully benefit from the new hardware.
This upgrade is especially beneficial for older computers that struggle with modern applications or multitasking workloads.
Fresh installation for system repair or optimization
Test environment: Windows 11 system + corrupted OS + bootable USB drive
Another common reason for installing windows on a new ssd is system repair. Over time, operating systems can become corrupted due to malware, failed updates, or software conflicts.
In such cases, a clean installation is often more effective than troubleshooting individual issues. A fresh windows 10 install on new ssd drive ensures that all system files are replaced with clean versions.
This method is widely used in:
- Virus recovery scenarios
- System crash recovery
- Performance optimization setups
A clean install eliminates hidden system errors and restores full stability.
Multi-drive system configuration and storage separation
Test environment: Gaming PC + SSD (OS) + HDD (storage) dual drive setup
Many modern systems use both SSD and HDD storage simultaneously. In these configurations, users often install Windows on SSD for performance while using HDD for data storage.
This leads to frequent searches like installing new ssd windows 11 or install ssd on windows 10.
Typical configuration:
- SSD → operating system and applications
- HDD → files, media, backups
This setup improves performance while maintaining large storage capacity.
⚠️Warning: Avoid mixing system and data drives incorrectly
Incorrect disk setup during installation may result in system boot failure or accidental data overwrite.
Methods: How to Install Windows on a New SSD Without Losing Data
Method 1: Clone existing system to SSD (recommended method)
Test environment: Windows 10 PC + HDD system drive + NVMe SSD + cloning software
One of the safest ways to perform install windows 10 on new ssd without losing data is disk cloning. This method copies the entire operating system, applications, and files from the old drive to the new SSD.
Steps:
- Connect SSD to computer
- Initialize SSD in Disk Management
- Use cloning tool to copy system drive
- Select SSD as target disk
- Start cloning process
- Set SSD as primary boot device
- Restart system
After cloning, the system boots exactly as before, but with improved performance.
This method is widely used for windows 10 install on new ssd drive scenarios where users want to avoid reinstalling everything.
Method 2: Clean install Windows 10 on SSD using bootable USB
Test environment: Windows 10 installation USB + new SSD + UEFI-enabled motherboard
A clean installation is the most reliable method for installing windows on a new ssd.
Steps:
- Create bootable Windows USB
- Enter BIOS/UEFI setup
- Set USB as boot priority
- Start Windows installer
- Select SSD as installation drive
- Format SSD partition
- Complete installation process
This method ensures a fresh system environment without leftover files.
Method 3: System migration using built-in tools
Test environment: Windows 10 system + secondary SSD + backup drive
Some systems allow migration tools that transfer OS data to SSD without full reinstall.
Steps:
- Backup important files
- Run migration tool
- Select SSD as destination
- Transfer system files
- Restart and boot from SSD
This method is useful for install ssd on windows 10 without reinstalling applications.
Method 4: Partition-based installation for advanced users
Test environment: Windows 11 PC + GPT disk + dual storage setup
Advanced users often manually configure partitions before installing Windows.
Steps:
- Initialize SSD as GPT
- Create system partitions
- Start Windows installer
- Select correct partition
- Install OS
- Configure boot settings
This method is commonly used for installing new ssd windows 11 systems.
Method 5: Data-safe installation with recovery preparation
Test environment: Windows PC + failing HDD + new SSD
Before reinstalling Windows, users should ensure important data is preserved.
Steps:
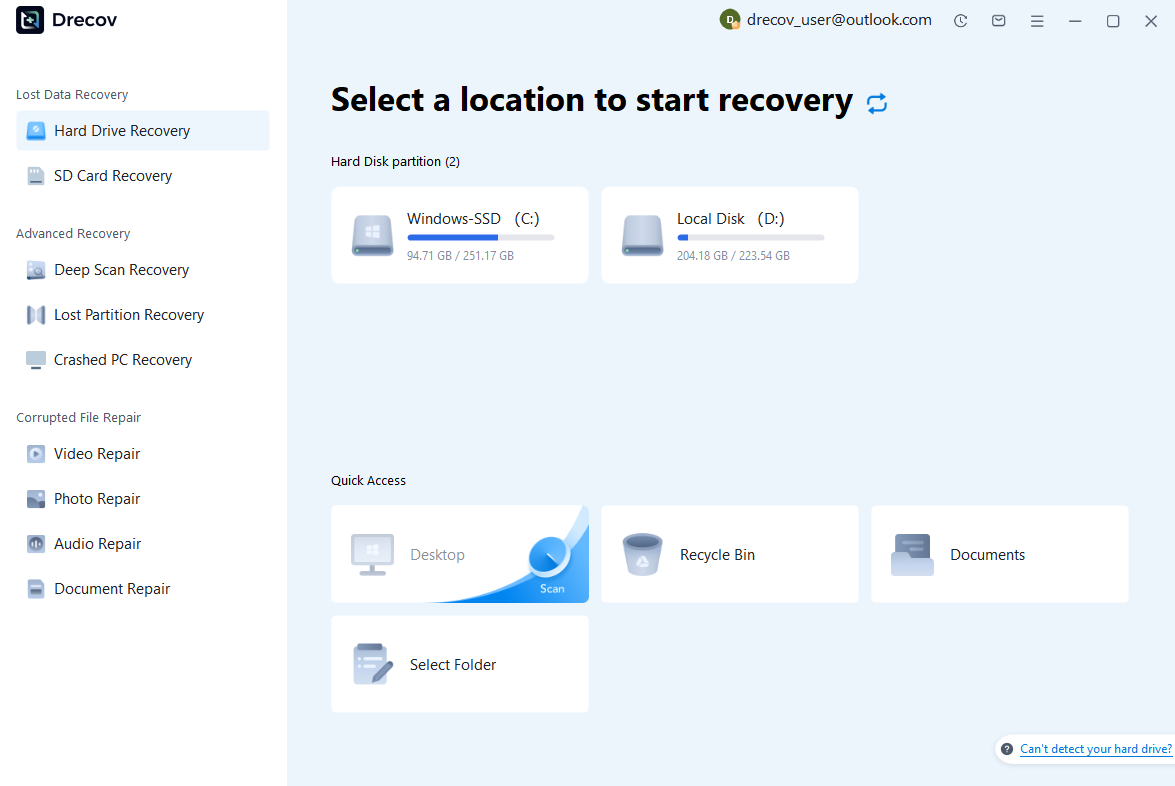
Step 1: Connect the Drive / USB)
Connect your device (SD card, HDD/SSD, or USB drive) to your computer and launch PandaOffice Drecov. Select the target device and start the scan. The software will perform a quick scan and deep scan to detect lost or deleted data.
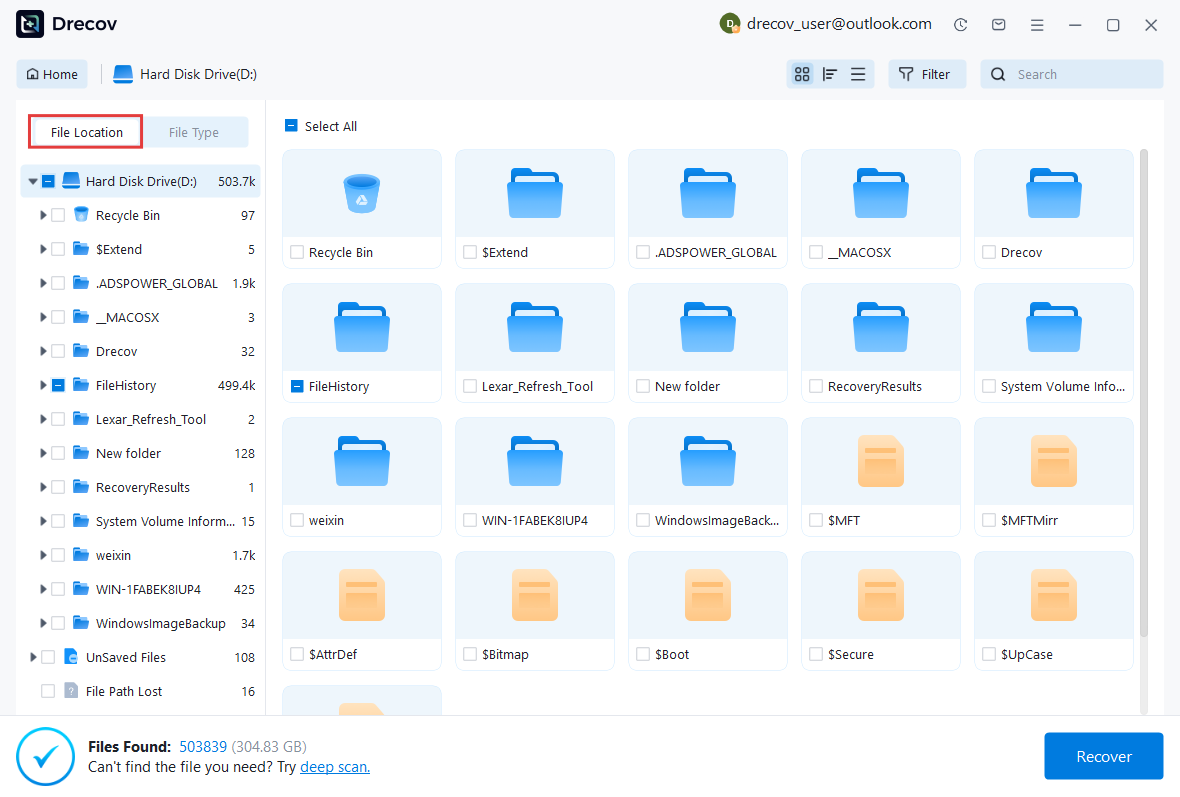
Step 2: Locate and Preview Lost Files
After scanning, browse the detected files and use the preview feature to check recoverable data. You can preview documents (Word, Excel, PDF), photos, and videos to ensure file integrity before recovery.
Step 3: Recover and Save to a New Location
Select the files you want to restore and click recover. Save all recovered data to a different drive or location (not the original device) to avoid overwriting lost data.

Why Choose PandaOffice Drecov Recovery Software?
PandaOffice Drecov offers a fast, secure, and user-friendly solution for recovering lost files across multiple scenarios. Whether you need email recovery, ZIP File Recovery, format data recovery, or help to recover deleted drafts Outlook, the software provides reliable recovery performance for both personal and business users.
PandaOffice Drecov supports recovery from formatted hard drives, SSDs, USB drives, SD cards, and external storage devices. Its advanced scanning engine can locate deleted archives, damaged ZIP files, lost Outlook drafts, and accidentally removed documents with high accuracy. For users searching for how to find deleted messages in Teams, PandaOffice Drecov can also help recover exported chat files, attachments, and related local cache data when available.
After recovery, test the file again. If the audio stream was damaged because of storage issues, a recovered version may play normally.
This method is particularly useful when only a few files exhibit audio problems while VLC works correctly with all other media.
This method can help users recover files from floppy disk storage after accidental deletion, formatting, or logical corruption.
In some cases, tools like Pandaoffice Drecov can be used before installation to recover important files from damaged drives, especially when system access is limited.
⚠️Warning: Always verify SSD selection before installation
Installing Windows on the wrong drive can permanently erase important data.
Advanced Optimization After Installing Windows on SSD
Enabling UEFI and GPT for best SSD performance
Test environment: Windows 10 system + NVMe SSD + UEFI motherboard firmware
After completing a windows 10 install on new ssd, one of the most important optimization steps is ensuring the system runs in UEFI mode with GPT partitioning. This configuration allows faster boot times, improved security features, and full SSD performance utilization.
Many users who perform install windows 10 on new ssd drive skip this step and continue using Legacy BIOS mode, which limits system efficiency.
To optimize:
- Enter BIOS/UEFI settings
- Enable UEFI boot mode
- Convert disk to GPT if needed
- Disable Legacy/CSM mode if supported
This ensures the system fully supports modern SSD architecture and faster initialization.
Optimizing SSD performance after Windows installation
Test environment: Windows 11 PC + SATA SSD + default system installation
Once Windows is installed through installing windows on a new ssd, additional optimization improves long-term performance.
Key optimization steps:
- Enable TRIM support
- Disable unnecessary startup programs
- Turn off disk defragmentation for SSD
- Enable AHCI mode in BIOS
Unlike HDDs, SSDs do not require fragmentation maintenance. Instead, TRIM ensures efficient data handling and prolongs drive lifespan.
These adjustments are especially important after installing new ssd windows 11, where default system settings may not fully optimize SSD performance.
Boot priority configuration and system stability tuning
Test environment: Dual-drive PC + SSD system drive + HDD storage drive
After installation, setting correct boot priority ensures the system always loads from SSD. Many users performing install ssd on windows 10 encounter boot issues due to incorrect BIOS settings.
Steps:
- Enter BIOS setup
- Set SSD as primary boot device
- Save and restart system
- Verify boot speed improvement
Correct boot order prevents fallback to slower drives and ensures stable system startup.
⚠️Warning: Do not disable system-critical BIOS features
Disabling AHCI or misconfiguring boot mode may cause Windows to fail to start after installation.
Common Problems and Troubleshooting During SSD Windows Installation
SSD not detected during Windows installation
Test environment: Windows 10 installer USB + NVMe SSD + new motherboard
A frequent issue during install windows 10 on new ssd is that the SSD does not appear during installation.
Possible causes:
- Missing storage drivers
- Disabled NVMe support in BIOS
- Incorrect SATA mode settings
Solutions:
- Enable AHCI or NVMe mode
- Load storage drivers during installation
- Recheck physical SSD connection
This issue is common in both windows 10 install on ssd and windows 10 install on new ssd drive scenarios.
Windows boot failure after SSD installation
Test environment: Fresh Windows install + incorrect boot configuration
Sometimes after installing windows on a new ssd, the system fails to boot and shows errors such as “No Boot Device Found”.
Fixes:
- Check BIOS boot order
- Rebuild bootloader using recovery USB
- Ensure correct partition is active
This issue often occurs when multiple drives are connected during installation.
Slow SSD performance after installation
Test environment: SATA SSD + Windows 10 + default system configuration
If SSD performance is slower than expected after install ssd on windows 10, it is usually due to misconfiguration.
Fix steps:
- Enable TRIM
- Update chipset drivers
- Switch to AHCI mode
- Disable background indexing
These steps restore full SSD performance and improve responsiveness.
⚠️Warning: Avoid reinstalling Windows repeatedly
Repeated installations without fixing root BIOS or driver issues may lead to system instability.
FAQ: Installing Windows on SSD Common Questions
Can I install Windows 10 on new SSD without losing data?
Yes. You can either clone your existing system or migrate files before performing installation.
Is clean installation better than migration?
Clean installation is more stable, while migration is faster and preserves existing apps.
Do I need to format SSD before installing Windows?
Yes, formatting ensures a clean partition structure for windows 10 install on new ssd drive.
Does SSD require special drivers?
Most modern SSDs work natively with Windows, but NVMe drives may benefit from chipset drivers.
Conclusion: Best Practices for SSD Windows Installation
Key takeaways for SSD system installation
Installing Windows on SSD is one of the most effective ways to improve computer performance. Whether users perform install windows 10 on new ssd, installing windows on a new ssd, or installing new ssd windows 11, the core principles remain the same: correct setup, safe installation, and proper optimization.
To ensure success:
- Choose clone or clean install based on needs
- Always back up important data
- Configure BIOS correctly before installation
- Optimize SSD settings after setup
Final system summary
A properly executed SSD installation dramatically improves system speed, reduces boot time, and enhances overall computing experience. Whether upgrading from HDD or building a new system, understanding windows 10 install on ssd procedures ensures long-term stability and performance.


