


Understanding Acronis True Image Clone Technology
The acronis true image clone function is designed to create an exact, bootable replica of a storage drive. Unlike basic file copying, this process duplicates the entire disk structure, including system partitions, boot records, hidden system files, and user data.
With acronis true image cloning software, users can migrate an operating system from one drive to another without reinstalling Windows or applications. This is particularly useful when upgrading from a traditional hard drive to an SSD or replacing a failing disk.
The acronis true image clone disk process works at a low level, meaning it copies data sector by sector. This ensures that the target disk behaves exactly like the original system, including bootability and system configuration.
In practical use, cloning is often preferred over manual migration because it reduces downtime and eliminates configuration errors. Once the process is complete, the new drive can usually be used immediately as a primary boot device.
Why Users Use Acronis True Image Clone Features
Many users rely on acronis true image clone drive functionality in real-world scenarios where speed, stability, and system consistency are important.
One of the most common use cases is upgrading to SSD. Modern SSDs provide significantly faster boot times and application performance, but reinstalling Windows and software manually can be time-consuming. Cloning solves this problem by transferring everything in one operation.
Another major reason is hardware failure prevention. When a hard drive starts showing signs of failure—such as slow performance, unusual noise, or bad sectors—users often create a clone immediately to avoid data loss.
Businesses also use acronis true image hard drive cloning software to deploy standardized system images across multiple computers. This ensures consistency in office environments and reduces setup time.
Additionally, cloning is widely used in system backup strategies. Instead of restoring individual files, users can restore an entire system instantly by swapping drives.
⚠️ Warning: The destination disk will be completely erased during cloning.
Preparation Before Using Acronis True Image Clone
Before starting any acronis true image clone operation, proper preparation is essential to ensure a smooth process and avoid data loss.
First, confirm that the destination disk has equal or larger storage capacity than the source disk. If the destination is smaller, cloning may fail or produce incomplete results.
Second, close all running applications. Background processes can interfere with disk access and cause cloning interruptions.
Third, check the health of the source disk. If the disk contains severe corruption or physical damage, cloning may not complete successfully.
Fourth, ensure your system has stable power. Interruptions during cloning can lead to system corruption or incomplete boot sectors.
Finally, back up critical files before starting. Although cloning is designed to be safe, unexpected errors can still occur.
How to Perform Acronis True Image Clone (Step-by-Step Methods)
Method 1: Standard Disk Cloning
This is the most commonly used method for acronis true image clone disk operations and is suitable for most users.
Steps
- Open Acronis True Image on your computer
- Navigate to the Tools section
- Select the Clone Disk option
- Choose Automatic mode for easier setup
- Select the source disk (original drive)
- Select the destination disk (new drive)
- Review the configuration settings
- Start the cloning process
- Wait for completion and restart system
Test Environment
- Operating System: Windows 10 / Windows 11
- Source Drive: HDD (system disk)
- Destination Drive: SATA SSD
- Mode: Automatic partition alignment enabled
- Scenario: Basic system upgrade
This method is recommended for general users because it automatically adjusts partitions and ensures boot compatibility without manual configuration.
Method 2: Manual Partition Cloning
This method is designed for advanced users who need full control over acronis true image clone drive configuration.
Steps
- Launch Acronis True Image
- Choose Clone Disk tool
- Select Manual mode instead of automatic
- Review all partitions on the source disk
- Assign each partition to destination disk manually
- Resize partitions if necessary
- Confirm boot partition mapping
- Start cloning process
- Restart system after completion
Test Environment
- Operating System: Windows 11 Pro
- Disk Layout: Multi-partition system disk
- Scenario: Advanced partition control
- Hardware: Mixed SSD + HDD environment
This method is useful when users want to customize partition sizes or manage dual-boot systems.
Method 3: System Migration Cloning
This method is widely used for operating system transfer using acronis true image cloning software.
Steps
- Open Acronis True Image
- Select Clone Disk option
- Choose system disk as source
- Select new SSD as destination
- Enable system migration settings
- Begin cloning process
- Wait for completion
- Boot from new drive after restart
Test Environment
- Operating System: Windows 10 Home
- Migration Type: HDD to NVMe SSD
- Boot Mode: UEFI enabled
- Scenario: Full OS migration without reinstall
This method is ideal for users upgrading to faster SSD storage while keeping the same system environment.
Method 4: Full Disk Cloning for System Backup
This method is commonly used with acronis true image hard drive cloning software for complete system duplication.
Steps
- Launch Acronis True Image
- Select full disk clone option
- Choose source disk
- Select destination disk
- Verify disk structure
- Start cloning process
- Wait until completion
- Replace or boot from cloned drive
Test Environment
- Operating System: Windows 11
- Disk Size: 1TB HDD
- Destination: External SSD
- Scenario: Full system backup and disaster recovery
This method ensures complete replication of the system for emergency recovery purposes.
Method 5: SSD Optimization Cloning Mode
This method improves performance when cloning to SSD using acronis true image clone drive.
Steps
- Open Acronis True Image
- Select Clone Disk tool
- Choose SSD as destination
- Enable SSD optimization option
- Start cloning process
- Allow automatic alignment
- Complete cloning process
- Boot system from SSD
Test Environment
- Operating System: Windows 11
- Source: HDD mechanical drive
- Destination: NVMe SSD
- Scenario: Performance upgrade optimization
This ensures proper alignment for SSD performance and longevity.
Method 6: Pre-Cloning Data Safety Workflow
Before performing cloning, some systems may require data recovery due to instability or disk errors.
Steps
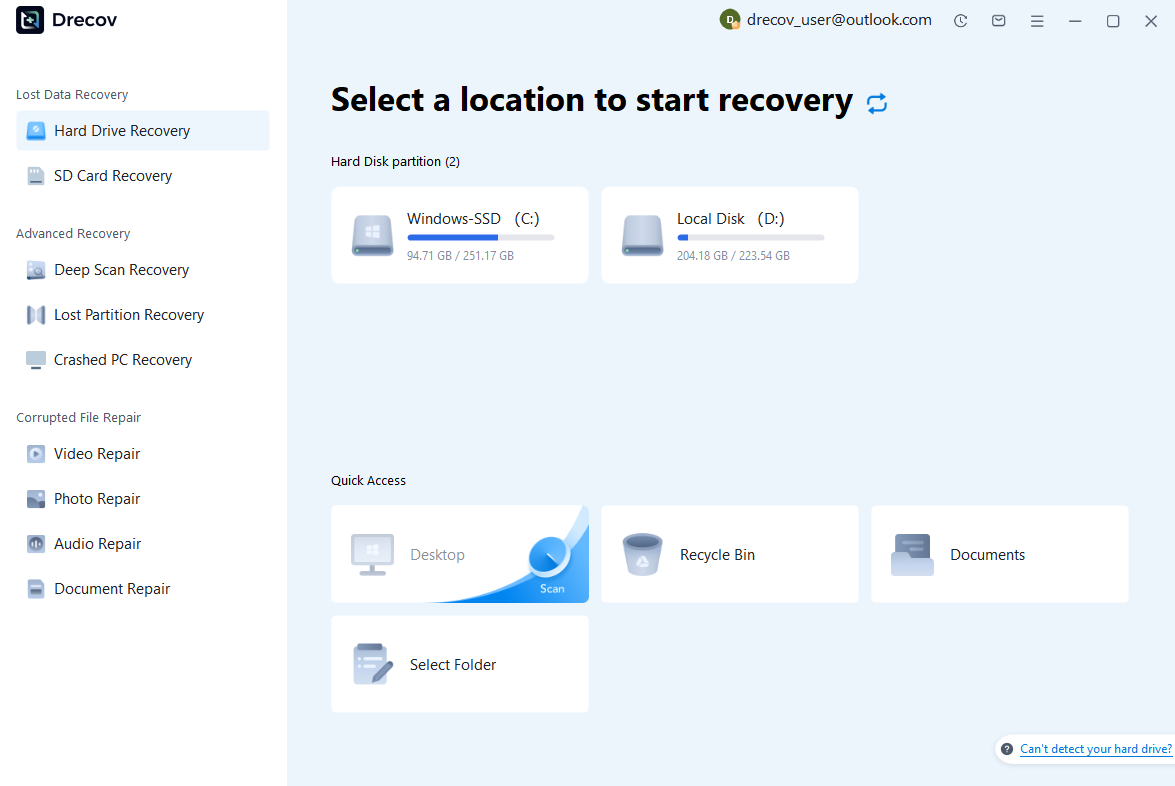
Step 1: Connect the Drive / USB)
Connect your device (SD card, HDD/SSD, or USB drive) to your computer and launch PandaOffice Drecov. Select the target device and start the scan. The software will perform a quick scan and deep scan to detect lost or deleted data.
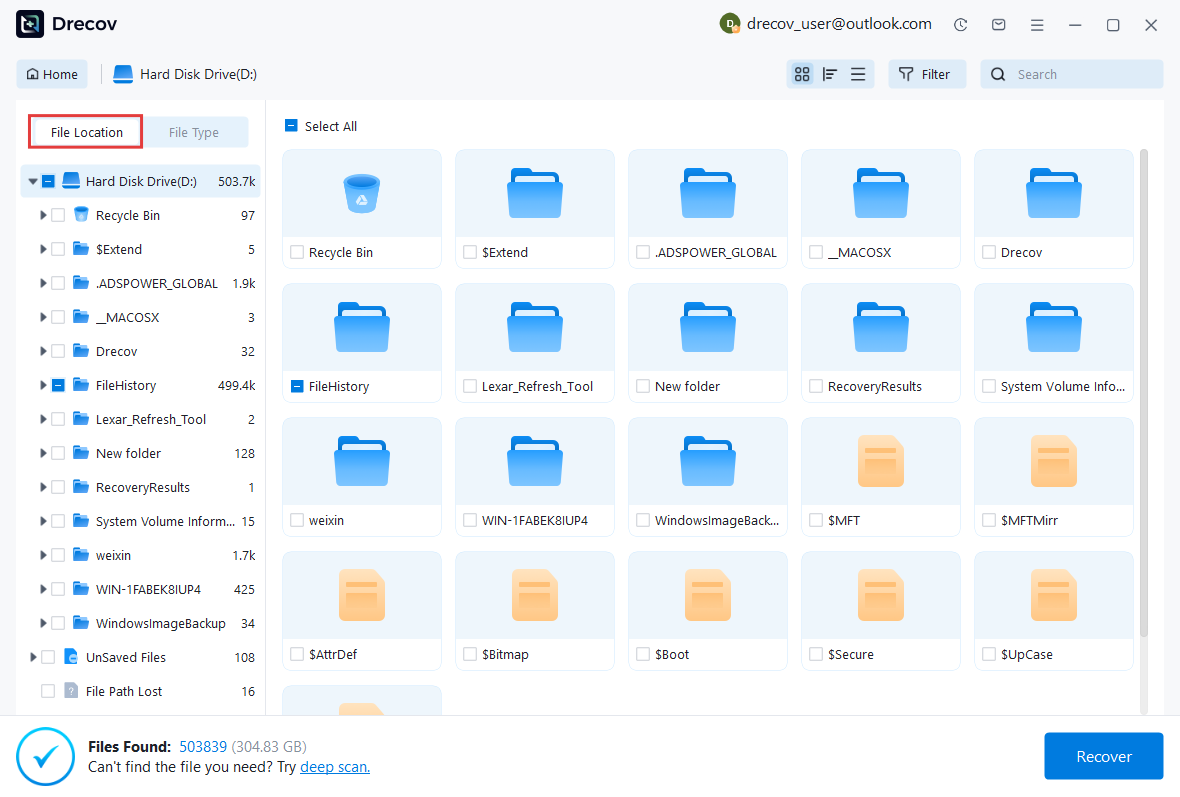
Step 2: Locate and Preview Lost Files
After scanning, browse the detected files and use the preview feature to check recoverable data. You can preview documents (Word, Excel, PDF), photos, and videos to ensure file integrity before recovery.
Step 3: Recover and Save to a New Location
Select the files you want to restore and click recover. Save all recovered data to a different drive or location (not the original device) to avoid overwriting lost data.

Why Choose PandaOffice Drecov Recovery Software?
PandaOffice Drecov offers a fast, secure, and user-friendly solution for recovering lost files across multiple scenarios. Whether you need email recovery, ZIP File Recovery, format data recovery, or help to recover deleted drafts Outlook, the software provides reliable recovery performance for both personal and business users.
PandaOffice Drecov supports recovery from formatted hard drives, SSDs, USB drives, SD cards, and external storage devices. Its advanced scanning engine can locate deleted archives, damaged ZIP files, lost Outlook drafts, and accidentally removed documents with high accuracy. For users searching for how to find deleted messages in Teams, PandaOffice Drecov can also help recover exported chat files, attachments, and related local cache data when available.
After recovery, test the file again. If the audio stream was damaged because of storage issues, a recovered version may play normally.
This method is particularly useful when only a few files exhibit audio problems while VLC works correctly with all other media.
This method can help users recover files from floppy disk storage after accidental deletion, formatting, or logical corruption.
In some cases, users may use recovery tools like Pandaoffice drecov to retrieve data before cloning begins.
Test Environment
- Operating System: Windows 11
- Scenario: Failing HDD before migration
- Condition: Partial disk corruption
- Workflow: Recovery → Backup → Clone
⚠️ Warning: Do not write new data to a failing disk before recovery
Common Problems During Acronis True Image Clone
Even though acronis true image clone is designed to be reliable, users may still encounter technical issues during the cloning process. These problems usually relate to hardware compatibility, disk health, system configuration, or user operation mistakes.
One frequent issue is cloning failure caused by bad sectors on the source disk. When a drive has physical degradation, the software may struggle to read all data blocks, leading to incomplete cloning or sudden interruption.
Another common problem is the destination disk not being recognized. This often happens when the BIOS does not detect the new SSD or HDD due to incorrect SATA mode, loose cables, or uninitialized partitions.
Boot failure after cloning is also a widely reported issue. Even if the cloning process completes successfully, the system may not boot because the boot partition was not correctly transferred or the boot order in BIOS was not updated.
Slow cloning speed is another concern, especially when cloning from older mechanical drives. HDD read/write limitations significantly reduce performance compared to SSD-to-SSD cloning.
⚠️ Warning: Always verify disk health before starting a clone operation to reduce failure risk.
Advanced Optimization for Acronis True Image Clone Performance
To improve the success rate and speed of acronis true image clone drive operations, users can apply several optimization strategies.
One important optimization is enabling SSD alignment during cloning. This ensures that data blocks are properly structured for solid-state drives, improving performance and extending SSD lifespan.
Another optimization is closing background applications before starting the cloning process. This reduces disk usage conflicts and allows Acronis to access storage resources more efficiently.
Using direct SATA or NVMe connections instead of USB adapters can also significantly improve cloning speed. External enclosures often introduce latency that slows down the process.
System defragmentation is useful when cloning from HDD. A fragmented disk increases read time and reduces cloning efficiency.
Finally, ensuring that the system is running in stable power conditions is essential. A sudden power failure during cloning may corrupt the destination disk.
Troubleshooting Boot Issues After Cloning
One of the most frustrating situations users face after using acronis true image cloning software is a non-bootable cloned disk.
The first step is checking BIOS or UEFI settings. The cloned disk must be set as the primary boot device. If the system still boots from the old drive, the boot order must be adjusted manually.
Another issue is mismatched boot modes. If the original system used Legacy BIOS but the new drive is configured for UEFI, the system may fail to start.
Corrupted boot sectors can also cause boot failure. In such cases, users may need to repair the boot configuration using Windows recovery tools.
Secure Boot settings can also interfere with cloned systems, especially when migrating between different hardware platforms.
Disk Detection and Compatibility Issues
When performing acronis true image clone disk operations, hardware compatibility plays a major role in success.
Some SSDs require firmware updates before they can be properly recognized by cloning software. Outdated firmware can lead to detection errors or unstable performance.
SATA mode configuration in BIOS is another critical factor. AHCI mode is generally recommended for SSD cloning, while RAID mode may cause detection inconsistencies.
USB-to-SATA adapters are convenient but not always reliable for cloning large system disks. Direct motherboard connections are always preferred.
Disk initialization status also matters. A newly installed drive must be initialized in Disk Management before it can be used as a cloning target.
Performance Comparison After Cloning
After completing an acronis true image clone drive, users often notice significant performance improvements, especially when migrating from HDD to SSD.
Boot time is usually reduced dramatically, often from over a minute to just a few seconds on NVMe SSDs. Application loading becomes faster due to improved read/write speeds.
System responsiveness also improves, especially when running multiple applications simultaneously. This is because SSDs eliminate mechanical latency found in HDDs.
File transfer speeds increase significantly, particularly when moving large files or performing system updates.
However, performance gains depend heavily on proper SSD optimization during the cloning process. Without alignment, SSD performance may be reduced.
Real-World Use Cases of Acronis True Image Clone
The acronis true image clone disk feature is widely used in both personal and professional environments.
In personal computing, users frequently use cloning to upgrade laptops from HDD to SSD without reinstalling Windows. This provides a quick and seamless upgrade experience.
In enterprise environments, IT departments use cloning to deploy standardized system images across multiple machines. This ensures consistency and reduces configuration time.
Gamers also benefit from cloning when upgrading storage to faster NVMe drives, allowing faster game loading and reduced stuttering.
System administrators rely on cloning for disaster recovery planning, ensuring that fully functional system copies are available in case of hardware failure.
Data Safety and Recovery Considerations
Before performing any acronis true image clone, understanding data safety is critical.
Cloning is not a backup solution in the traditional sense. It overwrites the destination disk completely, meaning any existing data will be lost.
Users should always create separate backups of important files before cloning begins.
If data loss occurs before cloning, recovery tools may be required. In some cases, tools like Pandaoffice drecov can be used to retrieve deleted or inaccessible files from damaged drives.
⚠️ Warning: Never rely solely on cloning as your only data protection strategy.
Frequently Asked Questions (FAQ)
Can I use Acronis True Image clone on different hardware?
Yes, but boot issues may occur if hardware is significantly different. Drivers may need to be updated after cloning.
Is cloned SSD faster than original HDD?
Yes. Performance improves significantly due to SSD technology, especially in boot speed and application loading.
Do I need to reinstall Windows after cloning?
No. A properly completed acronis true image clone creates a fully bootable system without reinstalling Windows.
Can I clone only the operating system?
Yes, but full disk cloning is recommended for best boot stability.
Why is my cloned drive not showing up?
It may not be initialized, or BIOS settings may need adjustment.
Final Conclusion
The acronis true image clone drive process is one of the most efficient methods for migrating or duplicating a complete system. It eliminates the need for manual installation, reduces downtime, and ensures a fully bootable system on the new disk.
Whether you are upgrading to SSD, replacing a failing drive, or deploying systems across multiple machines, cloning provides a reliable and scalable solution.
However, success depends on proper preparation, correct configuration, and understanding potential risks such as boot errors or disk compatibility issues.
When used correctly, acronis true image clone disk functionality can significantly simplify system management and improve overall computing performance.


