


Introduction to Photorec
Understanding Photorec and Its Purpose
Photorec is a free, open-source photorecovery tool designed to recover lost files, including photos, videos, and documents. It works on a variety of operating systems, including Windows Photorec, Linux, and Mac. Users frequently search for how to use Photorec when they encounter accidental file deletion or data loss due to formatting.
⚠️ Warning: Always avoid saving new files on the same drive where data was lost, as this can overwrite recoverable files.
Photorec software focuses on file-based recovery rather than recovering entire disk partitions, making it efficient for retrieving specific lost media. Many users wonder is Photorec safe—yes, it’s widely considered safe when used properly, as it only reads the disk and does not write to it.
Why Photorec is Essential for Data Recovery
Data loss can occur due to multiple reasons:
- Accidental deletion
- Disk formatting
- Corrupted storage devices
- Virus or malware attacks
Photorec data recovery software allows users to recover data from damaged or formatted drives without requiring prior backups. Its effectiveness makes it an essential tool for anyone needing Photorec file recovery, whether it’s on Photorec Windows or other platforms.
Common Causes of Data Loss
Accidental Deletion
Deleting files unintentionally is one of the most common causes of data loss. Whether it’s a photo or an important document, users frequently search for Photorec data recovery to restore these files.
Disk Formatting
Formatting a drive erases file system references, but actual data often remains. Tools like Photorec recovery software can scan these drives and recover files, as it works directly on file signatures rather than file tables.
Corrupted File System or Storage Device
When a drive or SD card becomes corrupted, files may become inaccessible. Users often ask Photorec for Windows if it can restore files in these situations. Yes, Photorec software is specifically designed to scan even corrupted sectors to recover photorecovery data.
Virus and Malware Attacks
Malware can delete or encrypt files, making them appear lost. Photorec data recovery download can retrieve the original files if sectors remain intact.
⚠️ Warning: Run a virus scan before recovering to avoid reinfecting your system.
How to Use Photorec: Step-by-Step Methods
Method 1: Basic Recovery Using Photorec
Test Environment
| Component | Configuration |
|---|---|
| OS | Windows 10 |
| Storage | Formatted USB drive |
| Scenario | Recently deleted photos |
Steps:
- Download Photorec: Obtain the official Photorec download package from its website.
- Install/Extract: Extract the software to a folder (no full installation required).
- Run Photorec: Open the executable; it will prompt a terminal-like interface.
- Select Storage Device: Choose the disk or drive to scan.
- Select File System Type: Choose between FAT/NTFS/ext or other depending on the drive.
- Choose Recovery Location: Pick a safe folder on a different drive.
- Start Recovery: Let the software scan and recover lost files.
Method 2: Deep Scan for Extensive Recovery
Test Environment
| Component | Configuration |
|---|---|
| OS | Windows 10 |
| Storage | SD card, 64GB |
| Scenario | Long-term deleted media |
Steps:
- Launch Photorec software in administrator mode.
- Select the SD card or drive where data loss occurred.
- Opt for Whole Disk Scan instead of partition scan.
- Choose file types to recover (images, videos, documents).
- Start scan and wait for deep scan completion.
- Review recovered files in the output folder.
Deep scanning increases recovery success for older or overwritten files.
Method 3: Recover Specific File Types
Test Environment
| Component | Configuration |
|---|---|
| OS | Windows 11 |
| Storage | External hard drive |
| Scenario | Recover only photos (JPEG/PNG) |
Steps:
- Open Photorec for Windows.
- Choose the target drive and partition.
- Select File Opt to choose specific file types.
- Specify output folder on separate drive.
- Run the scan and recover targeted files.
This method is efficient for users who want selective photorecovery without scanning unnecessary data.
Method 4: Recover from Corrupted Drives
Test Environment
| Component | Configuration |
|---|---|
| OS | Windows 10 |
| Storage | Corrupted hard drive |
| Scenario | Disk showing as RAW |
Steps:
- Open Photorec executable.
- Select corrupted drive from the list.
- Choose Whole Disk Scan for RAW recovery.
- Select destination folder outside the affected drive.
- Start scan to recover lost files from damaged sectors.
⚠️ Warning: Do not write recovered files to the same corrupted drive.
Method 5: Professional Recovery Using PandaOffice Drecov
When Photorec data recovery software cannot recover certain files due to severe corruption, users can use PandaOffice Drecov.
Test Environment
| Component | Configuration |
|---|---|
| Software | PandaOffice Drecov |
| Storage | Severely damaged SD card or HDD |
| Scenario | Files lost after formatting or virus damage |
Steps:
- Install PandaOffice Drecov on a separate drive.
- Select the affected disk or folder.
- Run a deep scan mode optimized for multimedia recovery.
- Preview recovered files before saving.
- Export recovered files to a safe location.
⚠️ Warning: Always recover files to a different drive than the source.
Method 6: Recovery from Partition Images
Test Environment
| Component | Configuration |
|---|---|
| OS | Windows 10 |
| Storage | Disk image created via backup |
| Scenario | Recover files without accessing original drive |
Steps:
- Create a disk image using backup software.
- Open Photorec recovery software.
- Scan the image instead of the physical disk.
- Recover files to another drive.
- Verify recovery success.
Using disk images ensures safety and avoids further corruption of the original drive.
Next Steps and Best Practices
- Avoid using the affected drive until recovery is complete.
- Always select an output folder on a different disk.
- Regularly back up important files to prevent future loss.
- Combine Photorec with professional tools like PandaOffice Drecov for advanced recovery scenarios.
⚠️ Warning: Overwriting the drive or installing recovery tools on the same drive can make recovery impossible.
Recovering Files from Multiple Drives
How to Scan Multiple Drives
Photorec for Windows allows users to scan multiple storage devices sequentially or simultaneously. This is particularly useful when files were distributed across several drives, such as external hard drives, USB sticks, or SD cards.
Test Environment
| Component | Configuration |
|---|---|
| OS | Windows 10 |
| Storage | External HDD + USB drive |
| Scenario | Deleted photos and documents from multiple devices |
Steps:
- Launch Photorec software.
- Select the first storage device for scanning.
- Specify output folder on a safe drive.
- Complete recovery before proceeding to the next drive.
- Repeat steps for each storage device.
Using this method, users can perform Photorec file recovery across multiple devices without mixing recovered files.
⚠️ Warning: Always use separate output folders for each drive to prevent overwriting files.
Recovering from Hidden Partitions
Test Environment
| Component | Configuration |
|---|---|
| OS | Windows 11 |
| Storage | Laptop internal SSD with hidden recovery partition |
| Scenario | Files accidentally deleted from hidden partitions |
Steps:
- Open Photorec executable.
- Detect all visible and hidden partitions.
- Choose the hidden partition to scan.
- Select file types to recover.
- Save recovered files to a separate drive.
This method is essential for users attempting Photorec data recovery download from drives with hidden partitions, such as OEM recovery areas.
File Type Filtering and Selective Recovery
Customizing Recovery for Specific Files
When users only need certain file types—like JPEG images or MP4 videos—Photorec data recovery software provides the option to filter by file signature.
Test Environment
| Component | Configuration |
|---|---|
| OS | Windows 10 |
| Storage | Formatted SD card |
| Scenario | Selectively recover photos |
Steps:
- Open Photorec for Windows.
- Choose the target drive and partition.
- Enter the File Opt menu.
- Select only desired file types (e.g., JPG, PNG, MP4).
- Run recovery and save files to a safe location.
Selective recovery reduces scan time and avoids unnecessary file clutter.
Recovering Files from Damaged or Corrupted Drives
Photorec Deep Recovery Mode
Sometimes, standard scans cannot recover all files. Photorec recovery software includes a deep scan mode that reconstructs files from damaged sectors or corrupted file tables.
Test Environment
| Component | Configuration |
|---|---|
| OS | Windows 10 |
| Storage | Corrupted USB drive |
| Scenario | Files lost due to disk corruption |
Steps:
- Launch Photorec software.
- Choose the corrupted drive.
- Select Whole Disk Scan for deep recovery.
- Choose output location on a different drive.
- Begin scan and review recovered files.
Deep recovery improves success for older or partially overwritten files.
⚠️ Warning: Recovery may take several hours for large drives or deep scans.
Recovering from Encrypted Drives
If the drive was encrypted and files were deleted, Photorec for Windows can attempt recovery if encryption keys or passwords are accessible.
Test Environment
| Component | Configuration |
|---|---|
| OS | Windows 11 |
| Storage | BitLocker-encrypted USB drive |
| Scenario | Recover files after accidental deletion |
Steps:
- Decrypt the drive using system password.
- Launch Photorec software.
- Select the decrypted volume.
- Choose file types or perform a full scan.
- Save recovered files to a separate drive.
This ensures Photorec data recovery works even for encrypted storage devices.
Professional Recovery for Advanced Cases
Using PandaOffice Drecov for Complex Recovery
In extreme cases—like severely corrupted drives or partially overwritten sectors—users can rely on professional recovery software. PandaOffice Drecov complements Photorec by providing advanced scanning algorithms for multimedia recovery.
Test Environment
| Component | Configuration |
|---|---|
| Software | PandaOffice Drecov |
| Storage | Severely damaged HDD or SD card |
| Scenario | Files lost after formatting or virus attack |
Steps:
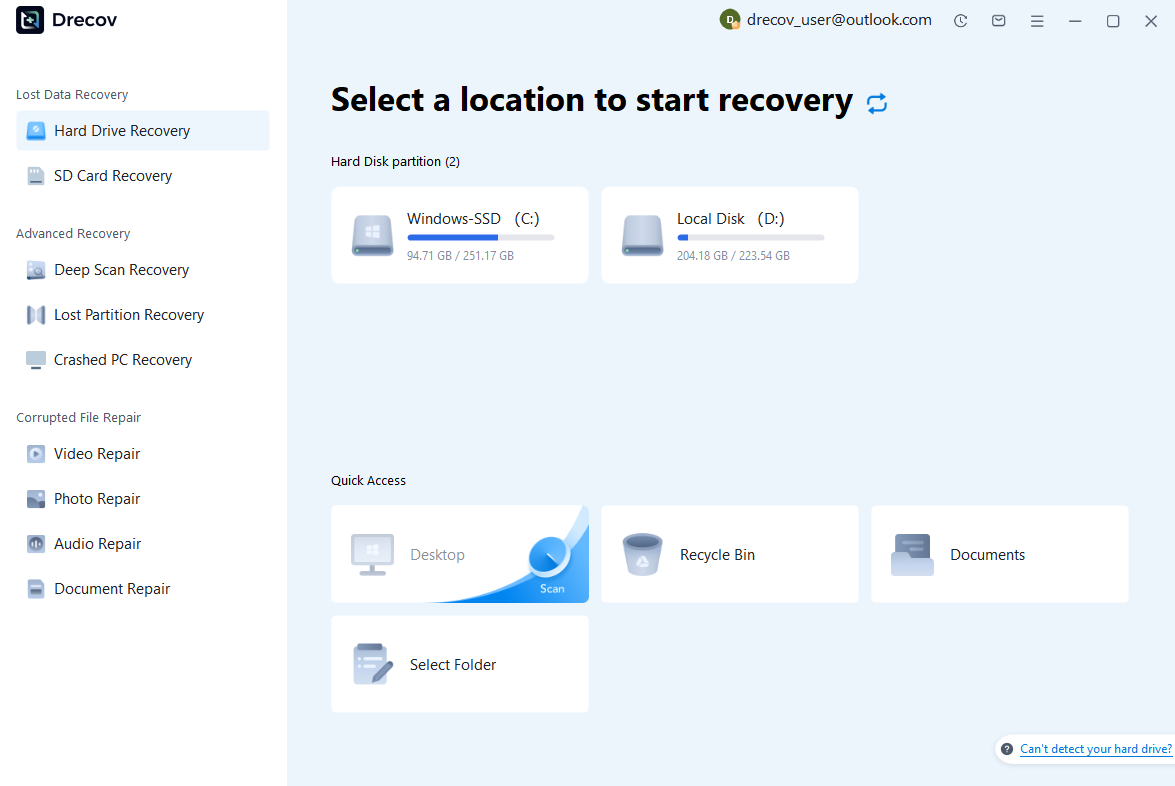
Step 1: Scan the Storage Device (SD Card / Hard Drive / USB)
Connect your device (SD card, HDD/SSD, or USB drive) to your computer and launch PandaOffice Drecov. Select the target device and start the scan. The software will perform a quick scan and deep scan to detect lost or deleted data.
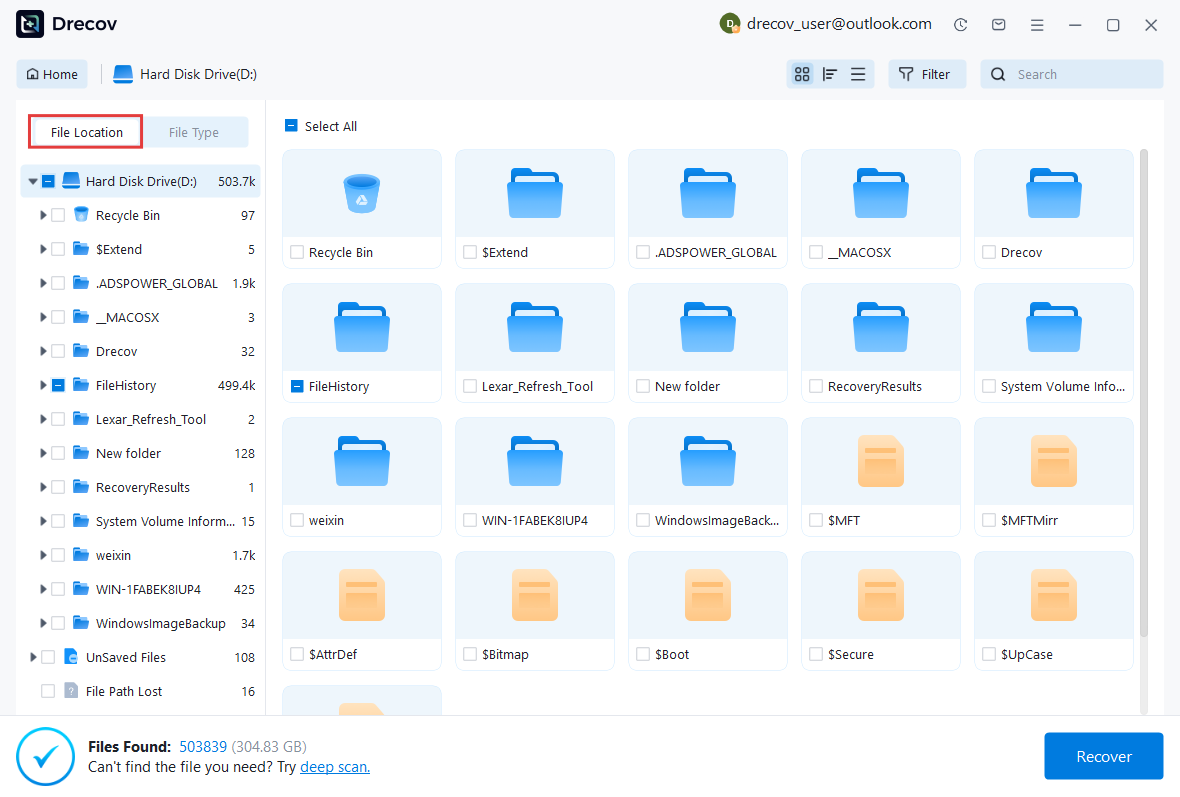
Step 2: Locate and Preview Lost Files
After scanning, browse the detected files and use the preview feature to check recoverable data. You can preview documents (Word, Excel, PDF), photos, and videos to ensure file integrity before recovery.
Step 3: Recover and Save to a New Location
Select the files you want to restore and click recover. Save all recovered data to a different drive or location (not the original device) to avoid overwriting lost data.

Why Choose PandaOffice Drecov Recovery Software?
PandaOffice Drecov offers a fast, secure, and user-friendly solution for recovering lost files across multiple scenarios. Whether you need email recovery, ZIP File Recovery, format data recovery, or help to recover deleted drafts Outlook, the software provides reliable recovery performance for both personal and business users.
PandaOffice Drecov supports recovery from formatted hard drives, SSDs, USB drives, SD cards, and external storage devices. Its advanced scanning engine can locate deleted archives, damaged ZIP files, lost Outlook drafts, and accidentally removed documents with high accuracy. For users searching for how to find deleted messages in Teams, PandaOffice Drecov can also help recover exported chat files, attachments, and related local cache data when available.
Key advantages include:
- Deep scan technology for complex data loss situations
- Support for emails, archives, videos, photos, and office documents
- Recovery from accidental deletion, formatting, corruption, and system crashes
- Easy preview before restoring files
- Compatible with Windows and multiple storage devices
Unlike complicated enterprise recovery tools, PandaOffice Drecov keeps the recovery process simple. Users can scan, preview, and restore files in just a few steps without technical expertise.
Whether you are dealing with lost Outlook drafts, corrupted ZIP archives, formatted drives, or missing communication data, PandaOffice Drecov provides an efficient and practical recovery experience designed to minimize downtime and protect important files.
Disk imaging ensures that even partially corrupted drives can be preserved. This is often the safest approach before attempting any aggressive repair operations for fix bad sectors on hard drive situations.
⚠️ Warning: Do not recover files to the same drive to prevent data overwriting.
Frequently Asked Questions About Photorec
Is Photorec safe to use?
Yes, Photorec software only reads the storage drive and does not write to it, minimizing the risk of further data loss.
Can I use Photorec on Windows?
Absolutely. Photorec Windows version supports Windows 7, 8, 10, and 11, and works with both internal and external drives.
How to download Photorec safely?
Use official sources or trusted repositories to get Photorec download packages. Avoid third-party sites to prevent malware.
Can I recover specific file types?
Yes, the Photorec file recovery option allows users to filter and recover only the file types they need, saving time and storage space.
How do I use Photorec for large drives?
For drives larger than 1TB, use the deep scan mode and ensure the output folder is on a separate drive with sufficient space.
Best Practices for Future Data Protection
- Regularly back up files to multiple locations.
- Avoid using drives after data loss until recovery is complete.
- Use professional recovery tools like PandaOffice Drecov for critical data.
- Keep your Photorec software updated to the latest version.
- Enable file versioning or cloud storage for extra safety.
Conclusion
Photorec is a powerful and versatile photorecovery tool for recovering lost photos, videos, and documents. Whether using Photorec for Windows, scanning corrupted drives, or performing selective file recovery, it provides a reliable solution for most data loss scenarios.
For complex or professional recovery needs, tools like PandaOffice Drecov enhance success rates, making it possible to recover files that standard scans cannot handle. By combining Photorec software with preventive measures and backups, users can significantly reduce the risk of permanent data loss.


