


Understanding the “File Is Too Large for the Destination File System” Error
What Does the Error Mean?
Many Windows users encounter an error message stating “file is too large for the destination file system” when attempting to copy large files to a USB flash drive, memory card, or external hard drive. The message often appears unexpectedly, especially when the destination drive seems to have enough available storage space.
This error does not necessarily indicate that the drive is full. Instead, it usually means the file system used by the storage device has limitations that prevent it from storing individual files above a certain size. In most cases, the destination drive is formatted using FAT32, a file system that cannot store files larger than 4GB.
As modern video files, disk images, system backups, and games continue to increase in size, users frequently encounter situations where a file too large for destination file system error interrupts file transfers.
Fortunately, the problem is relatively easy to solve once the underlying cause is understood. Several methods can eliminate the restriction while preserving data and maintaining compatibility with different operating systems.
Understanding how file systems work will help you choose the most suitable solution.
When Does the Error Usually Appear?
The error commonly occurs during the transfer of large files such as:
- 4K and 8K videos
- ISO image files
- System backups
- Virtual machine files
- Large game installation packages
- Database backups
For example, a 10GB video file may fail to copy to a FAT32-formatted USB drive even if the drive has 64GB of free space.
Users often encounter messages such as:
- the file is too large for the destination file system
- file is too large for destination file system
- the file is too large for the destination
Although the wording varies slightly, the underlying cause remains the same: the destination file system cannot accommodate the file’s size.
How File System Limitations Affect Large File Transfers
A file system controls how data is stored and organized on a storage device.
Common file systems include:
- FAT32
- exFAT
- NTFS
Each file system has different capabilities and limitations.
For example:
| File System | Maximum Single File Size |
|---|---|
| FAT32 | 4GB |
| exFAT | Practically unlimited for most users |
| NTFS | Supports extremely large files |
Because FAT32 imposes a strict 4GB file size limit, users frequently see too large for the destination file system errors when working with modern multimedia files.
Understanding these limitations is essential before attempting any fix.
Why the File Is Too Large for the Destination File System
FAT32 File Size Restrictions Explained
FAT32 remains one of the most widely supported file systems. Many USB drives and memory cards ship preformatted with FAT32 because it offers excellent compatibility across operating systems and devices.
However, FAT32 has one major limitation: individual files cannot exceed 4GB.
As a result, users may receive a file too large for destination error even when plenty of storage space remains available.
For example:
- USB capacity: 128GB
- Available space: 100GB
- File size: 6GB
Despite sufficient free space, FAT32 cannot store the file because it exceeds the maximum allowed size.
This limitation is the most common reason why the file is too large for the destination file message appears.
Differences Between FAT32, exFAT, and NTFS
Choosing the correct file system can prevent future transfer issues.
FAT32
Advantages:
- Broad compatibility
- Supported by most devices
Limitations:
- 4GB file size limit
- Less efficient for large storage devices
exFAT
Advantages:
- Supports large files
- Compatible with Windows and macOS
- Ideal for flash drives
Limitations:
- Some older devices may not support it
NTFS
Advantages:
- Supports very large files
- Advanced security features
- Better reliability
Limitations:
- Limited support on some non-Windows devices
Understanding these differences helps users avoid situations where a file is too large for the destination system error occurs repeatedly.
Why Large Videos and Backup Files Trigger the Error
Modern files continue to grow larger every year.
Examples include:
- 4K movies exceeding 20GB
- Blu-ray backups exceeding 30GB
- System images exceeding 50GB
- Virtual machines exceeding 100GB
These files frequently exceed FAT32 limitations.
As a result, users copying such data often encounter:
- the file is too large for the destination system
- too large for destination file system
- file is too large for destination file system
Large files are now common, making FAT32 increasingly impractical for many modern storage needs.
How to Identify the Current File System of Your Drive
Before applying any solution, determine which file system your drive currently uses.
Follow these steps:
- Connect the storage device.
- Open File Explorer.
- Locate the drive.
- Right-click the drive icon.
- Select Properties.
- View the File System field.
Windows will display:
- FAT32
- exFAT
- NTFS
If FAT32 appears, it is likely the cause of the transfer error.
Knowing the file system helps you choose the most effective solution.
How to Fix File Too Large for Destination File System
Method 1: Convert FAT32 to NTFS Without Formatting
Test Environment
- Windows 11 Pro 24H2
- FAT32 USB Flash Drive
- 8GB Video File
- 64GB Storage Capacity
One of the easiest solutions is converting FAT32 to NTFS without erasing existing files.
This method preserves stored data while removing the 4GB file size restriction.
Using the Convert Command in Windows
- Connect the FAT32 drive.
- Open Command Prompt as Administrator.
- Identify the drive letter.
- Enter the following command:
convert E: /fs:ntfs
- Replace E: with the correct drive letter.
- Press Enter.
- Wait for Windows to complete the conversion.
The process typically takes only a few minutes.
Once completed, the drive will support files much larger than 4GB.
Verifying the Conversion Result
After conversion:
- Open File Explorer.
- Right-click the drive.
- Select Properties.
- Verify that the file system now displays NTFS.
- Attempt to copy the large file again.
Most users find that the file is too large for the destination file system error disappears immediately after successful conversion.
Pros and Cons of NTFS Conversion
Advantages:
- No formatting required
- Existing files remain intact
- Supports large files
- Improves reliability
Disadvantages:
- Some devices may not support NTFS
- Compatibility may be reduced for older hardware
If cross-platform compatibility is important, exFAT may be a better alternative.
Method 2: Format the Drive to exFAT
Test Environment
- Windows 10 Pro 22H2
- External Hard Drive
- FAT32 File System
- 10GB Backup Archive
Formatting a drive to exFAT removes FAT32 limitations and offers excellent compatibility with modern systems.
Unlike NTFS, exFAT is supported by both Windows and macOS without additional software.
Preparing the Drive Before Formatting
Before formatting:
- Copy important files to another storage device.
- Verify that backups are complete.
- Confirm that the destination drive contains no irreplaceable data.
- Disconnect unnecessary storage devices.
- Close running applications.
⚠️Warning: Formatting permanently erases all data stored on the selected drive unless a backup is created beforehand.
Formatting the Drive to exFAT
- Open File Explorer.
- Right-click the storage device.
- Select Format.
- Open the File System dropdown menu.
- Choose exFAT.
- Click Start.
- Confirm the operation.
After formatting, the drive can store files far larger than 4GB.
Why exFAT Is Suitable for Large Files
exFAT offers several advantages:
- Excellent compatibility
- Support for large files
- Fast performance on flash storage
- Suitable for Windows and macOS environments
For most external drives, exFAT provides an ideal balance between compatibility and capacity.
Method 3: Use Pandaoffice Drecov to Protect Data Before Reformatting
Test Environment
- Windows 11 Pro 24H2
- FAT32 USB Flash Drive
- Important Business Documents Stored on Drive
- Pandaoffice Drecov Installed
Sometimes users decide to reformat a drive to eliminate the file is too large for the destination file system error but later realize that important files were not backed up beforehand. In such situations, data recovery software may help recover files before or after formatting.
Pandaoffice Drecov can scan storage devices and identify recoverable files that may still exist on the drive. This can be useful when accidental formatting occurs while trying to fix file system limitations.
Backing Up Critical Files Before File System Changes
Before converting or formatting a storage device:
- Connect the drive to the computer.
- Open the drive and review important files.
- Copy valuable data to another storage location.
- Verify that the backup files open correctly.
- Create a secondary backup if possible.
- Proceed with file system changes only after confirming backup integrity.
Taking these precautions significantly reduces the risk of accidental data loss.
Recovering Data If Formatting Causes Data Loss
If files disappear after formatting:
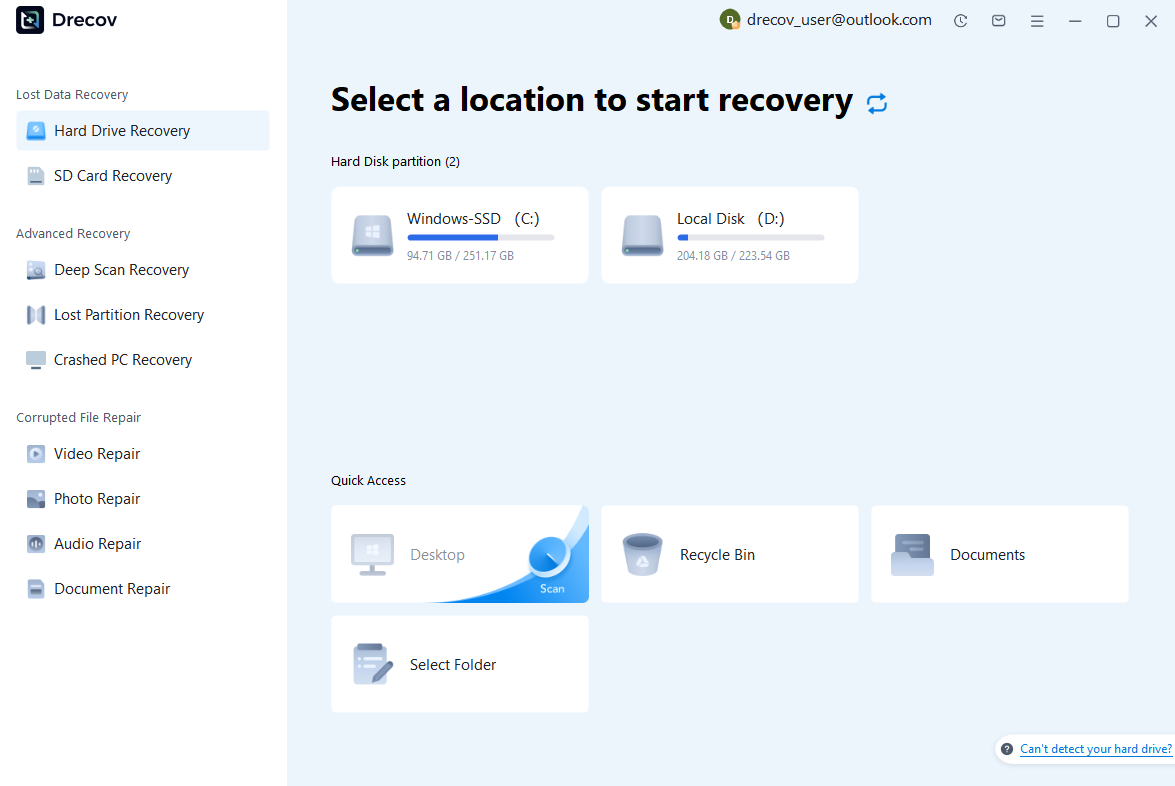
Step 1: Connect the Drive / USB)
Connect your device (SD card, HDD/SSD, or USB drive) to your computer and launch PandaOffice Drecov. Select the target device and start the scan. The software will perform a quick scan and deep scan to detect lost or deleted data.
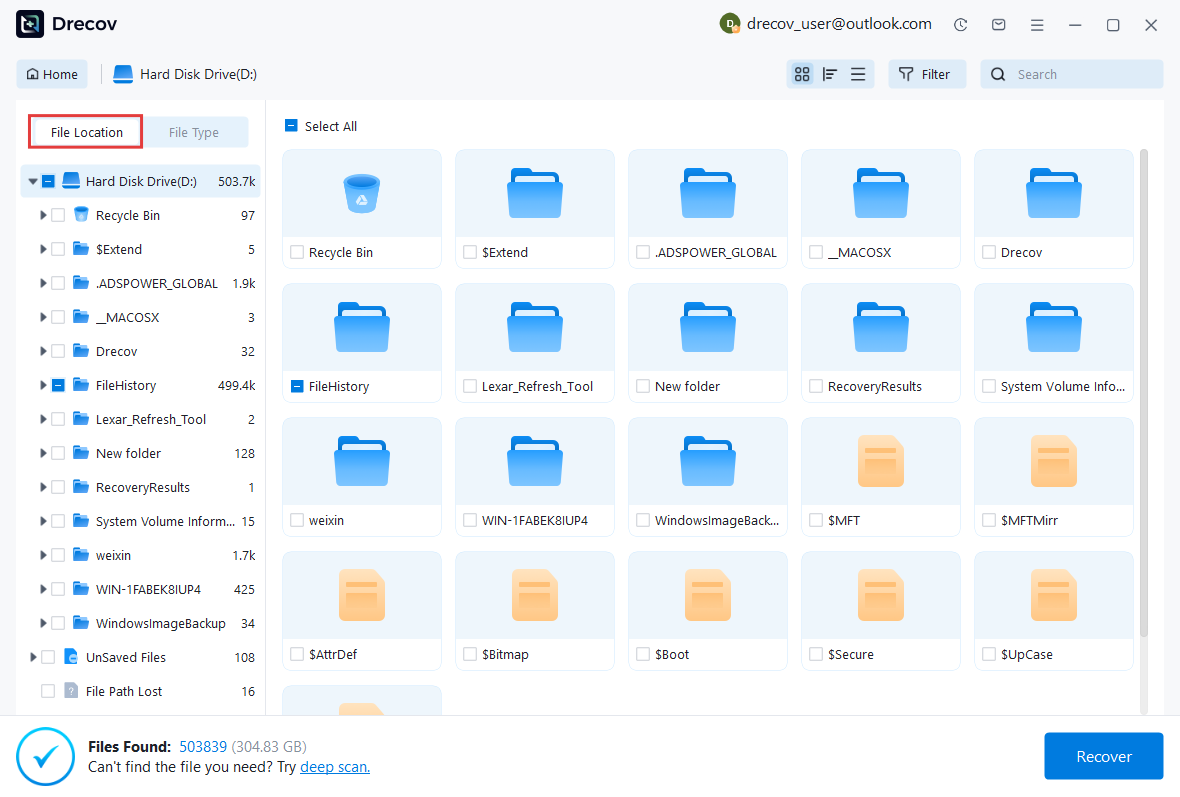
Step 2: Locate and Preview Lost Files
After scanning, browse the detected files and use the preview feature to check recoverable data. You can preview documents (Word, Excel, PDF), photos, and videos to ensure file integrity before recovery.
Step 3: Recover and Save to a New Location
Select the files you want to restore and click recover. Save all recovered data to a different drive or location (not the original device) to avoid overwriting lost data.

Why Choose PandaOffice Drecov Recovery Software?
PandaOffice Drecov offers a fast, secure, and user-friendly solution for recovering lost files across multiple scenarios. Whether you need email recovery, ZIP File Recovery, format data recovery, or help to recover deleted drafts Outlook, the software provides reliable recovery performance for both personal and business users.
PandaOffice Drecov supports recovery from formatted hard drives, SSDs, USB drives, SD cards, and external storage devices. Its advanced scanning engine can locate deleted archives, damaged ZIP files, lost Outlook drafts, and accidentally removed documents with high accuracy. For users searching for how to find deleted messages in Teams, PandaOffice Drecov can also help recover exported chat files, attachments, and related local cache data when available.
After recovery, test the file again. If the audio stream was damaged because of storage issues, a recovered version may play normally.
This method is particularly useful when only a few files exhibit audio problems while VLC works correctly with all other media.
This approach may help recover files that were unintentionally removed during troubleshooting.
When Pandaoffice Drecov Can Be Helpful
The software may be useful when:
- A drive was formatted accidentally.
- Files were deleted before conversion.
- Data becomes inaccessible after file system modifications.
- Important documents were not backed up properly.
Although prevention is always preferable, recovery software provides an additional safety layer during major file system changes.
⚠️Warning: Do not save recovered files back to the original drive during recovery operations.
Method 4: Split Large Files Into Smaller Parts
Test Environment
- Windows 10 Home 22H2
- FAT32 USB Drive
- 6GB ISO File
- File Compression Utility Installed
Sometimes changing the file system is not possible because the storage device must remain compatible with older hardware. In these situations, splitting large files into smaller segments may be an effective workaround.
This method allows users to transfer large content while avoiding the too large for destination file system limitation.
Using File Compression Software to Split Files
Many compression utilities support file splitting.
To divide a large file:
- Install a file compression application.
- Right-click the large file.
- Select the archive creation option.
- Choose a split archive size smaller than 4GB.
- Start the compression process.
- Wait for the archive segments to be generated.
- Verify that all archive parts were created successfully.
The resulting files can usually be copied to FAT32 storage devices without triggering file size restrictions.
Transferring Split Files Successfully
Once the archive has been divided:
- Connect the FAT32 drive.
- Copy all archive segments.
- Wait for the transfer to finish.
- Confirm that each segment appears on the destination device.
- Safely eject the storage device.
Because each segment remains below the FAT32 file size limit, the transfer should complete normally.
Recombining Files on the Destination Device
After transferring the archive:
- Move all archive segments to the same folder.
- Open the compression utility.
- Select the first archive segment.
- Begin extraction.
- Allow the software to rebuild the original file.
- Verify the extracted file.
- Test the file before deleting archive segments.
This technique is useful when maintaining FAT32 compatibility is necessary.
Method 5: Transfer Files to Another Storage Device
Test Environment
- Windows 11 Home
- FAT32 USB Drive
- NTFS External SSD Available
- 20GB Video Archive
Sometimes the easiest solution is simply using a different storage device.
If another drive already supports large files, transferring data to that device avoids the need for formatting or file splitting.
Choosing a Compatible Destination Drive
Before moving files:
- Connect the alternative storage device.
- Check available free space.
- Verify the file system.
- Confirm compatibility with intended devices.
- Ensure the drive functions properly.
An NTFS or exFAT drive will typically eliminate the file too large for destination problem.
Moving Large Files Without Modifying the Original Drive
To transfer files:
- Connect the destination device.
- Select the large file.
- Copy or move the file.
- Wait for the transfer process to finish.
- Verify the copied file.
- Compare file sizes if necessary.
- Safely disconnect the drive.
This method is often the fastest solution when another compatible storage device is available.
Comparing Different Storage File Systems
When choosing a destination drive:
| File System | Large File Support | Compatibility |
|---|---|---|
| FAT32 | Limited to 4GB | Excellent |
| exFAT | Excellent | Very Good |
| NTFS | Excellent | Primarily Windows |
Selecting the correct file system can prevent future encounters with the file is too large for the destination system error.
⚠️Warning: Verify that the destination device has sufficient free space before starting any large transfer operation.
Best Practices to Avoid Future File System Size Errors
Choose the Correct File System for Your Needs
Selecting the appropriate file system is the most effective way to avoid transfer problems.
Consider:
- NTFS for Windows-focused environments
- exFAT for cross-platform usage
- FAT32 only when legacy compatibility is required
Many users continue using FAT32 without realizing its limitations.
Choosing the correct format from the beginning prevents future issues.
Understand File Size Limits Before Copying Data
Before transferring large files:
- Determine the file size.
- Check available storage space.
- Verify the destination file system.
- Confirm compatibility requirements.
- Plan accordingly.
This simple process helps avoid unexpected interruptions.
Maintain Regular Backups Before Reformatting Drives
Any operation involving file system conversion or formatting introduces some level of risk.
Recommended backup practices include:
- External drive backups
- Cloud backups
- Network storage backups
- Multiple backup generations
Regular backups protect valuable files regardless of what troubleshooting steps become necessary.
Check Drive Compatibility Across Operating Systems
Different operating systems support file systems differently.
Examples include:
- Windows
- macOS
- Linux
- Smart TVs
- Cameras
- Gaming consoles
Understanding compatibility requirements before formatting can prevent future accessibility issues.
⚠️Warning: Some older devices may not recognize exFAT or NTFS drives.
Frequently Asked Questions About Destination File System Errors
Why Does FAT32 Reject Files Larger Than 4GB?
FAT32 uses an older file allocation structure that limits individual file sizes to approximately 4GB.
As a result, users frequently encounter the file is too large for the destination file system message when copying modern multimedia files.
Can I Convert FAT32 to NTFS Without Losing Data?
Yes.
Windows provides a built-in conversion tool that can convert FAT32 to NTFS while preserving existing files.
However, creating a backup before conversion is always recommended.
Should I Use exFAT or NTFS for External Storage?
The answer depends on your needs.
Choose exFAT when:
- Using Windows and macOS
- Working with flash drives
- Requiring broad compatibility
Choose NTFS when:
- Primarily using Windows
- Needing advanced permissions
- Working with very large datasets
How Do I Check My Drive’s Current File System?
Follow these steps:
- Open File Explorer.
- Right-click the drive.
- Select Properties.
- View the File System entry.
The displayed value will indicate whether the drive uses FAT32, exFAT, or NTFS.
Will Formatting Always Fix the Error?
If the error results from FAT32 limitations, formatting to NTFS or exFAT generally resolves the problem.
However, formatting deletes existing data unless backups are created beforehand.
Conclusion
Most Effective Ways to Resolve the Error
Several proven solutions can eliminate the file is too large for destination file system problem:
- Convert FAT32 to NTFS
- Format the drive to exFAT
- Back up data using Pandaoffice Drecov before changes
- Split large files into smaller segments
- Transfer data to a compatible storage device
The best solution depends on your hardware, compatibility requirements, and file sizes.
Selecting the Best Solution Based on Your Situation
For users focused on Windows, NTFS conversion is often the simplest option.
For cross-platform environments, exFAT usually provides the best balance between compatibility and performance.
When changing file systems is impossible, file splitting remains a practical alternative.
Preventing File Transfer Problems in the Future
Understanding file system limitations is the key to avoiding future transfer issues.
Before copying large files, always verify:
- File size
- Drive format
- Device compatibility
- Available storage space
By choosing the correct file system and maintaining reliable backups, users can avoid repeated encounters with file is too large for the destination file system errors and ensure smooth file transfers in the future.


