


Partition loss is one of the most frustrating storage problems users encounter. A partition can suddenly disappear after accidental deletion, disk management mistakes, operating system installation errors, malware infections, or unexpected power outages. When this happens, many users worry that all their files are permanently lost. Fortunately, TestDisk data recovery software is designed specifically to help recover lost partitions and restore access to valuable data.
As a free and open-source recovery utility, TestDisk has earned a strong reputation among IT professionals and advanced users. It can rebuild partition tables, repair damaged boot sectors, and assist in restoring inaccessible drives without requiring expensive software licenses. Whether you’re trying to perform testdisk recover partition procedures on a hard drive, SSD, memory card, or external storage device, understanding the correct recovery process can significantly improve your chances of success.
This guide explains how TestDisk partition recovery works, why partitions disappear, and how to recover lost partitions step by step. We will also discuss situations where file-level recovery tools may be more appropriate and provide practical recommendations to avoid permanent data loss.
What Is TestDisk and Why Is It Popular for Partition Recovery?
Overview of TestDisk Data Recovery Software
TestDisk is a free command-line utility developed to recover lost partitions and repair storage devices that have become inaccessible due to partition table corruption. Unlike many commercial recovery tools, it focuses primarily on restoring partition structures rather than recovering individual files.
The software supports a wide range of file systems, including NTFS, FAT32, exFAT, ext2, ext3, ext4, and others. This broad compatibility makes it useful for Windows, Linux, and macOS environments.
One reason many users choose data recovery software TestDisk is its ability to reconstruct damaged partition tables. If a partition has disappeared because of accidental deletion or corruption, TestDisk can often locate the original partition boundaries and restore them without requiring extensive file scanning.
In addition to partition recovery, TestDisk can repair boot sectors, recover deleted partition entries, and restore access to drives that the operating system no longer recognizes properly.
Supported File Systems and Operating Systems
The flexibility of TestDisk is one of its strongest advantages. It works across multiple operating systems and supports both traditional and modern partition schemes.
Supported operating systems include:
- Windows 11, 10, 8, and 7
- Linux distributions
- macOS systems
- BSD-based operating systems
Supported file systems include:
- NTFS
- FAT16/FAT32
- exFAT
- ext2/ext3/ext4
- HFS+
- ReFS (limited scenarios)
Because of this broad support, testdisk partition recovery can be applied to many different storage devices, including HDDs, SSDs, USB flash drives, memory cards, and external hard drives.
Common Causes of Lost or Damaged Partitions
Accidental Partition Deletion
One of the most common reasons partitions disappear is accidental deletion. This often occurs while using Disk Management, disk partitioning software, or during operating system installation.
Users may unintentionally remove the wrong partition while trying to resize or reorganize storage space. Although the files remain physically on the drive, the operating system loses the information needed to locate them.
In many situations, testdisk recover partition procedures can restore the deleted partition because only the partition table entry has been removed. As long as the affected area has not been overwritten, recovery success rates are generally high.
⚠️Warning: Never install recovery software directly onto the damaged partition you intend to recover.
Formatting Errors and Partition Table Corruption
Formatting the wrong partition can create serious problems. Although quick formatting does not instantly erase all data, it modifies important file system structures.
Similarly, partition tables may become corrupted because of software bugs, failed updates, storage controller issues, or interrupted disk operations. Once the partition table is damaged, the operating system may display the drive as unallocated or inaccessible.
TestDisk specializes in locating lost partition information and reconstructing damaged partition tables. This makes it particularly useful when partitions disappear after formatting mistakes or logical corruption events.
Operating System Installation Mistakes
Installing or reinstalling an operating system introduces additional risks. During setup, users are often presented with multiple partitions and disk configuration options.
Selecting the wrong partition can lead to accidental deletion, formatting, or overwriting. Some users discover that previously accessible partitions have vanished after completing an operating system upgrade.
Fortunately, if the partition data remains largely intact, TestDisk data recovery software may identify the original partition structure and restore it.
Virus and Malware Attacks
Certain malware families specifically target storage structures, boot sectors, and partition information. These attacks may hide partitions, alter file system metadata, or damage boot records.
Even after malware removal, users may still find partitions inaccessible because the underlying structure remains corrupted.
In such cases, TestDisk can often analyze the disk layout and recover the original partition entries. However, users should ensure that the malware has been completely removed before attempting recovery.
Power Failures and Unexpected Shutdowns
Unexpected shutdowns during disk operations can interrupt write processes and leave partition information incomplete or corrupted.
This issue is particularly common when:
- Creating partitions
- Resizing partitions
- Migrating operating systems
- Cloning disks
If the interruption occurs while critical partition structures are being modified, the operating system may no longer recognize the affected partition.
Preparing for TestDisk Partition Recovery
Download and Install TestDisk Safely
Before beginning recovery, download TestDisk from its official source and extract the application files to a healthy storage location.
Since TestDisk is portable, installation is generally not required. Users can simply launch the executable file with administrator privileges.
Avoid downloading modified versions from unofficial websites because they may contain outdated files or unwanted software components.
Create a Backup of the Affected Drive
Whenever possible, create a sector-by-sector image of the affected drive before attempting recovery.
A backup image provides several advantages:
- Protects against accidental mistakes
- Allows multiple recovery attempts
- Preserves original disk contents
- Reduces recovery risks
Professional technicians commonly perform imaging before working on damaged drives because it creates a safe recovery environment.
⚠️Warning: Never install recovery software directly onto the damaged partition you intend to recover.
Understand Disk Structures Before Recovery
Successful partition recovery depends on understanding how disks are organized.
Most modern systems use either:
- MBR (Master Boot Record)
- GPT (GUID Partition Table)
TestDisk automatically detects the partition scheme in many situations, but users should still verify the correct disk structure before writing recovery results.
Incorrect partition table modifications can complicate recovery efforts and potentially reduce recovery success rates.
Test Environment for This Guide
The recovery procedures demonstrated in this article use the following environment:
- Operating System: Windows 11 Pro 64-bit
- Storage Device: 1TB SATA SSD
- File System: NTFS
- Recovery Scenario: Deleted partition with recoverable data
- Software Version: Latest stable TestDisk release
While your environment may differ, the overall recovery workflow remains similar.
How to Perform TestDisk Recover Partition Step by Step
Method 1: Recover a Deleted Partition Using TestDisk
Test Environment
- Windows 11 Pro
- 1TB SATA SSD
- NTFS Partition Accidentally Deleted
The most common use case for TestDisk involves restoring a partition that was accidentally deleted from the partition table.
First, launch TestDisk with administrator privileges. When prompted, choose to create a new log file. Logging is useful for troubleshooting and maintaining recovery records.
Next, select the physical disk that contained the missing partition. Carefully verify the disk size before proceeding to avoid analyzing the wrong drive.
TestDisk will usually detect the partition table type automatically. Confirm the suggested option and proceed to the analysis phase.
Select Analyse and start a Quick Search. During the scan, TestDisk examines disk structures and searches for lost partition entries.
Once scanning completes, review the detected partitions carefully. Highlight a discovered partition and press the appropriate key to view its contents. If your files appear intact, the partition is likely recoverable.
After confirming the correct partition, choose the option to write the partition structure back to the disk.
⚠️Warning: Double-check partition information before writing changes. An incorrect partition selection may create additional recovery challenges.
Method 2: Use Deep Search for Missing Partitions
Test Environment
- Windows 10
- GPT SSD
- Partition Lost After Unexpected Shutdown
Sometimes Quick Search cannot locate the missing partition. This usually happens when partition information is heavily damaged.
In these situations, TestDisk provides a deeper scanning option called Deep Search.
Deep Search examines additional disk structures and scans a larger portion of the storage device. Although the process requires more time, it often identifies partitions that Quick Search misses.
After launching Deep Search, allow the scan to complete without interruption. Depending on disk size, this process may take several hours.
When the scan finishes, compare the discovered partitions with your original disk layout. Verify partition sizes, file systems, and locations before selecting recovery options.
If the correct partition is found, restore the partition table and restart the computer. Many users regain immediate access to previously missing partitions after the system reloads the updated partition information.
Method 3: Recover Files from a Lost Partition with PandaOffice Drecov
Test Environment
- Windows 11 Pro 64-bit
- 512GB NVMe SSD
- NTFS Partition Formatted Accidentally
- Important Office Documents and Photos Missing
While testdisk partition recovery is highly effective for restoring lost partition entries, there are situations where the partition structure has suffered severe damage. In these cases, rebuilding the partition table may not be enough to restore normal access to files.
When a partition cannot be recovered successfully, file-level recovery becomes the next logical step. Instead of repairing the partition itself, file recovery software scans the storage device for recoverable documents, photos, videos, archives, and other data.
PandaOffice Drecov offers a graphical recovery environment that is easier for beginners than command-line tools. Users can select the affected drive, initiate a deep scan, and preview recoverable files before restoring them.
The general recovery process includes:
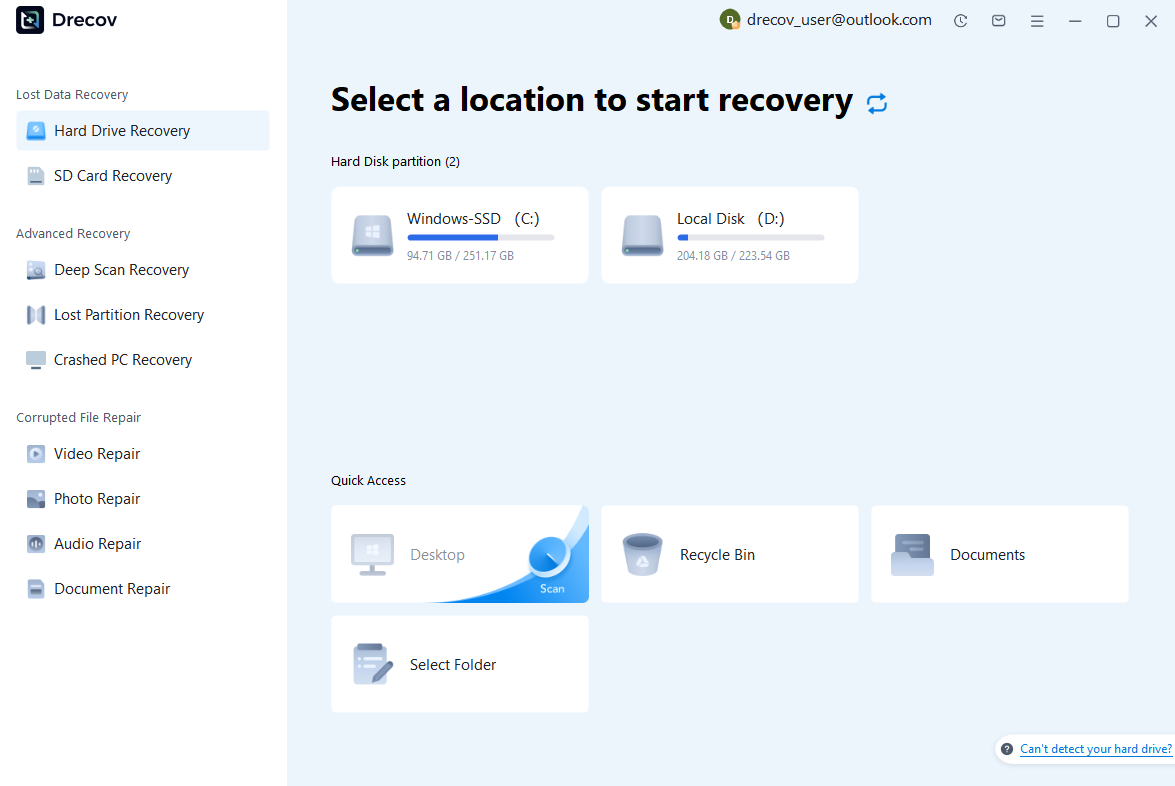
Step 1: Scan the Storage Device (SD Card / Hard Drive / USB)
Connect your device (SD card, HDD/SSD, or USB drive) to your computer and launch PandaOffice Drecov. Select the target device and start the scan. The software will perform a quick scan and deep scan to detect lost or deleted data.
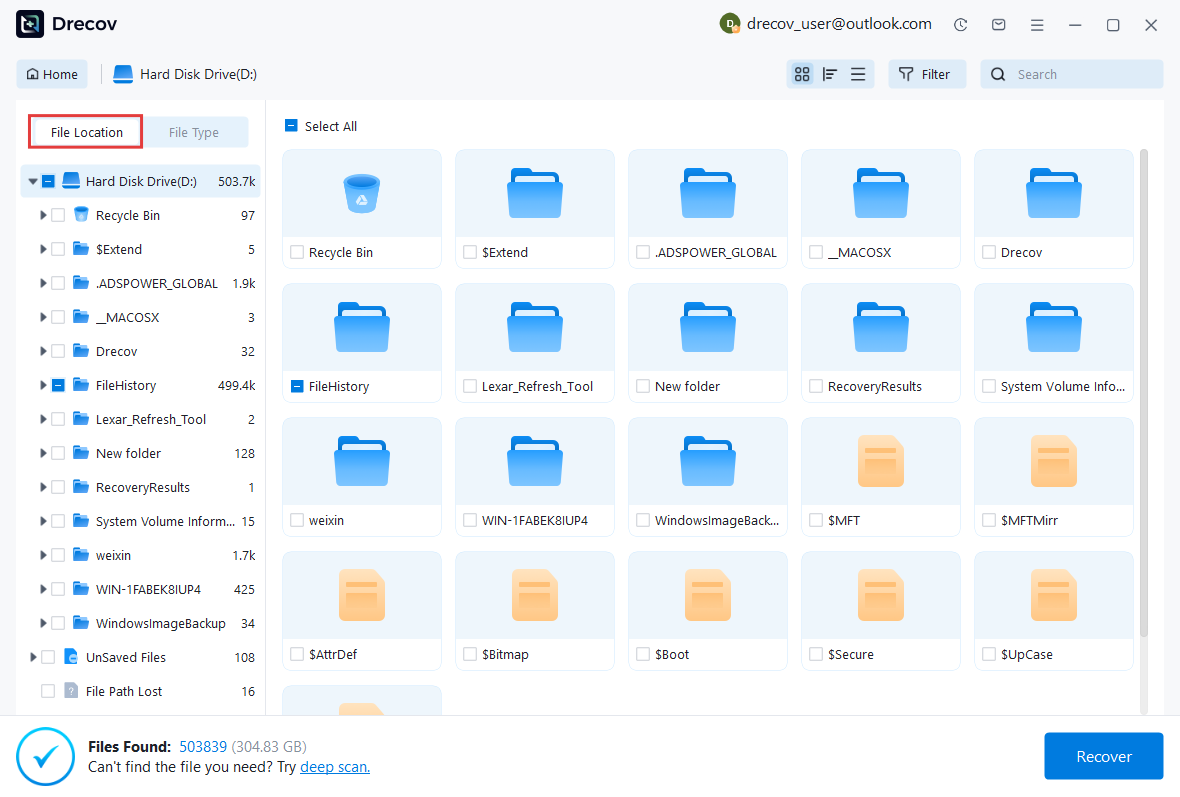
Step 2: Locate and Preview Lost Files
After scanning, browse the detected files and use the preview feature to check recoverable data. You can preview documents (Word, Excel, PDF), photos, and videos to ensure file integrity before recovery.
Step 3: Recover and Save to a New Location
Select the files you want to restore and click recover. Save all recovered data to a different drive or location (not the original device) to avoid overwriting lost data.

Why Choose PandaOffice Drecov Recovery Software?
PandaOffice Drecov offers a fast, secure, and user-friendly solution for recovering lost files across multiple scenarios. Whether you need email recovery, ZIP File Recovery, format data recovery, or help to recover deleted drafts Outlook, the software provides reliable recovery performance for both personal and business users.
PandaOffice Drecov supports recovery from formatted hard drives, SSDs, USB drives, SD cards, and external storage devices. Its advanced scanning engine can locate deleted archives, damaged ZIP files, lost Outlook drafts, and accidentally removed documents with high accuracy. For users searching for how to find deleted messages in Teams, PandaOffice Drecov can also help recover exported chat files, attachments, and related local cache data when available.
Key advantages include:
- Deep scan technology for complex data loss situations
- Support for emails, archives, videos, photos, and office documents
- Recovery from accidental deletion, formatting, corruption, and system crashes
- Easy preview before restoring files
- Compatible with Windows and multiple storage devices
This approach is particularly useful when partition information has been overwritten or when the original file system is no longer recoverable.
⚠️Warning: Always save recovered files to a separate drive to avoid overwriting remaining recoverable data.
Advanced TestDisk Recovery Options
Repair a Damaged Partition Table
Partition table corruption is one of the most common reasons drives suddenly appear as unallocated space. When this occurs, the actual files often remain intact, but the operating system can no longer locate them.
TestDisk includes specialized tools designed to rebuild damaged partition tables. After analyzing the disk structure, the software compares discovered partition information with existing partition records.
If inconsistencies are found, users can choose to rewrite the partition table using the recovered information.
This feature is especially useful in situations involving:
- Corrupted MBR records
- Damaged GPT entries
- Interrupted partition resizing operations
- Failed disk cloning procedures
Because partition tables define how storage space is organized, repairing them can immediately restore access to entire volumes without requiring individual file recovery.
Before applying any changes, carefully verify partition sizes and locations to ensure they match the original disk layout.
Rebuild a Corrupted Boot Sector
A partition may still exist while remaining inaccessible because of a damaged boot sector.
The boot sector contains critical information required for the operating system to understand the file system structure. If this information becomes corrupted, Windows may report errors such as:
- Drive not accessible
- File system corrupted
- RAW partition detected
- Need to format disk before use
TestDisk can compare the primary boot sector with its backup copy. If the backup remains intact, users can restore the damaged sector automatically.
The recovery workflow generally involves:
- Opening the affected partition.
- Accessing advanced recovery functions.
- Comparing boot sector information.
- Rebuilding or copying a healthy backup sector.
This process often restores partition accessibility without affecting existing files.
Recover Lost NTFS Partitions
NTFS remains the most widely used file system on Windows systems. As a result, many partition recovery cases involve NTFS volumes.
TestDisk includes specific functionality for identifying NTFS signatures and reconstructing lost partition information. During analysis, it scans storage sectors looking for evidence of previous NTFS structures.
Recovery success depends on several factors:
- Amount of overwritten data
- Severity of corruption
- Physical disk condition
- Time elapsed since data loss
When an NTFS partition has only been deleted from the partition table, recovery rates are typically very high.
However, if extensive new data has been written to the affected area, complete restoration becomes more difficult.
Handle GPT and MBR Partition Issues
Modern storage devices typically use either GPT or MBR partition schemes.
MBR is commonly found on older systems, while GPT is the standard for newer computers that use UEFI firmware.
Problems can occur when:
- Converting between GPT and MBR
- Installing multiple operating systems
- Replacing system drives
- Updating firmware
TestDisk can detect both partition styles and attempt reconstruction of missing entries.
Users should confirm the correct partition type before writing changes because selecting the wrong partition structure may prevent successful recovery.
⚠️Warning: Avoid converting GPT and MBR formats during recovery unless absolutely necessary.
Limitations of Data Recovery Software TestDisk
Command-Line Interface Can Be Challenging
One of the most significant limitations of data recovery software TestDisk is its command-line interface.
Unlike modern recovery tools that provide graphical dashboards, TestDisk relies primarily on keyboard navigation and text-based menus.
For experienced technicians, this approach provides flexibility and control. For beginners, however, it may appear intimidating.
Common challenges include:
- Understanding partition terminology
- Identifying correct disk structures
- Navigating recovery menus
- Interpreting scan results
Users unfamiliar with storage management concepts may require additional research before using advanced recovery functions safely.
File Preview Capabilities Are Limited
Many modern recovery applications allow users to preview photos, videos, and documents before restoration.
TestDisk focuses primarily on partition repair rather than detailed file recovery.
Although it provides limited file browsing capabilities within discovered partitions, it does not offer the same level of preview functionality available in dedicated file recovery software.
This limitation becomes more noticeable when users need to recover specific files instead of restoring entire partitions.
Recovery Success Is Not Guaranteed
No recovery tool can guarantee success in every scenario.
The effectiveness of testdisk recover partition operations depends on several variables:
- Disk health
- Extent of damage
- Amount of overwritten data
- File system condition
- User actions after data loss
If critical storage sectors have been overwritten, even advanced recovery methods may not fully restore the original partition.
For this reason, immediate action after partition loss remains extremely important.
Physical Drive Failures Require Different Solutions
TestDisk is designed for logical recovery problems rather than hardware failures.
If a drive exhibits symptoms such as:
- Clicking noises
- Grinding sounds
- Repeated disconnects
- Failure to spin up
- Severe SMART errors
The issue may involve physical damage rather than partition corruption.
In these situations, continued recovery attempts can worsen the condition of the drive.
Professional recovery services may be necessary when hardware failures are present.
Frequently Asked Questions About TestDisk Partition Recovery
Can TestDisk Recover Partition Data After Formatting?
Yes. In many situations, TestDisk can recover partitions after accidental formatting, especially when a quick format was performed and little new data has been written to the drive.
Recovery success depends on how much of the original partition information remains intact.
Is TestDisk Data Recovery Software Safe to Use?
Yes. TestDisk is widely recognized as a reliable recovery utility and has been used for many years by IT professionals.
However, users should always verify recovery results before writing changes to disk structures.
How Long Does a Recovery Scan Take?
Scan duration depends on:
- Drive size
- Interface speed
- Partition complexity
- Selected scan mode
Quick Search may finish within minutes, while Deep Search can require several hours on large storage devices.
Can TestDisk Recover Partitions on External Drives?
Yes. TestDisk supports external hard drives, USB flash drives, SSDs, memory cards, and many other storage devices.
The recovery process remains largely the same regardless of device type.
What Should I Do If TestDisk Cannot Find My Partition?
If TestDisk cannot locate the missing partition, consider:
- Running Deep Search
- Creating a disk image
- Using file-level recovery software
- Consulting professional recovery specialists
The sooner recovery efforts begin, the greater the likelihood of successful restoration.
Conclusion
Key Takeaways for Successful Partition Recovery
Partition loss does not necessarily mean permanent data loss. In many cases, the underlying files remain intact and can be restored by repairing damaged partition information.
TestDisk data recovery software remains one of the most powerful free utilities available for recovering deleted or corrupted partitions. Its ability to rebuild partition tables, repair boot sectors, and locate lost volumes makes it a valuable tool for both professionals and advanced users.
Best Practices to Prevent Future Partition Loss
To reduce future risks:
- Maintain regular backups.
- Verify partition changes carefully.
- Use reliable power protection.
- Monitor disk health.
- Avoid unnecessary formatting.
Preventive measures are often far easier than recovery efforts after a partition becomes inaccessible.
Choosing the Right Recovery Method
The most appropriate recovery strategy depends on the specific situation.
If the partition structure is still recoverable, testdisk partition recovery procedures can often restore full access quickly.
If severe corruption prevents partition restoration, file-level recovery tools such as PandaOffice Drecov may help retrieve important data directly from the storage device.
By understanding the strengths and limitations of each approach, users can significantly improve their chances of recovering lost partitions and valuable files.
⚠️Warning: The highest recovery success rates are achieved when recovery begins immediately after partition loss and before any new data is written to the affected drive.


