







What Is BitLocker and Why Should You Enable It on Windows
BitLocker is a built-in Windows encryption feature designed to protect data stored on internal drives and removable storage devices. It uses encryption technology to prevent unauthorized users from accessing files when a computer is lost, stolen, or accessed without permission.
Unlike traditional password protection, BitLocker works at the drive level. When encryption is enabled, the entire drive is protected instead of only individual files or folders. This makes it especially useful for laptops, business computers, and devices that store sensitive information.
Many Windows users search for how to setup BitLocker because they want to improve device security without installing additional encryption software. BitLocker is integrated directly into supported versions of Windows, including Windows Pro, Enterprise, and Education editions.
Before enabling BitLocker, users should understand that encryption changes how Windows accesses stored data. During startup, the system may require a recovery key or authentication method to verify the user.
BitLocker is not designed to replace regular backups. If the recovery key is lost and the password or authentication method is unavailable, accessing encrypted data can become extremely difficult.
⚠️Warning: Always save your BitLocker recovery key in a secure location before starting encryption. Losing the recovery key may prevent access to your encrypted drive.
How BitLocker Protects Your Files and Drives
BitLocker protects data by converting readable information into encrypted data that cannot be accessed without proper authentication. When the correct security credentials are provided, Windows automatically decrypts the required information during normal use.
The technology is commonly used to secure operating system drives, fixed data drives, and external storage devices. For example, a company laptop containing customer information can use BitLocker to reduce the risk of data exposure if the device is misplaced.
BitLocker works together with hardware security features such as Trusted Platform Module (TPM) chips. TPM helps verify that the computer environment has not been changed unexpectedly before allowing access to encrypted data.
Users can choose different unlocking methods depending on their security requirements. These may include passwords, PINs, recovery keys, or automatic unlocking on trusted devices.
However, encryption also means that recovery options become limited. If a drive fails or the system becomes inaccessible, recovering data requires both technical recovery methods and valid authentication information.
This is why users should understand BitLocker before enabling it. Encryption improves security, but proper backup management remains essential.
Things to Check Before Setting Up BitLocker
Before learning how to setup BitLocker, check whether your Windows edition supports this feature. BitLocker is generally available in Windows Pro, Enterprise, and Education editions, while some Home editions may not include full BitLocker management options.
You should also confirm that your computer has enough free storage space and that the drive is functioning correctly. Although BitLocker does not normally delete files, encryption is a major system operation, so unexpected interruptions may create problems.
Before starting encryption, create a backup of important files. This provides additional protection if hardware problems or system errors occur during the process.
It is also recommended to connect your device to a power source, especially when encrypting large drives. The process may take significant time depending on the amount of stored data and drive speed.
Finally, prepare a safe location for storing the BitLocker recovery key. You can save it to your Microsoft account, a USB device, a file, or print a physical copy.
How to See If BitLocker Is Enabled on Windows
Before changing encryption settings, many users want to know the current protection status of their drives. Understanding how to see if Bitlocker is enabled helps prevent unnecessary changes and allows users to confirm whether their files are already protected.
Windows provides several built-in methods for checking BitLocker status. Users can view encryption information through Control Panel, Windows Settings, or command-line tools.
The available options depend on your Windows version and user permissions. Administrative access may be required for some methods.
Checking BitLocker status is also useful when troubleshooting startup problems. For example, if Windows suddenly asks for a recovery key, confirming the encryption status can help identify whether BitLocker is involved.
Check BitLocker Status Through Control Panel
Test environment:
- Operating system: Windows 11 Pro 64-bit
- Computer type: Desktop PC
- Storage tested: Internal SSD
- User account: Administrator account
The Control Panel method is one of the easiest ways to check BitLocker protection.
First, open the Windows search box and type Control Panel. Launch the application and select System and Security.
Next, choose BitLocker Drive Encryption. Windows will display available drives and their current encryption status.
If BitLocker is active, the drive will show information indicating that encryption is enabled. If protection is disabled, Windows will display options to activate BitLocker.
This page also allows users to manage encryption settings, including suspending protection, backing up recovery keys, and turning off encryption.
The Control Panel method is suitable for users who prefer a graphical interface. It provides a clear overview without requiring command-line knowledge.
However, if BitLocker options are unavailable, your Windows edition may not support this feature, or your account may not have sufficient permissions.
Check BitLocker Encryption Status Using Command Prompt
Test environment:
- Operating system: Windows 10 Pro
- Command tool: Command Prompt
- Drive tested: C system drive
- Permission level: Administrator
Advanced users can check BitLocker status using the Command Prompt tool.
Open Windows Search, type Command Prompt, right-click the application, and select Run as administrator.
Enter the BitLocker management command to display encryption information for connected drives.
Windows will show details such as encryption percentage, protection status, and whether a recovery method is configured.
This method is useful for checking multiple drives quickly. It is also commonly used by system administrators managing several computers.
The command-line approach provides more technical details than the Control Panel option. Users can identify whether encryption is complete, still processing, or temporarily suspended.
If the command shows that BitLocker is disabled, the drive is not currently protected by encryption.
View BitLocker Settings Through Windows Settings
Test environment:
- Operating system: Windows 11 Pro
- Interface tested: Windows Settings
- Storage device: Internal hard drive
Windows Settings provides another way to review security-related features on modern systems.
Open Settings from the Start menu and navigate to the security or device encryption section.
Depending on your Windows version, you may see options related to device encryption or BitLocker management.
Some newer computers automatically enable device encryption when users sign in with a Microsoft account and the hardware supports it.
Checking through Windows Settings is useful for users who want a simple overview without opening traditional Control Panel tools.
However, advanced BitLocker controls are usually easier to access through the dedicated BitLocker management panel.
How to Setup BitLocker on Windows Computer
After confirming that your device supports encryption, you can begin enabling BitLocker. The setup process allows users to choose authentication methods and determine where recovery information is stored.
Learning how to setup BitLocker correctly is important because incorrect configuration may create future access problems.
Before starting, ensure important files are backed up and the recovery key is stored safely.
Enable BitLocker Through Control Panel
Test environment:
- Operating system: Windows 11 Pro
- Drive tested: C: system partition
- Encryption type: Full drive encryption
- User permission: Administrator
Open Control Panel and navigate to System and Security > BitLocker Drive Encryption.
Find the drive you want to protect and select the option to turn on BitLocker.
Windows will guide you through the setup process. You can choose how the drive should be unlocked, such as using a password or compatible security hardware.
Create a strong password that is difficult for others to guess. Avoid using simple combinations or personal information.
Next, Windows will ask you to save the recovery key. Choose a secure storage option and keep the key somewhere separate from the encrypted computer.
After selecting encryption settings, choose whether to encrypt only used space or the entire drive. Full encryption provides stronger protection, especially for previously used drives.
Start the encryption process and allow Windows to complete the operation.
The time required depends on drive size and system performance. During encryption, you can continue using the computer, although performance may temporarily decrease.
Turn On BitLocker From File Explorer
Test environment:
- Operating system: Windows 11 Pro 64-bit
- Device tested: Laptop computer
- Storage tested: Internal SSD drive
- User permission: Administrator account
For users who prefer a faster method, BitLocker can also be enabled directly from File Explorer. This approach is convenient when you want to protect a specific drive without navigating through multiple system menus.
Open File Explorer and locate the drive you want to encrypt. Right-click the drive and check whether the option Turn on BitLocker appears in the menu. Select this option to start the encryption setup wizard.
Windows will guide you through several configuration steps. You need to select an unlocking method, such as creating a password or using another supported security option. The password should be unique and strong because it will protect access to the encrypted drive.
After setting up authentication, Windows will ask you to save the recovery key. This step is extremely important because the recovery key can help you regain access if the normal unlocking method fails.
Next, choose the encryption mode. Newer computers usually work better with the newer encryption mode, while removable drives may require a compatible option for use on different devices.
Confirm your settings and start encryption. The duration depends on the drive capacity and the amount of stored data.
This method is useful for users who want to quickly enable encryption on a secondary partition or external drive. However, File Explorer options may not appear on systems that do not support BitLocker.
⚠️Warning: Do not remove, format, or modify an encrypted drive while BitLocker encryption is running. Interrupting the process may cause unexpected access problems.
Configure BitLocker Using Command Prompt
Test environment:
- Operating system: Windows 10 Pro 64-bit
- Tool tested: Command Prompt with administrator privileges
- Storage tested: Internal HDD
- Encryption status: Unencrypted drive
Advanced Windows users can manage BitLocker through command-line tools. This method is commonly used by IT professionals because it provides detailed control over encryption settings.
Open Command Prompt as administrator from the Windows search menu. The built-in BitLocker management utility allows users to start encryption, check drive status, and manage protection settings.
Before enabling encryption, review the available drives and confirm the correct target location. Selecting the wrong drive can lead to unexpected configuration changes.
After entering the required commands, Windows will begin preparing the drive for encryption. Depending on your settings, you may need to configure a password, recovery key, or other authentication method.
Command-line management is useful when working with multiple computers or automated deployment environments. Administrators can apply consistent encryption settings across devices without manually opening graphical menus.
However, this approach requires more technical knowledge. Incorrect commands may affect drive protection settings, so users should carefully review each step before execution.
For most home users, Control Panel or Windows Settings provides a simpler way to enable BitLocker. Command Prompt is better suited for users who need additional control.
How to Manage or Disable BitLocker Encryption
BitLocker is designed to provide long-term protection, but there are situations where users may need to disable encryption. For example, you may want to replace a drive, reinstall Windows, troubleshoot system problems, or transfer data to another device.
Turning off BitLocker does not simply remove a password. Windows must decrypt the entire drive before encryption protection is completely removed.
Many users search for how to turn BitLocker off when they want to disable drive encryption. The process is different from temporarily suspending protection. Suspending BitLocker only pauses certain security checks while keeping encryption active.
Before disabling BitLocker, make sure you can access the drive normally and have backups of important information.
How to Turn BitLocker Off Through Windows Settings
Test environment:
- Operating system: Windows 11 Pro
- Drive tested: System SSD
- Encryption status: BitLocker enabled
- User account: Administrator
To disable BitLocker through Windows settings, first open the encryption management page.
Navigate to the BitLocker settings area through Control Panel or Windows security options. Select the encrypted drive and choose the option to turn off BitLocker.
Windows will display a confirmation message explaining that the drive must be decrypted. Confirm the action to begin the process.
Decryption may take longer than expected because Windows needs to convert encrypted data back into normal readable information. The time required depends on drive size, storage speed, and computer performance.
During this process, you should avoid shutting down the computer unexpectedly. Keep the device connected to power, especially when working with large drives.
Once decryption finishes, the drive will no longer require BitLocker authentication.
This method is recommended when you want to permanently remove encryption protection. If you only need to temporarily disable security checks, using the suspend option may be more appropriate.
How to Uninstall BitLocker Features from Windows
Test environment:
- Operating system: Windows Server environment
- Windows feature management: Optional Features
- User permission: Administrator access
Some users search for how to uninstall BitLocker because they want to remove related Windows components. However, BitLocker works as a built-in Windows security feature, and most users do not need to uninstall it.
On supported Windows versions, BitLocker management tools can be added or removed through Windows optional features. Removing management components does not automatically decrypt existing encrypted drives.
If BitLocker encryption is currently active, turning off encryption should be completed before removing related management features.
Open Windows feature management settings and review available security components. Administrators can remove unnecessary management tools if they are not required.
For personal computers, uninstalling BitLocker-related components is usually unnecessary. Keeping the feature installed does not force encryption, and it allows you to manage protected drives when needed.
If your goal is to remove encryption from a drive, use the decryption process instead of uninstalling system components.
Understanding the difference between disabling encryption and removing Windows features helps prevent accidental data access problems.
Recover Files When BitLocker Protected Data Becomes Inaccessible
Test environment:
- Operating system: Windows 11 Pro
- Storage tested: Internal HDD and SSD
- File types tested: Documents, images, and office files
- Recovery condition: Lost files after deletion or storage issues
BitLocker improves security, but users may still experience data loss due to accidental deletion, drive formatting, hardware failure, or system problems. Encryption protects data from unauthorized access, but it does not prevent files from being deleted.
When important files disappear from a non-encrypted or accessible Windows drive, file recovery software can help locate recoverable data.
PandaOffice Drecov is designed for Windows systems and helps recover deleted or lost files from supported storage devices, including hard drives, SSDs, and external drives.
To recover files, install PandaOffice Drecov on a Windows computer, select the location where the missing files were stored, and perform a scan. After scanning, preview available files and recover the required data to another storage location.
Recovering files to a different destination helps avoid overwriting deleted data.
It is important to note that recovery software cannot bypass BitLocker encryption or unlock encrypted drives without proper authorization. If a BitLocker drive is locked, you still need the correct password or recovery key.
Steps
- Confirm that Windows can open the target storage after password reset, account recovery, decryption, or device repair.
- Stop saving new files to the same storage source.
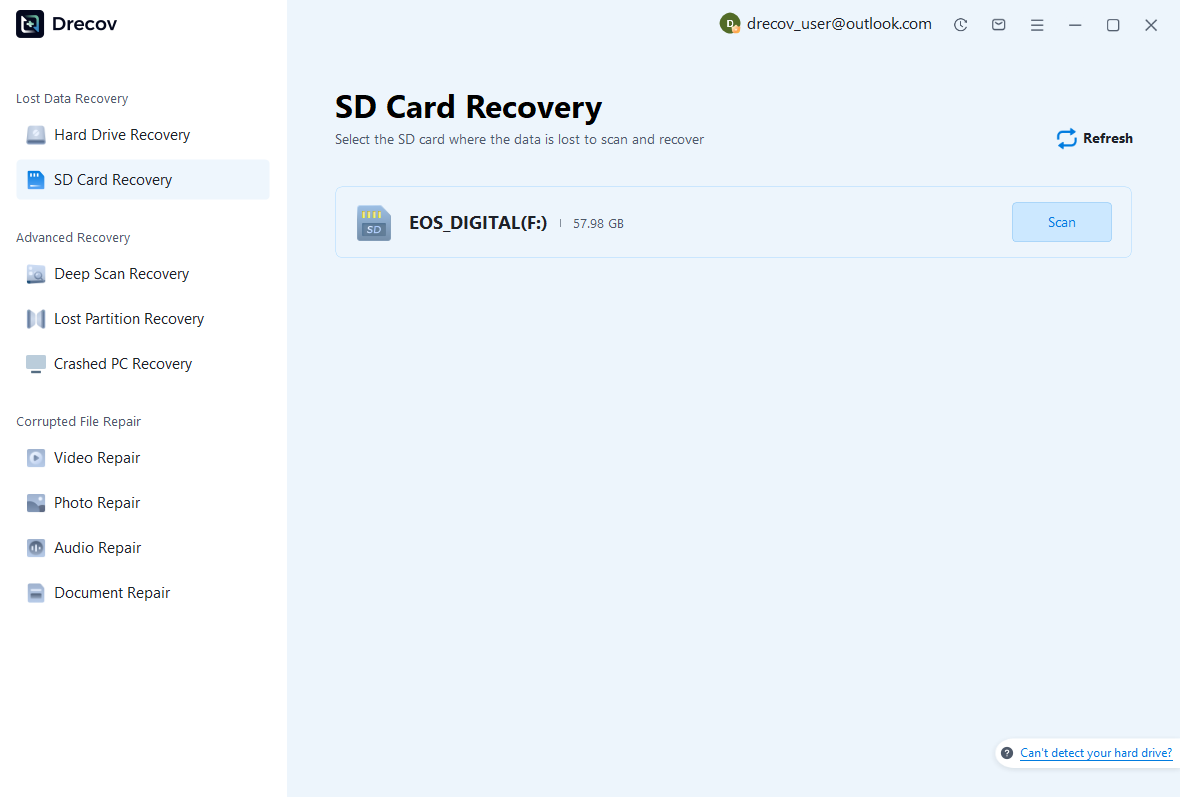
- Open PandaOffice Drecov and choose the drive, partition, SD card, or external storage device that lost files.
- Start the scan and wait for quick scan and deep scan results.
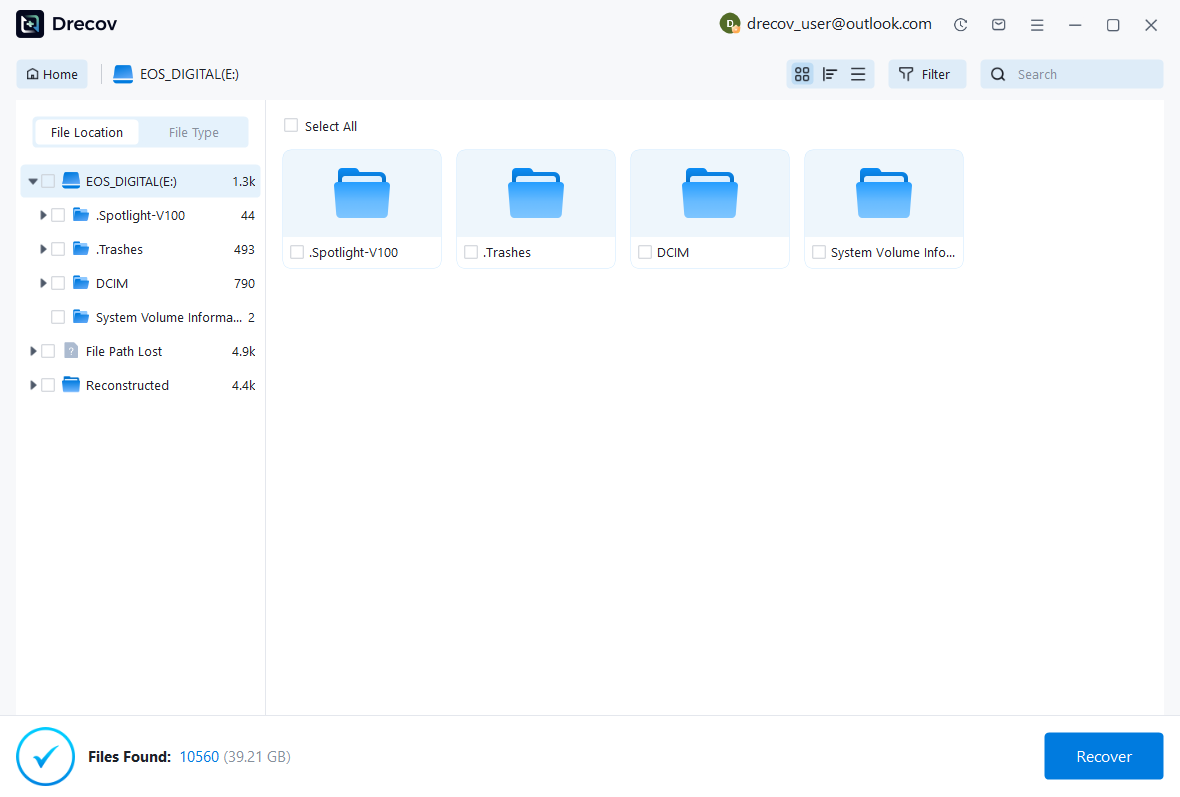
- Filter by documents, images, videos, archives, downloads, or original folders.
- Preview important files before recovery.
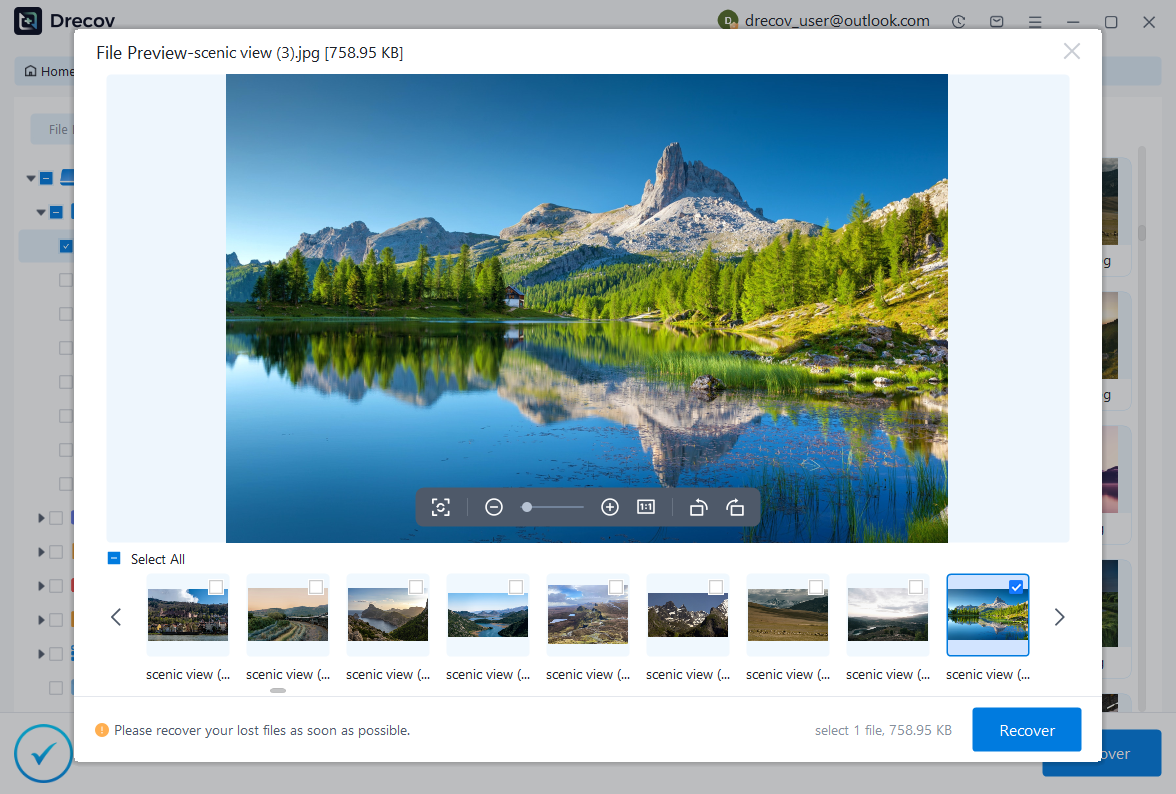
- Recover selected files to another drive, not back to the source storage.
- Open recovered files before deleting scan results or changing the original device.
Risk Level: Low when you save recovered files away from the source storage and avoid new writes during recovery.
The best protection strategy combines encryption with regular backups. BitLocker protects privacy, while backups provide a reliable way to restore important information.
Common Problems When Enabling BitLocker
BitLocker setup is usually straightforward, but users may encounter errors caused by hardware limitations, Windows settings, missing recovery keys, or system configuration issues.
Understanding these problems can help users complete encryption successfully without risking data loss.
BitLocker Option Is Missing in Windows
Test environment:
- Operating system: Windows 11 Home
- Device tested: Personal laptop
- Feature availability: BitLocker menu unavailable
One common issue is that users cannot find BitLocker settings. This usually happens because the Windows edition does not support full BitLocker management.
Some devices support automatic device encryption, while others require a Windows edition with BitLocker features enabled.
Check your Windows edition through system information settings. If your version does not support BitLocker, upgrade options may be required.
Hardware compatibility can also affect availability. Devices without required security features may have limited encryption options.
BitLocker Recovery Key Cannot Be Found
Test environment:
- Operating system: Windows 11 Pro
- Drive tested: Encrypted system drive
- Issue tested: Recovery key unavailable
The recovery key is essential when normal authentication fails. Without it, accessing an encrypted drive may not be possible.
Check common storage locations where you may have saved the key, including your Microsoft account, USB devices, printed copies, or secure backup locations.
Keeping the recovery key organized is one of the most important steps before enabling encryption.
BitLocker Encryption Takes Too Long
Test environment:
- Operating system: Windows 10 Pro
- Drive tested: 2TB HDD
- Encryption type: Full drive encryption
Large drives can require several hours to complete encryption. The process speed depends on storage technology, available resources, and the amount of data stored.
Avoid interrupting encryption unless absolutely necessary. Allow Windows to finish the operation for the best results.
Frequently Asked Questions About BitLocker Setup
Can I enable BitLocker on Windows Home edition?
Some Windows Home devices support limited device encryption, but full BitLocker management is generally available on Pro, Enterprise, and Education editions.
Does enabling BitLocker delete files?
No. BitLocker encrypts existing data without normally deleting files. However, creating backups before major system changes is recommended.
Can I unlock BitLocker without a recovery key?
Without the correct password, PIN, or recovery key, accessing encrypted data may not be possible.
How is BitLocker different from file passwords?
BitLocker protects entire drives, while file passwords protect individual documents. For example, searches like how to unlock a password protected word file or how to unlock a word document without password relate to document-level security rather than drive encryption.
Final Thoughts on Setting Up BitLocker on Windows
Learning how to setup BitLocker helps Windows users protect important information against unauthorized access. BitLocker provides strong drive-level encryption and is especially useful for laptops, business devices, and computers containing sensitive files.
Before enabling encryption, always confirm compatibility, create backups, and store the recovery key safely. Checking how to see if bitlocker is enabled before making changes can help avoid unnecessary configuration problems.
If you need to remove encryption later, understanding how to turn BitLocker off ensures that data remains accessible during the process. Remember that disabling encryption is different from removing Windows features, and proper steps should always be followed.
BitLocker is a powerful security tool, but it works best together with good data management practices. Regular backups, secure password habits, and careful recovery key storage provide the strongest protection for your files.





